Articles in Cooking

Anyone for delicious little frivolities with an aristocratic pedigree?
The peculiarly English habit of serving something savory as the final course in a meal — the place usually occupied by cheese — was still in fashion in the grander country houses of England until about half a century ago, when it dropped out of favor in domestic kitchens, although the custom didn’t entirely vanish in London’s gentlemen’s clubs and at formal civic occasions.
Savory bites originally intended to show off host’s good fortune
The savory — for those who’ve never been confronted by this small and salty bite on toast immediately after dessert — is a Victorian introduction to the British menu designed to show off the servants and the silver with as many courses as possible in the high old days of empire. Classics of the genre were roasted marrow bones; deviled herring roes; sweetbreads; chicken livers; smoked fish; salted anchovies pounded with butter; and prunes or oysters wrapped in bacon and flashed under the grill (devils and angels on horseback, respectively).
More from Zester Daily:
» Abundant anchovies lend themselves to Spanish tapas
Savories, simple to prepare and good with the gentlemen’s port, suited the style of the relatively servantless 1920s. Agnes Jekyll, a columnist at the London Times, devotes an entire chapter to them in her book “Kitchen Essays” (London, 1922). Agnes’ sister-in-law Gertrude, known as Lady Jekyll, suggests puff-pastry boats as a more elegant vehicle than toast, as these can be prepared in advance and filled “with all manner of cargo such as eggs scrambled with cheese, or cold hard-boiled and chopped with a little gherkin and capers, sardines made into a purée beneath a thin veil of a soufflé mixture or a savoury custard, slightly browned in the oven; anchovies beaten with cream into a cold cayenne mousse, or coming chilled from the refrigerator with a thin sprinkle of cress.”

Place cards created by Monica Rawlins for meals at her home. Credit: Monica Rawlins
Agnes Jekyll’s readership at the time included my husband’s godmother, Monica Rawlins — born at the turn of the century — who acted as her father’s hostess at the family home, Syston Manor in Somerset, after the early death of her mother. Miss Rawlins’ delightful illustrated menus indicate six courses, concluding with the savory. As the youngest of three daughters and three sons (two killed in World War I), she was expected to remain unmarried at home — all very “Downton Abbey.” But she escaped to live a bohemian life as an artist in Wales, never married and left me, the widow of her godson, a glove box full of her menu cards and her annotated Edwardian-era cookbooks in the remote farmhouse that was hers for the rest of her life, and where I now live.
Savories are simple, delicious and too good to lose for lack of a menu opening. Serve them in much the same way as tapas or mezze, in combination and all on the table at the same time.
Choose four recipes to share between four people as the main course — no need for starters, though a green salad would not come amiss. Savories are also perfect for a summer lunch or a candlelit kitchen supper.
Queen Victoria’s Beef Marrow Toasts
Her Imperial Majesty’s chef, Charles Francatelli, confided to his readership that his royal employer, in spite of rumors concerning her health after the death of her beloved Prince Albert, was fortified with this little treat every day.
Serves 4
Prep Time: 15 minutes
Cook Time: 5 minutes
Total Time: 20 minutes
Ingredients
2 beef or veal marrow bones
4 slices of white bread
Salt and pepper to taste
1 tablespoon chopped parsley
1 tablespoon finely chopped shallot or spring onion
Juice of 1 lemon
Directions
1. Have the butcher break the bone open to allow you to get at the marrow. Remove the raw marrow and cut it into hazelnut-sized pieces.
2. When you’re ready to serve, poach the marrow pieces delicately in a little boiling salted water for one minute only, and then drain immediately.
3. Meanwhile, toast the bread and then cut it into squares.
4. Pile the marrow on the hot toast, season with salt and pepper, sprinkle with the parsley, onion and a squeeze of lemon and serve without delay — marrow sets as it cools.
Lady Jekyll’s Mushroom Toasts
This was Miss Rawlins’ favorite savory, made with the big, flat field mushrooms that spring up overnight in the sheep pastures surrounding her house in the Welsh hills.
Yield: 4 servings
Prep Time: 10 minutes
Cook Time: 20 minutes
Total Time: 30 minutes
Ingredients
2 ounces butter
8 large open-cap mushrooms
Salt to taste
8 tablespoons thick cream
1 teaspoon English mustard
White pepper to taste
Bread rounds for serving
Directions
1. Melt the butter in a frying pan and lay in the caps (save the stalks for a sauce or soup). Salt lightly and be patient while they lose their moisture and begin to fry. First they will sizzle, and then juices will run.
2. Meanwhile, combine the cream with the mustard and pepper and mix well.
3. Transfer the mushrooms carefully to a gratin dish when done. Finish each cap with a tablespoon of the cream seasoned with mustard and pepper.
4. Slip the dish under a grill or broiler until the cream bubbles.
5. Serve on bread toasted in the buttery juices left in the pan — get the pan good and hot so the bread is really crisp.
The Duchess of Windsor’s Doigts au Fromage (Fingers of Cheese)
The former Mrs. Simpson — hostess-with-the-mostest in postwar Paris — astonished her sophisticated guests with her English savories, an idea unknown in France. “A meal,” she said, “should always be witty and include a surprise.” Frozen cheese fingers supplies both.
Yield: 4 servings
Prep Time: 20 minutes
Freeze Time: 2 to 3 hours
Total Time: start 2 to 3 hours ahead, 30 minutes prep and finish
Ingredients
1 medium-ripe camembert, crusts removed
1 heaped tablespoon curd cheese
Salt and pepper to taste
¼ pint (½ cup) heavy cream, whipped stiff
Grated parmesan for dusting
Directions
1. Blend the camembert and curd cheese together by pushing them through a sieve or chop thoroughly in the food processor.
2. Season with salt and pepper and fold in the whipped cream.
3. Spread a layer the thickness of your thumb on a baking tray lined with cling film. Turn out the cheese mixture onto a hard, clean surface and cut into fingers.
4. Dust with finely grated parmesan and serve ice cold. This is perfect served with ripe strawberries dressed with a few drops of balsamic vinegar.
Main illustration: Menu cards illustrated by Monica Rawlins for dinners at her home. Credit: Monica Rawlins

Our forefathers weren’t thinking of holiday fare or locavores when they signed the Declaration of Independence, but the Fourth of July fortuitously falls at a time of fabulous local food abundance. And seeking out local food is the patriotic thing to do. Fresh fruits and vegetables connect us in a literal and visceral way to our land, and buying them is good for our local environment, farmers and economies. Your purchase will support your community, give you an opportunity to interact with your local growers and food artisans, and provide you with the best-tasting food around.
More from Zester Daily:
While the Fourth doesn’t have the same gastronomic weight as the winter holidays, the possibilities are endless, but should start with whatever looks good at your local farmers market. If you don’t want to commit to a wholly local Fourth, just feature one local food — maybe the mint in your julep, the cabbage in your slaw, or the chicken on your grill. Or buy some local tomatoes, herbs, and cheeses and have a localicious pizza party.
Make this the year you declare your independence from high-fat, high-sugar crackers, chips, dips, cookies, and other processed holiday foods. Swap them out for low-calorie, high-nutrition fruits and vegetables from local farms, and this will be your best Fourth ever!
If you need help finding local foods, enter your ZIP code into Local Harvest. In just a few clicks, you’ll find many ways to connect with local producers and celebrate food sovereignty by eating fresh, delicious foods from your local farms and gardens.
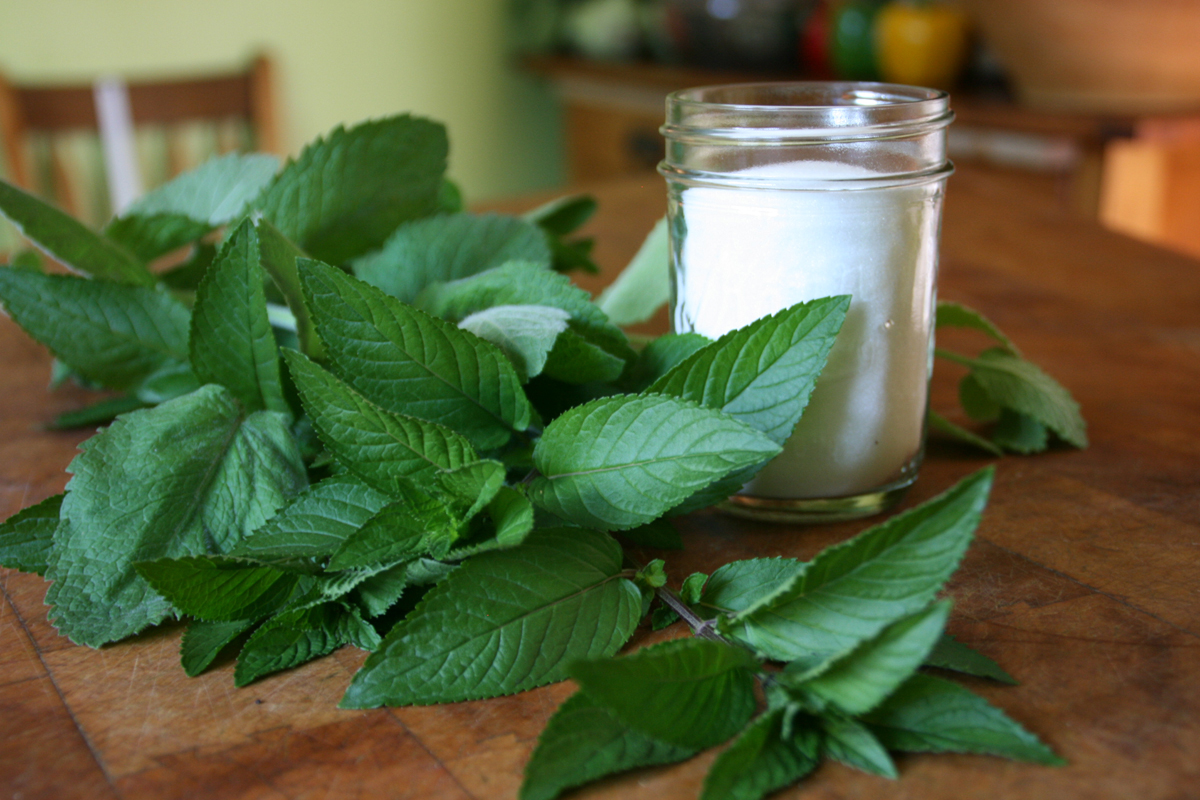
Make a cool mint soda for hot summer days. Credit: Cara Cummings
Cool Mint Soda
Mint is an all-time favorite for keeping cool in the summer, but chamomile, or lemon verbena, or any herb that strikes your fancy will also work in this recipe. Double it if you’re expecting a crowd.
Prep Time: 10 minutes
Cooking Time: 10 minutes
Total Time: 20 minutes
Yield: 6 servings
Ingredients
1 cup sugar
1 cup water
1 cup fresh mint leaves, coarsely chopped
Mint sprigs for garnishing
Sparkling water
Directions
1. Make simple syrup by dissolving the sugar in the water in a saucepan over medium heat.
2. Turn the heat off and stir in the chopped mint leaves. Let sit for a couple of minutes. When the mixture is cool, strain the mint leaves out.
3. Add two to four tablespoons (to taste) of the mint syrup to a glass of sparkling water. Add a mint sprig as a garnish.
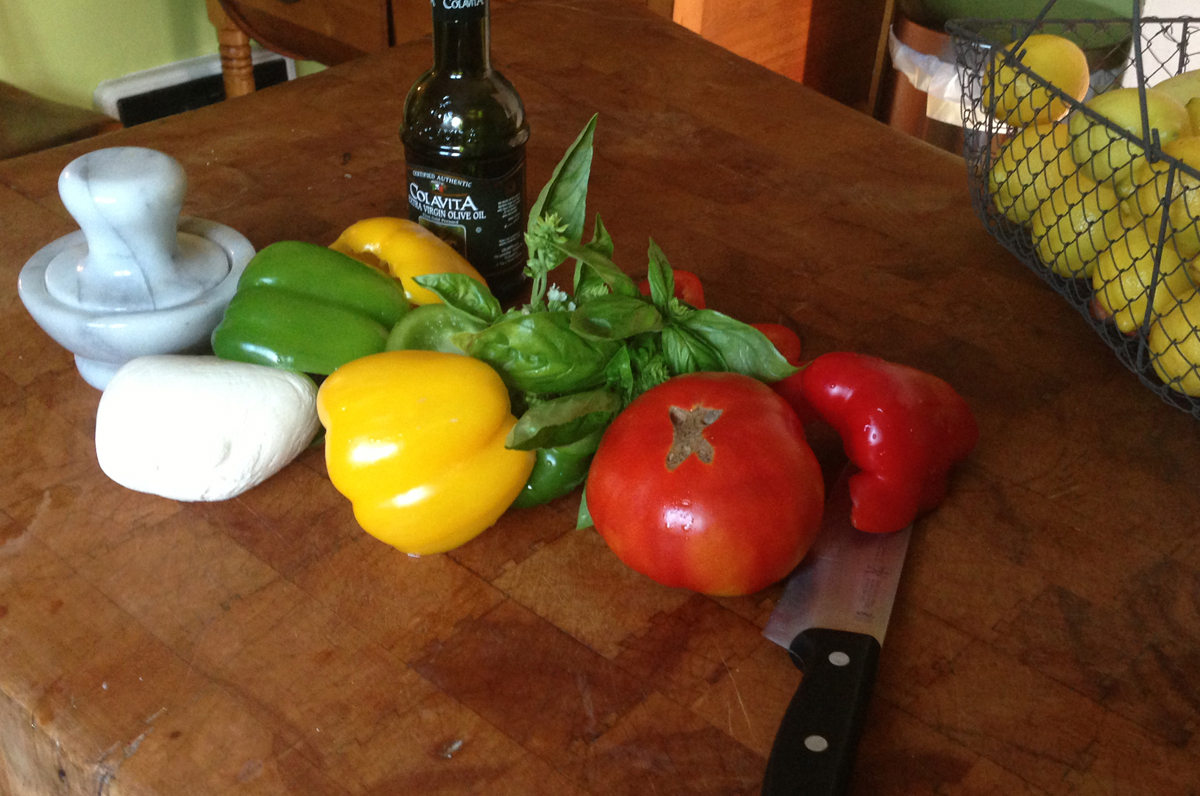
Grilled stuffed peppers are a quick Fourth of July favorite. Credit: Cara Cummings
Grilled Stuffed Peppers
Use red, yellow or green bell peppers, or Italian or Hungarian sweet peppers.
Prep Time: 10 minutes
Cooking Time: 30 minutes
Total Time: 40 minutes
Yield: 6 servings
Ingredients
3 sweet peppers, halved
8 ounces mozzarella cheese (sliced)
1 large tomato, chopped
6 sprigs basil
Salt and pepper to taste
Olive Oil
Directions
1. Cut each pepper in half and remove seeds. Fill each pepper with the chopped tomato, and drizzle olive oil over the top of the tomatoes.
2. Add a slice of mozzarella on top of the tomatoes, and then add a dash of salt and pepper and a sprig of basil.
3. Place the filled pepper halves on a hot grill, but not directly over the flame. Cover and grill for about 30 minutes, or until the pepper is soft.
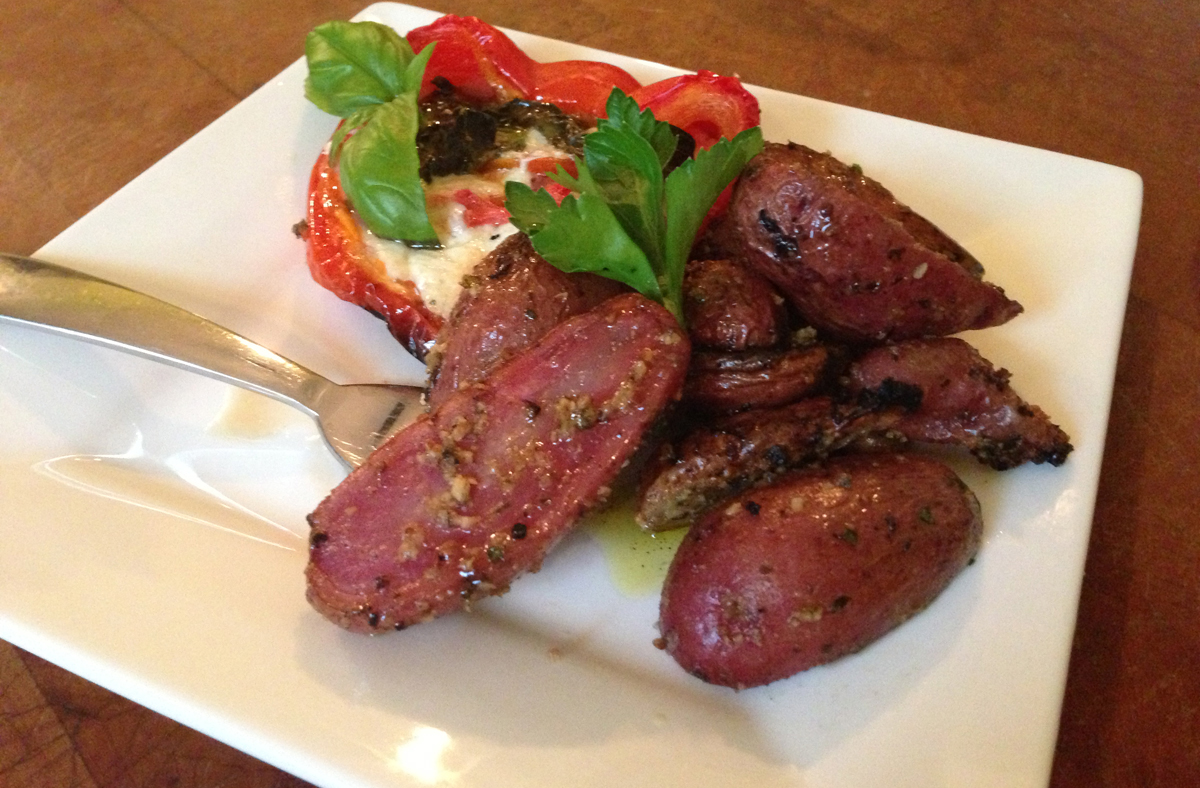
Use pesto to add a light, summer flavor to potatoes. Credit: Cara Cummings
Parsley Pesto Potatoes, Grilled
Herb pesto is quick and easy to make in a food processor. Make a double batch, and use the extra on crackers or sandwiches.
Prep Time: 10 minutes
Cooking Time: 45 minutes
Total Time: 55 minutes
Yield: 6 servings
Ingredients
1 cup fresh parsley, stems and leaves
1 cup pecans (you can substitute walnuts or pine nuts)
¼ cup hard cheese such as romano, grated
¼ cup olive oil
1 clove garlic, minced
Salt, to taste
1 to 2 pounds small new potatoes (or large potatoes cut into chunks)
Directions
1. To make the parsley pesto, put all the ingredients, except the potatoes, into a food processor and blend until well mixed.
2. In a large mixing bowl, toss the potatoes with the pesto.
3. Place the potatoes on a piece of foil on a hot grill, away from the direct flame. Cover the grill and cook until tender, about 30 to 45 minutes, depending on the size of the potatoes. When you can easily pierce them with a fork, they’re done. Top with extra pesto if you like.
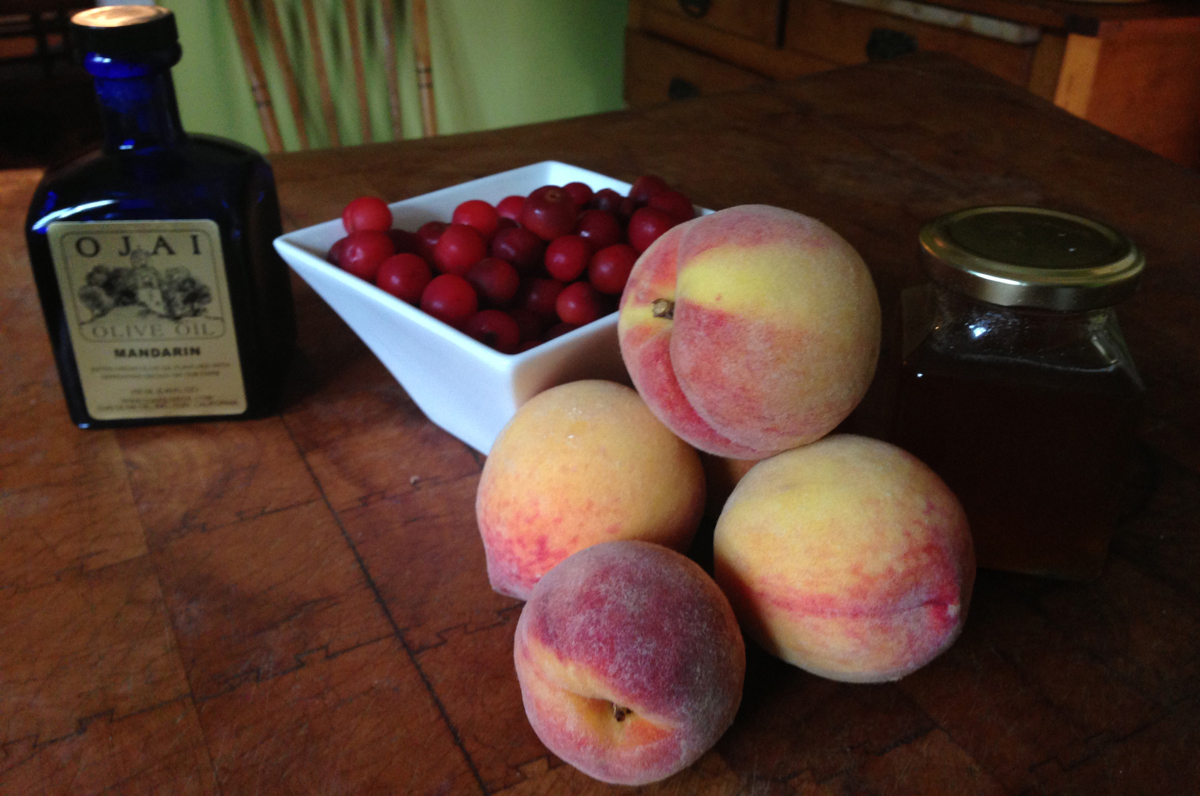
Make a quick, easy, and delicious dessert using fresh peaches. Credit: Cara Cummings
Grilled Peaches with Tart Cherries
While the grill is still hot, make this quick, easy, and delicious dessert. If you have a big group, slice up some local watermelons, muskmelons, and honeydew melons on the dessert table alongside the grilled peaches.
Prep Time: 5 minutes
Cooking Time: 15 minutes
Total Time: 20 minutes
Yield: 6 servings
Ingredients
3 peaches
1 cup tart cherries, pitted
½ cup honey
Olive oil
Directions
1. Cut the peaches in half and remove the pits. Coat the peaches in olive oil. If you have a citrus-infused olive oil, that is particularly nice!
2. Fill each peach half with some cherries, and drizzle with honey.
3. Place the peaches on the medium-hot grill for 10 to 15 minutes, or until soft.

My first taste of fiddlehead ferns was in a lodge overlooking Mount McKinley in Alaska, so I was shocked to hear the word “fiddlehead” mentioned on a frigid early spring evening in Washington, D.C. While scanning the menu at Vidalia Restaurant, I overheard the waiter at the next table explain that the halibut special came with fiddlehead ferns. My husband says my head whipped around “faster than a speeding bullet.”
I hadn’t tasted fiddlehead ferns in a decade. I ordered the halibut just for the ferns, and the waiter was kind enough to request extra for me. When they arrived, the steamed ferns sat on the plate like a pile of resting green snails. But one bite sent me into heaven … and took me back 17 years to a trip to Alaska where I first tasted these bitter green morsels.
I discovered Mary Carey’s Fiddlehead Fern Farm in 1997, just outside Talkeetna. Carey was a local legend, known as a fearless pioneer and author of numerous books, including her memoir “Alaska, Not For A Woman!” As I strolled through the fern farm with Carey, she regaled me and my traveling companion with stories about how she had come to Alaska in the 1960s as a new widow. She began her big adventure at 49, driving a station wagon from Houston to Anchorage. In her 50s, she began homesteading 100 miles from the nearest road.
More from Zester Daily:
» Eating local year-round in Alaska is hard, but they did it
She encouraged us to be bold and live without fear. Then she recommended a pilot to fly us over Denali (Mount McKinley), the highest peak in North America. After an amazing flight, we stayed at Mary’s McKinley View Lodge and ate pickled fiddlehead ferns in rice pilaf. My love of fiddleheads was sealed with the first crunchy and slightly bitter bite.
I never imagined I would taste fiddlehead ferns in the nation’s capital, more than 4,000 miles away from the only fiddlehead fern farm I knew. I figured if Vidalia could get fiddlehead ferns, I could too.
My first call was to Mary Carey’s McKinley View Lodge to see whether they still served fiddleheads. I talked with Mary’s daughter Jean Richardson, who sadly reported that Carey passed away in 2004 at 91. Mary had always pickled the fiddleheads herself, and Richardson said, “that talent died with her.” I was going to have to find another recipe for pickled fiddleheads, if only in memory of Mary Carey. But without a Fiddlehead Fern Farm nearby, it wasn’t easy.
I made several calls and googled my fingers raw. It turns out that it’s hard to find fiddlehead ferns in grocery stores and farmers markets. The fiddlehead is truly a foraged food, and not all fiddleheads are the same. Most fiddleheads consumed in restaurants come from fronds of the ostrich fern (Matteuccia struthiopteris), the only variety approved for human consumption by the USDA. While many varieties of ferns grow wild in North America, many of them are toxic, so it’s vital to know what you’re doing before foraging for fiddleheads. I realized I wasn’t experienced enough to do that.
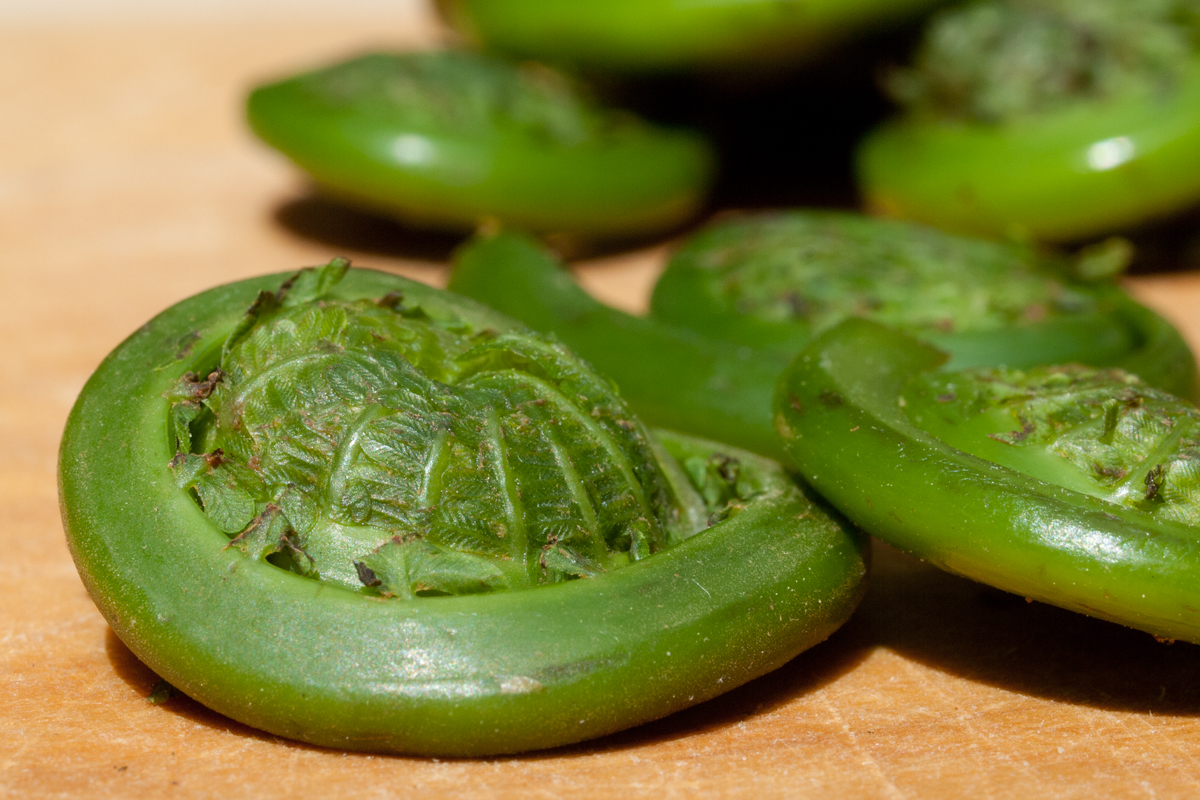
Fiddleheads from of the ostrich fern, the only variety approved for human consumption by the USDA. Credit: Susan Lutz
I eventually discovered Dan Donahue of Agora Farms and stalked his stall at Washington D.C.’s Eastern Market until fiddleheads arrived. Donahue gets his fiddleheads from a group of Native Americans in Maine who harvest wild fiddleheads. But spring came late this year, so the fiddleheads took longer than usual to appear at Dan’s stall. When they did, I scored a big baggie filled with clumps of dark green curlicues that resemble mollusks even more when they’re raw.
The problem was, I wasn’t sure what to do with them.
Finding fellow fiddleheads
Luckily, fiddleheads inspire almost cult-like devotion and Donahue put me in touch with fellow fiddlehead fan Jonathan Bardzik, who demonstrates fiddlehead fern pickling at Eastern Market. Bardzik and I discussed our mutual love of fiddleheads, especially the pickled variety. Asked what he loves about this little known treat, Bardzik explained that fiddleheads are one of the last truly seasonal foods. The season for finding ostrich ferns in their edible “fiddlehead” stage is extremely brief, only a few weeks at best and a single week in Alaska.
When you find them, you have to move fast. Preparing fiddleheads requires setting all other tasks aside to take advantage of their brief period of freshness, a good reminder of what’s important in life.
Bardzik shared his recipe for pickled fiddlehead ferns. This recipe is certainly different from the pickled fiddleheads I first ate at Mary Carey’s Fiddlehead Fern Farm, but they are lovely in their own way. I used half my stash for this. I blanched and froze the rest following guidelines from the University of Maine’s Cooperative Extension since I still want to try to replicate Mary Carey’s recipe for pickled fiddlehead ferns.
Then a wild thought occurred to me: Could I have my own Fiddlehead Fern Farm? Could I grow my own patch of ostrich ferns in my mid-Atlantic backyard? I asked veteran forager Matt Cohen if it were possible to grow ostrich ferns as far south as Washington D.C. Cohen was tentative: They only grow in limited areas in this region, but he had seen some scattered in small colonies along the Potomac River. He had even harvested some from his own backyard under the shade of a huge 150-year-old oak tree. So I’m planting my own patch of ostrich ferns under a grove of trees in my backyard. It may take a few seasons before new shoots appear, and I expect some trial-and-error in finding the right moment to harvest the tightly wound, snail-like nubbins. Until then I can munch on my pickled fiddleheads and think of Mary Carey. When I was under 30 and Mary was over 80, she told me to live life boldly. My fiddlehead patch will be proof, in a small way, that I can.
Recipe courtesy Jonathan Bardzik.
Ingredients
- 2 cups trimmed fiddlehead ferns
- 1½ cup roasted red pepper blackberry vinegar (You may substitute ¾ cup sherry vinegar and ¾ cup white balsamic vinegar.)
- 1 cup water
- 2 tablespoons salt
- 1 cup brown sugar
- ¼ teaspoon salt
- 2 bay leaves
- 1 tablespoon black peppercorns
- 1 tablespoon whole mustard seed
- 1 tablespoon whole coriander seed
- 1 star anise pod
Directions
- Soak fiddleheads in water for 10 to 15 minutes.
- Place cleaned and trimmed fiddleheads in a vegetable steamer over boiling water. Cover and steam for 10 to 12 minutes.
- Remove fiddleheads from steamer and transfer to a bowl filled with half ice and half water. Let cool, then drain.
- Meanwhile, combine remaining ingredients in a small saucepan to make the pickling brine. Bring to a simmer over medium heat, stirring until sugar is dissolved. Remove from heat and bring to room temperature.
- Place fiddleheads in a bowl or jar and cover with pickling brine.
- Refrigerate for at least two hours. Leave longer to intensify flavor.
Notes
Fiddlehead Safety Tips:
The Centers for Disease Control recommends that fiddleheads should be cooked thoroughly before eating. Do not eat raw or lightly cooked fiddleheads because of the risk of foodborne illness. Always buy fiddleheads from suppliers you know and trust. Most restaurant fiddleheads use fronds of the ostrich fern (Matteuccia struthiopteris), the only variety approved for human consumption by the USDA.
Main photo: Washing ostrich fern fiddleheads before steaming. Credit: Susan Lutz

You just can’t escape a barbecue grill on the Fourth of July. The holiday demands outdoor cooking followed by fireworks. And the curious thing about Americans’ Independence Day food traditions is that they are not confined to one or two expected dishes. Almost anything goes.
When I lived in Arlington, Mass., July 4 was an especially big deal because my house was about 100 yards from the route taken by William Dawes when he rode the southern route to Lexington while Paul Revere took the northern route on April 18, 1775, (as you know, Revere got all the fame and Longfellow’s poem).
Traditional New England fare
Traditional July 4 fare in New England, especially in the 19th century, was poached salmon with egg sauce, fresh peas and new potatoes, lemonade, and blueberry cobbler. Not once in the 14 years I lived in New England did we have this menu. What we did have was anything we damned pleased — hamburgers and hot dogs being on everybody’s go-to menu, along with potato salad, a bean salad, and, of course beer, plus soda and juice for the kids.
More from Zester Daily:
» Reviving Italian-American classic recipes
» Fire up the grill for the Fourth
This July 4 perhaps a little innovation is in order such as the favorites of Italian-Americans, braciole, stuffed meat roll-ups. They go by other names such as involtini, but for any Italian-American they’re always known as braciole and they’re always braised in ragù or grilled. But this was not always so. Interestingly, the word braciole derives from the word for charcoal, implying that it was originally cooked alla brace, that is, grilled and that it was a cut of meat with the bone.
Braciole was once synonymous with “cutlet.” The place to begin is with the cut of meat. Not all braciole are cut from the same meat. If you grill the braciole, you might want to use a large piece of beef such as sirloin tip or beef round from which you can slice nice flat steaks that can be pounded thinner in order to roll them up.

Braciole on the grill. Credit: Clifford A. Wright
Pound them as thin as scaloppini with a mallet or the side of a heavy cleaver. Lay the meat slice in front of you and place a heaping tablespoon of stuffing on the end nearest you. Roll once away from you and, pressing with your fingers so it’s tight, keep rolling and secure the ends or anything that looks loose with toothpicks. Now you’re ready to grill.
Here is a recipe to get you started after which you will only be limited by your imagination. The roll-ups can be prepared the day before and kept refrigerated until time to grill.
These beef roll-ups are stuffed with pecorino cheese, currants, and pine nuts. They are popular fare in the summertime around Palermo in Sicily.
Ingredients
- 12 large bay leaves, preferably fresh
- 1 tablespoon currants
- 1 ¾ pounds beef round, cut into twelve 3×5-inch-slices
- 6 tablespoons fresh bread crumbs
- 2 tablespoons extra-virgin olive oil plus more for basting
- 2 tablespoons freshly grated pecorino cheese
- 1 tablespoon pine nuts
- 6 tablespoons finely chopped onion
- Salt and freshly ground black pepper to taste
- Twelve 8- to 10-inch wooden skewers
- 1 large onion, quartered, and separated
Directions
- Prepare a hot charcoal fire to one side of the firebox or preheat a gas grill on high for 15 minutes.
- If using dried bay leaves, soak them in tepid water for 30 minutes and drain. Soak the currants in tepid water for 15 minutes.
- Place the beef slices between 2 pieces of wax paper or plastic wrap and flatten with a mallet or the side of a heavy cleaver until they are about 1/16 inch thick, being careful you don’t rip the flesh.
- In a small sauté pan, heat 2 tablespoons olive oil over medium-high heat. Add the bread crumbs and cook, stirring, until lightly browned, about 5 minutes. Remove the pan from the heat. Drain the currants and add to the bread crumbs with the pecorino, pine nuts, onion, and salt and pepper. Mix thoroughly and set aside.
- Roll the bread crumb mixture in the beef slices to create beef rolls.
- Double skewer all the ingredients: hold 2 skewers parallel to each other about ½ inch apart between your thumb and forefinger. Slide a bay leaf, an onion slice, and a beef roll onto each set of skewers.
- Place the skewers on the grill close to the fire, if possible, and baste with olive oil. Cook until golden brown, 5 to 7 minutes on each side. Move to the cooler side of the grill if there is too much flare-up. Serve hot.


After tasting 2,734 entries, it was easy to spot food trends. I was one of the dozen judges for the coveted sofi Awards given to this year’s outstanding artisanal food products. One of the unexpected benefits of being a judge was the opportunity to taste everything in neatly organized categories. Usually, when attending a food show, you sample food in a random order, tasting the 2,000-plus exhibitor’s products in the haphazard order of booth geography, meandering from a taste of vinegar to jam, salsa and beer. But not this year.
In April and May the Specialty Food Association, which gives the awards, grouped the entries into categories. Finally, instead of a random mix of flavors, submissions were organized into 32 groupings, such as appetizers, beverages, condiments, desserts, salad dressings, snack foods, and USDA-certified organic products. The items in each group were set out on long tables in a half dozen rooms in the association’s New York City offices. We tasted more than 2,000 entries! We taste-tested 111 cheeses, 167 cooking sauces, 154 diet lifestyle foods, and 144 snacks in 1½- to 3-hour sessions. Palate fatigue was kept at bay by slices of green apples, crackers, pitchers of water and seltzer.
This year’s sofi Awards finalists reveals five fascinating trends, where new tastes meet classic traditions:
1. Molecular gastronomy
Also called modernistic cuisine, molecular gastronomy combines chemistry with cooking to alter the texture, look and taste of foods. This kitchen-based rocket science, popular with many top chefs in recent years, is moving into specialty foods. Several companies are introducing faux caviar, little gelled spheres that burst in your mouth. They can be filled with just about anything, from pesto to balsamic vinegar to espresso to truffle juice.
2. Flowers
Get ready for floral-flavored waters, teas and even cocktail mixers, the next wave cresting in the beverage category. Blossom Water combines fruits and flowers in tandem, such as Lemon Rose, Plum Jasmine and Grapefruit Lilac. Rishi Tea is blending blueberries with hibiscus, and bergamot with sage. Owl’s Brew Pink & Black is a tea-infused cocktail mix blended with hibiscus. As unusual as these combinations may sound, they’re nothing new. Rosewater and orange flower water, familiar to Moroccan food enthusiasts, date to the Renaissance.
3. Savory sweets
More From Zester Daily:
» The real magic of molecular gastronomy
» Savory bacon shortbread
» Smoked salts add smokiness
» Dining on molecules
Pushing the envelope on savory sweets has been a growing trend since the realization that chocolate and caramel only get better with a sprinkle of sea salt. At this year’s Fancy Food Show we’ll be introduced to cauliflower kale muffins, savory ice creams, and Blue Hill’s vegetable yogurts, which derive their vegetal sweetness from beets, sweet potatoes or winter squash. Bacon marmalade, anyone?
4. Smoke
Smoke as a flavor component began as an important food preservation technique for our early ancestors, but now it’s showing up in items you wouldn’t expect. Smoke goes beyond barbecue and moves into chocolate chips (Hot Cakes Molten Chocolate Cakery Co.), smoked pizza flour, shortbread with smoked hickory sea salt (The Sticky Toffee Pudding Co.) and even smoked cocktail mixes. The aromatic allure triggers a primitive taste memory that we seem hardwired to love.
5. Compression and dehydration
Compressing or dehydrating foods not only changes their textures, but it also concentrates their flavors. Manicaretti’s dehydrated capers add a crisp, briny crunch to pasta, salads and seafood. The compressed cube of concentrated maple sugar made by Tonewood is so hard it can only be grated, but the delicate wisps that gently fall from a microplane taste more intensely of maple than maple syrup or maple candy. Grace & I’s tightly pressed Fruit + Nuts Press not only looks like a pretty pound cake, but slices like cake too. Coach Farms has transformed some of their goat cheese into grating sticks that allow you to easily add a subtle, cheesy tang to pastas, salads, and vegetables. It won’t be long before these trends and most likely many of these products will appear in the aisles of your favorite supermarket and specialty food shop. When you do see them, it’s fine to feel a little smug — you read about them here first! This year’s award ceremony will be hosted by Cronut creator Dominique Ansel on June 30 at the Javits Center in New York City.
Main photo: Among the food trends is molecular gastronomy; in this case, faux caviar that tastes like basil. Credit: Specialty Food Association

The two comfort foods I missed most when I first came to the United States revolved around legumes: muthira upperi (horse gram stir-fry) and idli, steamed rice cakes made with black gram and rice. Horse gram was unavailable in the United States during the 1970s, and idli batter never fermented properly in my New England kitchen.
To those who are not familiar with Indian cuisine the variety of dried legumes used in India can be quite overwhelming. Although red gram, black gram and green gram are all familiar names, one of the legumes that is not very well-known, but is quite nutritious, is horse gram (macrotyloma uniflorum). Unfortunately, rarely will you find recipes for horse gram dishes in Indian cookbooks, and Indian restaurants mostly avoid serving this healthy legume. But in the rural kitchens of India, people prepare some very tasty and nutritious dishes with this legume.
More from Zester Daily
» What beginning cooks don’t know About Indian dal
Dried beans, peas and lentils are one of the world’s oldest cultivated crops and a major component of human diets throughout history. An excellent source of protein, dietary fiber and complex carbohydrates, legumes and pulses are tasty, nutritious, inexpensive and versatile. Horse gram native to Africa, Asia and Australia is an important and unexploited tropical legume crop grown mostly in dry agricultural lands. It is a relatively short duration summer crop and fits well into crop rotations. It is often intercropped with various cereals, such as sorghum, maize, pearl millet and millet, which ensures increased soil fertility and increased production. It is also grown in citrus orchards in the vacant space between trees. It is an extremely drought-resistant crop.
Horse gram derives its English-language name from its use as a staple food for horses and cattle. The green plant—its leaves and branches, as well as the beans—are highly nutritive and are used as fodder. These small and somewhat kidney-shaped beans, which are greenish brown to reddish brown, are equally good for human consumption. In comparison, horse gram ranks as high as “super foods” such as quinoa and chickpeas that only health advocates have known about for years, but which have become common fare now.
Horse gram is gluten-free, high in iron, calcium, and protein, and contains no fat, cholesterol, or sodium; horse gram has the highest calcium content among pulses. It is also a good source of natural antioxidants. One-hundred grams of cooked horse gram has 22 grams of protein, 57 grams of dietary carbohydrates, 287 milligrams of calcium and 7 milligrams of iron.
Health benefits
The health benefits of horse gram have been well-known since ancient times. It is used in Ayurvedic medicine for the treatment of asthma, bronchitis, cough, gastric and urinary problems, and kidney stones. Studies by scientists at the Indian Institute of Chemical Technology have found that unprocessed horse gram seeds not only possess anti-hyperglycemic properties but also have qualities which reduce insulin resistance. The study found that horse gram is rich in polyphenols, which have high antioxidant capacity. It also found that horse gram has the ability to reduce high blood sugar following a meal by slowing down carbohydrate digestion and reducing insulin resistance. The majority of antioxidant properties are in the seed coat, and any dish made of whole grain horse gram is better than dishes made from the sprouts, which have less of the anti-diabetic medicinal property.
In cooking
Horse gram is cooked and consumed as whole seed, sprouts or as whole meal, largely in the rural areas of India. It is very hard in texture and requires lengthy cooking time. A pressure cooker can cut down on the cooking time substantially. Even after cooking, it does not get soft like chickpeas. It does not absorb water like other pulses, but soaking reduces cooking time and improves protein quality.
In India, traditionally different dishes were made with this pulse to suit different seasons. Horse gram is used to make idlis, dosas, various curries, soups and chutneys. The following is a recipe for a simple stir-fry made with cooked horse gram, mustard seeds, green chilies, asafoetida, cumin seeds and fresh coconut.
Note: Remember to allow for soaking the horse gram for eight hours (or overnight).
Ingredients
- 2 cups horse gram
- ½ teaspoon turmeric powder
- ½ teaspoon dried red cayenne, or Thai chili powder (less for a milder taste)
- Salt to taste
- 2 teaspoons oil (preferably coconut oil)
- 1 teaspoon mustard seeds
- ½ teaspoon cumin seeds
- 1 green Thai chili pepper sliced lengthwise
- ⅛ teaspoon asafoetida
- 12 to 15 fresh curry leaves
- ¼ cup freshly grated coconut for garnish
Directions
- Soak the horse gram for eight hours (or overnight). Wash and drain well. Place the beans, turmeric powder, and red chili powder in a saucepan, and add water to cover. Cook until the beans are soft to the touch. If necessary, add more water. When the beans are soft to the touch, stir in the salt, and cook for five more minutes. Alternatively, cook in a pressure cooker (following the manufacturer’s directions) for six to eight minutes. Most of the water should be absorbed by the time the beans are well cooked. Drain any remaining water.
- Heat the oil in a large skillet, and add the mustard seeds. When the mustard seeds start sputtering, add the cumin seeds, sliced chili pepper, asafoetida and curry leaves. Transfer the cooked beans to the skillet, and panfry over low heat for 20 minutes, stirring occasionally. Garnish with fresh grated coconut.

Main photo: Horse gram is a little-known but very nutritious legume. Credit: R.V. Ramachandran

Five years ago, I visited Peru and tasted ceviche, the national dish of raw fish cured in citrus juice, for the first time. I am a trained sushi chef and the author of a definitive book on Japanese sushi, but this meal was a revelation. The combination of lime juice and chile pepper with firm-tender cubes of a local white fish was strange, but utterly refreshing.
Ever since that meal in Peru, I have wondered again and again whether ceviche could be related to sashimi, the Japanese dish of sliced raw fish. (Sushi is raw fish combined with rice.) Both preparations are popular menu items today in high-end restaurants around the world, with creative interpretations that extend well beyond Japanese or Peruvian cuisine. Japanese celebrity chef Nobu Matsuhisa launched his restaurant career with a sushi bar in Peru, where he developed his signature style blending South American and Japanese takes on seafood.
Ceviche and sashimi were born in countries that share a similar geographical blessing. Warm and cold currents blend along the coasts of Japan and Peru, allowing high-quality plankton to flourish, and in turn, nourishing the fish to produce exceptionally tasty seafood.
More from Zester Daily:
At a time when not much ice was available and no refrigeration system existed, early residents of both countries devised these ways to enjoy good quality seafood longer and more safely. According to Claudio Meneses, a Peruvian with a great depth of knowledge on Peruvian gastronomy, ceviche originally was developed before the Spanish conquest, as a way to prevent rapid spoilage of fresh fish. In this original method, fresh or dried salted seafood was cured in tumbo (banana passionfruit) juice or chicha, a fermented beverage made from corn, along with aji chile and sometimes local aromatic herbs. The word “ceviche” is said to be derived from the Quechua word “siwich,” which means fresh fish.
Although people sometimes say that ceviche is “cooked” in the citrus juices, this curing technique does not kill the parasites that are common in even the healthiest of marine and freshwater fish. Therefore, like sashimi, ceviche must be made with absolutely fresh seafood of the highest quality.
Ceviche for lunch
“Peruvian cevicherías, that is, restaurants that specialize in ceviche, only open for lunch because fish used for ceviche traditionally had to be picked up from the fish market the same day it was going to be served,” Meneses said. “While this is not exactly true today, tradition has kept and so far I only know of one cevichería that opens for dinner.”
Japanese sashimi preparation can be traced to nama-su, which appeared around the 14th or 15th century. “Nama” means fresh or raw, and “su” means vinegar. Seafood for nama-su was pickled in vinegar with ginger or wasabi, or in ume plum-infused sake (rice wine) before serving. All of the pickling ingredients had anti-bacterial functions. The Japanese, like the Peruvians, cured fresh seafood to prevent spoilage and extend its life as a food source.
As time passed and world commerce increased, the transformation of sashimi and ceviche was peppered with foreign influences, political changes and technological advancement. The first change in ceviche preparation came when the Spanish brought bitter orange trees to Peru in the 15th century. Bitter orange quickly replaced the local fruit juice as a curing ingredient.
Modern Japanese sashimi at Kozue restaurant at the Park Hyatt, Tokyo. Credit: Hiroko Shimbo
In Japan, commercial production of shoyu, Japanese soy sauce, began and shoyu became widely available by the middle of the Edo period (1600-1868). Shoyu, which is high in sodium, was perfect for curing and preserving fresh tuna and skipjack tuna. Both are naturally dark in color, so the soy sauce does not affect their appearance. Shoyu also changed the way to eat raw fish in Japan. The umami-rich, savor of the shoyu, which masks any fishy taste, improves the overall flavor of raw fish. It therefore became an indispensable condiment to accompany sashimi. After World War II, more dramatic changes occurred in the Japanese sashimi kitchen. The refrigeration system introduced from America, efficient ice-making technology, development of high speed transportation networks and improved methods of fish catching and slaughtering allowed Japanese chefs to serve most seafood for raw consumption as sashimi at any place across the country, including areas far from the water.
From Japan to Peru
And then these developments in Japan began to influence ceviche in Peru, where the late 19th and early 20th centuries saw an influx of Japanese immigrants. By the 1970s, Japanese chefs living and working in Lima introduced modern Japanese sashimi preparation to Peru and these techniques migrated to the Peruvian ceviche kitchen. The Japanese chefs introduced a new way to cut ceviche seafood, in thin slices rather than the traditional cubes. This type of ceviche, known as tiradito, takes less time to cure because the large surface area and the thinness of the slices allow the marinade to penetrate more quickly. This resulted in the development of more subtly and interestingly flavored ceviches.
So although they originated on different continents and evolved in different ways, sashimi and ceviche were created around the same time for similar reasons — to make the most of a bounty of delicious fresh seafood. And over the years, these historical cousins have become even closer relatives as the culinary world has globalized.
This realization encouraged me to try to make my own ceviche dish, which I want to share with you. I happened to find a very good quality weakfish (sometimes called sea trout, though it is not a member of the trout family) locally and sustainably harvested in the northeastern U.S. by Blue Moon Fish, an operation on Long Island, N.Y. You can use any very fresh white fish available in your area. I recommend that you purchase the whole fish, so that you can confirm the freshness of the fish by looking at its eyes, which should be naturally bulging and not collapsed, and stomach, which should not be distended. You can find detailed filleting techniques in my book, “The Sushi Experience.” If you cannot find fresh fish in your area, then professionally frozen fish sold as sushi fish can certainly be used.
Ingredients
- 1½ pounds weakfish or other locally available, high-quality fresh fish
- Sea salt
- 1 garlic clove, chopped fine
- 1 yellow or red fresh cayenne pepper or other fresh chile pepper, chopped fine
- ½ red onion, sliced into fine thin rings, soaked in cold water for 30 minutes, then drained
- 1 lime
- 2 tablespoons coriander leaves
Directions
- Scale, clean, bone and skin the fish. Rinse the chopping board frequently during this process to remove any scales and blood attached to the chopping board.
- Fillet the fish, removing both the belly bones and center bones. You will have two back fillets and two belly fillets.
- Slice each fillet as thinly as possible and place the fish slices without overlapping on a large, clean serving platter.
- Sprinkle little sea salt over the fish. Garnish it with the chopped garlic and chile. Squeeze the lime juice over the fish. Decorate the fish with the onion and coriander leaves.
- Serve immediately.

Main photo: Ceviche with weakfish. Credit: Hiroko Shimbo

In the United States and perhaps elsewhere, most picnics are simply enjoyable outdoor meals and social occasions, where thoroughly normal groups of people decide to have a fun time and eat and drink some well-prepared goodies out of doors. In the United Kingdom, things are rather more complicated. By tradition, British picnics are of three sorts: the romantic, the grand and the disastrous.
Dream setting
The romantic picnic encapsulates simplicity in beautiful surroundings with a wonderful view, a stream, a wood or flower-filled meadow. The tradition started a couple of hundred years ago, when people began to see nature and the countryside as picturesque rather than dangerous. The food, drink and company are all planned to add to the picnickers’ awareness of nature and its beauties and seem particularly associated with happy and impressionable youth. Such a picnic involves little display or showing off, and not even a great deal of organisation. Sandwiches, fruit and some chilled wine or lemonade would be enough to make the right company happy in this setting — if it can be found. Somehow, this is the sort of picnic people dream of, but don’t very often end up having.
More from Zester Daily:
» Recipe for a perfect Parisian picnic
» The art of the summer berry tart
Over the top
The grand picnic is often and sometimes deservedly mocked. At its worst, it is based on the assumption that conspicuous expenditure will win the envy and admiration of spectators and guests. Victorian writers such as Anthony Trollope describe picnics with attendant servants, Champagne and dancing. Nowadays, grand English social occasions such as horse racing’s Royal Ascot, rowing’s Henley, opera’s Glyndebourne and the end-of-term speech days of the most expensive private schools all provide opportunities for showing off. Too much expensive food and drink such as lobsters, oysters and the very best Burgundy and Bordeaux, overdone table decorations, gilt wood chairs, striped awnings and tents, and even uniformed staff to wait on the picnickers are all to be seen. The hosts are often reduced to a state of nervous anxiety by the knowledge that highly competitive picnics are taking place all around them, and so only the richest, most confident and best prepared can expect to win.
When all goes wrong
The disastrous picnic is generally a product of nature winning the war with man. Although it can start out as one of the previous types, is somehow felt to be very traditional in itself. A romantic picnic in a field can be quickly spoilt by a herd of inquisitive farm animals, or worse, a loose bull. The British climate is far from reliable and can ruin the best-laid plans. Insects such as bees, wasps and biting flies can rout a group of potential picnickers. Rain, gusting wind, cold and driven sand at the seaside are some of the other hazards that British picnickers may have to face. In addition, picnics taken by a river provide the opportunity for at least one guest to fall in, and for others to feel duty-bound to follow as rescuers.
Then there’s the grand combination
When the grand merge, as they sometimes do for some reason with the disastrous, the situation is regarded as particularly amusing by spectators. Not only bad weather but the influence of gravity on expensively prepared cold collations can cause havoc. One of the smartest horse racing meetings in England takes place annually at Goodwood in West Sussex towards the end of July. Most people, of course, just come to enjoy themselves, but every year some overdo it. The most elaborate picnics are held on a steep slope and each year at least one of these is bowled downhill, with elegantly clad members of the (presumed) aristocracy in hot pursuit. Shellfish, the finest vintages of the best wine, cold beef and salmon, along with the occasional windblown table, glass, cutlery and awnings, have all been known to end up crushed against a boundary fence at the bottom of the hill. It is not, of course, considered polite to laugh too openly.
Since International Picnic Day is on June 18, this seems the right moment to celebrate with a delicious cold dessert. The recipe that follows is taken from our book “For the Love of an Orchard,” and would enhance any picnic. Pretty enough to pass for grand, delicious enough to increase a sense of romance and consoling enough to mitigate a disaster, it is based on a dessert dish that a visiting French friend prepared for Chris and his family a few years ago. Alice Soubranne, who is an excellent cook, was kind enough to give us this family recipe.
Ingredients
- Sweet pastry (use pâte sucré or a half-pound block of good-quality chilled supermarket pastry)
- 3 to 4 apples, peeled, cored and sliced, approximately 2 cups
- 4 to 5 tablespoons caster or superfine sugar
- 6 egg yolks
- 20 U.S. fluid ounces tub of crème fraîche
- 2 ounces butter
Directions
- Blind bake the pastry in a buttered 10-inch tart pan or flan case with removable base at 350 F. The shell should be firm and dry but not browned or biscuit-like.
- Arrange the sliced apples prettily in concentric circles and again bake at 350 F until softened but holding their shape (say, 10 minutes).
- In a big bowl, beat the egg yolks with enough sugar to make the mixture neither too sweet nor solid. Then fold in the gently melted butter and crème fraîche and pour this custard mixture over the apples in the baking case.
- Turn the heat up to 375 F and cook the tart for about 30 minutes so it is, in Alice’s words, “goldy and has a tan,” but does not burn. It must not even turn dark brown or the custard will curdle at the edges, making a break line where it meets the pastry.
- Eat cold, served with crème fraîche or cream. Other fruits can in principle be used for this tart, including plums and probably cherries, but the right liquid content and height in relation to the finished custard is important.
Notes
Presentation is important, with evenly cut apple rings and golden custard. Good apples for this recipe should have a slightly spicy taste with good acid, and hold their texture when cooked in the custard. Norfolk Pippin, Ashmead’s Kernel and most Russets are really good. Of the generally available supermarket apples Braeburn is reliable and tastes good, holding enough texture. Bramleys are too tart.

Main photo: Picnickers gather at St. James Park in London. Credit: iStock