Articles in Thanksgiving
In a perfect world, we would start making food for Thanksgiving on Halloween. In reality, even experienced cooks don’t do this. Most of us cook the whole meal on Thanksgiving Day. Ever been in a grocery store on the Wednesday night before Thanksgiving? Point proved.
Completing an entire Thanksgiving meal the day of is certainly reasonable and achievable, even for beginners. Here are 10 tips to get you going. Some are sure to horrify purists. But heat is heat and flesh is flesh. When they meet in an oven, the bird will cook.
1. Go over your recipes the night before.
Know your plan of action. If there’s time and you’re not too tired, chop onions, celery, and carrots and hold them in the refrigerator in zip bags. Get out the turkey’s roasting pan and any baking dishes you haven’t used all year. Check them because they might need washing.
2. Set the table the night before.
Psychological readiness is good for the cook and good for the guests. I had a friend who was a slow and dawdling cook. Her mother told her to always have the table set. Her family was fooled every time that dinner was imminent. In a more practical sense, a ready table spares last minute drawer-frenzy. Get out all serving platters and bowls for turkey, gravy, cranberry sauce, salad and all vegetables — plus decide on every serving fork, spoon and tongs.
3. Don’t serve too early.
And don’t serve a meal this big too late, either. That’s hard on the digestive system. If you serve about 5 or 6 p.m. you’ll have plenty of time to make your menu from turkey to dessert. Before a meal this big, you don’t need nibbles and snacks around the house, just some nuts to stave off hunger.
4. Start with a fully defrosted turkey.
None of the information here applies if you’ve forgotten to defrost your turkey. If you’ve bought a frozen one the night before, you are in trouble. Yes, you can try sticking a blow dryer up the turkey’s cavity, but you will not only create a heated incubator for bacteria in the cavity, you will end up with a gross blow dryer you’ll never want to touch again.
If caught short the night before, buy a fresh turkey. If you’re so unlucky that fresh turkeys are sold out, but a smallish frozen one — 10 to 12 pounds. You can defrost it safely — still wrapped — in a sink filled with cold water. Change the water every 30 minutes, calibrating one 30-minute soak per pound of turkey. A 10-pound turkey will take about five to six hours to defrost.
5. Tackle the clamp.
Fresh or frozen, the turkey’s drumsticks are constrained for shipping by the meanest thing in cooking — the clamp. Whether metal or plastic, the bird comes with no directions on how to free the drumsticks. You’ve got to open the cavity to remove the giblets. In my struggles to remove the clamp, I’ve drawn blood. That’s because, at least with the metal ones, the maneuver is counterintuitive.
Metal clamp: With a towel, pull the upside-down “U” toward you. With your other hand, find the strength to lift the loosest drumstick up, over and out of the clamp. Once the first drumstick is free, the second one will come over and out easily. But the clamp is still in the bird! Squeeze its sides in, and push it away from you. It will slide out.
Plastic clamp: Snip it with scissors, free the drumsticks, reach in and remove the bag of giblets.
6. Skip brining the turkey and just salt and pepper the bird before it goes in the oven.
You need no elaborate brining step or roasting-temperature schemes for a tasty and nicely browned turkey. Season simply with salt and pepper, inside and out, underside and on top (breast). You can wear rubber gloves if you’re grossed out by the bird’s cavity.
Some recipes have you start at a high temperature, turn it down, give the bird a few flips so the bottom is on top and back over again. This is ridiculous. A turkey isn’t pizza dough. Let it be. Once seasoned and in the oven, you’ll have no contact with this bird for another hour, so move on with your life.
7. Have the essential equipment.
- Towels for gripping the clamp, holding on to a warm (and slippery) drumstick at carving time.
- Oven mitts for both hands to prevent burns on your hands and arms.
- Instant-read thermometer.
- Turkey lifter that looks like mini-snow-chains and acts as a sling. This device lays across your roasting pan with handles draping over the sides. The turkey goes on top. When done, all you have to do is grab the handles and lift. You can find turkey lifters at dollar stores.
- Roasting pan with low sides because high sides prevent heat from getting down into the bottom of the turkey, precisely where the dark meat that takes the longest to cook is situated. If all you have is a roaster with high sides, elevate the turkey on a rack inside the roaster. Your best bet is a disposable aluminum roasting pan with shallow sides you throw away when roasting’s done.
- Mesh strainer for straining clear pan juices after roasting.
- Aluminum foil to tent turkey when it comes out of the oven
- Extra large cutting board to carve turkey.
8. Always use a meat thermometer.
Turkeys are tricky. The breast meat cooks first, but it’s still attached to the bird while it waits for the dark meat to finish. White meat is ready at 170 F, dark meat at 175 to 180 F. To take a reading, insert it in the dark meat, which takes the longest to cook. Newer digital thermometers stay in the turkey for the entire roasting time and beep when the set temperature is reached.
A 10- to 14-pound turkey should be cooked at 350 F for 2 to 2½ hours. A 14- to 18-pound bird should cook at 325 F for 2½ to 3½ hours.
If you don’t have a meat thermometer, here’s the old-fashioned method. Gently pull a drumstick (use a towel to hold on) away from the body. Where the skin has stretched, use a small knife to make a cut to expose the meat. Take a look. If you see red juices or pink meat, keep roasting. Check for doneness at 15-minute intervals until juices run clear. I like this method because no one will see the cut.
9. After the turkey has roasted an hour, add about 2 cups of water to the bottom of the pan.
This is the beginning of your gravy or natural pan juices.
10. If, after carving, parts are undercooked, microwave them for a minute or two.
No one will know.
Zester Daily contributor Elaine Corn is a James Beard Award-winning cookbook author and food editor. A former editor at the Louisville Courier-Journal and the Sacramento Bee, Corn has written six cookbooks and contributed food stories to National Public Radio.
Photo: Turkey in the oven. Credit: Sergiy Serdyuk
Thanksgiving is almost upon us. With the guest list finalized and all your favorite recipes organized, there is only one unanswered question: what to do with the turkey liver?
Even people who love chicken livers view turkey liver as too much of a good thing.
Whoever has the job of prepping the turkey on Thanksgiving Day frequently looks with bewilderment at the large double-lobed liver in the bag tucked ever so neatly inside the turkey.
Following my mother’s lead, my solution is to turn lemons into lemonade or, in this case, turkey liver into pâté.
My mother prepared chopped liver using a shallow wooden bowl and a beat-up, double-handled, single-bladed mezzaluna knife that her mother had given her.
She would cut up and sauté the turkey liver with a chopped up onion. Two eggs would go into boiling water. Once hard-boiled, they would join the sautéed liver and onion in the wooden bowl, which she would hand to me along with the mezzaluna.
While she prepared the turkey, she put me to work.
As a 9-year-old, I would sit on a stool with the wooden bowl on my lap, rocking the mezzaluna back and forth, chopping up the livers and hard-boiled eggs.
Periodically my mother would check on my progress and, when everything was reduced to a fine chop, she would retrieve the bowl, add melted chicken fat and mix everything together.
Just before our guests arrived for Thanksgiving dinner, she transferred the chopped liver to a serving bowl and put it on the dining room table with a plate of saltines and the other appetizers, a platter of black pitted olives, whole radishes and vegetable crudités.
Mushroom and Garlic Turkey Liver Pâté
My mother liked her chopped liver rustic style. It is a matter of taste, but I prefer turkey liver when it is made with a food processor, creating a smooth pâté.
To balance the richness of the liver, the pâté needs sweetness (caramelized onions), saltiness (sea salt), heat (black pepper) and earthiness (hard-boiled egg and mushrooms).
Serves 8
Ingredients
Directions
- Wash the uncooked liver and pat dry. Using a sharp paring knife, remove and discard all fat and membranes. Cut liver into half-dollar-sized pieces.
- Place the eggs into a pot of boiling water. Cook 10 minutes, remove from water, let soak in cold water to cool, remove and discard shells.
- In a large sauté pan over a medium flame, melt the butter and lightly brown the onions, mushrooms, parsley and garlic. Add the pieces of turkey liver and sauté until lightly brown, being careful not to overcook the liver, which should be pink inside. Season with sea salt and black pepper.
- Using a rubber spatula, scrape the sautéed liver and vegetables into a large food processor, add the hard-boiled eggs and pulse. Slowly add olive oil, a little at a time. Use the rubber spatula to push any accumulation off the sides of the mixing bowl.
- Continue pulsing and adding small amounts of olive oil until the pate is creamy. Depending on the size of the turkey liver, you might use more or less of the olive oil. Taste and adjust the seasoning with sea salt and pepper.
- Use the spatula to transfer the pâté from the food processor to a serving bowl. Cover with plastic wrap and refrigerate. The pâté can be kept in the refrigerator 1-2 days.
- Before serving, take the pâté out of the refrigerator, place on the counter out of the sun and allow to come to room temperature. Serve with crackers, toast points, fresh sourdough or French bread.
Variations
- Instead of Italian parsley, use 1 teaspoon finely chopped fresh rosemary leaves.
- For a denser pâté, use 1 hard-boiled egg instead of 2.
- Add ¼ teaspoon cayenne powder to the sauté for heat.
- Add 1 slice bacon, finely chopped to the sauté and brown until crisp.
- Add 1 teaspoon balsamic vinegar to the sauté.
- Sprinkle 2 tablespoons red onion or scallions, finely chopped, over the pâté just before serving.
Zester Daily contributor David Latt is a television writer/producer with a passion for food. His new book, “10 Delicious Holiday Recipes” is available from Amazon. In addition to writing about food for his own site, Men Who Like to Cook, he has contributed to Mark Bittman’s New York Times food blog, Bitten, One for the Table and Traveling Mom. He continues to develop for television but recently has taken his passion for food on the road and is now a contributor to Peter Greenberg’s travel site and the New York Daily News online.
Of course, we all have favorite family recipes, especially at holidays, and no other holiday beats Thanksgiving for having a focus almost entirely on food. In most families, one member becomes the designated producer of the Thanksgiving dinner, and in my family that person, happily, is me. I say happily because the meal doesn’t seem authentic to me unless I eat the same food I had as a child. One year, when I accepted an invitation to have Thanksgiving at the home of a friend, I found myself the next day preparing another Thanksgiving dinner just for my family because I had so missed the dishes that resonate for me. Above all, I had missed the turkey stuffing that has come to be the only one I like.
Most stuffing, especially what one finds in turkey dinners in family restaurants, tends to be a pasty mass of bready stuff seasoned with an oversupply of dried sage, a texture and a flavoring unpleasant to me. And when one dines in the homes of others, the stuffing may well be the one featured on the latest November cover of one of the glossy food magazines that invariably offer innovative Thanksgiving recipes just to break the monotony of the holiday meal. While they sometimes offer more-or-less traditional recipes that include such standard ingredients as cornbread, oysters or sausages, these recipes usually rely on clever ingredients such as fennel, spinach, pecans and toasted brioche. Such medleys might be fun to try at some other time of year, but, these stylish ensembles have nothing to do with my beloved stuffing recipe, which is for me the most symbolic dish on my Thanksgiving menu.
Aunt Hannah’s semi-secret recipe
For me, recalling Thanksgiving meal means the memory of my mother impatiently waiting for my father to return from a football game so that we can all sit down to eat. And, I am also reminded of the teasing I endured from an older brother who enjoyed watching me go white around the mouth when I had reached the limits of anger. In other words, Thanksgiving brings with it some memories that are not always delightful in that Norman Rockwell way, but a true reflection of the habits and style of an individual family.
My family’s stuffing recipe has taken on a meaning beyond Thanksgiving in that it reflects the way recipes came into my family. Many families have one member who is understood to be a wonderful cook, and in my family that was my grandmother’s sister, Hannah. She lived in a nearby city, and every time we visited her, we came back with a recipe for whatever delicious dish she had served.
My mother’s favorite cookbook, “The Settlement Cookbook,” which I inherited from her, is stuffed with bits of paper with recipes written in her beautiful hand: a chocolate cake made with brown sugar, a fruit salad dressing made with pineapple and lemon juice, and an elaborate salmon patty dish I used to enjoy and almost forgot. To me, these recipes for dishes my mother loved are like letters from her, affirmative statements about how delicious life can be. And I am pretty sure that the dishes were first tasted at the home of Aunt Hannah.
I tested my migratory theory of how recipes came into my family several years ago when Aunt Hannah’s two daughters traveled to my city and I met them for lunch. We had loads of family news to discuss, and during a lull in the conversation, suddenly, apropos of nothing, I burst forth with “How do you make your Thanksgiving stuffing?”
The sisters caught one another’s eye, eventually turning their gaze at me and one said: “This is going to sound strange to you, but we always make our stuffing with corn flakes.” I had never before heard of anyone using that ingredient for the festive bird. This was the one, true and only acceptable stuffing for Thanksgiving, and just as I had suspected, the recipe was introduced by fabulous Aunt Hannah. The stuffing it produces has great texture that allows the stuffing to hold its shape and not go all limp, yet it is moist from having absorbed the juices from the turkey. Said juices also combine well with the stuffing ingredients, which are few and simple:
Aunt Hannah’s Turkey Stuffing
Makes enough for a 16-pound bird
Ingredients
Directions
- Melt the butter in a sauté pan over medium-high heat.
- Add onion, celery, green pepper and sauté until brown.
- Combine with bread crumbs, eggs, water, sugar and salt and pepper and mix well.
- Add cornflakes and mix lightly.
- Use this mixture to stuff the bird.
Barbara Haber is a food historian and the former curator of books at Radcliffe’s Schlesinger Library at Harvard University where she built a major collection of cookbooks and other books related to food, and influenced the recognition of food history as a viable field of academic and professional study. She founded the Radcliffe Culinary Friends, which supported the library’s culinary collection and provided a forum for food writers from across the country to present their work to an appreciative audience. She also held monthly gatherings, called “First Monday,” where local chefs and writers came together to hear talks on timely food-related topics.
Barbara’s books include “From Hardtack to Home Fries: An Uncommon History of American Cooks and Meals” and “From Betty Crocker to Feminist Food Studies: Critical Perspectives on Women and Food,” which she co-edited. She has written numerous articles and reviews including “Home Cooking in the White House” published in “White House History.” She is currently working on a book about food and World War II in the Pacific tentatively called “Cooking in Captivity.”
She is a former director of the International Association of Culinary Professionals and currently serves on the awards committee and chairs the Who’s Who Committee of the James Beard Foundation. She is a frequent speaker on topics related to the history of food as well as popular food topics, and has appeared on television’s “The Today Show,” “Martha Stewart Living” and The Cooking Channel. Barbara was elected to the James Beard Foundation’s “Who’s Who’s in Food and Beverages” and received the M.F.K. Fisher Award from Les Dames d’Escofier.
Photo: Cornflake stuffing ingredients. Credit: Barbara Haber
Our image of the first Thanksgiving is a fanciful one created in grammar schools across the nation. We imagine pilgrims sharing turkey, sweet potatoes, cranberry sauce and pumpkin pie with the Wampanoag tribe in Plymouth, Mass., in 1621.
In fact, there was no turkey on the table although there was water fowl, lobsters and clams, and five deer brought by the Indians. There were no cranberries, no sweet potatoes and no pumpkin pie, although there was some kind of squash.
Nonetheless, Americans still like to assemble the traditional foods that reflect our flawed notion of a historically correct menu and preserve the continuity of our culinary culture. So we have turkey, and corn bread, and pumpkin pie and sweet potatoes.
Except in New England, few families serve up lobster on Thanksgiving, yet lobster should be one of the most traditional of Thanksgiving foods because it more than likely appeared at the first Thanksgiving.
Although our family doesn’t have lobster every Thanksgiving, a lobster stew is an ideal part of a traditional Thanksgiving menu. Besides, it’s nice to serve it first, perhaps long before you sit down for dinner, and that way you keep the hungry hordes at bay with a delicious and traditional dish.
A historic stew
First, be aware that lobster stew is a two-day affair. That’s actually ideal for Thanksgiving because you can make it Wednesday night and then just reheat it Thursday. Lobster stew was once considered poor people’s food in Maine. Horror writer and Maine native Stephen King, whose family was poor when he was a child, describes how his mother kept lobster stew on the stove and would hide it out of embarrassment when company came.
The Pulitzer Prize-winning Maine poet Robert P.T. Coffin advised that lobster stew should be half lobster and half liquid. Sometimes you will find white wine or sherry in lobster stew, which is the first type of lobster stew recipe I’m familiar with. The recipe in “Accomplished Cook” (published in London in 1685) by Robert May uses claret. The lobster stock called for is made from the shells of the lobster you used to get the meat. Boil the shells in water to cover for two hours.
Lobster Stew
Makes 4 to 5 regular soup servings or 8 appetizer-type servings
Ingredients
Directions
- In a stockpot, bring an inch of water a boil over high heat, then add the live lobster, partially covered and cook on high for 12 minutes. Remove the lobsters and, when they are cool enough to handle, crack them and remove all the meat from the arms, claws, body, legs and fan tail. Chop into pieces not larger than ¾ -inch. Set aside along with any tomalley and coral you find in the lobster.
- Place the shells in a large pot and cover with water. Bring to a boil over high heat and boil for 1 hour. Remove and discard the lobster shells and strain the broth, setting aside 1 cup.
- In a large pot, melt 5 tablespoons butter over high heat then cook the lobster, stirring, until bubbling vigorously, about 2 minutes. Add the milk and cream slowly. Add the reserved 1 cup of lobster broth. Add the sherry and season with salt and pepper. Cook on high heat until tiny bubbles appear on the edges. Turn the heat off. Let cool and place in the refrigerator overnight.
- Bring water to a boil over high heat in the lower portion of a double-boiler. Pour the lobster stew into the top part of a double-boiler and heat, stirring occasionally, over medium-high heat until very hot but not bubbling, 10 to 15 minutes. Add the remaining tablespoon of butter and, once it has melted, serve with crackers.
Zester Daily contributor Clifford A. Wright won the James Beard / KitchenAid Cookbook of the Year Award and the James Beard Award for the Best Writing on Food in 2000 for “A Mediterranean Feast.” His latest book is “Hot & Cheesy” (Wiley) about cooking with cheese.
Photo: Lobster stew. Credit: Clifford A. Wright
A handsome bottle of amber-bronze maple syrup is a seasonless soldier, ready to transform lowly morning pancakes or waffles into vehicles for its sweet, dark nectar at a moment’s notice. After a satisfying weekend breakfast of maple-smoked bacon and … aaah, pancakes … the dutiful bottle returns to its sticky spot in the refrigerator door, ready to serve, yet not called to duty quite often enough.
American maple syrup originates in northern New England, in deep woods caked with lumpy February snow. Spring sun coaxes sugar maple sap up from the roots of the trees to the tips of their bare, majestic branches. As night falls, so do the temperatures (back to bitter freezing) and so too does the sap. This liquid rise and tumble from tree root to tree tip and back draws the rugged souls who turn raw maple sap into made-in-the-USA maple syrup.
“Sugaring,” as it’s known in the picturesque hills of Vermont, western Massachusetts, New Hampshire, Maine and beyond, involves many trees, each with metal bucket affixed to its bark to catch the day’s run of sap. Each bucket is emptied into a vat at the sugar house, usually a sturdy log cabin designed to collect the sap and boil it down at high heat. Eastman Johnson, a 19thcentury painter known as the American Rembrandt, captured the charm of this rural tradition — men in red plaid wool and winter caps leaning against the walls of a sugar house waiting for the sap to boil, sharing the heat of the fire.
Maple syrup is a completely natural sweetener from a sustainable, renewable resource. One way to salute the virtues of this indigenous sugar is to include it in savory dishes. This Thanksgiving, spike your sweet potatoes with maple. Your guests will thank you.
Sweet Potatoes with Maple Syrup and Pecan Crust
Ingredients
Directions
- Preheat oven to 350F. Wash the sweet potatoes and put them in the oven. Bake for about 45 minutes, until they are completely soft. Remove the potatoes from the oven and allow them to cool until they can be handled. Split them with a chef’s knife, and scoop the potato meat into a medium bowl. Discard the skins. Add the butter and cream and mash the potatoes until they are soft. Add half of the maple syrup and stir. Add milk if needed for smooth texture. Add salt and adjust to taste. Put sweet potatoes in a buttered dish such as a casserole dish or deep pie plate.
- Spread the pecans on a baking sheet lined with parchment paper. Pour the remaining maple syrup over them and stir. Add more maple syrup if needed — nuts should be lightly coated. Bake the nuts for about 10 minutes at 350F. Allow to cool enough to handle, then crumble them over the sweet potatoes. Bake the sweet potatoes with nuts for about 20 minutes or until warm throughout.
Susie Norris is a chocolatier, TV producer and author of the book “Chocolate Bliss.”
Photo: A sign advertising local maple syrup.
Credit: Susie Norris
When it comes to Thanksgiving, I remember how much effort my mother, who was born and raised in Japan, put into making our dinner authentic and splendid. She raised her five children in the U.S., Japan and Mexico. We celebrated Thanksgiving no matter where we lived. It was my mother’s favorite holiday.
When Thanksgiving neared, our Japanese staples like tofu, natto, daikon and miso were temporarily moved to the refrigerator in the basement to make room for the big turkey and all its accompaniments. Normally, our house smelled of miso soup in the morning. During this time of the year, however I would wake up in the middle of the night from the aroma of sweet apple pies baking. My mother liked to bake when it was quiet. We would come downstairs in our pajamas and join mother in the kitchen. She would let us cut out the dough into petals and leaves to decorate the pies, and taste her creations while they were warm. It was the one time of the year that I felt American in a buttery kind of way.
Because the traditional Japanese diet that we practiced in our house was butter-free, my mother knew it was necessary to build in a break from the rich holiday meals that lasted for weeks, if you include Christmas. We needed to clear our palates, ease our tummies — a haven dish, so to speak.
In the Japanese diet, rice and pickles are used to adjust your appetite back to neutral. My mother included these dishes in the holiday menu. During Thanksgiving dinner, I would fight with my brothers and sisters for the dark turkey meat, dig into the mashed potatoes and cranberry sauce, and steer clear of the brussels sprouts and sweet potatoes. But we all left our plates half-empty to accommodate the rice and tsukemono, Japanese pickles made with a combination of one or two vegetables like cucumbers, radishes and napa cabbage. Mother added sliced apples to the tsukemono to carry on the holiday theme.
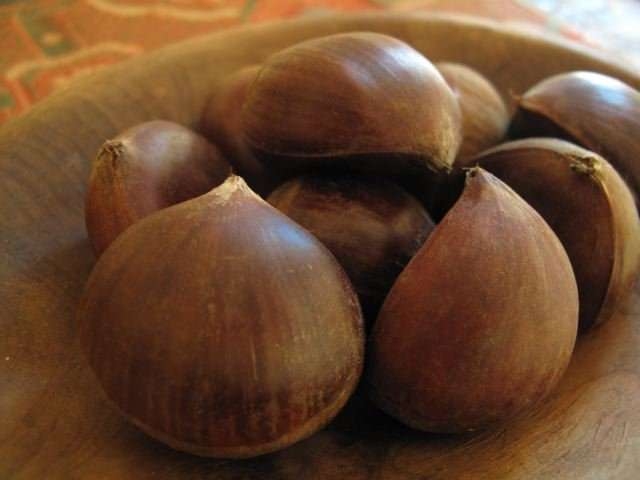
The rice dish that blended in particularly well was chestnut rice. The rice is cooked with fresh chestnuts and seasoned with a kombu-based stock, light soy sauce and sake. Peeling the chestnuts can be laborious, but they represent fall and add a nutty flavor to the rice.
You can serve the chestnut rice plain or sprinkled with roasted sesame seeds and salt. My friends Rob and Lucy have a beautiful yuzu tree in their garden. This year, they gave me a bag full of the ripe fruit, and I sprinkled yuzu rind on top of the chestnut rice. It adds a lovely citrusy perfume to the nutty rice. The yuzu rind also works with the pickles. These dishes make me appreciate the East-West tradition my mother left behind and the friends who help me brighten the season.
Chestnut Rice
Serves 6 to 8
Ingredients
1 teaspoon salt for cooking the chestnuts
2 cups short grain white rice
5 tablespoons sweet rice (mochi-gome)
2-inch piece kombu seaweed
2 teaspoons light soy sauce (usu-kuchi shoyu)
2¼ cups of water
2 teaspoons sake
For garnish:
1 tablespoon thinly sliced yuzu or lemon rind
1-2 tablespoons roasted black or white sesame seeds
Maldon salt to taste
Directions
- Soak the chestnuts in hot water for about 10 minutes to soften the shell and make the chestnuts easier to peel. Peel the chestnuts. Slice the meat in half. Then cut each half into four pieces.
- Bring a saucepan of water with the salt to a boil. Put the chestnuts into the boiling water and turn heat off and let stand for 10 minutes. This removes the surface starch. Drain the water and set the chestnuts aside.
- Combine the short grain rice and the sweet rice in a bowl. Rinse and drain, then put the rice in the rice cooker or saucepan with the measured water, soy sauce, sake and kombu. Soak for 20 minutes and up to 1 hour.
- Add the chestnuts to the rice and cook in the electric rice cooker, regular pot or donabe pot, as you would cook regular steamed rice, following manufacturer’s instructions.
- Remove the kombu. Discard (or eat it, if you like). Gently toss the chestnut rice. Garnish with sesame seeds, Maldon salt and yuzu rind. Serve immediately.
Quick Napa Cabbage and Apple Pickles With Yuzu Rind
Serves 4
Ingredients
1 red apple
3 teaspoons salt (Japanese ara-jio salt or fleur de sel)
½ teaspoon of thinly sliced yuzu or lemon rind (optional)
Directions
- Cut the root end of the napa cabbage and separate the leaves.
- Wash the leaves.
- Slice the white parts of the leaves at a 45-degree angle, about 2 inches in width. Cut the green part of the leaves into large bite-size pieces.
- Rub salt on the leaves and give them a gentle massage for about 1 minute. Put the leaves in a Japanese pickling press or in a bowl and cover with a plate. Put a heavy weight on top (5 pounds) to draw out the excess water from the leaves. Press for 3-4 hours in the fridge.
- Before serving, cut the apple into eight wedges. Slice each wedge into ¼-inch pieces. Add the apples to the cabbage leaves and press for 30 minutes.
- To serve, squeeze excess water from the cabbage. Serve the napa and apple pickles with yuzu rind if you like a citrus fragrance.
- The cabbage and apples will keep in the fridge for a couple of days.
Sonoko Sakai is a Japanese freelance writer and film producer who divides her time between Tokyo and Santa Monica. She has contributed stories and recipes to the Los Angeles Times, the former Los Angeles Herald Examiner, Saveur and Bungei Shunju (Japan). She is passionate about making soba by hand and, with master chef Akila Inouye of the Tsukiji Soba Academy, has created MazuMizu to teach Japanese home-cooking in Japan and abroad.
Top photo: chestnut rice with kombu, sesame and yuzu.
Photo and slideshow credit: Sonoko Sakai
I have a friend who never travels but is deeply curious about my own wandering and always eager for details. “So!” my stay-at-home friend asked one October a few years back as I was getting ready to leave for Tuscany, “What do Italians eat for Thanksgiving?”
“Um,” I said. “Thanksgiving? You know, it’s, like, an American holiday? Even Canadians don’t celebrate it, or at least not on the right day.”
But in Tuscany, when my children were young, we always celebrated Thanksgiving, even on the wrong day, and we honor it still on rare occasions when we’re all gathered together in Teverina. It’s a fine way to end the year. Late in November when the olives are pressed and the first of the new wine has been sampled, when summer crops are long gone but winter-hardy greens still stand in muddy fields, when the chestnuts have been gathered and the pigs are getting fat — it’s a good time for a feast.
If we often celebrated Thanksgiving on the wrong day (the Saturday after the official date), we also feasted with the wrong food. Wrong for an American Thanksgiving, that is. But arista di maiale, a spit-roasted loin of pork, flavored with rosemary, garlic and wild fennel pollen, basted with a good red sangiovese as it turns all day before a chestnut-wood fire, is not at all wrong for giving thanks in Tuscany. In fact, it’s the quintessential Tuscan harvest banquet, the centerpiece of any festive country meal. The farm house at that time of year is full of people, plenty of volunteers to stand by (sometimes, when it’s chilly, actually to stand in) the big living room fireplace, keeping watch over the arista, basting it regularly and rewinding the clockwork mechanism, the girarrosto toscano, that turns the spit and dings an alarm every 20 minutes or so when it runs down. Rewind, baste the arista with red wine and accumulating juices, refill the glasses with that same rugged wine, throw another log on the back of the fire, rake the coals forward under the girarrosto and relax until the next ding of the alarm bell. It’s a very comfortable way to cook, one that menfolk, especially, take to.
Pork is the focus, but what goes with it? Cranberry sauce? No way! We start the meal with zuppa di castagne, pureed chestnut soup, made with chestnuts from the trees at the end of the garden, which, my neighbors insist, are not castagne at all but marrone, a sweeter, finer variety like what French cooks use for marrons glaçés. It’s the most labor-intensive part of the meal: Each chestnut must be cut with a cross, then roasted in the oven until the shell separates, then the shell itself peeled away along with the tannic inner lining, a tiresome procedure but worth it for the lavishly creamy soup that results.
Here’s a sample menu, which has varied only slightly over the years:
Crostini neri (chicken liver crostini because no Tuscan feast is complete without them);
Crostini ai fagioli (with mashed beans, for the vegetarians in the crowd);
Zuppa di castagne (or zuppa di marrone, if you insist), garnished with a dollop of sheep’s milk raviggiolo (Tuscany’s answer to mascarpone);
Taglierini con ragù di funghi porcini (egg-rich pasta, whipped together by my daughter the pasta chef, the sauce made with wild porcini mushrooms gathered at the end of August, sliced and dried in the sun);
Arista di maiale with its reduced cooking juices;
Braised cavolo nero (aka Tuscan kale, lacinato kale, dinosaur kale) with more chestnuts buried in the greens;
Potatoes roasted in the oven in new olive oil, rosemary and garlic;
Salad of bitter greens dressed with new oil and wine vinegar;
Elizabeth David’s flourless chocolate cake (a family favorite that is mandatory at all feasts and celebrations).
No pumpkin or mince pie, no creamed onions, no dreaded sweet potatoes with marshmallows, no mashed squash or turnips or gelatin salad. All banned, every one of them. Truth to tell, I always found Thanksgiving a boring feast, full of bland mushy foods, centered around that too often overcooked and dried-out turkey, graced by a peculiar sour-sweet red sauce, and finished off with an array of desserts that sank like stones to the pit of one’s stomach. But a Tuscan Thanksgiving? If you dare …?
Here’s a recipe for arista that I developed for those who lack fireplaces or clock-work spits. It makes about 8 servings, depending on what else you serve with it. Note that you’ll need kitchen twine to tie the roast.
Arista (Roast Port Loin)
Ingredients
4 pounds pork loin, boned and ready to be rolled and tied
2 or 3 plump garlic cloves coarsely chopped
2 or 3 good-sized sprigs if rosemary, leaves only
1 big tablespoon Tuscan fennel pollen, if available
1 tablespoon sea salt
¼ cup extra virgin olive oil (divided)
1½ cups dry red wine
Directions
- Spread the roast out on a work counter with the boned side facing up. Chop together the garlic and rosemary and mix with the fennel, salt and 2 tablespoons of the oil. Use half this mixture to rub over the inside of the pork, then roll up the roast and tie in several places. Rub the remaining aromatic mixture all over the outside of the roast.
- You can prepare the roast ahead, even the night before you’re going to cook it, but refrigerate it if you’re going to keep it more than an hour. Bring the roast to room temperature before putting it in the oven.
- Turn the oven on to 350ºF.
- Set a large frying pan over medium-high heat and add the remaining 2 tablespoons of oil. When the oil is hot, drop the roast in the pan and sear it quickly on all sides, turning frequently, until it’s brown. Remove it from the heat and set on a rack over a roasting pan. Use a couple of tablespoons of the wine to deglaze the pan, then pour the juices over the roast.
- Transfer the pork to the preheated oven and roast for about 1½ hours, basting every 20 minutes or so with the red wine and then with the juices that accumulate in the pan. Now lower the heat to 325º F and continue roasting and basting another 1½ to 2 hours, depending on how well done you like your pork.
- Remove the pork from the oven and set aside for 10 minutes or longer before slicing. Strain the pan juices through a fine sieve and set aside to let the fat rise. Remove the fat layer (it’s great for frying potatoes) and boil down the juices to thicken them. Spoon the thickened juices over the thinly sliced pork and serve.
Nancy Harmon Jenkins is the author of several books, the latest of which is her newly revised “The New Mediterranean Diet Cookbook.” Her other food books include, “Cucina del Sole: A Celebration of the Cuisines of Southern Italy” and “The Essential Mediterranean,” which looks at a dozen foods key to understanding Mediterranean cuisines. She also wrote “Flavors of Tuscany,” “Flavors of Puglia” and “The Mediterranean Diet Cookbook.” She is working on a book on Atlantic salmon. A former staff writer with The New York Times, Nancy continues to contribute to the Times in addition to writing for The Washington Post, Saveur, Food & Wine and other national publications. She currently divides her time between a Tuscan farmhouse and a home on the coast of Maine where she was born and raised. She has lived and worked throughout the countries of the Mediterranean, at various times making a home in Spain, France, Italy, Lebanon, and Cyprus as well as in Hong Kong and England. You can read more of her food writing on her site, NancyHarmonJenkins.com.
When pulled out of the oven, the mahogany patina of our crisply roasted 18-pound turkey, moist at the thighs with clear juice, was successful confirmation of hours of maddeningly alluring aromas. It was the perfect turkey: crisp skin, joints that fell off and juicy butter-like flesh that sliced cleanly and easily. You too can make the perfect turkey by following a few important tips.
Cooking a moist bird
Many people claim that they don’t like turkey because it’s too dry. A roasted turkey should never taste dry. If a turkey is “too dry” then it’s been overcooked. That’s the only reason turkey breast (white meat) is dry and crumbly.
A turkey is a naturally moist and delicious tasting bird. So, when cooking turkey you must pay attention. One reason people overcook turkeys is because the United States Department of Agriculture, many cookbooks, supermarkets, everybody, instruct you to cook the turkey until you have an internal temperature of 180 F. Instead, it should be 160 F. To achieve this, you should always use a quick-read thermometer, use it multiple times in multiple places and never rely solely on a pop-up timer in the turkey or any roasting rules-of-thumb.
When roasting turkeys it is important to keep the breast meat protected from becoming overcooked, because it will cook faster than the legs and thighs, the dark meat. Convection ovens will help, but if you don’t have one do this by placing a triangular piece of doubled-up cold aluminum foil over both halves of the breast about 1 to 1½ hours before the bird is done. You don’t always have to do this. It depends on your oven and how well air circulates (i.e. if you have a convection oven) and if there are hot spots. You need to eyeball it to be sure. If the top of the turkey, the breasts and backbone area are getting way too brown before it’s done, then use the aluminum foil.
Picking a bird
About 99 percent of the turkeys sold in the United States at Thanksgiving are the breed known as broad-breasted white. These are only kind of turkey sold in the supermarket and they are almost all sold frozen or defrosted. Your other options are wild turkey and heritage turkeys. A heritage turkey is an heirloom breed of turkey that long ago went out of popularity and is being revived by some turkey farmers. I’ve cooked wild turkey and have used the heritage known as the bourbon red and both were fantastic turkeys. Remember, though, that a wild turkey will not have the enlarged breast typical of supermarket turkeys.
Prepping the bird
If possible, always buy a fresh turkey, never frozen. A frozen turkey will be tougher because the natural juices crystallize and when they defrost the texture changes. If your turkey is defrosted place softened butter in between the skin and breast, or just butter the top of the turkey and use a triangle of aluminum foil as previously described. Always defrost the turkey in the coldest spot of the refrigerator, a process that will take about three days. Do not defrost quicker than that. A 15- to 18-pound turkey is plenty for 10 diners with plenty, but not a ridiculous amount, of leftovers.
Before preparing the turkey for roasting — and this is a step nearly everyone doesn’t do — always check your oven thermostat to make sure it is accurate; turn the oven on to 350 F with an independent thermometer placed in the center rack of the oven. Check the independent thermometer against the oven setting after 45 minutes and if they are not calibrated make the proper correction when roasting.
Using a fresh as opposed to frozen turkey will help in having a non-crumbly meat bird, although you can use the aluminum foil method and/or you can separated the breast skin from the flesh, pushing in gently with your fingers to do this and then rub a stick of soft butter underneath the skin.
You can also drape a butter-soaked cheesecloth over the breast meat. Never stuff a turkey before you intend on roasting it because bacterial development is a sure probability; so stuff it, truss it, roast it. The rule of thumb for roasting is 15 minutes per pound for stuffed turkey — but be careful with rules of thumb.
Taking the temperature
The turkey should be basted every 20 minutes. This will help the bird look golden brown and crispy. The turkey is done when the entire bird is golden brown and the juices run clear from a hole made by a skewer stuck in where the leg meets the body. This means that it should have an internal temperature of 160 F measured with an instant-read thermometer pierced deep into the stuffed cavity. Make sure the thermometer is not resting on a bone. If that temperature is reached before you are ready to serve, turn the oven down to 150 F and let the turkey rest there. It’s important to keep taking the turkey’s temperature plenty of times in different areas, especially the breast. You will see many cookbooks and temperature guides saying a turkey should be roasted until 180 F internal temperature, but cooking your turkey to this temperature will only lead to dry, crumbly meat.
It’s always better, if you still feel the anxiety, to undercook your bird rather than overcook it. If you overcook turkey everyone is unhappy. If you undercook it, you can slice off the meat for the first serving and then return it to the oven for more roasting.
Always let the bird rest 25 to 30 minutes outside the oven before carving.
A stuffed 18-pound turkey will take 4½ hours to cook at 350 F. As far as the advice about brining turkeys (I did it one year and it was fine, but no one noticed), turning them upside down, roasting them at 450 F, and other snippets of advice you’ve heard. None of it is necessary.
Zester Daily contributor Clifford A. Wright won the James Beard / KitchenAid Cookbook of the Year Award and the James Beard Award for the Best Writing on Food in 2000 for “A Mediterranean Feast.” His latest book is “Hot & Cheesy” (Wiley) about cooking with cheese.
Photo: Thanksgiving turkey. Credit: Clifford A. Wright