Clifford Wright
From:
Santa Monica, California
Books by author
Hot & Cheesy

A Mediterranean Feast

The Best Soups in the World
Bake Until Bubbly: The Ultimate Casserole Book
Some Like It Hot: Spicy favorites from the world’s hot zones
Little Foods of the Mediterranean
Real Stew
One-Pot Wonders
Articles by Author

Given how easy it is to make harīsa, the ubiquitous chile paste of North Africa, I’ve never had much use for those inferior tubes of the stuff. Harīsa is the most important condiment used in Algerian and Tunisian cooking, and you need to make this recipe and keep it in the refrigerator before attempting any other Algerian or Tunisian recipe you might have in my or others’ recipes.
More from Zester Daily:
It’s hard to believe that so essential a condiment could evolve only after the introduction of the New World capsicum after Columbus’ voyages. It’s thought that the chile entered North Africa by way of the Spanish presidios that dotted the coast in the 16th century or came up from West Africa overland from the Portuguese holdings there.
Harīsa comes from the Arabic word for “to break into pieces,” which is done by pounding hot chiles in a mortar, although today a food processor can be used. This famous hot chile paste is also found in the cooking of Libya, and even in western Sicily where cùscusu is made. In Tunisia it would be prepared fresh at home. The simplest recipe is merely a paste of red chile and salt that is covered in olive oil and stored.
Harīsa is sold in tubes by both Tunisian and French firms. The Tunisian one is better, but neither can compare to your own freshly made from this recipe.
I first became intrigued with making harīsa from a preparation made by Mouldi Hadiji, my Arabic teacher more than 30 years ago. I concocted this version, based on a Berber-style one I had in Djerba, from a recipe description given to me by a merchant in the market in Tunis, who unfortunately provided measurements that could last me a century (calling for 50 pounds of chile).
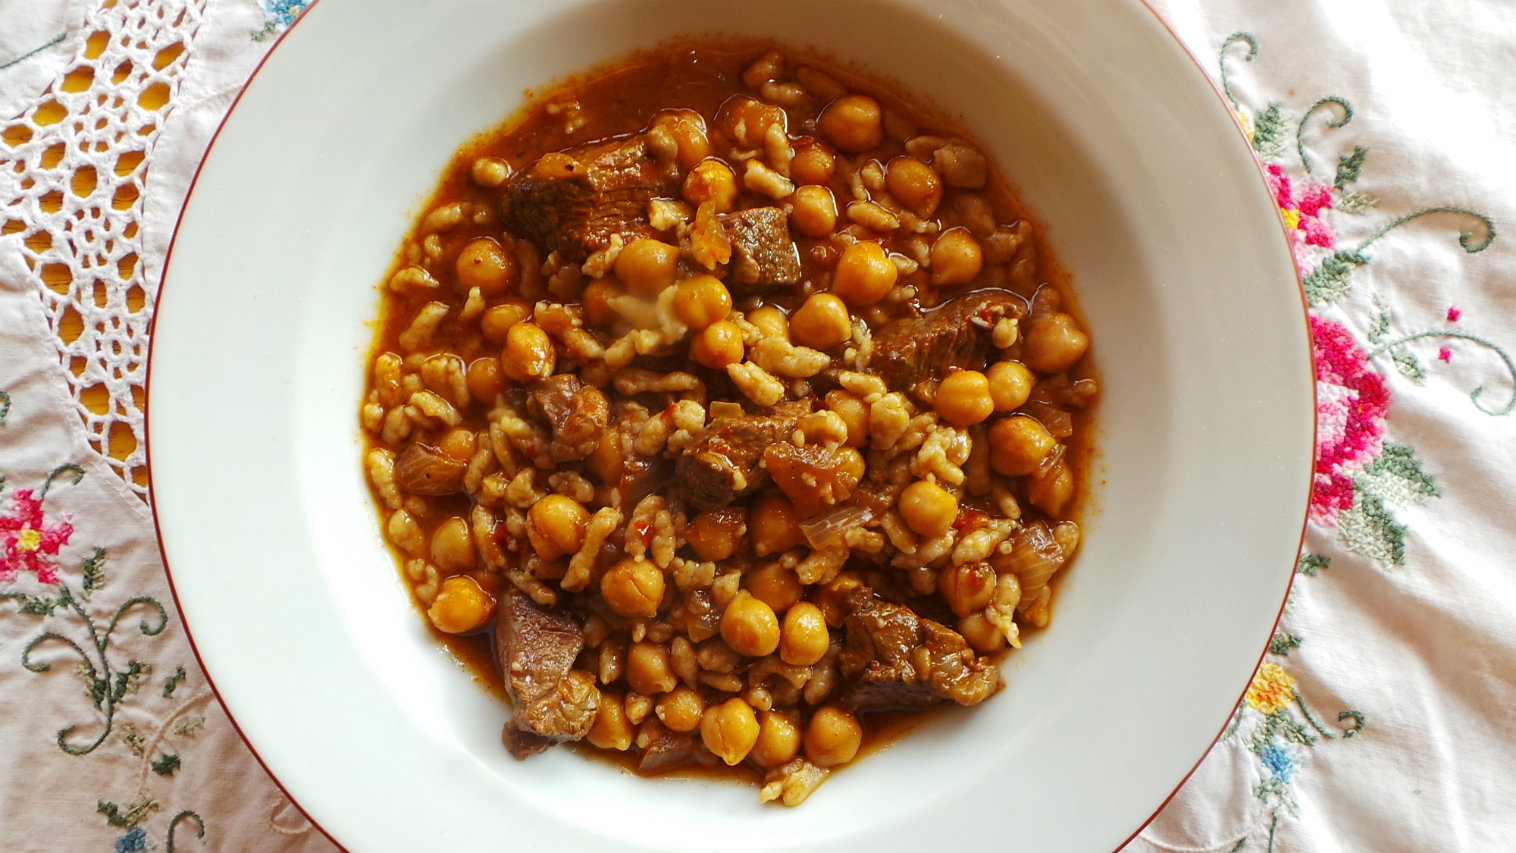
Tlitlu bi’l-Lahm (fresh pasta pieces with lamb in spicy harīsa sauce). Credit: Copyright 2016 Clifford A. Wright
Some cooks also use mint, onions or olive oil in their harīsa. You also don’t have to use the exact dried chiles I call for, but at least one should be quite piquant.
Be careful when handling hot chiles, making sure that you do not put your fingers near your eyes, nose or mouth, or you will regret it. Wash your hands well with soap and water after handling chiles. After you make your first harīsa, with all the modern conveniences, I hope you can appreciate what exacting work this was, making it in the traditional mortar — 50 pounds of the stuff!
Harīsa
Prep time: 1 1/4 hours
Yield: 1 cup
Ingredients
2 ounces dried Guajillo chiles
2 ounces dried Anaheim chiles
5 garlic cloves, peeled
2 tablespoons water
2 tablespoons extra virgin olive oil
1/2 teaspoon freshly ground caraway seeds
1/2 teaspoon freshly ground coriander seeds
1 1/2 teaspoons salt
Extra virgin olive oil for topping off
Directions
1. Soak the chiles in tepid water to cover until softened, 1 hour. Drain and remove the stems and seeds. Place in a blender or food processor with the garlic, water and olive oil and process until smooth, stopping occasionally to scrape down the sides.
2. Transfer the mixture to a small bowl and stir in the caraway, coriander and salt. Store in a jar and top off, covering the surface of the paste with a layer of olive oil. Whenever the paste is used, you must always top off with olive oil making sure no paste is exposed to air, otherwise it will spoil.
Variation: To make a hot harīsa, use 4 ounces dried Guajillo chiles and 1/2 ounce dried de Arbol peppers.
Note: To make ṣālṣa al-harīsa, used as an accompaniment to grilled meats, stir together 2 teaspoons harīsa, 3 tablespoons olive oil, 2 tablespoons water and 1 tablespoon finely chopped fresh parsley leaves.
Main photo: Harisa. Credit: Copyright 2016 Clifford A. Wright

Families all seem to have their own Christmas classics — roast turkey, baked ham, crown roast or pork, or prime rib. Many Italian-Americans will have lasagna or a feast of seven fishes. One spectacular preparation for a change of pace is to follow some families and make the classic Sicilian Christmas tummàla.
Tummàla is a timbale of rice, a magnificent concoction of layers of baked rice, poached chicken, veal meatballs, hard-boiled eggs, cheeses and a cheesed omelet to create a golden mantle.
More from Zester Daily:
» Sicilian spaghetti and wine in one dish
» Reviving Italian-American classic recipes
Although a Christmas specialty, Sicilian cooks prepare tummàla for all sorts of celebrations when a grand culinary gesture is warranted. It is considered a representative example of cucina arabo-sicula, a contemporary folkloric expression of a supposed Arab culinary sensibility found vestigially in the contemporary Sicilian kitchen, some 800 years after the last of the Arab-Sicilian population disappeared. At the very least, it is considered Arab-Sicilian because the Arabs introduced rice to the island in the ninth or 10th century.
The Italian translation of the Sicilian tummàla is timballo, leading one to believe that this dish is derived from the French timbale, a baking mold in the shape of a kettledrum, hence its name.
In fact, the name comes either from Muhammed Ibn al-Thumna, the 11th-century emir of Catania, or from tummala, the purported Arabic name for a certain kind of plate, although that etymology is not confirmed.
Assembling a Sicilian classic
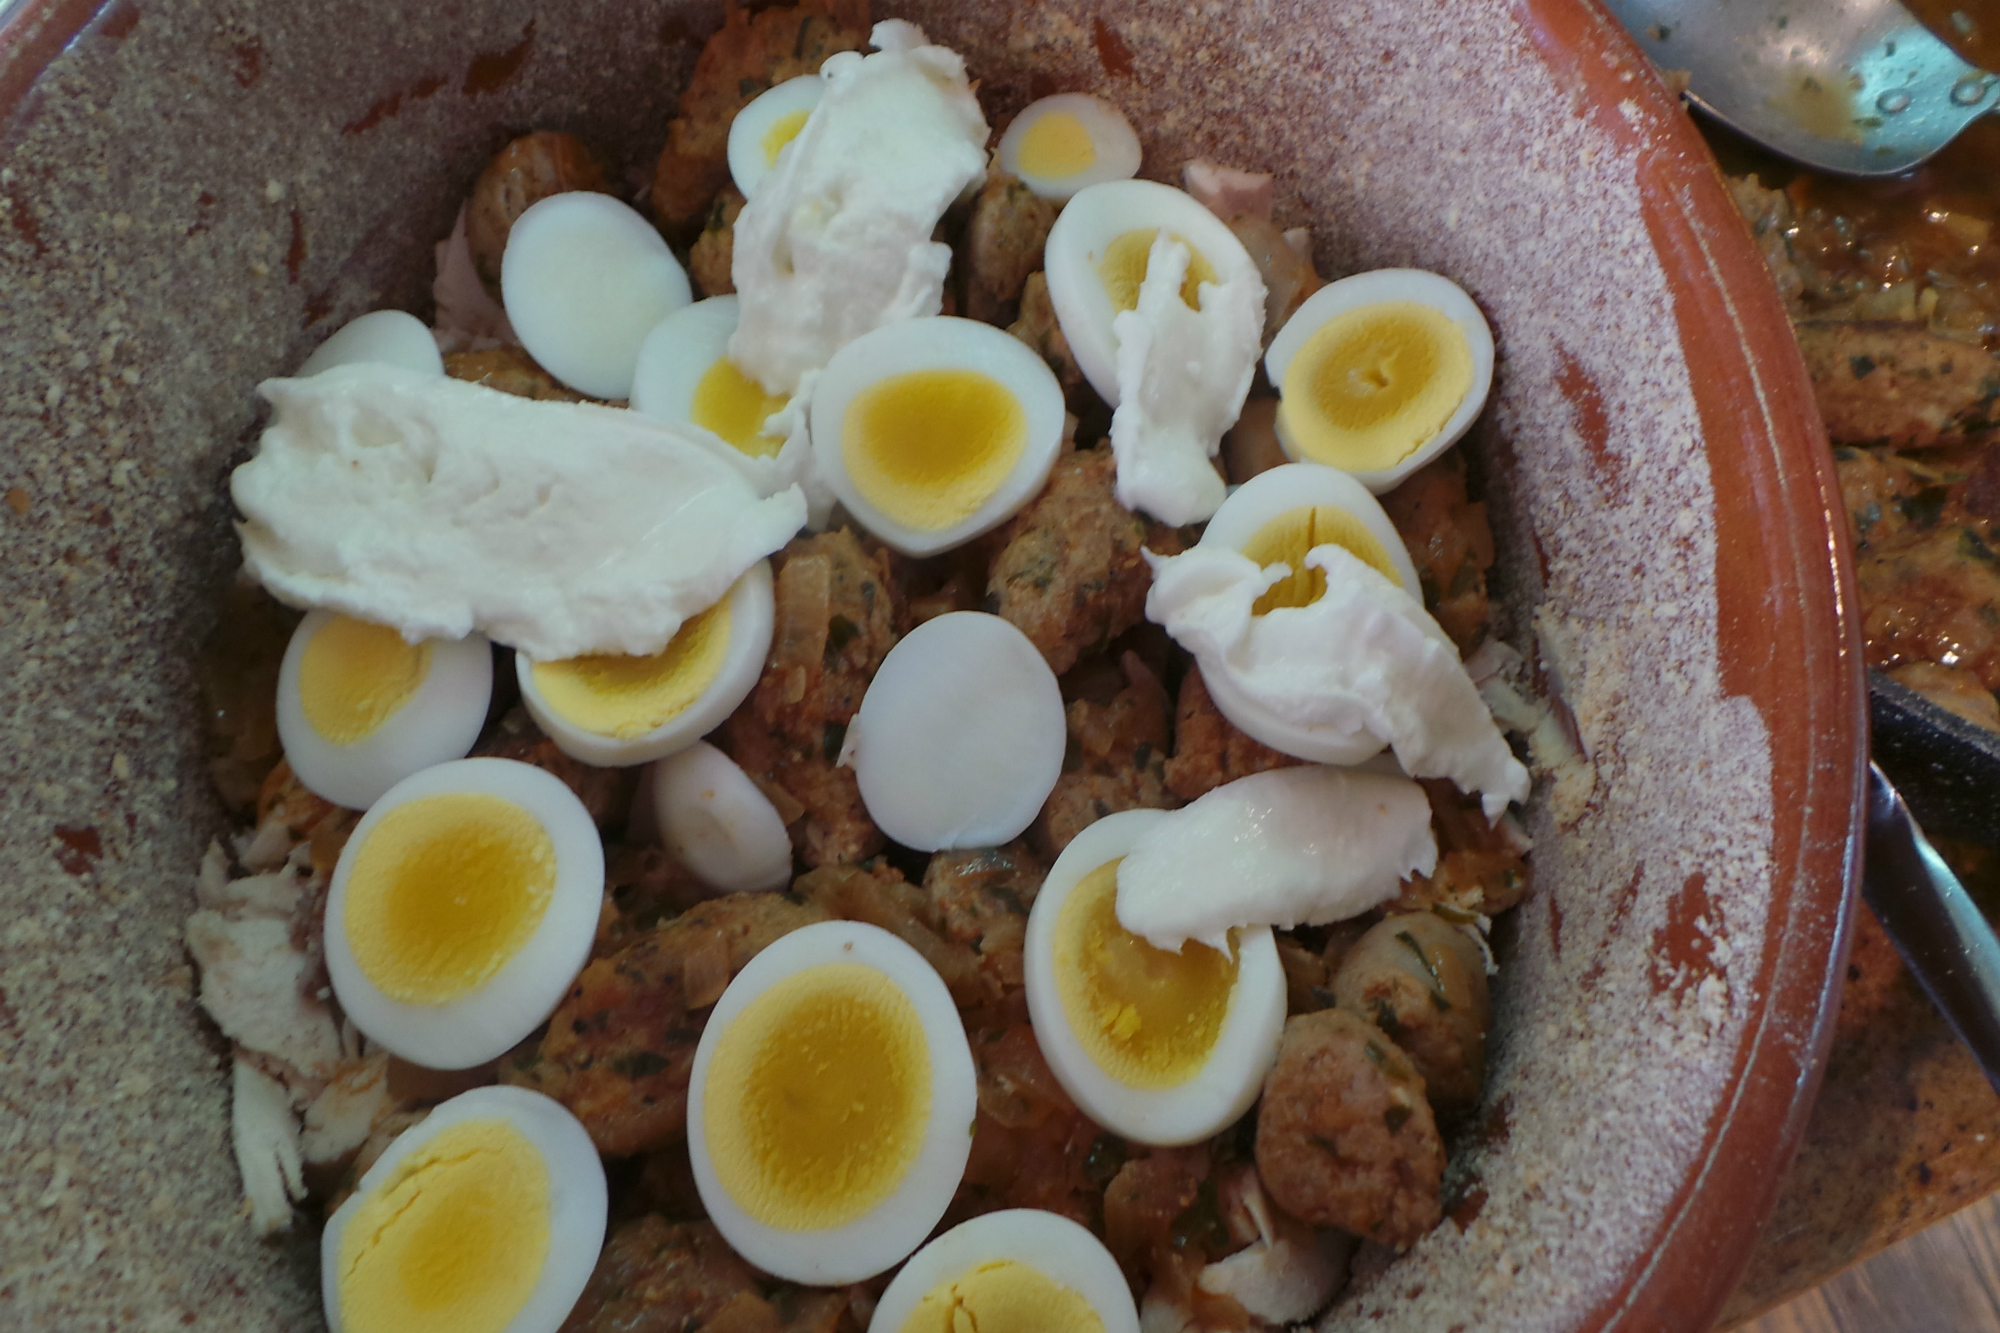
Assembling tummala. Credit: Copyright 2015 Clifford A. Wright
Traditionally, this dish is made with a chicken with its unborn eggs. The cheeses called for are pecorino pepato, caciocavallo and fresh mozzarella. Pecorino pepato is a young pecorino cheese made with peppercorns thrown into the curd. Caciocavallo is a spun-curd cow’s milk cheese and can be replaced with provolone.
Mozzarella is used in place of fresh tuma, a fresh pecorino cheese that is only found at the source of production, so it’s not available in this country. It is possible to find a young tuma aged between three and six months in Italian markets in the United Sates. One can also try Internet sources such as Murray’s Cheese or igourmet.com.
Finally, don’t let the list of ingredients intimidate you. Great length, in this case, does not mean great difficulty.
Sicilian Christmas Tummàla
Prep time: 1 1/2 hours
Cooking time: 3 1/2 hours
Yield: 8 to 10 servings
Ingredients
One 3-pound chicken
2 medium onions, cut into eighths
2 celery stalks, cut into chunks
4 ripe tomatoes, peeled, seeded and quartered
5 fresh parsley sprigs
10 black peppercorns
1/2 cup fresh bread crumbs
3 tablespoons milk
3/4 pound ground veal
3/4 pound pecorino pepato cheese, grated, divided
1 large garlic clove, finely chopped
6 tablespoons finely chopped fresh parsley, divided
1/2 teaspoon salt 1/4 teaspoon freshly ground black pepper
7 large eggs (2 hard-boiled and sliced)
1 medium onion, chopped
2 tablespoons pork lard
1/2 pound mild Italian sausage, sliced 1/2 inch thick
1/4 pound pork rind (optional), cut into thin strips
2 tablespoons tomato paste
2 1/2 cups (1 1/4 pounds) short grain rice, such as Arborio rice, soaked in tepid water to cover for 30 minutes or rinsed well in a strainer, drained
Unsalted butter as needed
1 cup dry bread crumbs
1/2 pound fresh mozzarella cheese, sliced
1/4 pound caciocavallo cheese, thinly sliced
1/4 pound pecorino cheese, grated
Directions
1. In a large stockpot that will fit the chicken comfortably, place the chicken with its gizzards, onions, celery stalks, tomatoes, parsley sprigs and peppercorns. Cover with cold water and bring to a near boil over high heat. As soon as the water looks like it is going to boil, reduce immediately to a simmer and cook the chicken until the meat falls off the bone when pushed with a fork, without letting the water boil, 2 hours. Don’t let the water bubble; otherwise it toughens the chicken.
2. Meanwhile, prepare the veal croquettes. In a bowl, soak the fresh bread crumbs in the milk. If the mixture looks soggy, squeeze the milk out. Add the veal, half of the pecorino pepato, the garlic, 2 tablespoons chopped parsley, 1/2 teaspoon salt and the pepper. Lightly beat 1 egg and add to the mixture. Mix well with a fork or your hands. Form croquettes the size and shape of your thumb. Cover and put aside in the refrigerator.
3. Drain the chicken, saving all the broth in a smaller pot. Remove and discard all the skin and bones from the chicken and cut the meat into small pieces.
4. In a large sauté pan, cook, stirring, the chopped onion in 1 tablespoon lard over medium heat until golden, about 8 minutes. Remove from the pan and set aside. Add the remaining lard to the pan and cook the veal croquettes until they are browned. Add the sausage and the pork rind and cook for 10 minutes. Add the sautéed onion, the remaining 4 tablespoons parsley and the tomato paste diluted in 1 cup hot water. Cook over low heat for 10 minutes. Set aside.
5. Preheat oven to 350 F.
6. Bring the chicken broth from step 1 to a boil and reduce by one-third. Pour 2 1/2 cups broth into a heavy saucepan, bring to a boil, add the rice and about 1 1/2 teaspoons salt. Cook, covered and without stirring, until al dente, about 15 minutes. Pour about 3/4 cup broth into the veal-sausage mixture.
7. Drain the rice, if necessary, and mix it with the remaining pecorino pepato.
8. Butter a deep baking dish or baking casserole and spread 1 cup dry bread crumbs on the bottom, shaking vigorously to spread them thin so that they coat the bottom of the baking dish, dumping out any excess.
9. Spread the rice on top of the bread crumbs, about 3/4 inch deep. Spread three-quarters of the chicken and half of the veal croquettes and sausage mixture on top of the rice. Make a layer of hard-boiled egg. Layer the mozzarella cheese on top of the eggs. Cover with the remaining veal and sauce. Spread on a layer of caciocavallo cheese. Mix the remaining chicken with the remaining rice and spread it on top.
10. Beat the remaining 4 eggs lightly and combine with the pecorino cheese. Season with salt and pepper. Pour the sauce evenly over the top.
11. Bake until the top has a nice golden crust, about 1 hour. Check from time to time to be sure it doesn’t dry out. The tummàla can be served directly from the baking dish with the pan sauces or with tomato sauce.
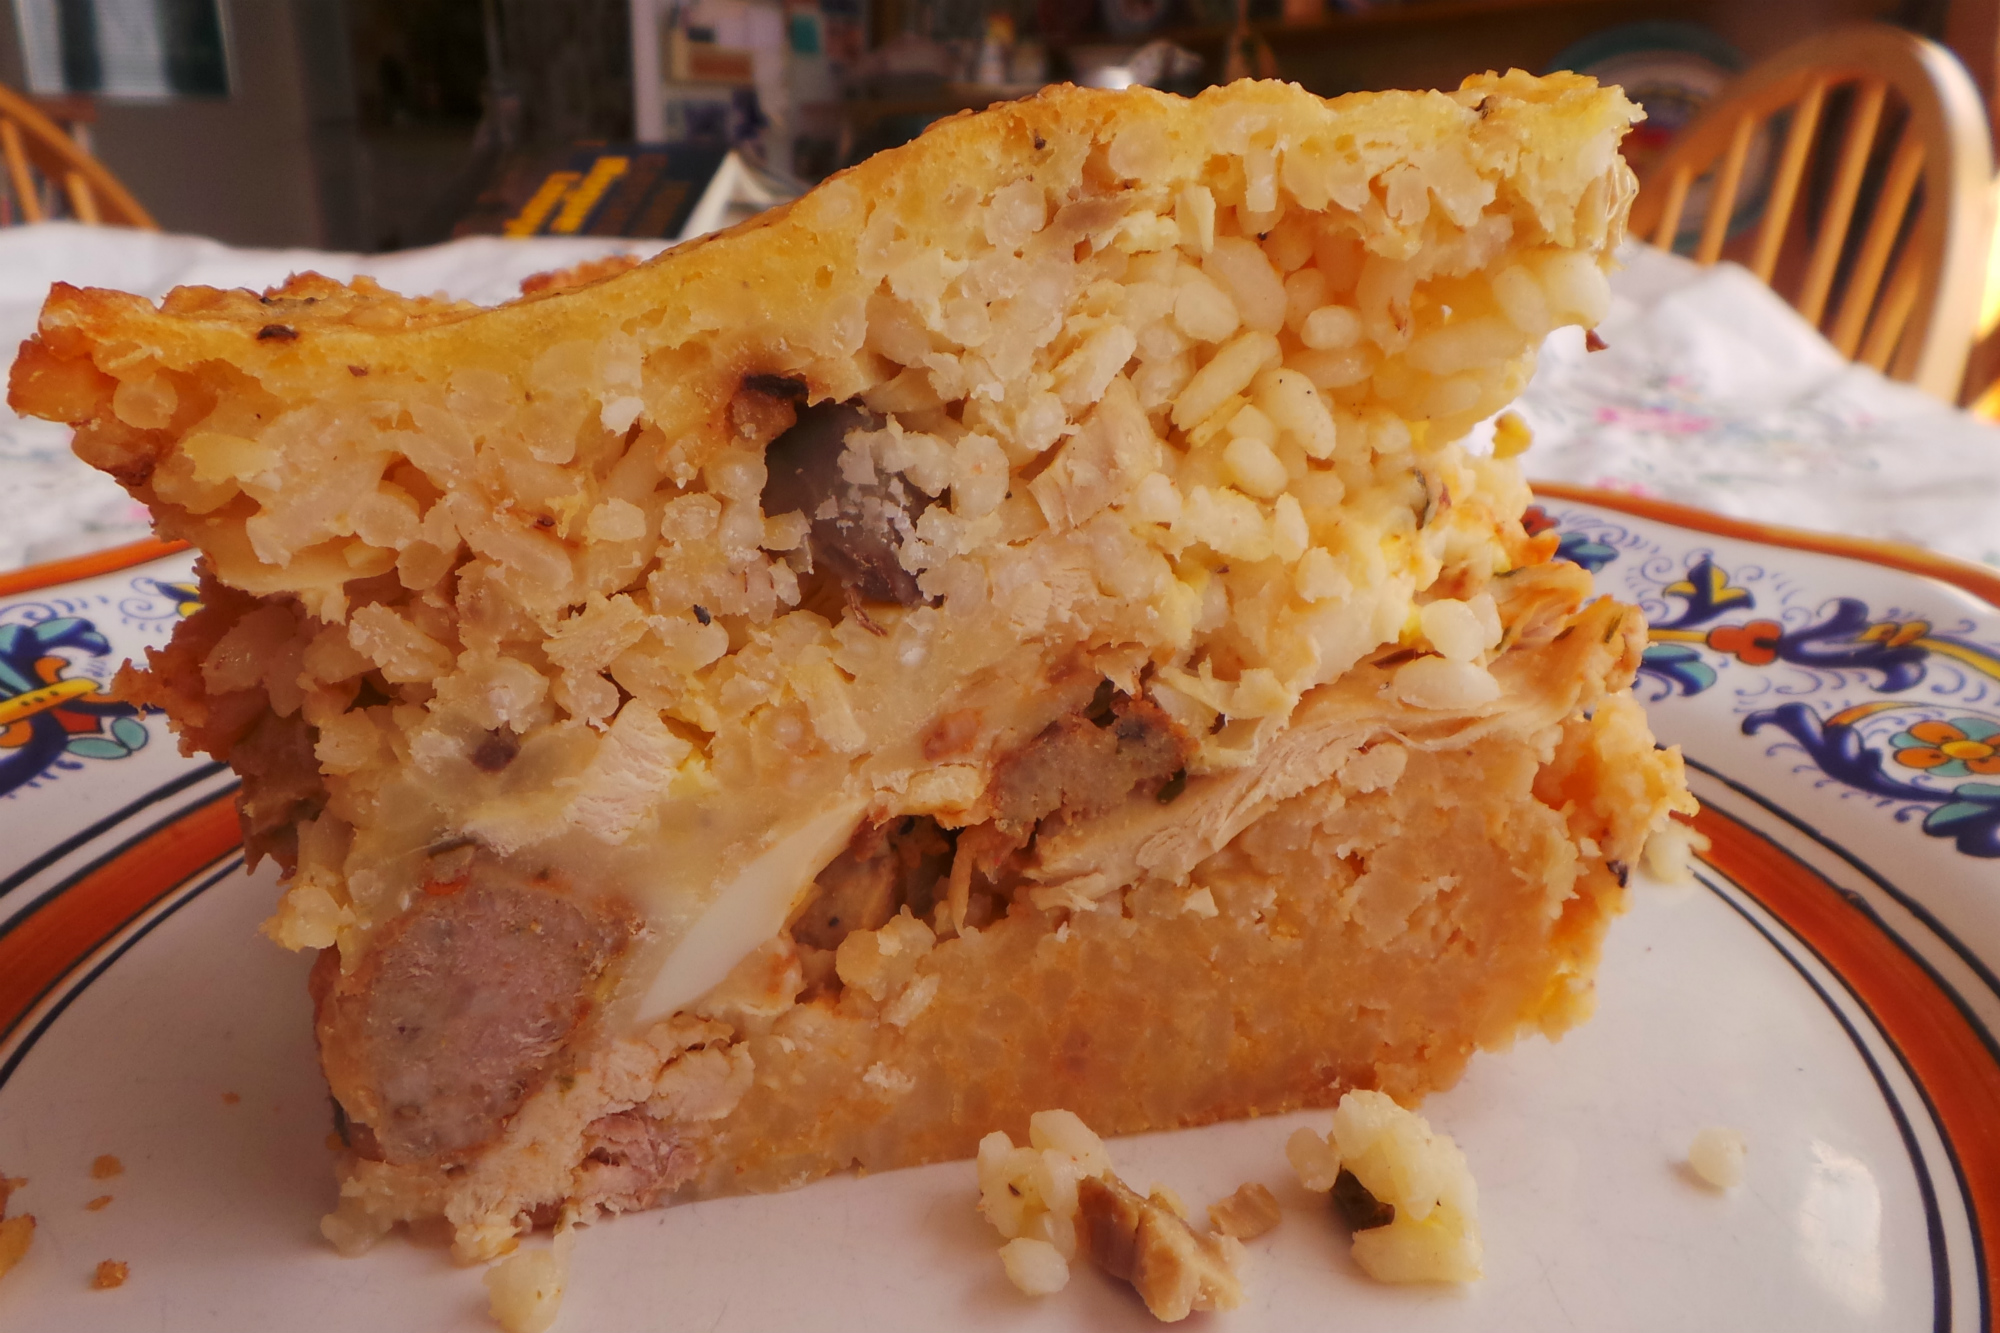
Tummala. Credit: Copyright 2015 Clifford A. Wright
Main photo: Tummàla, a Sicilian Christmas specialty. Credit: Copyright 2015 Clifford A. Wright

Thanksgiving is surely a time for gastronomic excess, but at the same time, unless your children are adult cooks as mine are and the work is joyfully parceled out, the task of cooking Thanksgiving dinner can become burdensome and stressful. But dinner, especially the Thanksgiving sides, shouldn’t be stressful.
When I was a kid, I remember it was my aunt or my mom cooking and we kids played football in the cold late November air. Entering the house to the aroma of that roasting turkey is as indelible a memory as any.
Simple, satisfying green Thanksgiving sides
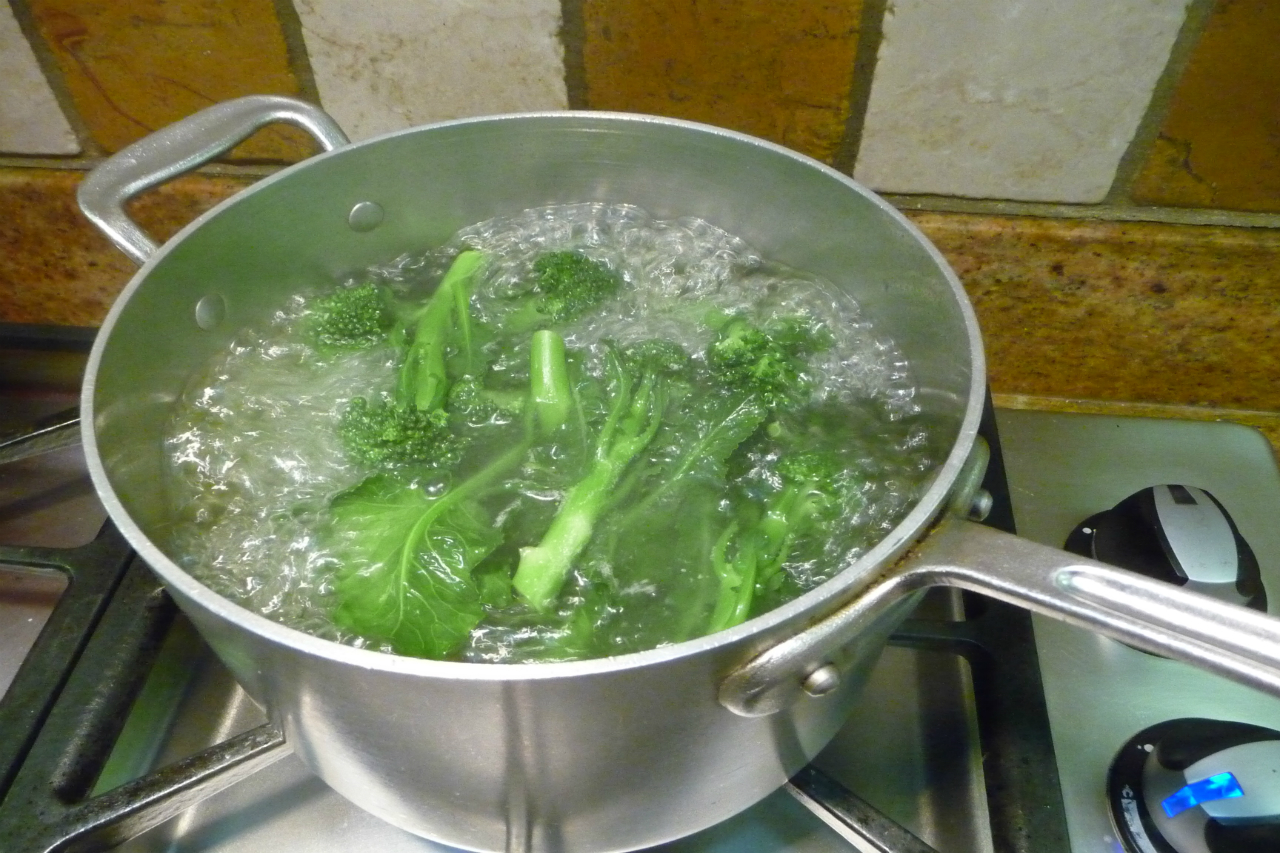
Boiling broccoli for broiled broccoli. Credit: Copyright 2015 Clifford A. Wright
These days we all cook, and there is much hilarity as we cook and eat all day. We gather about 11 a.m. and shoot for the turkey carving around 4:30 p.m.
I can’t say our food is simple — it’s mostly labor-intensive — but there are three wonderful Thanksgiving side dishes that can fit right into the program of a too-tired cook or a teeny kitchen. I call them the three B’s, three vegetable recipes that are perfect for Thanksgiving, easy to do, more-or-less traditional and all begin with the letter B: broccoli, beans and Brussels sprouts.
Broiled Broccoli
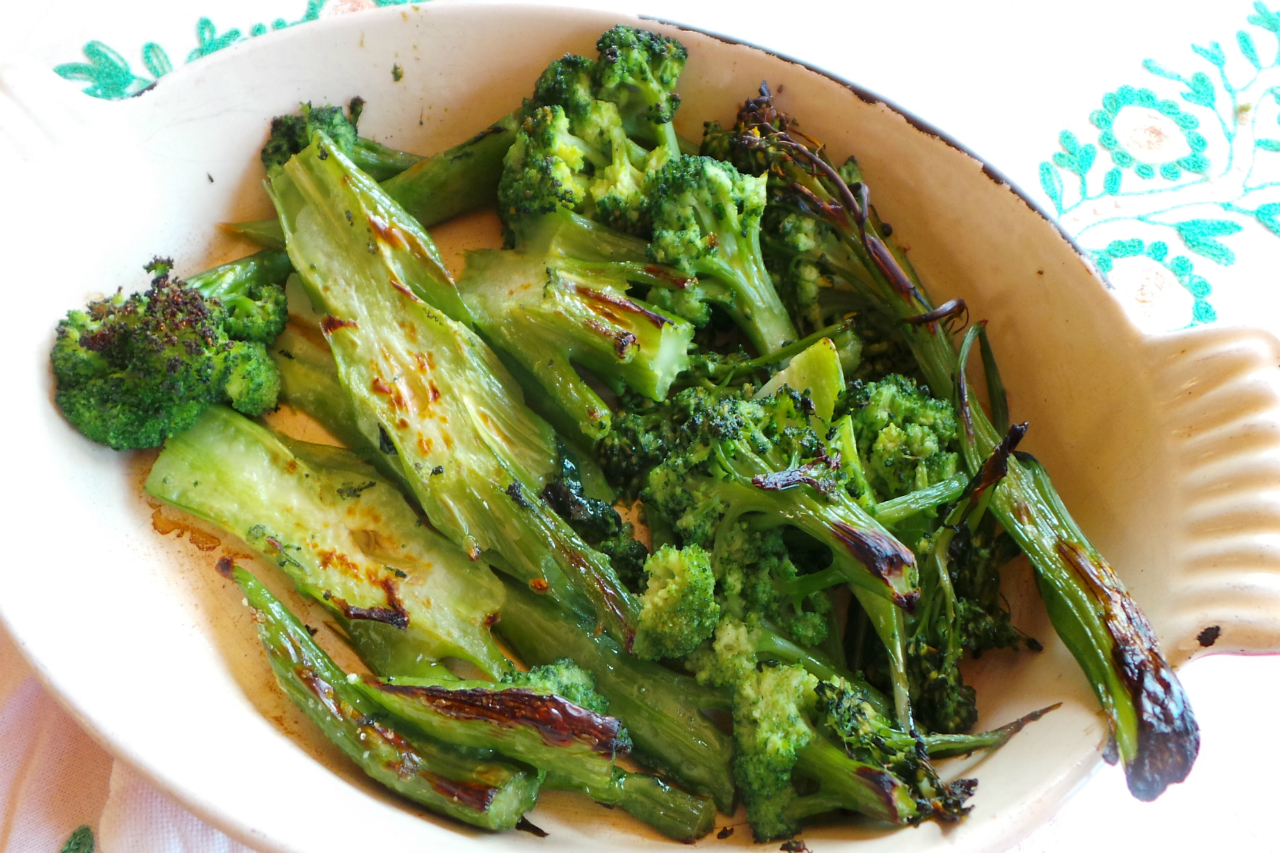
Broiled broccoli. Credit: Copyright 2015 Clifford A. Wright
I like to make this preparation when I’ve cooked something else in the oven that is either richer or more complex and has taken more of my time, such as a roast turkey. It seems almost no one has had broiled broccoli, so you’ll get positive comments. And it’s so simple it barely needs a recipe. The turkey is going to rest for 20 minutes, so that’s the perfect time to raise the oven to “broil” and cook this.
Prep time: 15 minutes to preheat broiler
Cook time: 10 to 15 minutes.
Yield: 6 servings
Ingredients
3 pounds broccoli
Extra virgin olive oil
Salt and freshly ground black pepper to taste
Directions
1. Preheat the broiler.
2. Bring a large pot of water to a vigorous boil and plunge the broccoli in, stems first. Boil until the broccoli is still bright green and slightly tender when skewered into the stem portion, 6 minutes, but not more. Drain well.
3. Slice the stem at a sharp diagonal, then slice the florets in half. Toss the broccoli in a large bowl with the olive oil, salt and pepper. Arrange the broccoli, cut side up, on a broiler tray. Broil until blackened on the edges, 5 to 10 minutes. Serve hot.
Green Beans with Pine Nuts
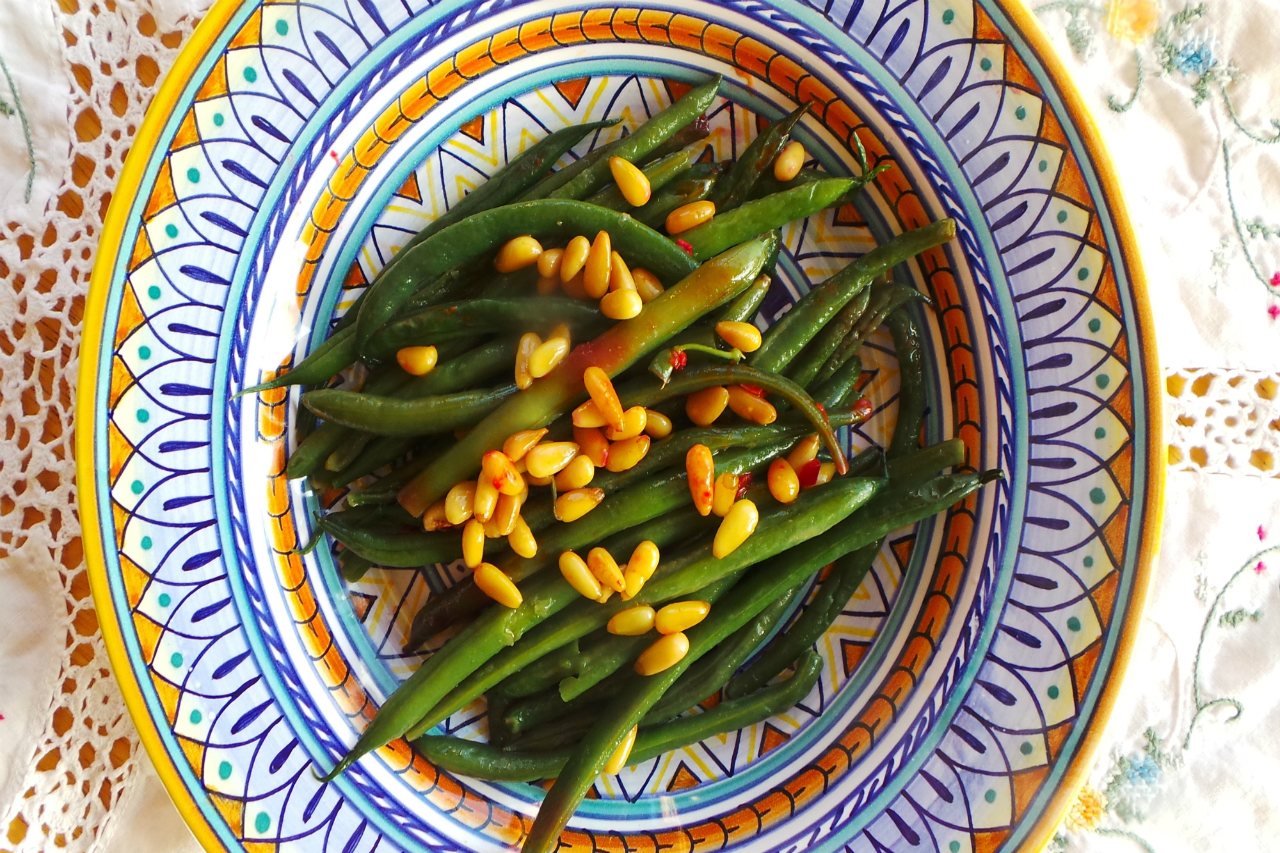
Green beans with pine nuts. Credit: Copyright 2015 Clifford A. Wright
This is about the easiest way to make green beans sparkle in taste and color. This preparation occasionally appears on our Thanksgiving table as it can be assigned to someone who feels they are not a good cook and they won’t mess it up. It makes a nice room-temperature antipasto the day after.
Prep time: 10 minutes
Cook time: 12 minutes
Yield: 8 servings
Ingredients
2 pounds green beans, trimmed
1/4 cup extra virgin olive oil
4 to 6 tablespoons pine nuts
Directions
1. Bring a large pot of water to a boil and cook the green beans until no longer crunchy, about 10 minutes. Drain the beans and cool quickly under cold running water so that they stop cooking, and then let drain further.
2. In a large sauté pan, heat the olive oil over medium-high heat, then cook the pine nuts until golden, about 1 minute. Add the green beans. When the pine nuts begin to brown, take the pan off the heat and serve.
Griddled Brussels Sprouts
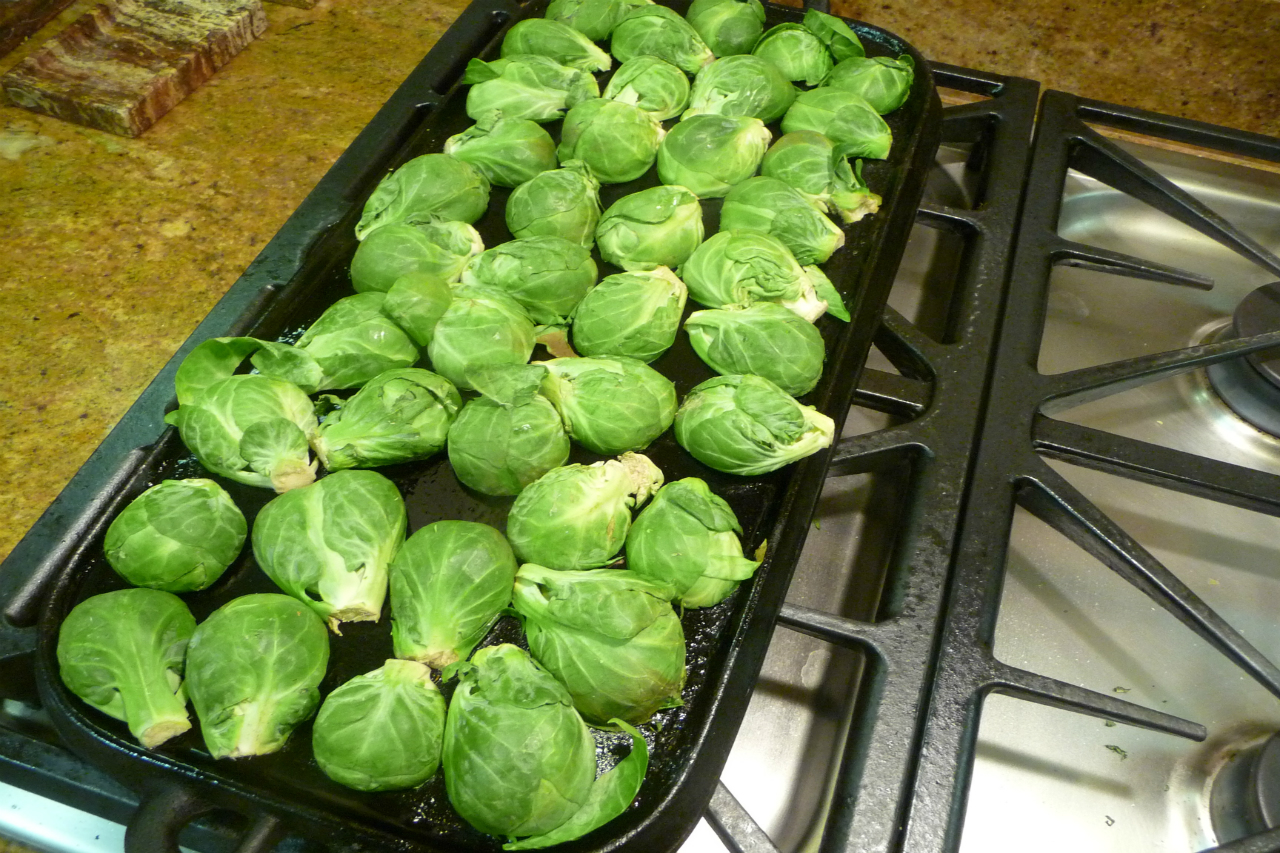
Griddled Brussels sprouts. Credit: Copyright 2015 Clifford A. Wright
This is as simple as it gets. Typically we serve this preparation as a kind of appetizer, as it’s easy to cook, easy to eat and tossed with salt — just perfect with a pre-turkey drink.
Prep time: 10 minutes
Cooking time: 8 minutes
Yield: 4 to 6 servings
More from Zester Daily
» A game plan for the perfect last-minute Thanksgiving
» Potatoes you’ve never heard of, but should be mashing
Ingredients
Extra virgin olive oil
1 pound fresh Brussels sprouts, cut in half lengthwise
Coarse sea salt
Directions
Preheat a cast-iron skillet or griddle over medium heat for 10 minutes. Pour oil into the skillet or griddle until slightly thicker than a film of oil. Place the Brussels sprouts in the skillet, cut side down. Cook until blackened golden brown, then turn with tongs and cook until the convex side is also browned, 5 to 8 minutes in all. Sprinkle with sea salt, drizzle with more olive oil, if desired, and serve hot.
Note: By the time you place the last cut Brussels sprout down, you will probably need to begin turning the first.
Main photo: Griddled Brussels sprouts. Credit: Copyright 2015 Clifford A. Wright

Outside of the candy that the kids collect, Halloween may be the only American holiday that is not associated with a particular feast or recipe.
More from Zester Daily:
» Spiced nuts are the true Halloween treat
» Brew up some bewitching Halloween cocktails
In fact, I didn’t know until recently that Halloween wasn’t celebrated in America until the late 19th century when Irish immigrants brought the Oct. 31 celebration to the United States and that the tradition of trick or treating didn’t become established until after World War II. I knew that because my mom told me that growing up in Manhattan in the 1920s they never trick or treated.
So if there is no traditional Halloween food, it seems ideal for each family to invent one. When I lived in Massachusetts and my three children were little, we took them around the neighborhood in a short-lived frenzy of trick or treating, returning home for them to examine their candy and for us to hide three-quarters of it.
One-pot meals to warm up little devils
Braised lamb and eggplant. Credit: Copyright 2015 Clifford A. Wright
Then we would eat dinner, which often was something I put on the stove before we left with the spooks and goblins. Usually it was some one-pot meal that could cook unattended and to which we could return enjoying the heavenly wafting smells of lusciousness.
Since nothing was traditional, these meals became purely inventive. The kids were ravenous because late October is cold in New England and rushing house to house is tiring work for a kid. If it wasn’t nailed down, my kids would eat it.
A warm dinner to make you forget about candy
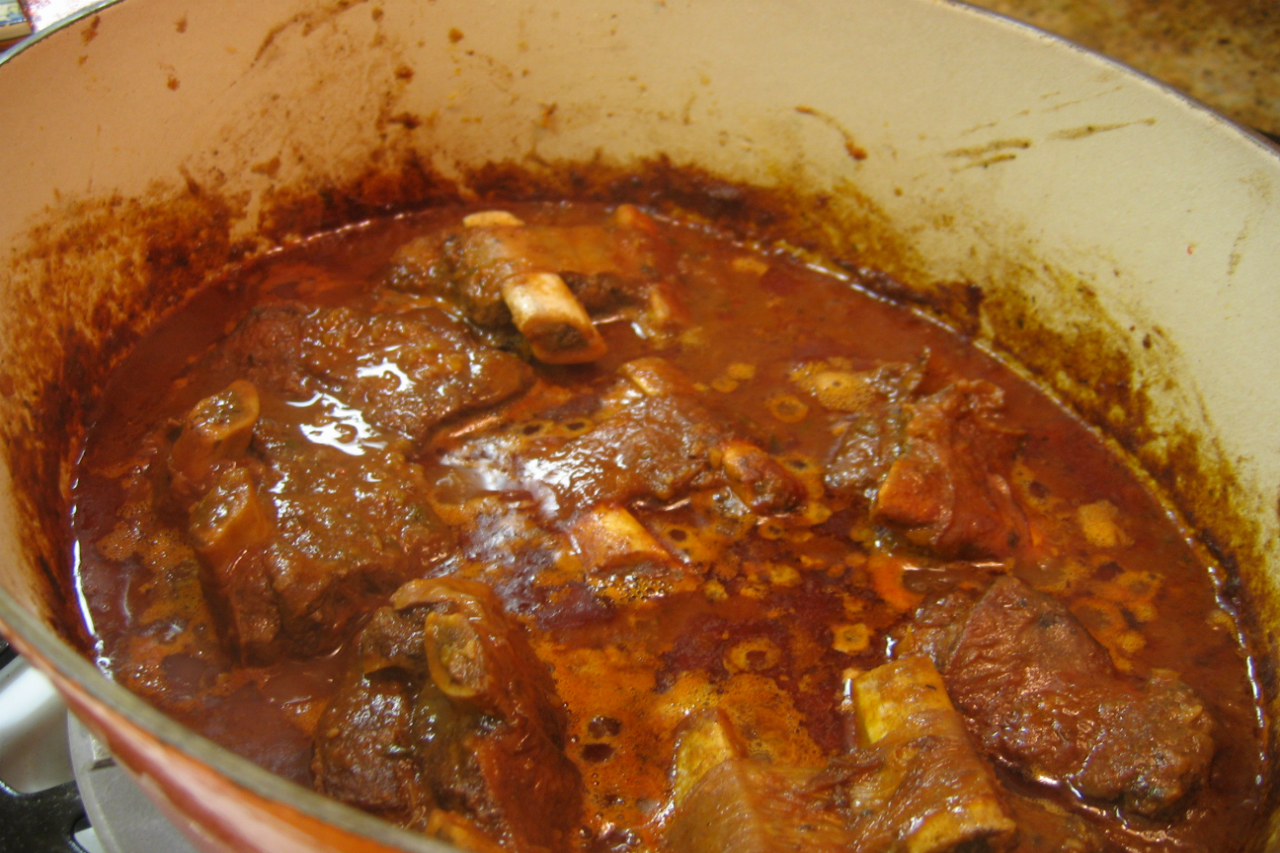
Braised buffalo short ribs in ragout. Credit: Copyright 2015 Clifford A. Wright
There were several dishes they liked. Lamb with mushrooms and onions, braised veal with cabbage lasagna, my mom’s lasagna, which we called grandma’s lasagna, and pork with lentils were all demolished by my little hungry witches and goblins. They never did figure out that we tossed out several tons of their candy.
Braising lends itself to dishes that can be Halloween classics
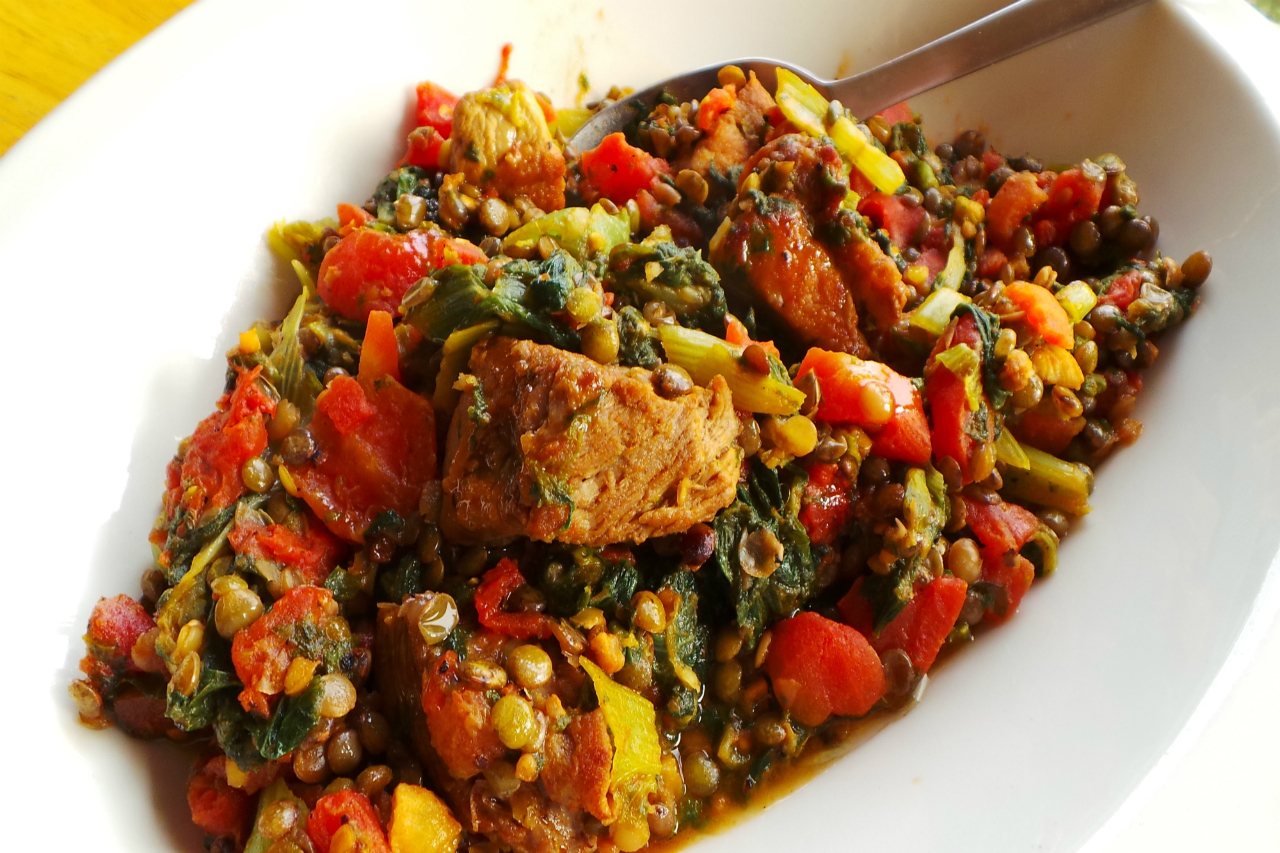
Pork with lentils. Credit: Copyright 2015 Clifford A. Wright
Many of these Halloween stews and braises are long lost, because in those days I wouldn’t necessarily write them down. But one doesn’t really need to follow a recipe because the whole idea is slap-it-together-easy.
Here’s a braised veal recipe to start, but as you see by the photos, anything works, such as lamb and eggplant, pork and lentils, beef ragout or braised short ribs in ragout.
Braised Veal or Pork With Cabbage Lasagna
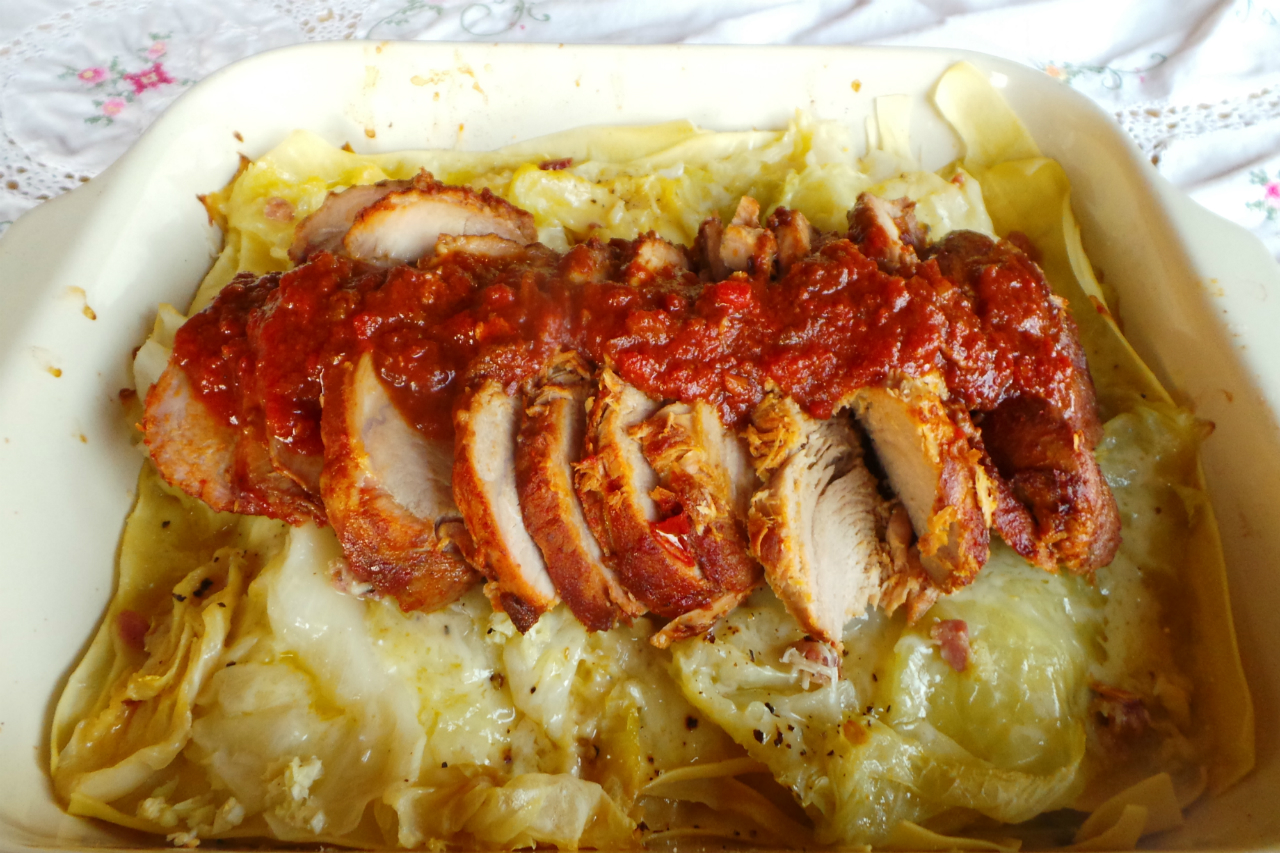
Braised Veal With Cabbage Lasagna. Credit: Copyright 2015 Clifford A. Wright
A shoulder roast of veal is not a terribly expensive cut and it makes a nice family dinner. You can use a pork shoulder, too. I use a pig’s ear or pork skin instead of the bacon because they are flavorful without being fatty and can be discarded, but they’re hard to find, so bacon is fine. As for the lasagna, you don’t have to boil it when using the so called instant no-boil lasagna, just layer them dry. This is a delicious dinner that kept everyone in my family happy after one particularly cold Halloween outing.
Prep time: 45 minutes
Cook time: 4 hours (unattended)
Total time: 4 hours, 45 minutes
Yield: 6 servings
Ingredients
1 tablespoon unsalted butter
3 tablespoons extra virgin olive oil
One 3-pound boneless veal shoulder roast, tied with kitchen twine
3/4 cup dry red wine
4 cups tomato sauce
One 2 3/4-pound green cabbage, cored
1/2 pound lean slab bacon (preferably), sliced
Salt to taste
2 cups low- or no-sodium chicken broth
2 ounces pancetta, chopped
1 pound no-boil (instant) lasagna
Freshly ground black pepper to taste
1 1/2 cups freshly grated pecorino or Parmigiano-Reggiano cheese
4 large garlic cloves, finely chopped
Directions
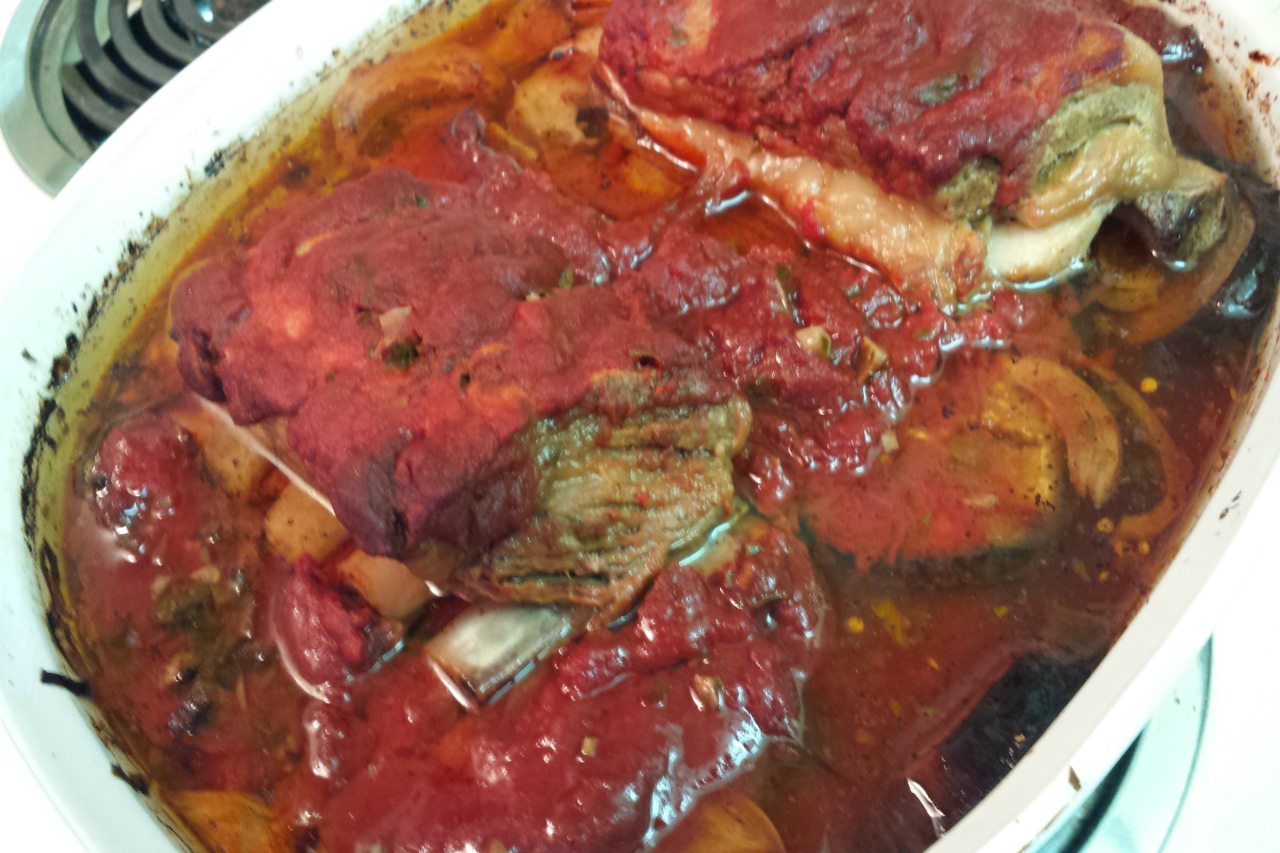
1. In a flameproof casserole, melt the butter with 1 tablespoon olive oil over medium-high heat, then brown the veal roast on all sides, about 6 minutes. Pour in the wine and reduce until it is nearly evaporated, about 3 minutes. Reduce the heat to low, add the tomato sauce, partially cover, and simmer for 3 to 4 hours, turning the roast occasionally. Transfer the roast to a serving platter and remove the butcher’s twine.
2. While the veal is roasting, prepare the cabbage lasagna. Bring a pot of lightly salted water to the boil and cook the cabbage for 10 minutes. Remove the cabbage and when cool enough to handle and separate the leaves. Layer the bottom of the pot in which you boiled the cabbage with half the bacon. Layer the cabbage leaves on top with a light sprinkle of salt. Lay the remaining slab bacon slices on top, pour in the chicken broth, cover, and cook on a medium heat for 45 to 50 minutes. Drain.
3. Place the pancetta in a small frying pan and cook over medium heat until slightly crispy and rendered of some fat, stirring occasionally, about 6 minutes. Set aside.
4. Bring a large pot of water to a rolling boil, salt abundantly, and add the lasagna. Drain as soon as the lasagna is limp, about 1 minute. Reserve in a pot of cold water so the leaves of lasagna do not stick together.
5. Preheat the oven to 350 F.
6. Spread some olive oil on the bottom of a baking dish or lasagna pan and cover with lasagna, cabbage, pancetta, salt and pepper, a drizzle of olive oil, pecorino or Parmigiano-Reggiano cheese and garlic, in that order. Continue in this order until you run out of ingredients, ending with a layer of lasagna, cheese and a drizzle of olive oil. Cover with aluminum foil and bake 40 minutes.
7. Slice the veal, pour a few ladles of sauce over the meat and serve with the cabbage lasagna.
Main photo: Beef ragout. Credit: Copyright 2015 Clifford A. Wright

4 Antipasti To Capture Bell Peppers’ Peak Of Perfection
by: Clifford A. Wright
in: Vegetables w/recipe
Eating seasonally has been the rule of thumb for cooks for millennia. But if you were to read the food blogosphere, you would think that it was just discovered. And now that we are in the early fall, there are certain foods you can tell are in season because they’re inexpensive and abundant at the farmers market. Of course, if you have a garden, you know that too.
More from Zester Daily:
» Whip up antipasto with ingredients from the pantry
» Add asparagus to your antipasto plate
» Turn peppers into red and green relish
It’s a bit more difficult to tell what’s happening seasonally at supermarkets because supermarkets don’t follow seasons as they provide consumers foods all year round, often imported from far away, such as those grapes from Chile.
I am not slavish to the seasons, but I tend to stick somewhat closely to the best local and seasonal produce. I do so gastronomically rather than out of any political correctness. The reason is simple: They taste better.
There’s one vegetable that is rather prominent now in my local Southern California farmers markets and my little roof-top garden: bell peppers. I like them ripe and red, and I often serve them in an Italian style as an antipasto. Here are four very simple ways of preparing red bell pepper antipasti. I usually serve them before the main course, which in the early fall is still quite often grilled foods.
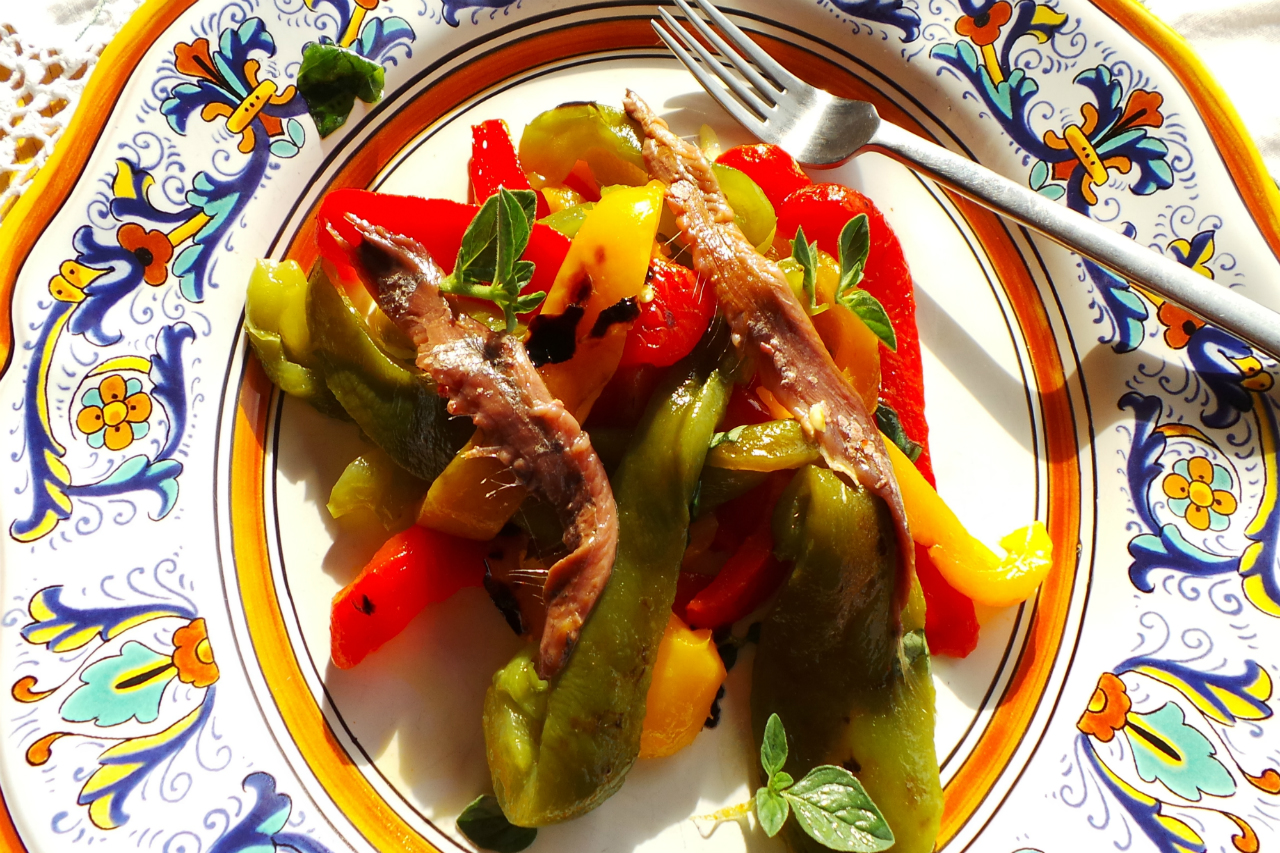
Roasted Green And Red Bell Peppers With Toscano Salami
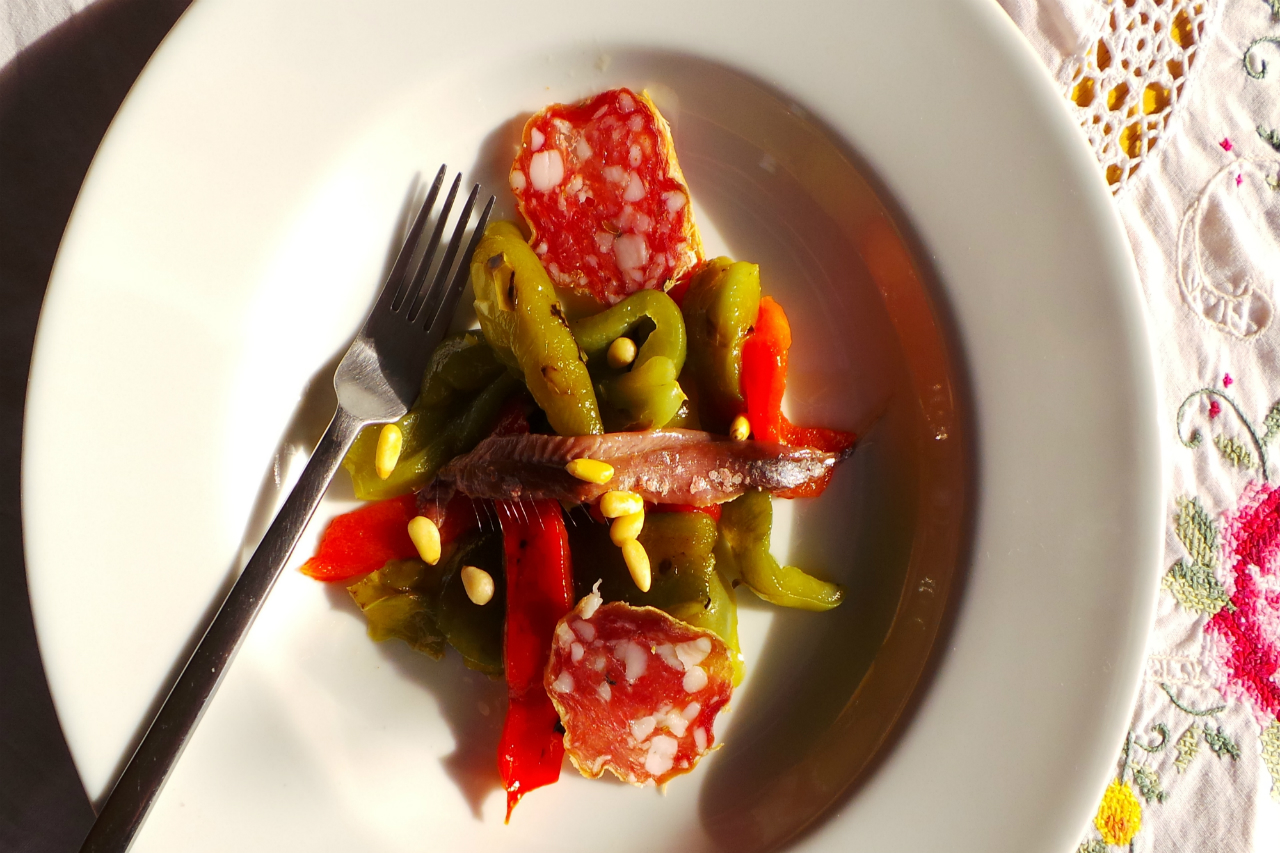
Roasted red and green bell peppers with Toscano salami Credit: Copyright 2015 Clifford A. Wright
The natural sweetness of bell peppers can flavor many other foods, and that’s why I like to serve this antipasto before plainer or simply cooked meats. The Toscano salami is available in Italian markets and some supermarkets. It has a darker color with larger, but fewer, chunks of fat than the common Genoa salami. Use whatever salami is available. Choose large and fleshy bell peppers for this dish.
Prep time: 5 minutes
Cook time: 20 minutes
Total time: 25 minutes
Yield: 6 servings
Ingredients
4 green bell peppers
1 red bell pepper
8 slices Toscano salami, each slice cut in half
1 large garlic clove, very finely chopped
1 tablespoon finely chopped onion
1/4 teaspoon dried oregano
1/4 teaspoon fennel seed
2 tablespoons extra virgin olive oil
1 teaspoon pine nuts
4 salted anchovy fillets, rinsed (optional)
Directions
1. Place the peppers on a wire rack over a burner on high heat and roast until their skins blister black on all sides, turning occasionally with tongs. Remove the peppers and place into a paper or heavy plastic bag to steam for 20 minutes, which will make them easier to peel. When the peppers are cool enough to handle, rub off as much blackened peel as you can and remove the seeds by rubbing with a paper towel (to avoid washing away flavorful juices) or by rinsing under running water (to remove more easily).
2. Cut the peppers into thin strips and arrange on a platter. Surround the peppers with the halves of salami. Sprinkle the peppers with the garlic, onion, oregano, fennel seed, olive oil and pine nuts. Place the anchovy fillets on top, if desired, and serve at room temperature.
Roasted Red, Yellow, Green Bell Peppers In Olive Oil, Oregano, Anchovies
Roasted red, yellow and green bell peppers in olive oil, anchovies and oregano. Credit: Copyright 2015 Clifford A. Wright
This colorful antipasto platter is perfect for a large buffet table. In Italy, trattorie will put these tables outdoors (fuori tavola) and sometimes allow their customers to serve themselves. Ideally, you will use a colorful polychromatic platter for serving that perhaps you’ve brought back from Italy. If you make this antipasto a day ahead of time, make sure you hold the black pepper and anchovies until it is ready to be served.
Prep time: 1 hour
Cook time: 20 minutes
Total time: 1 hour, 20 minutes
Yield: 8 servings
Ingredients
4 red bell peppers
4 yellow bell peppers
4 green bell peppers
1 tablespoon dried oregano or 2 tablespoons fresh oregano
1/4 cup extra virgin olive oil
8 salted anchovy fillets, rinsed
Freshly ground black pepper to taste
Directions
1. Place the peppers on a wire rack over a burner on high heat and roast until their skins blister black on all sides, turning occasionally with tongs. Remove the peppers and place in a paper or heavy plastic bag to steam for 20 minutes, which will make them easier to peel. When cool enough to handle, rub off as much blackened peel as you can and remove the seeds by rubbing with a paper towel (to avoid washing away flavorful juices) or by rinsing under running water (to remove more easily).
2. Toss the peppers together and let drain for 1 hour in a strainer.
3. Toss the peppers again with the oregano and olive oil. Arrange on a platter so that the colors are nicely distributed and place the anchovy fillets on top and sprinkle with pepper. Keep covered and refrigerated, but serve at room temperature.
Roasted Red And Yellow Bell Peppers With Shaved Celery Heart
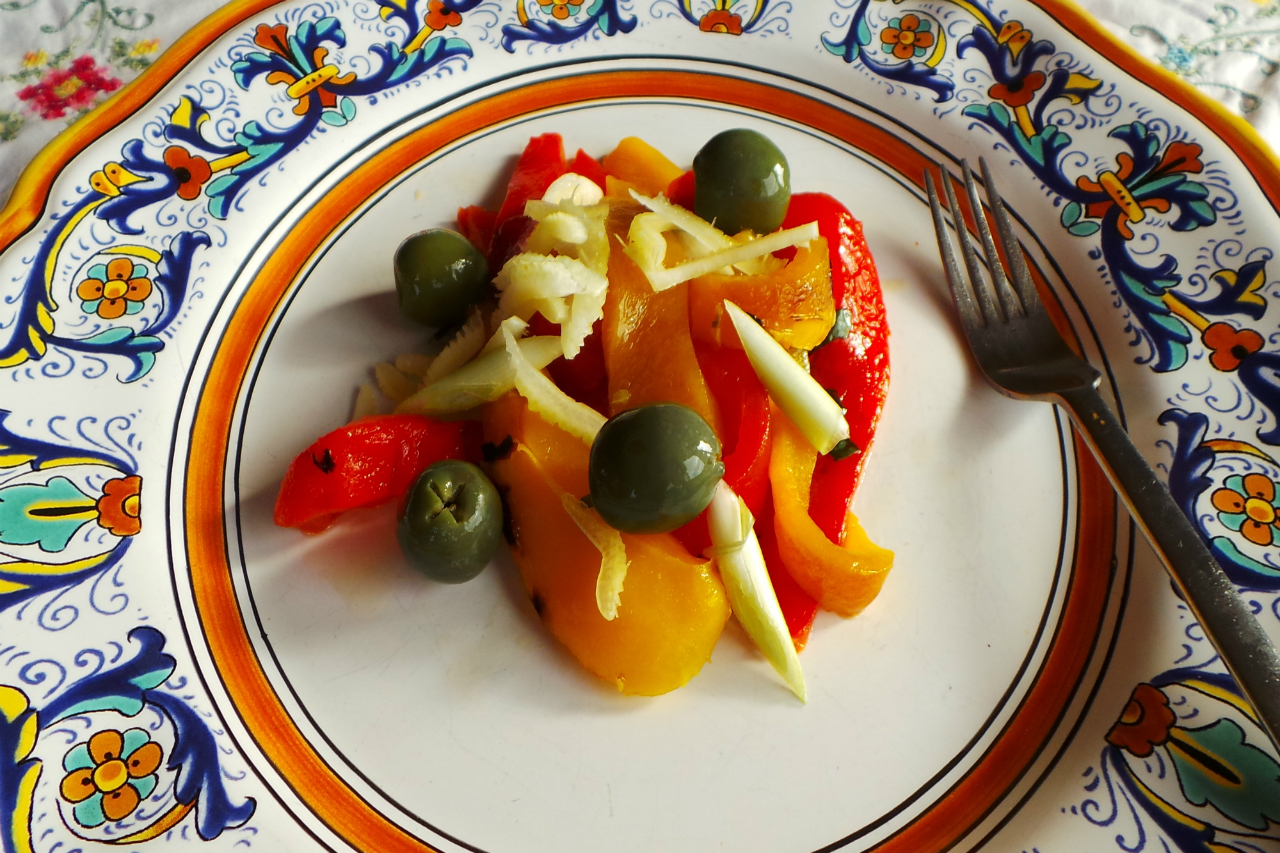
Roasted red and yellow bell peppers with shaved celery heart. Credit: Copyright 2015 Clifford A. Wright
This is a nice antipasto for an early fall day when you have the grill going, as the best way to cook the peppers is on the grill, which gives them a nice smoky flavor. Alternatively, you can blister their skins as instructed in the recipes above.
Prep time: 5 minutes
Cook time: 20 minutes
Total time: 25 minutes
Yield: 4 servings
Ingredients
4 red bell peppers, roasted until the skin blisters black, skin discarded, seeded, cut into 1/4-inch thick slices
4 yellow bell peppers, roasted until the skin blisters black, skin discarded, seeded, cut into 1/4-inch thick slices
1 celery heart, very thinly sliced
3 scallions, white part only, thinly sliced
16 green olives
Extra virgin olive oil
Balsamic vinegar to taste (optional)
Salt and freshly ground black pepper to taste
Directions
Arrange the bell peppers attractively on an oval platter. Spread the sliced celery heart and scallions in the center. Garnish with the olives and sprinkle with olive oil, balsamic vinegar, if using, and salt and pepper.
Roasted Red Bell Peppers With Mozzarella And Prosciutto
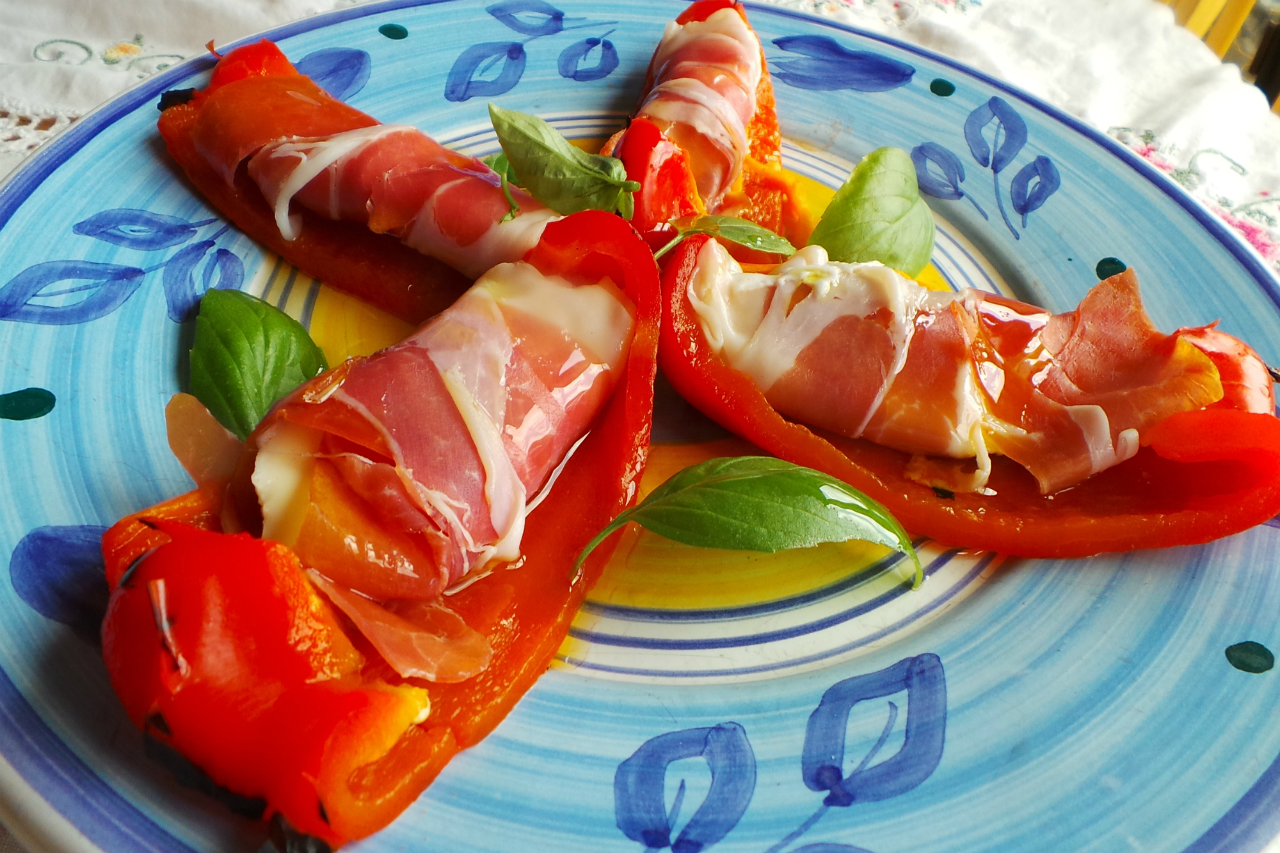
Roasted red bell peppers with mozzarella and prosciutto. Credit: Copyright 2015 Clifford A. Wright
This is a five-minute antipasto for a time you are too tired to cook or when you have unexpected guests. Excellent quality roasted red peppers sold in Italian groceries, supermarket salad bars and even in jars and cans make this dish an easy one. Of course, you can make them on the grill, too.
Prep time: 5 minutes
Cook time: 0 minutes
Total time: 5 minutes
Yield: 2 to 4 servings
Ingredients
1/2 pound fresh mozzarella cheese
1/4 pound prosciutto di Parma, thinly sliced
3 large red bell peppers, roasted until the skin blisters black, skin discarded, seeded, quartered
5 large fresh basil leaves, chopped
Extra virgin olive oil to taste
Freshly ground black pepper to taste
Directions
1. Slice the mozzarella into 3-by-1/2-inch rectangles. Place each piece of cheese on a slice of prosciutto and roll them up. Take a quarter of a roasted red pepper and stuff the wrapped cheese inside.
2. Arrange attractively on a platter and sprinkle the basil over all. Drizzle the olive oil over the cheese, add a sprinkling of pepper and serve.
Main photo: Red and green bell peppers for late-summer antipasti. Credit: Copyright 2013 Wynne Everett

Broccoli is a vegetable that makes for a wonderful salad. Its bright green color and crisp-tender texture can be appealing if cooked properly.
More from Zester Daily:
» Tips for growing your own brassicas
» Kale, broccoli, cabbage create late-season garden color
Cooking broccoli properly might seem like a no-brainer, but many people do not do so. Broccoli, and all cruciferous vegetables, must not be overcooked, otherwise chemicals in the plant break down and release sulfurous compounds, such as ammonia and hydrogen sulfide, and interact with the chlorophyll in the plant, which cause the broccoli to turn an unappetizing brownish-grey color and have a very unpleasant smell.
This chemical reaction is probably why some people don’t like broccoli. I imagine that at a young age they ate improperly cooked broccoli.
Broccoli should always be cooked in small amounts of water until it is crisp-tender and retains its bright green color; it should never be cooked until limp. That means broccoli should not be cooked more than five minutes.
Here are five broccoli recipes, all Mediterranean-style dishes that make wonderful accompaniments to your Labor Day grill party.
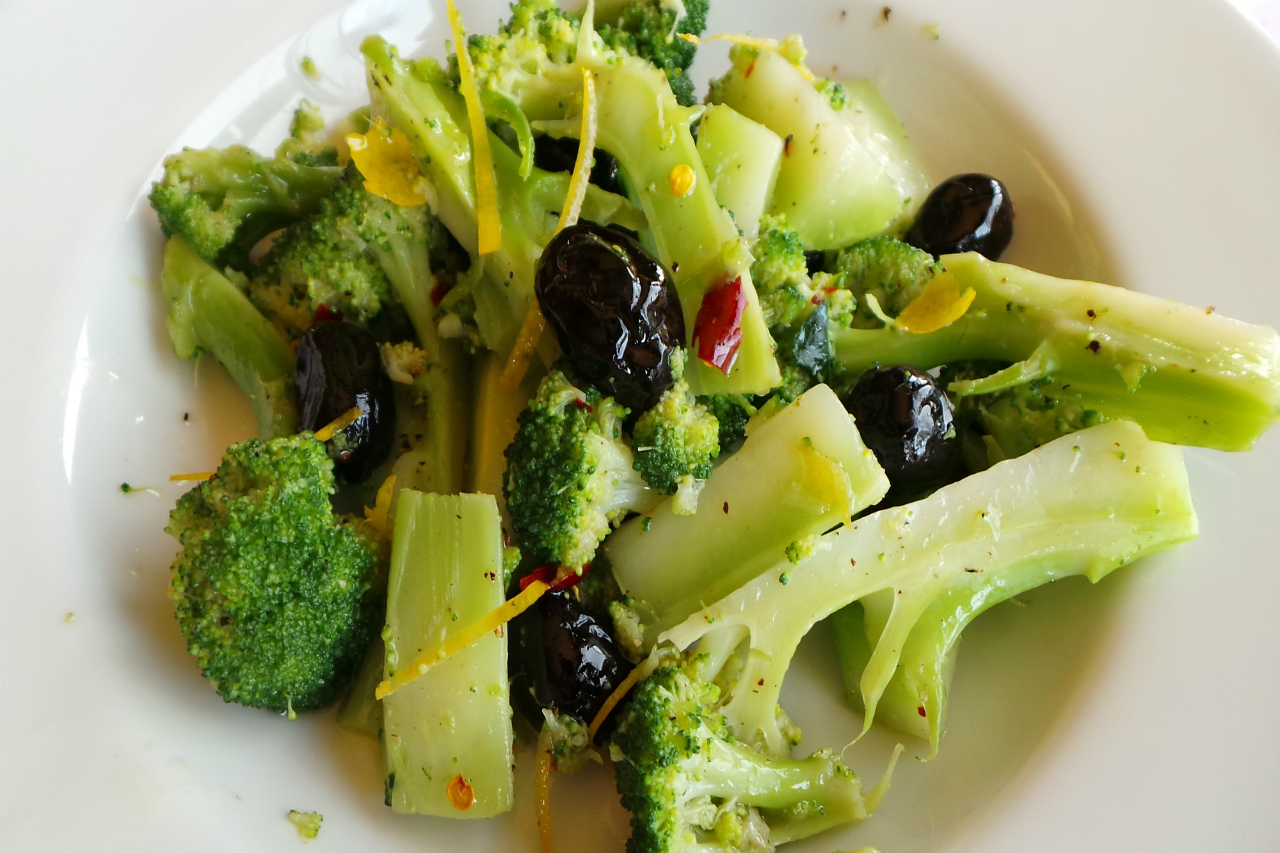
Broccoli With Golden Bread Crumbs, Oil-cured Olives and Orange Zest
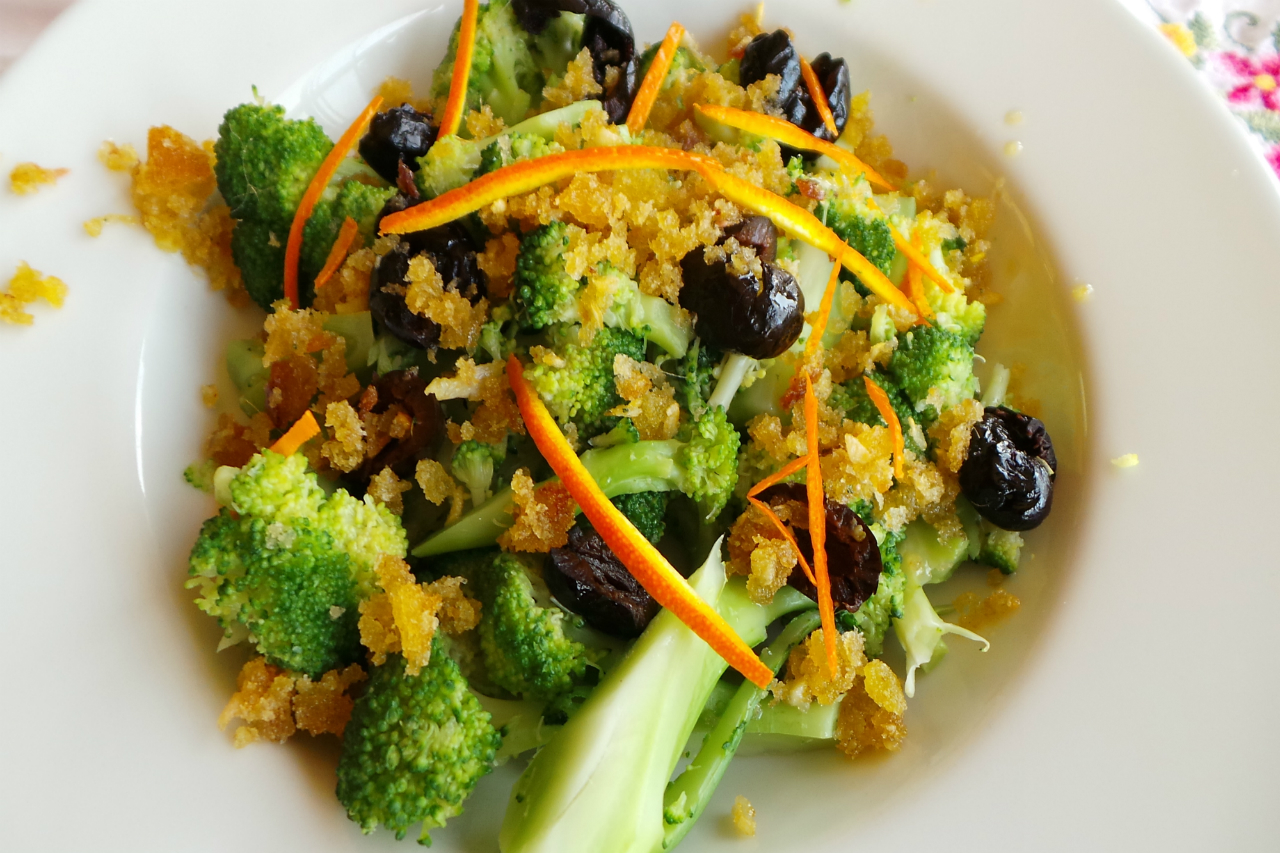
Broccoli with golden bread crumbs, oil-cured olives and orange zest. Credit: Copyright 2015 Clifford A. Wright
This is an appealing Sicilian-style salad with a great taste thanks to the orange zest and black olives. It’s important not to overcook the broccoli even by a minute because you want the taste and the beautiful color contrast of bright green to come through. Oil-cured olives are crinkly skinned, but you can use any good-quality black olive if you can’t find them.
Prep time: 5 minutes
Cook time: 10 minutes
Total time: 15 minutes
Yield: 4 servings
Ingredients
1 pound broccoli
3 tablespoons extra virgin olive oil
4 salted anchovy fillets, rinsed
2 garlic cloves, finely chopped
1/2 cup fresh bread crumbs
15 oil-cured black olives, pitted
1 teaspoon orange zest
Extra virgin olive oil for drizzling (optional)
Directions
1. Bring a saucepan of water to a boil and blanch the broccoli for 3 minutes. Drain, cool and break into florets.
2. In a skillet, heat the olive oil over medium heat with the anchovies and garlic until sizzling. Add the bread crumbs and cook, stirring until the bread crumbs are golden brown, about 4 minutes.
3. Arrange the broccoli on a serving platter and sprinkle on the olives. Sprinkle the bread crumb and anchovy sauce around and then add the orange zest. Drizzle with olive oil, if desired, and serve at room temperature.
Broccoli and White Onion Salad
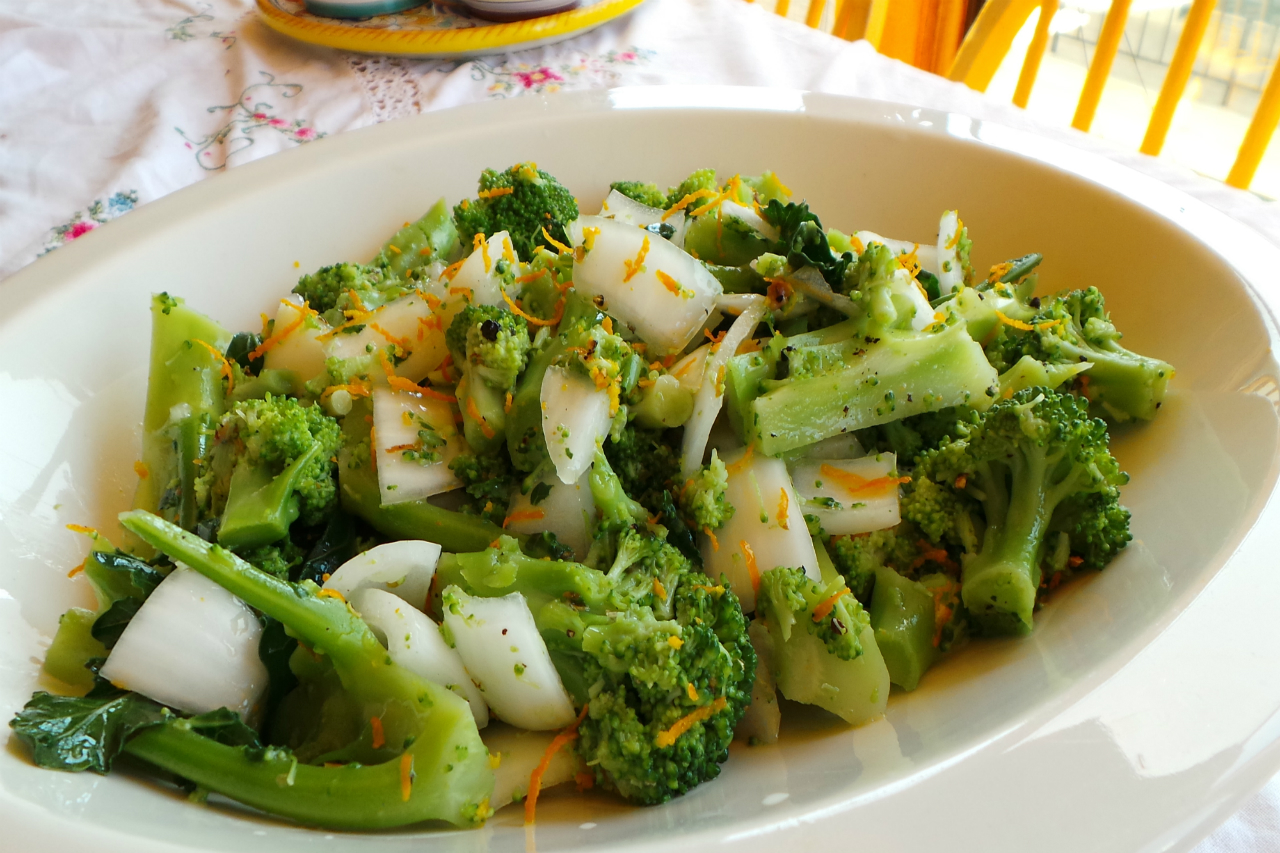
Broccoli and white onion salad. Credit: Copyright 2015 Clifford A. Wright
White onion rather than yellow onion is critical in this broccoli salad not only because of taste but for the color contrast with the green, white and orange. This salad also makes for a nice antipasto or accompaniment, with grilled or roast meat.
Prep time: 5 minutes
Cook time: 10 minutes
Total time: 15 minutes
Yield: 6 to 8 servings
Ingredients
3 pounds broccoli
1 medium white onion, coarsely chopped
Zest from 1 orange
1 tablespoon sugar
2 tablespoons white wine vinegar
1/4 to 1/2 cup extra virgin olive oil
1 teaspoon dried oregano
2 salted anchovy fillets, rinsed and finely chopped
1 garlic clove, finely chopped
Salt and freshly ground black pepper to taste
Orange wedges for garnish (optional)
Directions
1. Bring a pot of lightly salted water to a boil and plunge the broccoli in to blanch it for 2 minutes. Drain and cool quickly. Return the broccoli to a steamer or strainer and steam until tender with a slight crunch, 6 to 7 minutes. Let the broccoli drain and cool in the strainer.
2. Break the broccoli into florets and toss with the white onion and orange zest in a large bowl.
3. In another bowl, dissolve the sugar in the white wine vinegar. Whisk in the olive oil, oregano, anchovies and garlic. Pour over the broccoli and toss again seasoned with salt and pepper. Transfer to a large serving platter and garnish with orange wedges, if desired. Serve at room temperature.
Green and Yellow Salad
Green and yellow salad. Credit: Copyright 2015 Clifford A. Wright
The colors are startling in this zippy salad. It’s great with something off the grill, and the leftovers can be tossed with pasta and olive oil.
Prep time: 3 minutes
Cooking time: 8 minutes
Total time: 11 minutes
Yield: 2 to 4 servings
Ingredients
1 pound broccoli, broken into small florets
1 yellow bell pepper, seeded and chopped
Extra virgin olive oil to taste
Coarse salt to taste
Freshly ground black pepper to taste
Directions
Bring a pot of water to a boil and cook the broccoli 5 minutes. Drain well, cool, then toss with the yellow pepper and add olive oil, salt and pepper to taste.
Broccoli With Oil-cured Olives and Lemon Zest
Broccoli with oil-cured olives and lemon zest. Credit: Copyright 2015 Clifford A. Wright
What a beautiful dish! The brilliant green of broccoli, the pitch black of the olives and the sunny flecks of lemon zest make for an appetizing presentation. In this recipe, you blanch the broccoli first to keep its brilliant green color.
Prep time: 5 minutes
Cooking time: 10 minutes
Total time: 15 minutes
Yield: 6 servings
Ingredients
2 pounds broccoli
1 garlic clove, crushed
1/2 cup extra virgin olive oil
1/2 cup oil-cured black olives, pitted or unpitted
1/2 teaspoon red chile flakes
Zest of 1/2 lemon
Salt and freshly ground black pepper to taste
Directions
1. Bring a large saucepan of water to a rapid boil, then blanch the broccoli for 2 minutes. Drain and dunk into ice-cold water immediately to stop it cooking. Set aside.
2. In a bowl, mix the garlic with the olive oil.
3. Remove and drain broccoli from ice-water bath.
4. Slice the broccoli and after it has cooled, mix it in a large bowl with olives, chile, lemon zest, garlic mixture, salt and pepper.
5. Serve at room temperature.
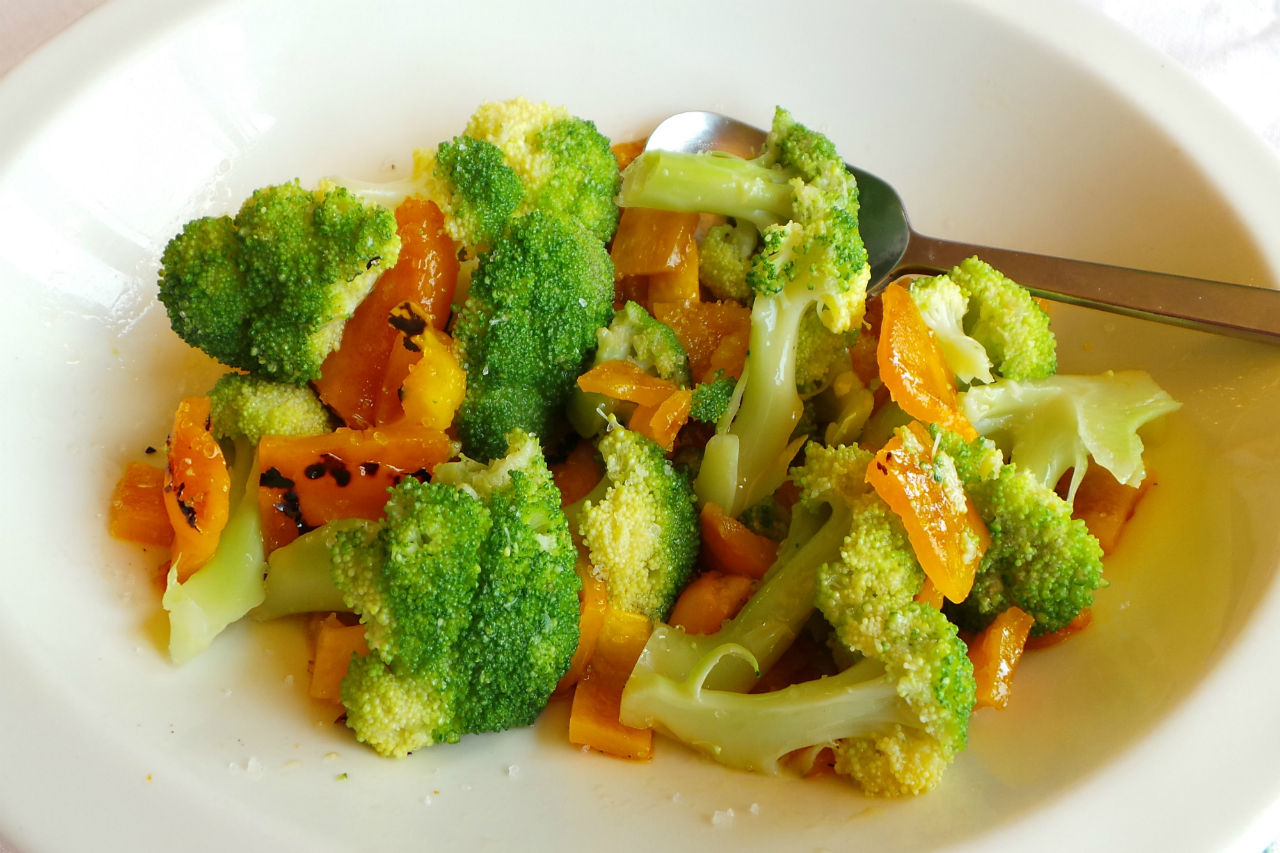
Broccoli and Roasted Red Bell Pepper
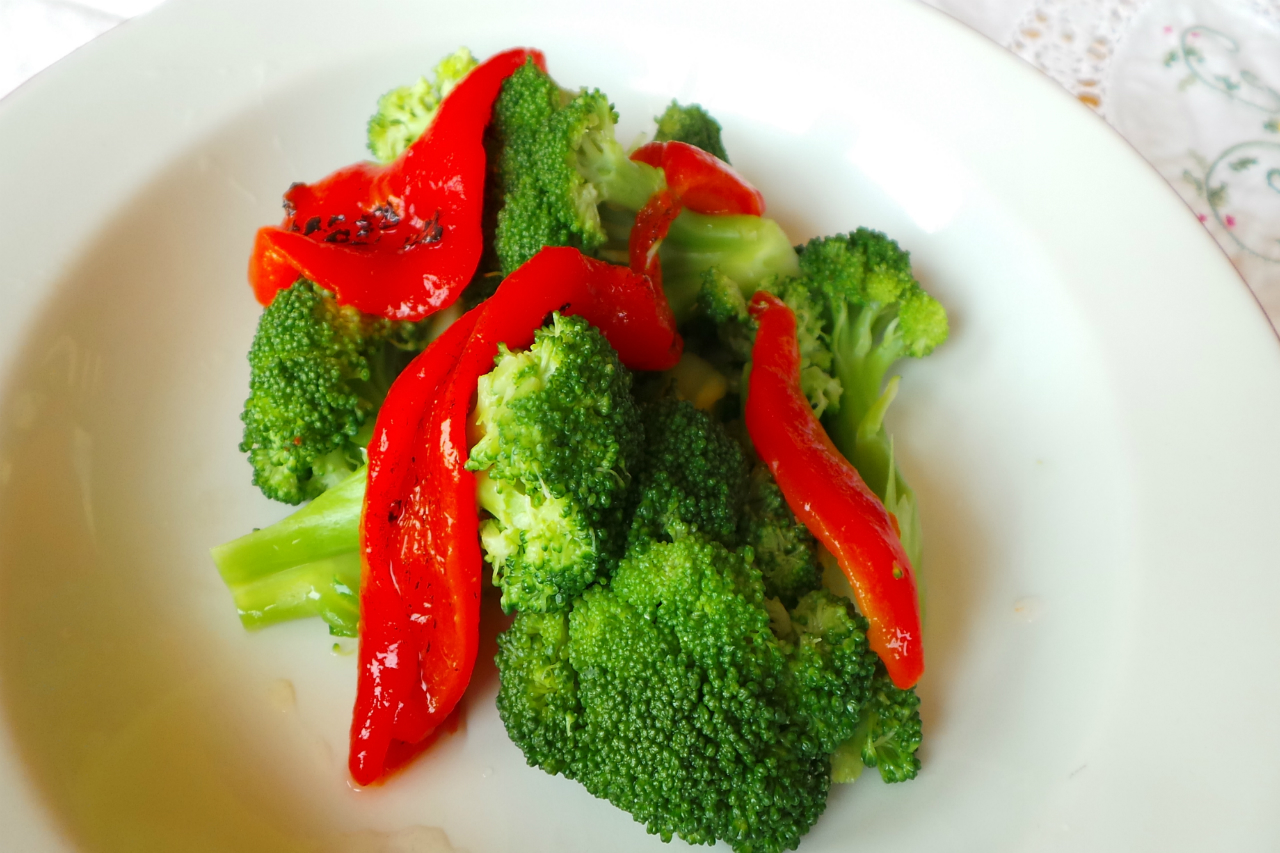
Broccoli and roasted red bell pepper. Credit: Copyright 2015 Clifford A. Wright
Good and good for you. That was a phrase I often heard from my mom when I was growing up. She never quite made it this way, but this Italian-American family-style side dish of bright green broccoli and brilliant red bell pepper is a delight to look at, a delight to eat and it’s good for you.
Prep time: 2 minutes
Cooking time: 8 minutes
Total time: 10 minutes
Yield: 4 servings
Ingredients
1 1/2 pounds broccoli, sliced and broken into florets
1 roasted red bell pepper, sliced into strips
1/3 cup extra virgin olive oil
2 garlic cloves, very finely chopped
2 tablespoons fresh lemon juice
Directions
Bring a pot of water to a boil and cook the broccoli 5 minutes. Drain a bit and transfer to a mixing bowl. Toss with the remaining ingredients and arrange on a serving platter.
Main photo: Broccoli. Credit: Copyright 2011 Lori Shepler