
Articles by Author
In many Italian, Spanish and French dishes, anchovy filets supply a deeply nuanced umami that turns the ordinary into the passionately delicious. Italian puttanesca, Tuscan chicken liver paté and French tapenade are but a few examples that come to mind. Without anchovies they are good. With anchovies they are delicious. Combine skinless anchovy filets with caramelized chicken livers, toss with pasta and dust with freshly grated Parmesan cheese and surf dances with turf in the most beautiful way.
More from Zester Daily:
Pasta is wonderful. Pasta is infinitely variable. Pasta can be complex or simple. For many cooks, the best pasta dish is one that allows the ingredients to shine through with a minimum of sauce. Toss penne with fresh English peas, a bit of oil and garlic, a dusting of cayenne and a fresh grating of Romano and all that is necessary to complete the meal is a crisp Fumè Blanc, a farm-fresh green salad and a dessert of fresh fruit with a nice selection of cheeses.
Chicken livers and anchovies are as different as can be. When cooked properly with a charred exterior and an interior still moist and pink, chicken livers are creamy and earthy with a hint of sweetness.
Anchovies on the other hand have a sharper impact on the palette — salty, raspy and tangy. Combined, they bring out the best in one another.
As with any simple recipe, this dish is only as good as the quality of the ingredients. Whenever possible, buy organic chicken livers to avoid the chemicals and antibiotics that can accumulate in birds that are raised in industrial coops. Skinless anchovies packed in olive oil are not overly salty. Because the fish are caught all over the world, experimenting with different brands will lead you to the one you like the best.
Spanish and Italian anchovies are especially good, whether packed in glass jars or in tins. The price can vary from an affordable $2 a tin to well over $15 for a glass jar of the same weight.
Pasta with Chicken Livers and Anchovies
Before using chicken livers, wash and pat dry. Using a sharp paring knife, cut away any fat, sinews or veins and discard. Separate the two lobes. Cut each lobe in half, making pieces the size of a quarter to facilitate even cooking of the livers.
Serves 4
Ingredients
1 tablespoon kosher salt
¾ to 1 pound pasta (penne, ziti, spaghetti or angel hair)
1 tablespoon olive oil
1 small yellow onion, washed, stemmed and skin removed, roughly chopped
2 garlic cloves, skins removed, finely chopped
¼ cup finely chopped Italian parsley, leaves only, washed
4 to 8 anchovy filets (the number depends on how much you enjoy anchovies)
1 pound chicken livers, washed, lobes separated, each lobe cut in half
¼ cup finely chopped Italian parsley, leaves only, washed
1 tablespoon sweet butter (optional)
Sea salt and black pepper to taste
¼ cup Parmesan cheese, freshly grated
⅛ teaspoon cayenne (optional)
1 tablespoon olives, pitted, finely chopped (optional)
¼ cup cherry tomatoes, washed, quartered (optional)
Directions
1. In a 2-gallon pot, fill with water to within 3 inches of the top. Add kosher salt and bring to a boil. Put in pasta and stir well. Allow to boil 10 minutes, stirring every 3 to 4 minutes.
2. Taste and when al dente, place a small heat-proof cup in the sink next to a colander and drain the pasta, capturing 1 cup of pasta water in the process. Return the pasta to the warm pot and set aside.
3. In a large frying pan, heat the olive oil. Sauté onions, garlic and Italian parsley until lightly browned. Using a fork, add the anchovies, dragging them along the bottom so they break apart. Stir well with the aromatics.
4. Add the chicken livers to the pan, using a large spoon to move them around the pan so they lightly brown all over. Be careful not to overcook and dry out the livers.
5. At this point you have some options. You can season with cayenne for heat, add chopped olives for another layer of flavor, stir in quartered cherry tomatoes to contribute liquid and a bit of acid to the sauce and sweet butter for creaminess.
6. Or keep it simple and do one, some or none of the above. In any case, add ¼ cup of pasta water to the frying pan and stir well.
7. Just before serving, add cooked pasta to the frying pan over a medium flame and toss well until heated. Top with freshly grated Parmesan or Romano cheese and serve.
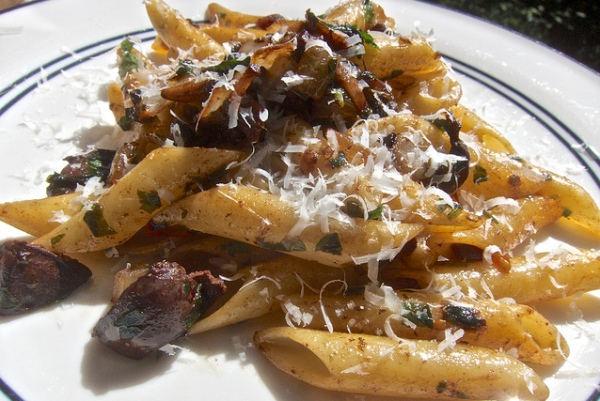
Top photo: Penne pasta with anchovies and chicken livers. Credit: David Latt
Looking ahead to hot days when meals must be light and flavorful, home cooks and restaurant chefs alike want light and flavorful dishes to put on the table. One dish perfect for the summer is tuna tartare, delicately seasoned and plated to satisfy any gourmand’s need for luxurious food, beautifully presented.
More from Zester Daily:
» Tips to prepare healthy seafood
» Giving props to fresh mackerel
» Versatile striped bass is a tasty part of spring
Gabriel Kreuther, executive chef at The Modern, the fine dining restaurant at New York City’s Museum of Modern Art is a master at preparing beautifully delicious comfort food. With a dining room view of MoMA’s sculpture garden, Chef Kreuther lets his food take its cue from the art. His plates are mini-sculptures, animated with color, contrasts and meticulous detailing.
Tartare, like sashimi, is only as good as its ingredients and those must be as fresh as possible. Quality seafood purveyors are a good source of the high quality yellowfin tuna and diver scallops required for the recipe.
Adding to the quality of the seafood is the visual design. For Kreuther, the extra effort it takes to make a visually striking plate gives added pleasure to a dish.
Tartare of Yellowfin Tuna and Diver Scallops Seasoned with American Caviar
Serves 6
For the tartare:
12 ounces yellow fin tuna, sushi grade, medium dice (½-inch cubes)
12 ounces diver scallops (8 to 10 of the freshest, highest quality, firm), medium dice (½-inch cubes)
2 tablespoons hazelnut oil
3 tablespoons olive oil
3 ounces American Caviar
3 tablespoons chives, finely chopped
1 lemon, juiced
Salt and pepper, to taste
1 cucumber, not too thick, preferably seedless, unpeeled
2 tablespoons aged balsamic vinegar (or reduction of regular balsamic vinegar made by reducing 8 tablespoons over a low flame), as needed
Baby greens or arugula for garnish
For the chive oil:
Chives, leftover parts from above chopped portion
4 tablespoons grapeseed oil
Directions
To prepare the chive oil:
1. Blend the chives and oil in a blender. Strain the mixture and reserve in a squeeze bottle.
To prepare the seafood:
1. Dice the tuna into ½-inch cubes. Place into a bowl, cover and reserve in the refrigerator.
2. Dice the scallops into similarly sized ½-inch cubes. Place into a separate bowl, cover and also refrigerate.
To prepare the bed of cucumber:
1. Wash the cucumber and pat it dry. Slice it very thinly using a Japanese mandoline slicer for better precision or if unavailable, use a very sharp knife.
2. Season the slices with salt, pepper and a bit of olive oil and arrange the slices on a chilled plate in 2 overlapping columns (6 slices each, arranged like shingles on a roof) down the center of the plate. Refrigerate until ready to plate the dish.
To prepare the tartare mixture:
1. Combine the tuna and scallops in one bowl and add the chopped chives, hazelnut oil, olive oil and caviar.
2. Season with salt and pepper and mix all the ingredients together gently. On the final stir, add some lemon juice to taste.
Note: Do not use too much lemon juice, as it will overpower the dish.
To plate the dish:
1. Place several spoonfuls of the tartare mixture along the length of the 2 columns of cucumber, down the center, leaving some of the outer edge of cucumbers to be visible.
2. Season the baby greens with some of the remaining lemon juice and olive oil.
3. Spike one end of the tartare with a few leaves of the seasoned greens.
4. Finally, using the aged balsamic vinegar (or reduced balsamic vinegar) and the chive oil in 2 separate squeeze bottles, make 2 straight lines, on either side of the columns of cucumber (parallel to and approximately ½ inch away from the cucumbers.)
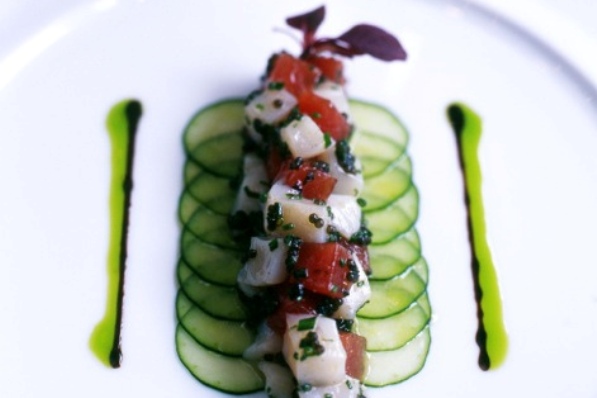
Top photo: Tartare of yellowfin tuna and diver scallops seasoned with American caviar. Credit: Diana DeLucia
The non-descript bar was the perfect refuge for a rainy spring afternoon. Seated at a small Formica table that would have been at home in a 1950s kitchen, with small plates and a fat tumbler of Havana Gold 7-year-old rum in front of me, I discovered the new love of my culinary life: anchovies.
In Bar Pozano, a narrow workingman’s hangout across the river from the Burgos Cathedral in northern Spain, half a dozen older men sat talking and ignoring a soccer game on mute on a flat-screen TV high on the wall near the front door. In the narrow refrigerated display case on the bar were the tapas of the day. Plates were displayed with Spanish omelets (tortillas de palatas), Iberian ham sandwiches (bocadillos) and skewered octopus bits seasoned with olive oil and pimentón. With all those delicious tapas inviting attention, it was the anchovies gathered around hard boiled eggs, pickles, pitted green olives, poached tuna and mussels that won my heart.
Anchovies are part of the ocean’s bounty. Found in great abundance all over the planet, the tiny fish, like goldilocks, prefer temperate waters that are not too hot, not too cold. Available in some areas fresh as filets with the silvery skin on one side, anchovies are usually sold as skinless filets in jars and flat tins.
I left my heart in Spain but brought home the anchovies
The thing about anchovies is that people either love them or hate them. With these delicate fish there is no middle ground. For those diners who enjoy them, anchovies have an umami flavor similar to that of shiitake mushrooms but with a deeply nuanced saltiness and feather-light raspiness on the tongue.

Bar Pozano in Spain. Credit: David Latt
The Spanish get the best out of anchovies by applying them liberally on tapas and pinxtos, Basque open-faced sandwiches. Italians know that skinless anchovy filets will dissolve in heated butter or olive oil, creating an exquisite sauce that adds a depth of flavor to braising sauces and pastas.
Part of the beauty of anchovies is that they are easy to use. To have a delicious snack, just open a jar or tin, drag out a couple with a fork, lay the filets over a piece of grilled bread with slices of Manchego cheese, drizzle with olive oil, dust with pimentón and serve with ice cold beer or a light white wine.
For an entrée, only a little more work is required. Dissolve four or five anchovies in heated oil, toss with cooked pasta, sprinkle with finely chopped Italian parsley and freshly grated Parmesan cheese and the main course is finished in less than 10 minutes.
To have a thoroughly enjoyable evening with anchovies as the centerpiece, all that’s needed is a group of like-minded diners who regard the anchovy as one of nature’s best treats.
Anchovies With Hard-Boiled Eggs
Infinitely variable, the basics are the salty anchovy filets, which contrast with the dry and creamy hard-boiled eggs. In Spain, a condiment made with finely chopped, charred red and green peppers and onions is used as a topping on neutral tasting products like poached tuna filets or mussels. That topping goes beautifully with the hard-boiled eggs and anchovies.
I am indebted to Katie Goodman who described her method for hard-boiling eggs to facilitate easy shell removal.
Serves 4
Ingredients
4 farmers market fresh large eggs, washed
1 teaspoon kosher salt
¼ red pepper, washed and seeded
¼ green pepper, washed and seeded
¼ medium yellow onion, washed and peeled
2 tablespoons olive oil
8 anchovy filets packed in olive oil
4 mini-dill pickles, cut in half longwise
8 mussels, canned or freshly steamed, debearded and shelled
Sea salt
Black pepper
Pimentón (optional) or cayenne
8 long toothpicks or short bamboo skewers 3 or 4 inches in length
Directions
1. Cover the eggs in a pot of water. Add 1 teaspoon kosher salt. Bring to a vigorous boil and cook uncovered for three minutes.
Remove from the flame, cover and let sit for 15 minutes.
Pour off the hot water and soak the eggs in cold water. Allow to cool, then remove the shells. Dry and refrigerate in an airtight container until ready to use.
2. On a hot barbecue grill or on a stovetop gas burner with the flame turned on high, place the green and red peppers and the onion on the flame. Allow the outer skin to lightly char. Turn once with tongs and remove.
Once the peppers and onions are cool to the touch, use a sharp chef’s knife to finely chop the vegetables and place in a small, lidded container. Cover with the olive oil, seal and refrigerate until ready to use.
3. Assemble just before serving. First, carefully slice each hard-boiled egg from top to bottom using a very sharp paring knife. Slide the skewer through one anchovy, then through the side of one half of the hard boiled egg, then the pickle half and the mussel. Add one more anchovy on the other end if desired.
Top with an espresso-sized teaspoon of the marinated peppers and onions and a little olive oil. Season as desired with sea salt, black pepper and pimentón.
Variations
- Instead of the mussel, place a slab of canned tuna fish filet, preferably a good quality tuna from Spain.
- Instead of the mini-dill pickle, use a pitted green olive.
- Instead of the mini-dill pickle, use crisp and vinegary, pickled Basque guindilla peppers, available from Spain in jars.
- In addition to the marinated charred peppers and onion topping, dust the hard boiled egg with finely chopped fresh Italian parsley.
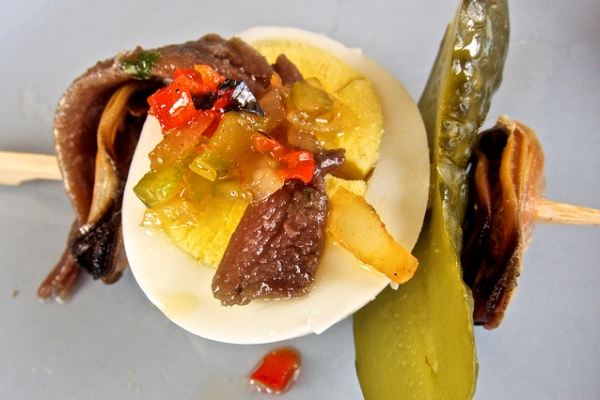
Top photo: A Spanish tapas made at home with anchovy, mussels, hard-boiled egg, marinated chopped peppers and onions and pickle on a skewer. Credit: David Latt
Susan Feniger, one of Los Angeles’ best-known restaurateurs, is always planning her next food trip, as soon as she comes home. Feniger’s restaurant Street, which opened in 2009, is inspired by the global street-food scene, but her explorations are as much about experiencing the lives people lead as they are about finding travel-inspired recipes.
More from Zester Daily:
» Light Brussels sprouts salad recipe
» The best ways to cook up brassica veggies
Talking about a trip to the Turkish countryside, her eyes brightened as she described going with a friend to meet a farmer he knew. A walk into the fields up from the river led them to a house made of sticks with a cow in front. Inside, the kitchen had a fire pit in the middle of the room.
Sitting on the floor for their meal, Feniger watched with pleasure as the farmer’s wife first made tahini by grinding sesame seeds and then baked the tahini into the bread for their midday meal. The bread was delicious as was the experience.
In her kitchen at Street, Feniger demonstrated one of the popular dishes on the menu, an easy-to-make dish with lots of flavor: Brussels sprouts flavored with goat cheese, apples and hazelnuts, topped with an Italian version of a picada without nuts.
When Feniger and Mary Sue Milliken, her longtime cookbook collaborator and fellow chef, were doing research for the dishes they would serve at their second restaurant, Border Grill, they traveled extensively in Mexico. She quickly discovered that the food she loved was the food cooked by street vendors and in people’s home.
As she explained, When you go into people’s homes “they’re so happy you’re there eating their food. People took us into their homes because they wanted us to taste their food. You didn’t get that if you go to restaurants. When you are on the street and you are in a culture that doesn’t usually see [outsiders], they really like that [you are willing to try their food].”
Travel-inspired recipes from around the world
To Feniger, eating the food prepared by people for their everyday lives is how you see the heart of a country. Over the years she has traveled around the world, pursuing her love of culture and eating.
“When I travel, if I don’t see a historical site, I’m OK. The much more rewarding experiences are the ones with people in their kitchens. My memories when I travel are ones with people, not with the monuments.”
On a 14-day trip, crisscrossing India from Delhi to Mumbai to Goa to Kerala (her favorite), Feniger ate on the street or in people’s homes every day. … When she was in Shanghai she was taken by a local on a food tour that began at 4 a.m. so she could watch a man make savory fresh soy milk sticky rice doughnuts cooked in a wok. By 8 a.m., he had finished his breakfast service so he cleaned up and left, allowing a shoe repairman to take over the stall.
Let the ingredients lead you
The menu at Street cherry-picks taste treats she ate during her travels over several decades.

A featured dish at Susan Feniger’s Street: Brussels sprouts with goat cheese, apples and hazelnuts. Credit: David Latt
Recently, Feniger revamped the Street menu and gently moved in the direction of vegetarianism, not for policy reasons but because the street food she loves tends to feature produce over animal products.
Hence, the Brussels sprouts dish. Her picada is Italian and illustrates Feniger’s belief that keeping it simple is best. Take a run at flavor, she suggests, letting the ingredients lead you and everyone will be happy.
Brussels Sprouts with Goat Cheese, Apples and Hazelnuts
Cooked quickly, the Brussels sprouts should be crunchy so the dish tastes fresh and inviting. The contrast of savory Brussels sprouts, sweet apples and tart-creamy goat cheese, together with accents of the picada make the dish delicious on its own or as a side dish with a protein such as sautéed tofu, fried chicken, grilled steak or baked salmon.
Serves 4
Ingredients
For the sauté:
½ cup raw hazelnuts
1½ tablespoons olive oil
6 cups whole Brussels sprouts, shaved thinly on a mandolin or with a knife
2 medium sized Granny Smith apples, cored and cut into a small dice
Juice of 1 lemon
6 ounces soft goat cheese, broken into small pieces
1 teaspoon kosher salt
For the picada:
⅛ cup extra virgin olive oil
2 tablespoons minced raw garlic
2 cups bread crumbs
Salt to taste
zest of 3 lemons
1 bunch Italian parsley, finely chopped
Directions
For the sauté:
1. Preheat oven to 350 F.
2. Spread the hazelnuts out on a cookie sheet and toast them for 5 to 10 minutes until they are roasted and slightly browned.
3. Remove from heat and pour onto a clean dish towel.
4. Fold the dish towel over the toasted hazelnuts and roll lightly to remove the skins. Discard the skins.
5. Place the hazelnuts on a cutting board and chop into small pieces, or alternately pulse in a food processor for a brief period of time. Set aside.
6. In a large sauté pan, heat the oil on medium-high heat.
7. Add the Brussels sprouts, apples and salt, and cook, stirring occasionally, until the Brussels sprouts are slightly browned on the edges.
8. Add the hazelnuts, lemon juice and goat cheese.
9. Toss together and turn off heat.
For the picada:
10. In a large sauté pan heat the oil, but do not let it smoke.
11. Add the garlic and stir quickly to release its flavors, but do not brown.
12. As the garlic starts to color, add the bread crumbs and salt to taste.
13. Stir well to combine and toast in the oil (about 5 minutes).
14. When the bread crumbs are browned, remove from heat and place in a mixing bowl.
15. Add the lemon zest and the parsley while the bread is still slightly warm.
16. Toss and then spread out on a cookie sheet to cool to room temperature. Store in an airtight container before using.
17. Sprinkle on top of the Brussels sprouts before serving.
Top photo: Susan Feniger in her kitchen at Street, demonstrating making Brussels sprouts with goat cheese, apples and hazelnuts. Credit: David Latt
“We are what we eat” should be amended to “We are what we ate growing up.” Somehow the food we ate as kids gets embedded in our DNA. For James Johnston, chef and co-owner of two vegan restaurants in Texas, that presented a problem. He craved Southern-style dishes, heavy on animal products. As exemplified by his vegan country collard greens, his solution was to adapt country-style cooking to veganism.
Growing up in a meat-centric world, Johnston ate what everyone else did. Fatty brisket, barbecue ribs, grilled sausage, pulled pork and fried chicken were the preferred proteins, served with sides familiar to anyone who has traveled in the South — coleslaw, black-eyed peas, mac n’ cheese, cornbread and collard greens.
No tofu and sprouts
For many vegetarians and vegans, a pursuit of a healthier life-style motivates their move away from animal products. That partly motivated Johnston, but that wasn’t the whole story.
And he’s frequently asked why he went vegan. His answer comes accented in his distinctive Texan twang. “I reached a point where if I wasn’t going to kill it myself, I shouldn’t eat it, and that was a direct response to factory farming. And, in terms of milk, I never really liked it and when you think about what it is, milk’s kind of weird.”
Unlike other vegetarians, “When I went vegan, I wasn’t eating tofu and sprouts.” Au contraire. Even though he had walked away from pork and beef, his taste buds clamored for the flavors of his childhood.
What he needed was good old Southern cooking. Drawing inspiration from battered copies of ”Joy of Cooking” and the “Betty Crocker Cookbook,” at first he tinkered in his home kitchen with familiar recipes, trading out animal products with faux substitutes. After meeting Amy McNutt, a fellow vegan and an accomplished baker and now his wife and business partner, Johnston took his veganism professional.
He and McNutt run the Spiral Diner and Bakery at two locations in Texas, in Fort Worth and Dallas, where the menu offers American classics and an eclectic mix of dishes with a global touch.
Their customers can choose dishes from a large menu, including Jamaican jerk made with tempeh, coconut curry, humus, a veggie taco and nachos with lots of gooey non-milk cheese, a hamburger patty made with soy, a meatball sub, a club sandwich with tofu and ice cream sundaes called i-Scream because the ice cream is made without milk.
Veganizing a classic
Adding movie producer to his credentials, Johnston makes it part of his on-set work to cook vegan meals for the actors and crew as he did on “Ain’t Them Bodies Saints” and “Pit Stop,” which screened at the 2013 Sundance Film Festival in Park City, Utah.
The heart and soul of Johnston’s cooking is the food of his childhood. “I mostly make the food I grew up eating, just veganized.”
Recently at our home in Los Angeles, Johnston cooked up a vegan country dinner that included cornbread, black-eyed peas, cole slaw, mac n’ cheese and collard greens. He was going to make a vegan brisket but ran out of time.
My favorite was his collard greens. He was kind enough to give me his recipe.
Vegan Country Collard Greens
Some ingredients in vegan recipes are designed to mimic the flavors of animal based products. Johnston brought a shopping bag of those ingredients, purchased locally at health food markets and grocery stores. To replace mayonnaise, he brought Vegenaise, the cheese in the mac n cheese was Daiya vegan cheese and replacing the deep flavor of sausage was liquid smoke.
Some writers, including Zester Daily’s Martha Rose Shulman, point out that most faux ingredients are heavily processed, which may not be the healthiest way to go. Johnston accepts the trade-off in his pursuit of those country flavors that are in his DNA.
Serves 4 to 8
Ingredients
2 bunches collard greens, washed, pat dried
½ yellow onion, washed, ends and skin removed
2 tablespoons garlic cloves, peeled
1 quart hot water
3 faux chicken or veggie broth bouillon cubes (Johnston recommends the Rapunzel brand)
⅓ cup sunflower oil
¼ teaspoon crushed red pepper flakes
2 teaspoons salt
2 teaspoons black pepper
2 teaspoons liquid smoke
Directions
1. Using a knife, get rid of the big chunks of stem in the middle of each collard green leaf and discard. Cut leaves into 1-inch strips and rinse in a tub with cool water. Lift the collards out of water and rinse it again until you are sure there is no dirt.
2. Finely chop the onions and garlic.
3. Mix the hot water with the bouillon. Whisk until the bouillon cubes are dissolved into a broth. Set aside.
4. Using a stockpot, over a medium-high flame heat the oil. Add the onions and garlic and cook until they turn translucent, tender and fragrant.
Stir in the red pepper flakes, salt, pepper and liquid smoke and let simmer for a few minutes.
5. Add half the chopped greens. Let them start to wilt and cook down. You’ll need long tongs to really mix them around so the hot oil covers them. When you have room add the rest of the collards.
6. Add the broth to the stockpot.
7. As the liquid gets hotter the greens will wilt and shrink, make sure you mix them well so the oil and broth are combined evenly with the greens.
8. Bring to a boil and turn the flame to low for simmering.
9. Cover with a lid and simmer on low for 30 minutes. Taste to make sure they are nice and tender, no bitterness. Cook longer if needed.
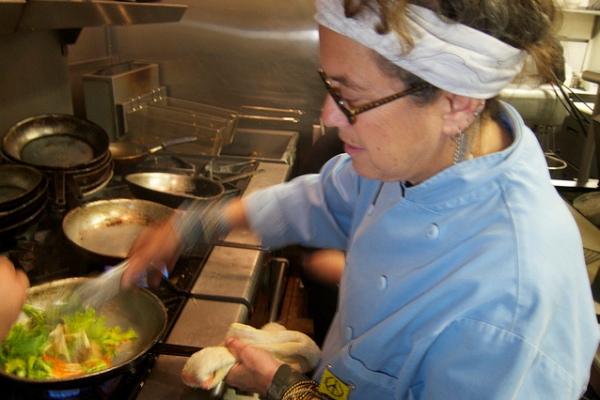
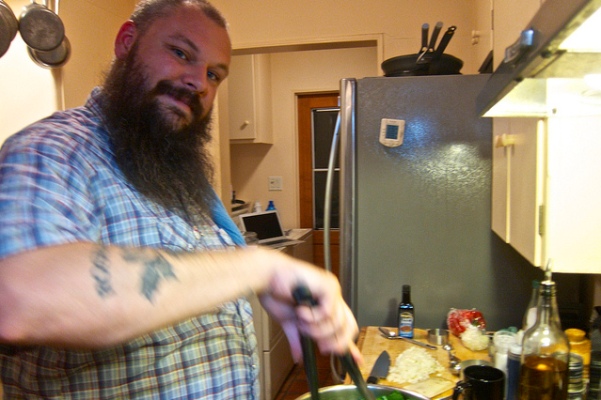
James Johnston cooking a vegan country meal. Credit: David Latt
Enjoying winter’s chill outdoors requires a well-insulated coat and good gloves. Indoors, the kitchen fights back the cold with a hot oven and good food ready to eat. The best winter food comforts our spirits and nourishes our bodies. Nothing does that better than a roasted vegetable salad.
More stories from Zester Daily:
» How to fall in love with kale
» Kale salad with squash, cheese and almonds
» Hearty bean and veggie soup with kale
In summer, a ripe tomato salad mixed with peppery arugula leaves and bits of salty, creamy Bulgarian feta can be a meal in and of itself. When the weather cools and a weakening sun denies farmers the heat they need to grow nature’s leafy wonders, we still hunger for salads but now it’s time to look to hearty greens and root vegetables to satisfy that craving.
In winter, walking through the local supermarket’s fresh produce section, it’s easy to believe we live in a one-season world. Vegetables and fruit that require summer’s heat are stacked high in the bins. But one taste and it’s easy to tell, these delectables have been grown out of season or traveled long distances to reach our tables.
Root vegetables like celery root, beets, turnips and potatoes grow well in the colder months. When roasted, their starches convert into sugar, coaxing the best out of these subterranean gems.
Winter produce is perfect for roasting
Sturdy leafy greens, like kale, especially black or Tuscan kale, come into their own at this time of year. Delicious raw in a salad, tossed with toasted hazelnuts, and a simple vinaigrette, kale reaches new heights of deliciousness when roasted.
When roasted, oil and heat drive moisture out of the kale, creating an airy crispness. That delicate texture beautifully complements the earthiness of roasted root vegetables when combined in a warm vegetable salad.
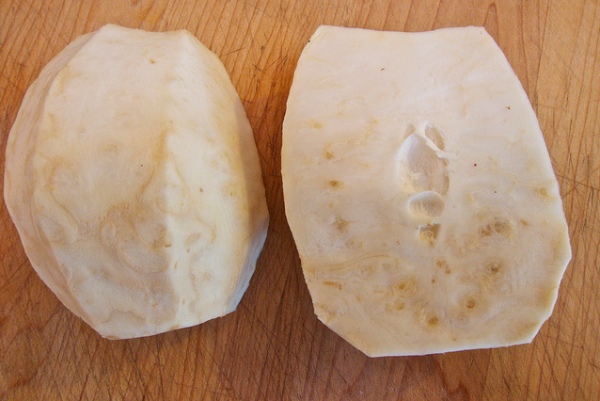
Having only recently tried celery root or celeriac, I had to look beyond its decidedly unattractive exterior. Put simply, celeriac may have a pretty name, but it is a very ugly duckling.
You have to wonder at the leap of faith it took the first person who ate celeriac. What possessed that brave diner to bite into the pale brown bulb, stippled with stiff, hairy roots?
Only when the woody outer skin is peeled like a pineapple is the pale white flesh revealed. Cut into matchsticks and tossed with olive oil or mayonnaise, raw celeriac makes a refreshingly crisp salad. Like kale, however, celeriac achieves its best self when roasted.
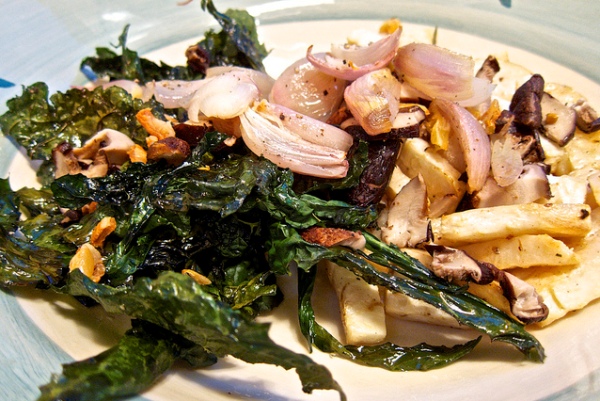
Winter’s Best Salad: Roasted Black Kale, Celery Root, Shiitake Mushrooms, Shallots and Garlic
Simple and easy-to-prepare, a roasted vegetable salad can combine any of your favorite vegetables. For this dish, I wanted to complement roasted kale’s crispiness with tender, savory roasted celery root. Shiitake mushrooms, whole garlic cloves and large shallots added flavors to round out the umami of the dish.
Serves 4
Ingredients
2 pounds celery root or celeriac, washed, peeled, cut into batons 2 inches by ½ inch, yields 1½ pounds
6 shiitake mushrooms, washed, halved
3 garlic cloves, root ends and skin removed
1 bunch black kale, washed, stems removed
3 large shallots or 6 small shallots or 1 medium yellow onion, root ends and outer skin removed, washed, quartered
1 tablespoon olive oil
Sea salt and freshly ground black pepper to taste
A pinch cayenne pepper (optional)
Directions
1. Heat the oven to 350 F.
2. Separately, toss each vegetable with a drizzle of olive oil, season with sea salt, pepper and cayenne (optional).
3. On a large baking pan lined with a Silpat sheet, parchment paper or aluminum foil, lay out the vegetables separately because they cook at different times. Place the pan in the oven.
4. Every five minutes, use tongs to turn the vegetables for even cooking, using the following times as a guide: kale leaves (10 minutes), shiitake mushrooms, shallots and garlic cloves (20 minutes), celery root (30 minutes).
5. Except for the kale, using a paring knife, check each vegetable for doneness.
6. After cooking, roughly chop the shiitake mushrooms, shallots and garlic cloves.
7. In a flat bowl, toss together the celeriac, shitake mushrooms, shallots and garlic cloves. Top with the crisp kale leaves.
8. Serve immediately to avoid the kale leaves losing their crispness.
Variations
- Together with the other vegetables, roast 2 large carrots, ends trimmed, peeled. Cut these into 1-inch rounds, seasoned with sea salt, pepper and olive oil and added to the chopped salad after roasting.
- Roast 2 large beets, whole, stems and leaves removed, washed, drizzled with olive oil. Place these on a lined baking sheet and cook in a 400 F oven for 45-60 minutes or until a paring knife pierces the flesh easily. Use rubber gloves to handle the beets. When cool to the touch, trim ends and peel off the skin. Rough chop the beets and toss with olive oil, sea salt and pepper separately so they do not color the other vegetables. Place them on the bottom of the serving bowl before adding the other vegetables.
- Season the vegetables with your preference of herbs, such as fresh rosemary, sage or tarragon, or toss any one of the herbs with olive oil and roast on a lined baking sheet in a 350 F oven for five minutes. Remove the leaves, finely chop and sprinkle over the cooked vegetables before tossing.
Winter salad with roasted kale, celery root, shallots and garlic. Credit: David Latt
Zester Giveaway
 Fall in love with recipes, inspired by New Orleans. Enter here to win one of 5 copies!
Upcoming Events
-
see all of our
Upcoming Events
-
Vermont Brewers Festival July 19-20Took place on July 19, 2013Vermont Brewers Festival Welcome to the 21st Vermont Brewers Festival. An Artisan Craft Beer Festival celebrating Artisan Craft Beer and the Brewers who brew them….
-
Kirkland Uncorked July 19-21Took place on July 19, 2013Kirkland Uncorked Kirkland Uncorked is a regional showcase of art, food and wine of the picturesque shores of Lake Washington in Kirkland, WA taking place…
-
Food & Wine Conference July 19-21Took place on July 19, 2013Food & Wine Conference The Food and Wine Conference brings together bloggers, small business owners, winemakers, chefs, public relations professionals, traditional media, new media, authors…
SmartBrief