Articles in Desserts
Everybody loves apple pie, and everybody at the very least has warm feelings about pumpkin pie, which is practically a symbol of the holidays.
Apple and pumpkin, two seasonal ingredients. Hmm. Apple and pumpkin, apple and pumpkin.
Hey, why not combine them in one super-seasonal pie?
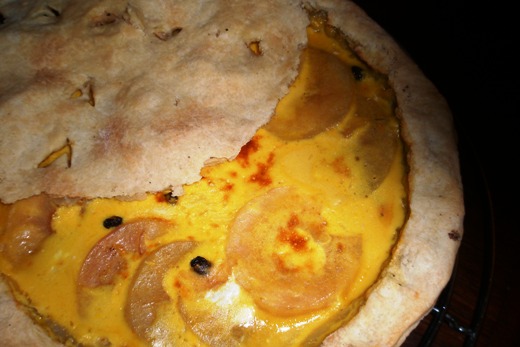
This edgy, avant-garde idea was already thought of 350 years ago. The leading English chef of the Restoration period, Robert May, gives a recipe for Pumpion Pie in his magnum opus “The Accomplisht Cook, or the Art & Mystery of Cookery.” It’s a wonderful pie, the apples giving perfume and juiciness to the pumpkin, and May’s pumpkin filling is nicely plush.
And it’s also exotic. It contains the usual pumpkin pie spices cinnamon, nutmeg and clove (plus pepper, which has a sweet aroma atop the pepperiness), but it’s also flavored with herbs: thyme, marjoram and rosemary. The herb flavoring works surprisingly well with pumpkin.
Or perhaps this is not so surprising. After all, winter squashes such as pumpkin are usually treated as vegetables, and herbs go well with them in a savory context, so why not in pie? I personally think rosemary is excellent in pumpkin pie, and if you ever have it at my house, there’s probably going to be some rosemary in it from now own.
But I’m also the kind of guy who likes to pump up the clove flavor by grinding cloves fresh. I recognize that a lot of people are reluctant to mess with the basic pumpkin pie recipe, which is practically set in stone because of its association with Thanksgiving.
Master the caudle
And the traditional Thanksgiving pumpkin pie tends to be very simple and straightforward because Thanksgiving spread around the country as a symbol of national unity after the Civil War. Pumpkin pie seemed a natural element in the great American feast because it seemed homespun and unpretentious, a symbol of sturdy Yankee self-reliance with no foreign frippery about it.
May’s recipe does admit the foreign frippery of currants, and it includes a typical 17th-century addition to pie, the caudle. This was a mixture of eggs and wine or other ingredients which was usually added to pie after it was baked, often through a hole poked in the crust. For this pie, you’re supposed to remove the whole top crust before pouring in the caudle.
I’m of two minds about this caudle business. It adds a pleasant bit of richness and a glamorous golden surface. On the other hand, it calls for six egg yolks, and this pie already contains 10 whole eggs. I’m thinking it may belong in the foreign frippery category.
An interesting thing about the filling is that May says to cook it before filling the pie. In fact, he calls on bakers to fry it “like a froise,” which was a sort of thick, eggy pancake, often containing bacon. This particular froise is so thick that it’s never going to turn into anything like a pancake because the bottom will burn before the top is ever done. You have to stir it like scrambled eggs (in effect it’s pumpkin scrambled eggs), which seems to give a pleasant crumbliness to the filling’s texture.
Robert May’s ‘Pumpion’ Pie
Serves 8
Ingredients
Directions
- Heat the oven to 350 degrees F. Line the pie pan with the bottom crust.
- Put the pumpkin in a food processor. Add the thyme, rosemary, marjoram, cinnamon, nutmeg, pepper, cloves, eggs and sugar, and process to a smooth soupy consistency. Transfer this to a buttered medium frying pan and cook over medium heat, stirring often, until thickened.
- Pour the filling into the bottom crust in a pie bpan. Sprinkle the currants over the pie filling. Peel and core the apples, cut in thin slices and arrange on top. Spoon the melted butter over the apples, affix the top crust and bake the pie until the crust is turning tan and you can hear bubbling, 35 or 40 minutes.
- At this point you can let the pie cool for a couple of hours in the usual way, or you can apply the “caudle.” To do so, slice around the top of the pie and lift off the crust. Pour the egg yolks and wine over the apple slices and return the pie to the oven until the caudle sets, about 7 minutes. Return the crust and let cool.
Zester Daily contributor Charles Perry is a former rock ‘n’ roll journalist turned food historian who worked for the Los Angeles Times’ award-winning Food section, where he twice was a finalist for the James Beard award.
Photo: Apple pumpkin pie. Credit: Charles Perry
We’re hurtling straight toward the cookie season … pardon me, the holiday season. That’s the time when we’ll be needing lots of little treats.
We especially need orange-flavored treats. Once upon a time, oranges were strictly a winter pleasure, and something about this most optimistically colored fruit still echoes in the holiday aesthetic.
Nuts are an old-time holiday treat too. Voila, here we have exotic cookies with an impressively ancient pedigree that are stuffed with almonds and candied orange peel and sweet spices.
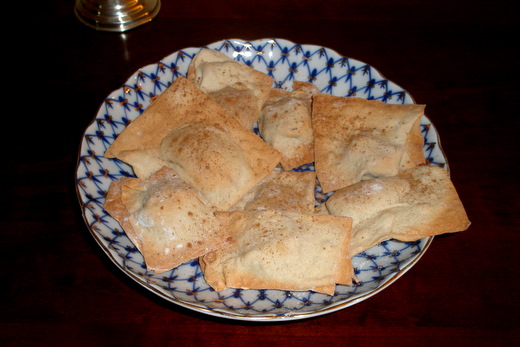
These cookies, however, are ravioli. That’s right, they’re ravioli baked cookie-fashion. The 1691 German cookbook known as “Vollständiges Nürnbergerisches” Koch-Buch categorizes them as kucheln, or little cakes, but the cookies are what they really are — sweet, crisp, crunchy cookies.
I know, the idea of German ravioli puzzles you. Well, there was a lot of French and Italian influence on upscale German cookery in the 17th century, and Mediterranean ingredients such as almonds and oranges were luxury goods north of the Alps. Mandeln Raffioln must have just seemed a natural concept.
The perfect thin pasta
Why not bake ravioli? You can finally use that very finest setting on your pasta machine (if it has six settings), the one you’d never dare use for making boiled ravioli, since these don’t get tossed around in cooking. The result is odd but pleasing — a disk of ground almonds, orange zest and spices surrounded by a square of crisp, browned paste. This cookie is unique in being practically fat-free. The only fat in it is oil in the almonds and orange peel, plus 1/36 of an egg yolk per cookie.
Or let’s call it an approximate square. The recipe says to roll the pasta as thin as possible (the thinner, the crisper), and the sheet that comes out of the finest setting on a pasta machine is likely to be somewhat oddly shaped. Go with it. You can trim the ravioli with a chef’s knife to make them as neat as possible, but these cookies strongly tend to be what we call rustic in appearance no matter what you do.
Wonton skins are convenient and perfectly square, but they’re also relatively thick and make a chewier cookie. If you want to substitute them, put 1½ teaspoons of filling in the center and fold one corner over to the opposite one to make a triangle, and figure on about 48 cookies.
Orange flavor to spare
If you don’t have any candied orange peel, use an apple peeler to remove the top layer of peel from two or three oranges, taking as little of the white part of the peel as possible. Mince the peel and boil it with 1 cup water and 1 cup sugar until it darkens and becomes translucent, 10 minutes. Drain the peel and discard the syrup. If you remove the zest with a super-fine grater instead of a peeler, it will include scarcely any of the bitter white peel and will need only a minute or two of boiling.
The original 1691 recipe called for about ¼ cup minced pistachios, but they’re out of season this time of year, so I either ignore that measurement or substitute one dried cranberry per cookie. The original recipe also called for rose water, but I’ve given up on getting most Americans to eat anything with rose water in it; I’m convinced they associate the flavor with soap. Anyway, why use rose water when orange blossom water suits the recipe better?
Mandeln Raffioln
Makes three dozen
For the paste:
For the filling:
Directions
- For the filling, put the flour and ½ cup sugar in a bowl and mix. Add egg whites and enough water to make a kneadable dough. Transfer the dough to a floured work surface and knead until smooth and elastic, about 10 minutes. Let rest, covered, at least ½ hour.
- Meanwhile, grind the almonds in a food processor. When they are as fine as coarse sand, add the orange blossom water so they don’t turn oily as you process them to a paste. Add the orange peel, pepper, mace, cardamom, a good pinch of cinnamon, the yolk and the ¾ cup sugar and process to a thick paste. You will have about 1½ cups filling.
- Divide the dough into four parts. Remove one to work on and cover the remaining three while you work. Roll the piece of dough in flour and run it through your pasta machine, starting at the coarsest setting and moving to the finest, flouring lightly at each pass. You will probably have to divide the dough in half at some point.
- Cut one sheet into oblongs. Fold over to make a square and pinch to seal. Or use a ravioli mold.
- Arrange on greased baking sheets. Bake at 350 F until the edges and bottoms are browned. Remove, toss with sugar and cinnamon and transfer to a rack to cool.
Zester Daily contributor Charles Perry is a former rock ‘n’ roll journalist turned food historian who worked for the Los Angeles Times’ award-winning Food section, where he twice was a finalist for the James Beard award.
Photo: Ravioli cookies. Credit: Charles Perry

My quest for the perfect chocolate cake has haunted me ever since I realized I had a knack for baking — not the professional kind with pastry bags and such — but homey baking that produces yeast rolls, fruit crumbles and birthday cakes. And for me, a birthday cake has always meant a chocolate layer cake with chocolate frosting. Don’t talk to me about boiled white icing or other fluffy stuff. To me, only a cake covered in thick chocolate icing will do, and to my mind it ought to replace “apple pie” in that adage “as American as apple pie.” Versions of apple pie exist in many Western cultures around the world, but chocolate layer cake is distinctly American.
For years I have never passed up a recipe claiming to be “the best chocolate cake you will ever eat,” and I would find an occasion to try it out, only to be disappointed. The cake would be too bitter or too sweet or too airy or dense or dry or simply lacking in any outstanding characteristic that would make it memorable, some intriguing je ne sais quoi element of flavor. Nor am I alone in this particular quest, for I have come to find that anyone who grew up in Brooklyn still talks about the long-defunct Ebinger’s bakery that produced the legendary Blackout Cake they grew up with and adored. Tears come to their eyes as they describe its heavenly properties: layers of moist dark cake separated by pudding and then iced with chocolate and topped off with cake crumbs clinging to the sides of the cake and along its top.
Several notable cookbook writers have offered recipes claiming to be authentic, but none has satisfied me, perhaps because I didn’t grow up in Brooklyn. I found the cake, first of all, a big drag to make. Getting the pudding right, slicing the layers into thinner layers, and then the fussy business of crumbling one of the layers and applying it to the sides and top of a frosted cake was just too much. After all of that, I just didn’t find the result thrilling. Sure, the contrast between the textures of the cake and the pudding filling was nice, and it certainly looked great, but again, the cake itself lacked that special texture and flavor that have kept me on the hunt.
So many chocoloate cake disappointments
I have tried recipes for cakes with batters tinted red, for one made with mashed potatoes, and for various recipes for fudge cakes, all promising bliss, but none truly satisfying. Some were too sticky and dense, others too unsubstantial and light, and all just plain boring. My quest went on until a day some years ago when I was at a meeting in Louisville, Ky., that wound up at the Woodford Reserve Distillery, which caters meals in its banquet hall.
Famous for its bourbon whiskey, the organization also serves up excellent dinners in its impressive facility, a place that has been referred to as “one of the best kept secrets of the South.” I don’t remember much about the main part of the meal except that we served ourselves from attractive buffets loaded with such Southern dishes as fried chicken, greens, sweet potatoes and many salads, and I recall being satisfied and very happy. But then came the dessert table, which offered an array of cakes, pies and puddings, among them a chocolate cake glistening with swirls of chocolate frosting. I headed straight for it, thinking that I would go back for some pie if my expectations for the cake would suffer my usual disappointment.
I remember every sensation of that moment — what was going through my mind when I plunged my fork into that slice of cake and had my first taste of it. It was moist and deeply chocolate and had a flavor I couldn’t identify but knew it was the je ne sais quoi I had been seeking. It was as if an orchestra had suddenly appeared and let loose with soaring strings from a thousand violins. I was shaken and overwhelmed by the knowledge that I had finally found THE CAKE. Of course I sought out the maitre d’ to request the recipe, but was turned down when told that it could not be distributed just then because it was going to be published.
At last, the best recipe is in hand
I spent the next year or so looking in every new Southern cookbook I could lay my hands on and was especially alert for a recipe for cake connected to the Woodford Reserve Distillery but had no luck. Finally I looked online and there it was — Woodford Reserve Chocolate Cake. Everything about the recipe is unusual. Instead of creaming butter and sugar the way most cake recipes begin, butter is melted with two kinds of chocolate to which sugar, strong coffee and bourbon are added. After cooling, the dry ingredients are added, and eggs and vanilla come in at the end. The whole thing bakes for an hour and a half in a slow oven, a direction I have never before seen in a cake recipe. The secret ingredient, of course, is the bourbon, which offers a nuanced flavor to the cake.
These days I get my fix of Woodford Reserve Chocolate Cake by offering to bring dessert to any potluck to which I am invited, and I am quick to throw birthday parties for friends. In my circles, the cake has become as famous as the Ebinger Blackout Cake — and for good reason. It is the perfect chocolate cake.
Woodford Reserve Chocolate Cake
Serves 16, generously
Ingredients
¼ cup Woodford Reserve bourbon
½ pound unsalted butter
3 ounces unsweetened chocolate
2 ounces bittersweet chocolate
2 cups granulated sugar
2 cups all purpose flour
2 well beaten, large eggs
1 teaspoon baking soda
1 teaspoon salt
¼ teaspoon finely ground pepper
1 teaspoon vanilla extract
Directions
- Combine coffee and Woodford Reserve, butter and chocolate and simmer over very low heat till butter and chocolate have melted. Whisk mixture to incorporate.
- Add sugar and stir till dissolved. Let mixture cool 10 minutes.
- While mixture is cooling, sift remaining dry ingredients together. Using a whisk, incorporate flour mixture into the liquid, making sure that all flour is dissolved.
- Whisk in beaten eggs and vanilla extract.
- Place finished batter into a 9-inch springform pan that has been buttered and dusted with cocoa.
- Bake at 275 F for 1½ hours or until a knife inserted into the center of the cake comes out just holding a couple of crumbs.
- Cool cake entirely before removing from the pan.
- This cake has never met an icing it didn’t like! Woodford bakers prefer caramel.
*Author’s Note:
In response to requests for an icing recipe to go with this luscious cake, Barbara Haber suggests:
Chocolate Frosting
3/4 cup good quality unsweetened cocoa (I use Ghirardelli)
3 cups confectioners sugar
1 stick of softened butter
3 – 4 tablespoons of half-and-half or heavy cream
1 teaspoon vanilla
Sift together cocoa and confectioners’ sugar in a bowl. In another bowl( I use the bowl of my stand mixer for this) combine 1 cup of this mixture with the butter and a tablespoon of cream and beat until smooth. Add vanilla. Add the rest of the sugar mixture alternately with cream all the while beating well. If mixture seems dry, add more cream carefully until the consistency is just right for spreading on the top and sides of the cake.
[This makes a lot of frosting, but the cake, which is not especially sweet, can hold up to it But, use your own judgement.] — Barbara
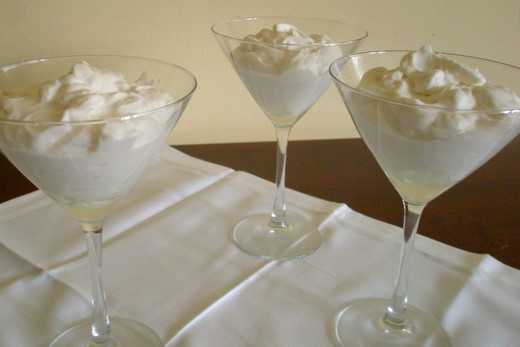
It’s a whimsical summer picnic treat that turned into a classic English dessert, and it has the silliest dessert name ever: syllabub. It was a leading English sweet from the 17th to the 19th centuries, and it was the classic topping for trifle until the English fell hard for Bird’s Custard Powder. Syllabub’s a lot nicer than fake custard — rich but light, dainty and elegant, innocent-looking and just a bit naughty.
All this started as something people liked to do on picnics. When you were out in the countryside, you would pour some wine in a bucket and talk a dairymaid into milking her cow into it, creating a sort of spiked milk foam.
Some people liked to serve the old school “syllabub from the cow” even when they were living in town with no dairymaids on hand, so for them there was a device called the artificial cow. It was sort of a wooden bicycle pump, with which you could spurt wine into your milk with enough force to produce foam.
Most city syllabubs, however, were made by whipping wine with cream and fell into two categories: whipt and everlasting. Whipt syllabub was flavored with wine (nearly always white wine, to preserve the color of the cream) sweetened with sugar, often with the addition of lemon juice and rind. You stirred these ingredients into the cream, carefully, so that their acidity wouldn’t just curdle the cream. Then you would whip it to stiff peaks and let the syllabub stand for a couple of hours.
And behold, it comes out a bit thicker than regular whipped cream, because the acidity has caused some of the watery fraction of the cream to separate. In a way, syllabub is the whipped cousin of an English fruit fool, which is simply cream thickened by the acidity of pureed fruit. Anyway, there was your whipt syllabub — lightly spiked whipped cream floating on a layer of sweetened wine faintly clouded with whey.
Everlasting syllabub was made the same way, except that you removed your whipt topping by spooning it off the wine layer (and then discreetly swigging the latter, I expect) to be served on its own. It would keep, if not forever, at least for several days. But who wants to keep syllabub that long?
As for that silly name, nobody really knows where it comes from. It would be like asking where “toodle-oo” comes from.
Syllabub from the British housewife
Martha Bradley’s “The British Housewife” (1756) included a syllabub recipe that’s worth trying today. I have halved it. There were a million kinds of syllabub, though. Mrs. Bradley also gave a more complex recipe for which you spooned off the foam into glasses partly filled with sherry and port, which must have looked rather fine. All syllabubs are delightful, whatever your doctor may say.
Syllabub
Serves 6
Ingredients
Directions
- Grate the rinds of two small lemons and juice them.
- Combine the lemon zest and lemon juice with the ice cream, stirring continuously to prevent it from turning.
- Sweeten the mixture to taste with sugar.
- Whip it up until stiff peaks form
- Spoon into 6 martini or wine glasses that each have a dash of sherry and wine in the bottom and let stand for 4 hours before serving.
Zester Daily contributor Charles Perry is a former rock ‘n’ roll journalist turned food historian who worked for the Los Angeles Times’ award-winning Food section, where he twice was a finalist for the James Beard award.
Photo: Syllabub. Credit: Charles Perry
I’m a pusher. A sugar peddler. I’m the lady on the street corner with a bag of taffy in her hand who lures you over with: “The first one’s free. Come back if you like it.”
Go ahead, cast your aspersions. I’ll just be here casting sugar molds and licking the spoon while you rail away at my evil ways. I can take it. Pastry chefs get guff from all sides, especially within the culinary ranks. If you’ve ever watched an episode of “Top Chef” (not the “Desserts” edition, obviously), there’s a guarantee that some perfectly competent chef will mutter, “Not dessert — I don’t do pastry,” in a tone so dismissive you’d think they’d been asked to use a toothpick to clean the bottom of a pair of clogs after a hike through a field of cow patties.
In the health community, the criticism is harder to ignore, with rising rates of obesity, diabetes, heart disease and cancers being linked to Americans’ increased consumption of sugar. In 1999, the per capita consumption in America was 158 pounds. Let’s see that again: 158 pounds of sugar per American! That’s about 50 tablespoons or a cup of sugar a day. That’s insane!
What’s even more insane is that the vast majority of the sugar is coming from what’s called “wholesale products” or what I like to call “sneaky snacks”; prepackaged foods like peanut butter, yogurt, salad dressing, soup, low-fat meals, crackers, etc. These are things that have no business containing extra sugar. And don’t get me started on soda. Thirty-three percent of the sugar going straight to Americans’ waistlines is coming from a can of pop.
For a woman who just released a book called “Sugar Baby,” you’d think I’d be applauding this overwhelming saturation of sweetness in every meal. And to you I’d say, “Not so fast, buster.” I think it’s appalling, this covert sugar distribution. If I’m going to be eating sucrose, I’ll do it on my own terms: openly and with relish, not in high doses hidden in my supper. I’m going to make my favorite taffy recipe that contains two cups of sugar and a cup of corn syrup and makes over 150 pieces of candy. When I eat a single piece of taffy, I will know exactly what it is I’m eating: Sugar!
I’m under no illusion that I’m nourishing myself.  However when I am eating healthfully, when I have every intention of filling up on nutrients with a salad, chances are if I’m eating a name brand product, the dressing’s second main ingredient is high fructose corn syrup. I could be forgiven for assuming I’m safely within my 1,500-calorie restrictive diet when I eat a packaged diet Glazed Chicken entrée from a brand name manufacturer — but its second main ingredient after chicken is high fructose corn syrup. I look at ingredient lists of allegedly “healthy” packaged foods and this is how I translate them: “dehydrated chicken, a bag of Skittles, a month’s worth of salt that would be better off sprinkled on some caramel …”
I’d rather poach a breast of chicken myself and even steam some veggies for good measure. That leaves me with a nice slice of homemade pie for dessert, and I bet you I’ll be well within the calorie confines of even the most restrictive diet. And I’ll guarantee that it’ll taste a hell of a lot better than anything I had to tear from two layers of cardboard and a toxic coating of cellophane. Nutrition-wise, I’ll have eaten far less sugar than had I eaten that prepackaged “diet” chicken … and it didn’t even include dessert!
I’ve done a very unscientific survey on my sugar consumption and this is what I’ve found: Aside from the sugars I consume from fruits and veggies, I eat about 5 to 10 tablespoons of sugar in a normal* week. Why so low? Because I make every meal from scratch and I don’t add sugar. I buy plain yogurt. I drink coffee black. I make my own soups and dressings. And then I bake and eat desserts knowing damn well what’s in them. Sugar is a treat, a celebration. It’s not the enemy.
But it is an unwitting pawn in the food manufacturing game. Keep sugar where it’s meant to be, in birthday cakes and campfire S’mores, in those treats that we eat on occasion to celebrate our good fortune at being alive.
*Normal is a week during which I’m not knee deep in recipe testing for a cookbook. On those occasions, the sugar consumption is off the charts and untrackable. But I’m a professional. Don’t try this at home.
This week’s Soapbox contributor, Gesine Bullock-Prado, founder of the Gesine Confectionary product line and author of “My Life from Scratch” (Broadway Books) and “Sugar Baby” (Stewart, Tabori & Chang) has been featured in People magazine, on the Food Network, Zester Daily and in many other national publications. She lives in Vermont.
Top photo: Gesine Bullock-Prado. Credit: Tina Ripp
Patience is not one of my virtues (anyone who knows me will confirm this). But cooking with a toddler requires nothing but. Just when I’d resisted the temptation to open the oven and peek at a cake or incorporate the egg whites too quickly, my daughter dragged her stepstool into the kitchen.
To my 3-year-old daughter, Penelope, cooking and eating should — and do — happen simultaneously. She loves nothing more than dumping the flour in while the butter and eggs are still in the early stages of mixing, dipping her finger into a half-prepared cake batter, tasting the raspberries before they become jam and munching on carrots that were intended for the spaghetti sauce. All of this is followed by, “Is it ready yet?” The only sign of patience from Penelope is a neat row of 14 chocolate chips, placed one by one, on the kitchen counter.
Penelope’s culinary convictions don’t stop there. The real test of my patience begins when I’ve asked what she would like for dinner. A choice is made, but when she sits down to eat she declares that she asked for spaghetti — thin spaghetti, in fact. And no, she doesn’t like tomato sauce (which she adored only yesterday). I’ve started uttering the words I dreaded hearing from my own mom growing up — “This is not a restaurant.” To which her response was to open her own “restaurant” in her kid-sized play kitchen, complete with order pad. “What would you like at Penelope’s restaurant?” she asked sweetly, balancing a tray of plastic eggs and wooden sausages.
Penelope leftovers
All of this has led to my latest culinary challenge: dealing with the leftovers that are created by Penelope’s ever-changing food moods, as I like to call them. She might point excitedly to the bright yellow bananas in the grocery store, encouraging me to buy the whole bunch, but eat them at home? The horror. Ditto for strawberries, blueberries, and spinach from the farmers market.
This leaves me with two options: to never take her to the grocery store or farmers market (impractical on all counts, and too depressing to contemplate) or get creative with “Penelope leftovers.” I have stuck with option two, creating smoothies, cakes, cookies and casseroles when faced with the sadly neglected foods that don’t satisfy her palate this week. I’ve tried to bribe, cajole, encourage and suggest, but truly there is nothing you can do to change a 3-year-old’s mind about a food she’s declared public enemy No. 1. As any self-help book will tell you, you have to change.
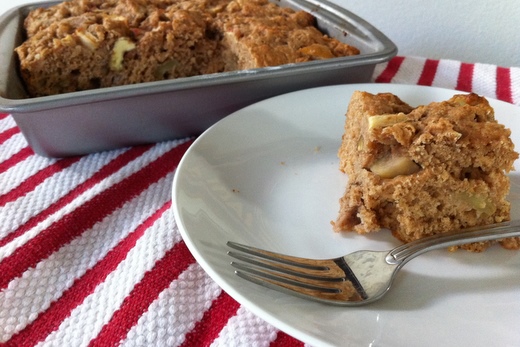
This cinnamon-scented apple cake was created out of desperation: mounds of leftover apples haunted my refrigerator last month with which I was determined to make something other than applesauce. (Since then, apples have taken top position in Penelope’s daily diet. Check back next month, I’m sure apples will have fallen out of favor and blueberries will be the star of this cake.) This cake is for bakers and non-bakers alike; it’s a buttery, slightly dense cake that takes little time to whip up and will use up any apples you have lying around. And the whole wheat flour and fairly low sugar content erase any guilt you might feel about feeding this to your toddler (or husband) for a few days. In short, you need little patience to pull this one off.
Leftover Apple Cake
Serves about 12
Ingredients
Directions
- Preheat the oven to 400 F. Butter and flour one 9-inch square baking dish or tart pan.
- Place the chopped apples in a bowl of water along with the juice of the lemon. Set aside.
- Sift the flours together in a large bowl and add the baking powder, cinnamon, nutmeg, brown sugar and salt.
- In a separate smaller bowl, whisk together the eggs and the buttermilk. Whisk in the melted butter. Pour the buttermilk mixture over the flour mixture and stir until barely combined — don’t overmix. (The batter will be very thick.)
- Drain the apples, shake off any excess water and fold the apples into the cake batter. Gently fold in the walnuts (do not over-mix).
- Spoon the batter into the prepared pan, pushing it out toward the edges. Sprinkle the sugar over the top of the cake, if using. Bake on the middle rack for about 25 to 30 minutes or until the cake is just set and slightly golden on top. (Check it at 25 minutes; if a toothpick inserted in the middle comes out clean the cake is ready.)
- Let it cool for at least 15 minutes before you slice it. It’s delicious as is, but a dollop of whipped cream never hurts. Keep any leftover cake in a sealed container in the fridge for up to 5 days.
Note: To create a crunchy sugar top, add a large-grain sugar right before baking (it’s available in baking and specialty stores).
Zester Daily contributor Laura Holmes Haddad lives with her husband, daughter and son in Northern California, where she writes about wine and food and runs her website, gourmetgrrl.com. Her latest collaboration is “Plats du Jour: A Journey Through the Seasons in Wine Country” with the girl & the fig restaurant in Sonoma, Calif., released in November 2011.
Photo: Leftover apple cake. Credit: Laura Holmes Haddad
Sixteen years ago, I left a job in academia to go to cooking school. The course itself was a joy. But completing the required six-week apprenticeship at a four-star Manhattan restaurant was the scariest thing I’ve done in my life. Every day I’d come home from work and tell my husband that I was going to be fired — for making the tuiles too thick or for wasting too much phyllo dough when making tart shells. He would protest that I couldn’t be fired, since I wasn’t being paid. But I knew another intern who had been dismissed for choosing too-large mint leaves to garnish plated desserts (“This is not a diner!” the chef shouted at her as he gestured toward the door). I was sure I would be next.
It was with immense relief and hard-earned self-knowledge (I now knew I was not cut out for restaurant work) that I made it through and collected my certificate. I also walked away from that four-star kitchen with the most useful piece of baking advice ever. In an unusually friendly and expansive mood one day, the chef told me he considered the freezer as important as the oven in helping him do his job. From that day on, I looked at my freezer in a new light and tried to use it to produce my own humble home desserts with seeming effortlessness.
Many components of fancy restaurant desserts are made days or weeks in advance of service and frozen. At the restaurant where I worked, the pastry chef was rightly famous for a chocolate soufflé that diners could order at the end of a meal, rather than ordering at the beginning as is traditional. The secret to his kitchen magic: The batter was frozen in little aluminum cups and baked straight from the freezer in less than 10 minutes.
But the restaurant’s freezer held much more than novelty desserts like this one. There were unbaked puff pastry shells, mousses, buttercream fillings and frostings, ice creams, sorbets, and cookies. With these pre-made elements at the ready, it was easy for the pastry cooks on duty during dinner service to gather and assemble them into spectacular showpieces in minutes.
It’s been 15 years since that terrifying, enlightening internship. And yet, I find myself thinking of the famous pastry chef’s frozen Bavarian creams, sliced brioches and streusel toppings every time I open my freezer door to retrieve a disc of pie dough or to stow individually wrapped leftover brownies. My freezer holds a variety items so that I am always prepared to bake. It helps me shave hours off of preparation time and eliminate last-minute work when I entertain.
My freezer is my pantry
Is there anything worse than realizing that you can’t make blondies during a snowstorm because you are out of butter? My freezer functions as an extension of my pantry, storing pounds of butter, lard (we make a lot of pie dough around here), nuts, extra flour and other grains in case of emergency.
Frozen dough changed my life
My baking life changed when I realized that I could freeze unbaked cookie dough. Gone are the days when I baked four dozen cookies and ate all of them in 24 hours. Now, I drop balls of dough onto a parchment-lined baking sheet, freeze the sheet until the dough is hard (about 15 minutes) and throw them into a zipper-lock freezer bag. This bag sits on a shelf in my freezer, and when I want a cookie or two, I preheat the oven, take a couple of balls of cookie dough from the bag and bake them. I also feel secure in the knowledge that I have several pounds of pie dough in the freezer, so I’m always a few hours closer to homemade pie than I would be if I had to start from scratch.
Ice cream is essential
I usually have several pints of ice cream and sorbet in the freezer. I use it to accompany pies, tarts and cakes and to make simple ice cream treats like sandwiches (see recipe below) or chocolate-dipped ice cream cones. If I have a package of graham crackers and some time on my hands, I will make an ice cream cake in a spring-form pan, layering two flavors of ice cream and some fudge sauce, chopped nuts and/or caramel sauce on top of a quick crumb crust. A layer of sweetened whipped cream spread over the top of the cake is a pretty finish. Wrapped well in plastic, this cake can sit in my freezer for weeks until there’s an occasion for it.
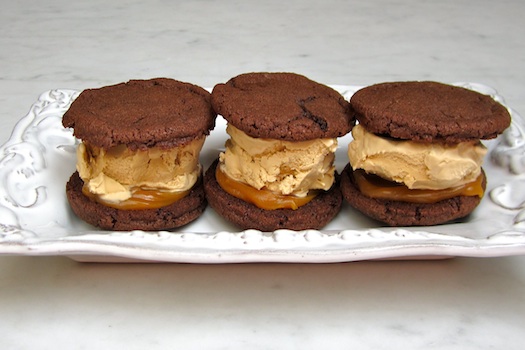
Mocha Caramel Ice Cream Sandwiches
Makes 12 ice cream sandwiches
Every Memorial Day, I delight my friends with homemade ice cream sandwiches that I fetch from the freezer after our meal of barbecued brisket, ribs and baked beans. I put together these treats at my leisure. My stockpile of ice cream guarantees that I won’t have to settle for what’s left in my supermarket’s frozen food aisle after the frenzy of shopping that takes place here in the Hamptons in anticipation of the holiday. I make the cookie dough, shape it into balls, freeze the unfrozen balls well in advance of my party and bake the cookies when I’m ready to put together the sandwiches, a day or two before I’ll be serving them. Once I put together the sandwiches, I wrap each one individually in plastic wrap and then freeze them all in an airtight container or zipper-lock bag for freshness.
Ingredients
Directions
- Preheat the oven to 350 degrees. Line two baking sheets with parchment paper. Combine the flour, cocoa powder, baking soda and salt in a medium mixing bowl.
- Cream the butter and sugar together in a large mixing bowl with an electric mixer on medium-high speed until fluffy, 2 to 3 minutes. Add the egg and vanilla and beat until smooth. Stir in the flour mixture until just combined.
- Scoop up tablespoons of dough and roll them between your palms to form a ball. Place dough balls on baking sheets, leaving about 3 inches between each cookie. You should wind up with 24 cookies, two baking sheets’ worth. (Cookies may be placed next to each other on parchment-lined baking sheets, frozen, transferred to zipper-lock plastic freezer bags and stored in the freezer for up to 1 month. Frozen cookies may be placed in the oven directly from the freezer and baked as directed.)
- Bake the cookies until they are dry on top, 8 to 10 minutes (a minute or two longer for frozen dough). Let them stand on the baking sheet for 5 minutes and then carefully slide the entire parchment sheet with the cookies from the pan to a wire rack and let the cookies cool completely.
- Line a baking sheet with a clean piece of parchment paper. Use a ¼-cup dry measure to scoop out 12 disks of ice cream (if the ice cream begins to melt on the baking sheet, place it in the freezer, along with the unmolded ice cream, to firm up before proceeding). Lightly cover with plastic and use the flat bottom of the measuring cup to slightly flatten each ice cream disk. Freeze until very firm, at least 1 hour and up to 1 day.
- Spread 1½ teaspoons of caramel sauce over the flat side of half of the cookies. Sandwich the flattened balls of ice cream between two cookies. Wrap each ice cream sandwich tightly in plastic wrap and place in a zipper-lock freezer bag. Freeze for at least 1 hour and up to 3 days before serving.
Lauren Chattman is a cookbook author, freelance writer and former professional pastry chef. Her recipes have appeared in Food & Wine, Bon Appetit, Cook’s Illustrated, and The New York Times. She is the author of 14 books, most recently “Cake Keeper Cakes” (Taunton 2009) and “Cookie Swap!” (Workman, 2010).
Photo: Mocha caramel ice cream sandwiches. Credit: Lauren Chattman
We can get oranges all year around, but if you’re one of the lucky few who own an orange tree, you may be wondering about now what you’re going to do with all the fruit weighing its boughs.
This points up the thing about oranges. They have wonderful juice — none better — but what do we ever make with them? Mostly fruit salad. The juice loses its fresh flavor in cooking, and you can’t pickle oranges like lemons, Moroccan style, because they develop a loathsome spoiled-pumpkin aroma.
Astonish the guests
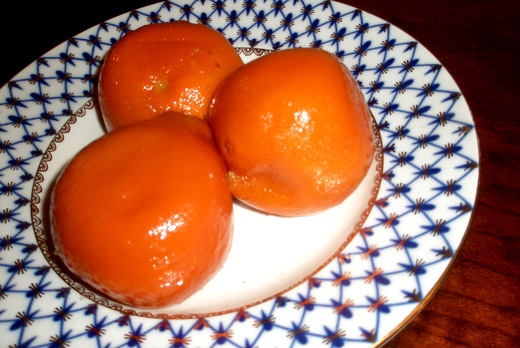
In 17th century England, the thing about oranges was that they were rare and expensive. Unless you owned a special greenhouse called an orangery, you had to buy them imported from Spain or Portugal. With their fragrant peel and optimistic color, they were a show-off fruit, and people came up with show-offy treatments like oranges preserved “after the Portugall fashion.”
The recipe in Sir Hugh Plat’s 1609 “Delights for Ladies” points out that you can cut right through one “as you would a hardboiled egg,” astonishing your guests by revealing a translucent globe of aromatic peel inside. They’re basically whole candied oranges, languid and plush, dark orange-amber in color with an unnatural luster. They have a strange, overdone appeal, kind of like Snooki Polizzi on “Jersey Shore,” even down to the skin tone.
The filling is something like marmalade, but proper marmalade requires an exact balance between fruit pectin and sugar to jell, while the filling of Portugall-fashion oranges isn’t expected to jell. So they’re easier to make than marmalade, though they still involve a little more trouble than we’re used to taking with oranges. I, for one, am willing to go to a little trouble when it comes to astonishing the old guests from time to time.
Perfect for dessert
In the 17th century, this was a way of preserving oranges, and they will keep in the refrigerator for several weeks. I think of them basically as an accompaniment for vanilla ice cream. One orange would be overwhelming for a single diner, so serve them by halves or even quarters.
This dish was created for Valencia oranges. Navel oranges will do just fine, although their peels are thicker and you might want to scrape off a little of the bitter white part. Tangelos work too, but tangerines are too small to be practical.
Oranges ‘After the Portugall Fashion’
Makes 4 stuffed oranges, 8-16 servings as a condiment
Ingredients
Directions
- Choose the 4 best-looking oranges. Take one and make a hole in the side (not on one of the ends) with an apple corer. Remove a plug of peel and hollow out the orange, scraping and sawing with the apple corer to remove as much of the pulp and seeds as you can without puncturing the peel — a melon baller is the best tool for this job. Repeat with the remaining 3 chosen oranges.
- Quarter the 2 remaining oranges and remove the flesh and seeds, exposing as much of the white peel as possible. Boil all 6 oranges in 4 or 5 quarts of water for 2 to 2½ hours to soften and reduce bitterness.
- Boil 6 cups sugar with 3 cups water until clear. Add the oranges and cook on a low boil for ½ hour. They will turn a richer orange color. Remove and drain.
- Puree the 2 quartered oranges with ½ cup sugar and stuff the 4 hollowed oranges with this puree (you may have some left over).
- Return the oranges to the syrup and poach (the syrup should not quite to cover them) for 15-20 minutes.
- Remove, drain and refrigerate.
- To serve, present with the hole side down and slice through for maximum effect.
Zester Daily contributor Charles Perry is a former rock ‘n’ roll journalist turned food historian who worked for the Los Angeles Times’ award-winning Food section, where he twice was a finalist for the James Beard award.
Photo: Oranges “after the Portugall fashion.’”Credit: Charles Perry.
 Celebrate home-style baking with 120 delicious, must-have recipes for all lovers of sweets. Enter here to win one of 5 copies!
Upcoming Events
-
see all of our
Upcoming Events
-

Vegas Uncork’d by Bon Appétit May 9th-12thTakes place on May 9, 2013Vegas Uncork’d by Bon Appétit The most anticipated foodie event of the year is bigger than ever with dozens of one-of-a-kind events that could only happen…
-

Bottle Rock Napa Valley May 9th-12thTakes place on May 9, 2013Bottle Rock Napa Valley Situated on three stages spread over 26 acres on the grounds at the Napa Valley Expo in the City of Napa, more than three…
-

Spring Open House Presented by Rodale Institute May 10th-11thTakes place on May 10, 2013Spring Open House Presented by Rodale Institute Cannot wait to get your hands in the dirt? We have everything you need to get your organic…
SmartBrief