Articles in Desserts
If there’s one thing I enjoy as much as making cookies during the holidays, it’s shopping for high-quality, well-designed, useful baking tools. No gingerbread house kits, chocolate temperers or novelty cake pans for me (although this one my sister just gave me is awesome). I want equipment and ingredients I’m going to use more than once or twice a year. The following list includes many items I already own (some given to me as gifts, some I generously gave to myself) and couldn’t live without. There are also a few that are still on my wish list (Brown Bag shortbread pan, hint, hint). As a bonus, you’ll find a favorite holiday recipe from my new book, “Cookie Swap!,” which can certainly be made without a cookie scoop, high carbon steel biscuit cutter or a Silpat but is a pleasure to make with these relatively inexpensive but highly functional tools.
1. Cookie scoops: Spring-loaded stainless scoops from OXO are a must for anyone who is serious about cookies. Cookie scoops allow you to portion out drop cookie dough (and muffin batter) uniformly, so every one of your cookies bakes at the same rate. And they help keep your hands clean while you’re working. A set of three — large, medium, and small — makes a very nice gift.
2. Handmade copper cookie cutters: Copper Gifts manufactures copper cookie cutters in hundreds of shapes and sizes, and if they don’t have what you want, they’ll fabricate one to your own design specifications. In the past year, I’ve purchased a poodle (to make cookies that look just like my own dog), a whale (our school mascot), and New York State (I decorate those cookies with Yankee stripes). Buy the baker one or several of these handmade cutters and you will be giving an heirloom, for a very reasonable price.
3. Stainless steel offset icing spatulas: Constructed of high-carbon stainless steel, these spatulas are light but strong, with flexible blades that easily help spread the thickest batters and icings. The regular size (13 inches long) is great for smoothing brownie batter into an even layer, for icing bar cookies and for transferring hot, delicate cookies to wire racks. The mini size (7 inches long) is small enough to neatly ice tiny cookies.
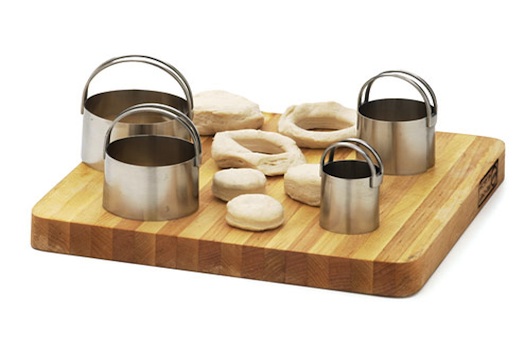
4. Heavy-duty biscuit cutters: These biscuit cutters have razor-sharp edges, and are essential for cutting cookie dough into rounds. (If four cutters isn’t enough, check out Sur la Table’s professional bakeware shop for a set of 12.) If this gift seems too skimpy, throw in a pre-seasoned Lodge cast iron skillet, and your recipient will have just the right equipment to make great pot pies and cobblers.
5. Brown Bag shortbread pans: Every time I see one of these pretty stoneware pans in a catalog or online, I have the urge to begin a massive collection. If the baker you are shopping for is also a collector, start him or her off here.
6. Glass canisters: I store my flour and sugar in airtight plastic containers, but I like these retro canisters (in production since the 1940s) to store pretty homemade cookies on my counter-top.
7. Blanched hazelnuts: This will sound completely crazy, but one of the best gifts I ever received was a five-pound bag of blanched hazelnuts from Nuts Online. I was in heaven. Hazelnuts are my favorites, but the idea of skinning them often sends me straight to the nearest bag of pecans. So to have a large store of ready-to-use nuts was a convenience I fully appreciated. If hazelnuts aren’t quite the thing, this website has bulk quantities of all sorts of luxury ingredients (organic dried fruit, praline and pistachio pastes, organic cacao nibs) that make excellent gifts for the cookie baker.
8. Silpat: A no-brainer if your baker friend does not already own one. Packaged along with a heavy-duty rimmed half sheet pan and wire cooling rack, this gift is a nice upgrade for the novice.
9. Digital scale: I used to use my digital scale primarily to weigh out ingredients for bread dough. But now I find myself using it more and more for cookie- and cake-baking. Newer baking books, acknowledging the importance of accuracy in getting consistent results, often give weight as well as volume measurements. Cookie recipes from Internet-accessible British sources (Dan Lepard’s column in the Guardian is a favorite) are simple to prepare using volume measurements. This OXO scale has all of the features that a baker requires: A large (11-pound) capacity, a pull-out display for easy reading, a tare function, and measurement in 1/8-ounce and 1-gram increments.
12. Pizzelle maker: When I saw this machine in Pittsburgh’s premier kitchen shop during my “Cookie Swap!” book tour, I dreamed of owning it. But it was just too heavy to drag through airport security! When I got home and read about Pittsburgh legend Carmen Palmieri, the founder of Palmer Manufacturing (makers of the only domestic pizzelle irons on the market), I had to have one. Luckily, In the Kitchen has them in stock and ready to ship anywhere in the U.S.
Chocolate-Mint Sandwich Cookies
Makes 32 cookies
When I set out to make these cookies, I started with the idea that I would just sandwich a peppermint patty between two warm chocolate rounds and leave it at that. But my dough spread in the oven, and when I made my sandwiches the candies were lost inside the cookies instead of becoming a filling visible at the edges. What to do? I got out a biscuit cutter and pressed it down on the warm cookie sandwiches, cutting away the excess around the edges and sealing the candy inside. The creamy peppermint was now a hidden surpise. Fabulous!
Ingredients
Directions
- Preheat the oven to 350 degrees. Combine the flour, cocoa powder, baking soda, and salt in a medium mixing bowl.
- Cream the butter and sugar together in a large mixing bowl with an electric mixer on medium speed until fluffy, 2 to 3 minutes. Add the egg and vanilla and beat until smooth. Stir in the flour mixture until just combined.
- Use a cookie scoop to portion out rounded tablespoonfuls of dough on parchment- or silpat-lined baking sheets (alternatively, roll scant tablespoonfuls of dough between the palms of your hand to form small balls), leaving 3 inches between each cookie. Bake the cookies until they are dry on top, 10 to 12 minutes. Let them stand on the baking sheet for 3 or 4 minutes.
- Working quickly, and while the cookies are still warm, sandwich a peppermint patty between two cookies and transfer to a wire rack to cool. After you’ve made the sandwiches and while the cookies are still pretty soft, place each cookie on a cutting board and use a 2-inch biscuit cutter to press down on each sandwich, cutting away the edges and sealing the peppermint patty inside. Chocolate-Mint Sandwich Cookies will keep at room temperature in an airtight container for up to 3 days.
Zester Daily contributor Lauren Chattman is a cookbook author, freelance writer and former professional pastry chef. Her recipes have appeared in Food & Wine, Bon Appetit, Cook’s Illustrated and The New York Times. She is the author of 14 books, most recently “Cake Keeper Cakes” (Taunton, 2009) and “Cookie Swap!” (Workman, 2010).
Photo: Biscuit cutters.
Tarte Tatin was invented, so we are told, late in the 19th century by one of the two Tatin sisters, les demoiselles Tatin, who kept a restaurant, the Hotel-Terminus Tatin, in the Loire valley town of Lamotte-Beuvron. Yeah, right, I used to say, and Marco Polo brought back pasta from China. But it turns out the legend is credible: We actually know the names of the sisters. Mlle. Caroline (1847-1911) ran the dining room of the establishment, while her older sister Stephanie (1838-1917) was the chef and, presumably, inventor of this seductive dessert. “Invention,” however, is something of stretch, for the famous tarte is really nothing but a classically simple French tarte renversee like those found in every farmhouse kitchen, then and now.
The combination of caramelized butter, sugar and apples melting together under an equally buttery, sugary shortcrust pastry lid (pate brisee or pate sucree) is extraordinary, a sum that is much, much greater than its parts, an exaltation of apples and the epitome of all the world’s apple pies. Down through the decades, cooks have tinkered with the original, adding rum or armagnac, cinnamon or vanilla, serving it with ice cream, even substituting pears, mangoes, plums or tomatoes for the apples that form the heart of the dish. But as with a Shakespearean tragedy turned into opera or ballet, the tinkering only serves to remind us of the indisputable greatness of the original.
Reine des reinettes
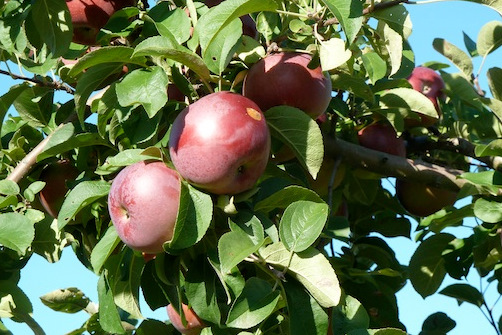
As that wonderful writer John Updike noted, September is apple season when throughout northern regions “the breezes taste of apple peel.” A fine time, then, to commemorate this great version of apple pie.
A tarte Tatin is a little tricky but not difficult, provided you have certain critical ingredients. The major one is apples, and not just any apples. Every French recipe for this classic calls for a very special apple called reine des reinettes, an old-fashioned apple variety that is hard to find in the United States, though perhaps a little easier in Canada. Crisp and crunchy, nicely tart but with a high sugar content, firm enough to maintain its texture when cooked, this is an apple that deserves to be better known. Some say it’s related to English pippins (e.g., Cox’s orange pippin, the most popular British apple) but John Bunker, Maine’s apple guru, doesn’t think so. When I called Bunker for information — he knows more about apples all over the world than anyone else I know — he offered to graft a reine des reinettes scion onto another apple tree so that one of these years, with luck and attention, I will harvest my own reinettes and make an authentic tarte Tatin.
But for now I’ll make do with Julia Child’s advice. Back in 1971, she attempted a true Tatin on camera (it didn’t work very well) using golden delicious apples. But she recommended others too: Rome beauties, York imperials, Baldwins, northern spies and Cortlands. Amazingly, just 40 years ago, American cooks had access to all those different apples. No longer. Golden delicious is the only one still widely available — too widely if you ask me. And in apple country — Maine, Michigan, or upstate New York — you can find Cortlands. But the rest of them? Happy the cook who lives near an heirloom apple farm and can have the pick of the orchard!
Butter, sugar and apples
Whatever the variety used, the fruit must be fully ripe and flavorful. You’ll add sugar but not much — this is not a jam tart but a tart of apples that have been thickly sliced and braised in butter and sugar until they have absorbed the buttery caramel flavor but still retain their shape, and their distinctive appley characteristics. The butter should be the best and densest you can obtain.
The beauty of tarte Tatin for diners is obvious, as there are few aromas more enticing than the combination of butter, sugar and apples. For cooks, it has added advantages, first of all in the way it makes a pie but without the fiddly business of pie crust, rolling it out, fitting it to a pan, crimping the edges, making the whole thing look beautiful and homely at one and the same time. With tarte Tatin, you just roll out the pastry; if it’s misshapen, it doesn’t matter because it simply gets plunked down on top of the apples and if it doesn’t quite fit, you trim off the ragged edges. French cooks traditionally use pate brisee, which is close to what we conventionally call pie crust or shortcrust pastry.
For the pie dish, ideally you use a heavy, tinned-copper tarte renversee pan, and that alone is sufficient excuse to make a trip to Paris to visit Dehillerin, the great French kitchen supply store deep in the bowels of what was once les Halles where a tarte Tatin pan currently is listed for €71 , or a larger one for €77.50, or about $125.
But if you don’t have time to get to Paris and back before supper, use your favorite deep black-iron skillet, the one with sloping sides that is about 11 inches across and three or four inches deep. But first plant that apple tree and wait for it to grow.
La Tarte des Demoiselles Tatin
Ingredients
For the pate brisee:
Directions
-
Place the flour, salt and sugar in the bowl of a food processor and process very briefly, then add the butter, cut into inch-long chunks and process again, briefly, just until the ingredients are combined and have the texture of coarse cornmeal. With the processor running, add a few tablespoons of water through the feed tube and continue adding ice water until the dough just holds together. Be careful not to over-process — the whole procedure should take less than a minute start to finish.
-
Turn the dough out onto a very lightly floured pastry board and pull it quickly into a ball, then flatten it to a circle about an inch thick. Cover it with plastic wrap and set in the refrigerator while you proceed with the rest of the recipe.
For the tarte:
Directions
- Take a 10-inch round pan, a tarte Tatin pan or a deep, heavy ovenproof skillet such as a black-iron skillet. Generously butter the bottom and sides, using all the butter to make a thick layer, especially on the bottom. Sprinkle the sugar all over the bottom and sides, turning the pan to coat it evenly with sugar.
- Now, beginning at the edges, arrange the apple quarters, peeled side down, in concentric circles (large quarters may be cut in half), covering the entire bottom of the pan. Fit extra slices of apple in and around the slices so that the bottom is completely covered with apple slices and you can’t see through. Set the pan over low heat just until the butter melts, then turn the heat up to medium or medium-high and continue cooking until the sugar starts to brown. Do not stir the apples. This may take as much as 20 or 30 minutes. When the sugar is browned and caramelized, remove the pan from the heat.
- Preheat the oven to 350 F. Roll out a disc of pastry to fit over the apples with enough of an overhang to tuck down gently around the edges. Set in the preheated oven and bake 30 minutes, or until the pastry is golden. Remove from the oven and let rest about 15 minutes, then run a knife around the edge of the pan. Set a round serving platter over the top and carefully, using pot holders to hold the pan, turn it over. Some of the apples may stick to the bottom of the pan but just pry them up with a spatula or palette knife and add to the tart. The tart should be served warm with vanilla ice cream or vanilla-flavored whipped cream.
Nancy Harmon Jenkins is the author of several books, the latest of which is her newly revised “The New Mediterranean Diet Cookbook.” Her other food books include, “Cucina del Sole: A Celebration of the Cuisines of Southern Italy” and “The Essential Mediterranean,” which looks at a dozen foods key to understanding Mediterranean cuisines. She also wrote “Flavors of Tuscany,” “Flavors of Puglia” and “The Mediterranean Diet Cookbook.” She is working on a book on Atlantic salmon. A former staff writer with The New York Times, Nancy continues to contribute to the Times in addition to writing for The Washington Post, Saveur, Food & Wine and other national publications. She currently divides her time between a Tuscan farmhouse and a home on the coast of Maine where she was born and raised. She has lived and worked throughout the countries of the Mediterranean, at various times making a home in Spain, France, Italy, Lebanon, and Cyprus as well as in Hong Kong and England. You can read more of her food writing on her site, NancyHarmonJenkins.com.
Why don’t we toast coconut? I mean, everybody knows macaroons are way more aromatic than raw coconut.
It’s not as if we never toast coconut in this country; even good old Fanny Farmer mentions the process. But most American cookbooks don’t, and apart from macaroons, we mostly see toasted coconut as an accompaniment for Indonesian curries.
But I say coconut should be toasted. Toasting improves nuts; it makes them crunchier and more aromatic, with all the delicious browned flavors that result from what chemists called the Maillard reaction.
Think about it. Toasted almond: irresistible. Raw almond: sort of resistible. I rest my case. Even walnuts are better toasted, though I understand you shouldn’t toast macadamias, because they’re so rich with oils they might actually catch fire.
Chocolate ‘cries out’ for roasted accompaniment
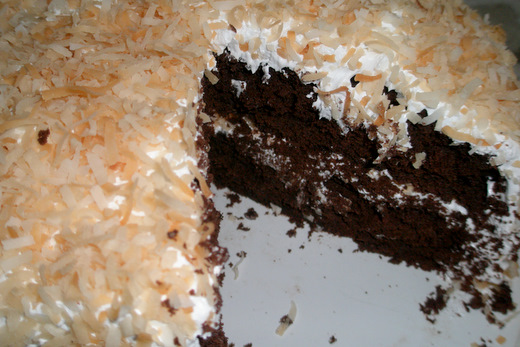
These deep philosophical ideas came to me when I decided I wanted to make a chocolate coconut cake. It sounded great. The more I thought about it, though, the clearer it became that I was going to have to toast the coconut first. Raw coconut is all very well with vanilla, but chocolate is a roasted flavor and cries out to be with its kind.
So I made a chocolate cake with a toasted coconut frosting, and it was my best-received cake ever: a plush white frosting furred over with fragrant golden bits of coconut, enclosing a rich blast of chocolate.
So far, all I’ve been doing with toasted coconut is making variations on established dishes such as chocolate cake and banana pudding. But I have the feeling I’ve just gotten started down this road. Dimly, I see the possibilities: Toasted coconut sprinkled on salad. Toasted coconut doing strange things to braised chicken or grilled pork chops. Or hey, to peanut butter. Toasted coconut ice cream!
And now I’m wondering, can you toast Brazil nuts?
Toasted Coconut Chocolate Cake
For the toasted coconut:
Directions
- Spread a package of sweetened shredded or flaked coconut as evenly as possible on a baking tray; thinner areas will brown faster and may burn if not watched. Bake at 350 F until the coconut is an even golden brown, 15 to 17 minutes, removing the tray and stirring the contents at 5 and 10 minutes and then every minute or two afterward until done. Flaked coconut, because it mounds higher, will brown unevenly on top, so it has to be turned over with a spatula at the same time that it is stirred.
- Shredded and flaked coconut are roughly interchangeable, but shredded is chewier and tends to be sweeter, and flaked is crunchier and a little buttery. So shredded is preferable when mixed into something, while flaked is particularly good when sprinkled on top of something.
- If you’re using freshly grated coconut, allow at least 20 minutes for toasting. You may want to toss it with a little sugar after toasting.
For the cake:
Ingredients
Directions
1. Turn on the oven to 350 F.
2. With the 2 tablespoons of butter, generously grease the bottoms and sides of two 9-inch cake pans. (If possible, line the buttered bottoms with circles of parchment paper first then grease the parchment paper also.) Drop the 2 tablespoons flour into one pan and shake it around until the bottoms and sides are dusted with flour, then transfer the remainder to the other pan and flour it. When both pans are floured, turn them upside down and tap them over a sink to get rid of the excess..
3. Put the cocoa in a small mixing bowl and stir in the boiling water until pretty well dissolved. When cool, add the vanilla.
4. Place the butter in a mixing bowl and beat until pale yellow and slightly inflated. Add the sugar and beat until smooth and fluffy. Add the eggs one at a time, beating 20 seconds after each addition.
5. Mix the flour, baking powder, baking soda and salt in a bowl. Add ⅓ of the flour mixture to the mixing bowl and beat until smooth, then ½ of the cocoa mixture. Continue, alternating two more additions of flour with one of cocoa liquid, beating just until the flour is incorporated.
6. Immediately transfer the batter into the cake pans, smooth the tops as evenly as possible and bake about 30 to 35 minutes until the tops of the layers are firm to the touch and they are starting to pull away from the sides of the pans.
7. Remove the cake pans and place on racks to cool for 15 minutes. Place a large plate or another rack on top of each of the pans, overturn it onto the plate, remove the pan from the cake layer (and the parchment paper too, if you used it), then repeat the process to turn the layer back right side up on the rack. Repeat with the other layer. Allow to cool at least 30 minutes more.
For the frosting:
Ingredients
Directions
1. Put 2½ to 3 inches of water in the bottom of a double boiler and bring to a simmer.
2. Meanwhile, mix the sugar, corn syrup, water, egg whites, salt and cream of tartar in the top of the double boiler. Using an electric mixer, beat at low speed until foamy and pale yellow, one minute.
3. When the water is simmering, place the top of the double boiler over it and beat the contents at high speed until the mixture is thick and tripled in volume, with the beaters leaving a wake of sculptured-looking folds. This can take anything from 7 to 14 minutes. Continue to beat a minute or two longer until the surface just starts to lose its shine.
4. Immediately remove the top of the double boiler from the bottom, add the vanilla and beat the frosting one minute more.
5. Frost the top of one cake layer with ⅓ of the frosting and sprinkle about 1 cup coconut on top of the frosting. Place the other layer on top and frost the top and sides with the remainder of the frosting, then sprinkle and pat as much of the coconut onto the cake as you can get to stick.
Zester Daily contributor Charles Perry is a former rock ‘n’ roll journalist turned food historian who worked for the Los Angeles Times’ award-winning Food section, where he twice was a finalist for the James Beard award.

For those of us of a certain age, our first encounter with figs came not in life but in a movie theater when Oliver Reed used a fig, deftly cut open from the bottom, to help Alan Bates appreciate the pleasures of sensuality as he struggled with his attraction to Glenda Jackson in the 1969 classic, “Women in Love.” Watching Oliver Reed spread open that ripe fig was the height of eroticism to a young boy.
After the movie I rushed out and bought a basket of figs and marveled at their round fullness. The ones that were ripe had a heaviness that made my juvenile heart race with excitement. But to my young palate, used to simple fruits like apples and pears, figs were much too strong tasting.
An irresistible bargain inspires new fig creations
I learned to appreciate figs when I lived in a house with a fig tree. I enjoyed watching the fruit slowly form, first as a small bulb attached to a twig, then bulging into a soft, round shape, expanding into a fullness that invited the touch.
In one of my most pleasurable, early food moments I watched a fig ripen and picked it just as its nectar collected at the bottom. Biting into its warm sweetness, I was hooked. My breakfast routine after that required only a cup of black coffee, a piece of dry toast and a trip to the fig tree.
Recently I visited a fresh produce store in our neighborhood. Because I buy my fruits and vegetables at farmers markets, nothing much tempted me, but as I was about to walk out empty-handed, a display near the checkout counter caught my attention: A flat of 40 figs was priced at $3.99, usually the cost of a single basket. Seeing me staring at the display, a store clerk confided that the figs were so very ripe they had to be sold immediately, hence the extraordinary price.
Indeed, some were bruised, others already attacked by mold, but with the clerk’s permission, I replaced the bad figs with good ones and carried home a wonderful prize.
Yet, as anyone with a fruit-bearing tree knows, while the first appearance of fruit on a tree seems akin to a miracle, as the season progresses and the small gathering of fruit turns into a seemingly unending torrent, that miracle can become a curse.
Now that I was home, what to do with all those figs?
Crystallized ginger crust
Given that I had so many figs, a rare occasion, I allowed myself a day of baking. I made, variously, a tart with a sweetened fig puree and quartered figs only, a second with a light sprinkling of raw sugar added, a third that included the puree, figs and sugar but allowed a drizzle of custard, and, another that had all of the above and added roasted, chopped almonds. All the tarts were good, but I still felt unsatisfied, as if there were one more adjustment I needed to make.
In the past I had experimented with crystallized ginger in pie crusts. Finely ground, the ginger and its sugar are so thoroughly spread throughout the crust, their flavors influence but do not dominate the flavor profile of the dessert.
With that last addition, I felt I had a winner. The crystallized ginger added a sense of heat, contrasting perfectly with the sensual figs. Served at a dinner party, my choices were confirmed. The fig tart was approvingly declared “not too sweet, so full of flavor.”
A pate brisee dough, thinly rolled out, creates a flaky starting point for the layers of flavors in the tart. The fig confit has a rich huskiness. A simple custard binds those flavors together. The roasted almonds complete the contrasts of flavor and texture. All four ingredients can be prepared days ahead so the tart can be easily assembled on the day.
Fig Tart With Custard, Crystallized Ginger and Almonds
Makes a 9-inch tart, or three or four 3-inch tartlets
- Use a chef’s knife to chop up the crystallized ginger as much as you can before further grinding in a food processor with a metal blade. Don’t worry if you’re left with large pieces. Add the flour, sea salt, sugar and butter. Pulse for 30 seconds until well combined.
- With the food processor on, slowly add the ice-cold water in a steady stream. If the flour accumulates on the sides of the processor, shake it loose. Add enough water so the flour gets crumbly and sticks together.
- Lightly flour a work surface and your hands. If you are making smaller tarts, divide the dough accordingly. Gently work the dough into a flattened disk about 5 to 6 inches in circumference for the large tart, 2 to 3 inches for the small, turning it so all sides are dusted with flour. Wrap in plastic and refrigerate for at least one hour or overnight.
- Brush melted sweet butter on the tart pan. Place in the freezer for at least 30 minutes or overnight. This will guarantee that the dough will not stick to the pan.
- Before rolling out the dough, let it sit on the counter 30 minutes. Preheat the oven to 400 F.
- Again, lightly flour a work surface. Roll out the dough evenly, starting in the middle and working to the outer edges, keeping the round shape as much as possible. Create a circle of dough 2 to 3 inches larger than the circumference of the tart pan so there’s enough to line the sides.
- Take the tart pan out of the freezer. Use the rolling pin to transfer the dough onto the pan. Start on one edge, lifting the dough onto the rolling pin, moving forward until the dough has wrapped around the rolling pin. Gently place the dough on the tart pan, being careful to press the dough against the sides of the pan. Use a paring knife to gently cut off the excess dough.
- Use pieces of the excess dough to fill any holes or close any tears. Tarts are very forgiving.
- Using the paring knife, poke holes every few inches on the bottom of the tart to release steam during baking. Pour pastry weights or uncooked rice to cover the dough. Bake 10-15 minutes in the preheated oven or until the crust is lightly browned. Cool on a rack. Carefully remove the pastry weights or rice.
- Reduce the oven temperature to 350 F.
- Using a pastry brush, spread the fig confit evenly over the bottom as well as the sides of the crust. Cut off and discard the stems from the figs and quarter them lengthwise. Lay the figs on the bottom of the tart, cut side up, in a decorative way, which usually means placing them in circles within circles. Sprinkle with 1 tablespoon raw sugar. Place the tart on a baking tray and put in the oven. Bake 20 minutes.
- Remove the tart from the oven. Drizzle custard over the figs. Sprinkle with roasted almonds. Return to the oven for another 30 minutes.
- Check to see that the custard has set. Be careful not to burn the figs. Remove the tart and let cool on a rack.
- Serve warm, dusted with powdered sugar and with a bowl of vanilla ice cream or freshly whipped cream.
Zester Daily contributor David Latt is a television writer/producer with a passion for food. His new book, “10 Delicious Holiday Recipes” is available from Amazon. In addition to writing about food for his own site, Men Who Like to Cook, he has contributed to Mark Bittman’s New York Times food blog, Bitten, One for the Table and Traveling Mom. He continues to develop for television but recently has taken his passion for food on the road and is now a contributor to Peter Greenberg’s travel site and the New York Daily News online.
I worry about fruit.
I wonder where its flavor has gone. I brood over its absence of sensuality — when fruit is all about being sensual. I watch with alarm the demise of its overall quality. Quantity we don’t have to worry about, apparently, for supermarkets are overflowing with fruit. But much of it is tasteless, most of it comes from far away, and fruit suffers even more than vegetables do at the hands of industrial agriculture.
I confronted all these issues while working on my book, “Seasonal Fruit Desserts From Orchard, Farm and Market.” Good tasting fruit would speak to a number of dessert-making concerns — it’s generally quick, healthy and doesn’t require immersion in confection-making — but I was stunned anew at what passes for fruit in the United States. What fruits were worth centering a dessert on? Certainly not those pale shadows of fruit found in the supermarket — the peaches picked green and rock hard. Start there and I’d end up with lackluster desserts that rely on a lot of butter, sugar and cream to make an impression. For a more delicious alternative, the need to look for fruit grown much closer to home became quickly apparent.
Fruit, for the most part — citrus being an exception — is delicate stuff. It’s meant to be sensational. Fruit is sexy. It emanates beguiling perfumes and wears showy colors so that it might be found by birds and animals, including us human animals, who will eat it, then leave a pit, a seed or stone to continue the cycle of growth. Fruit’s perfume is its promise of goodness. When you lift a plum to your nose, you’re searching for the scent that tells you that it’s going to be juicy and sweet but with just enough acid to push its honeyed flavor over the top. Yet when I watch people shop I see them drop fruit into plastic bags without bringing it first to their noses to assess whether the promise is faint or strong or even there at all. This deeply human gesture has been lost, for only rarely is there perfume present.
Fruit has become ‘duty food’
I suspect shoppers buy their scent-free fruit because they’ve been told to eat nine servings a day of fruits and vegetables. Fruit, whether fresh or dried, has become a “duty” food, something one ought to eat, not something one lusts to eat. Last winter I bought a package of dried figs, called “Nutra Fig.” The label said only that it was “A fat free high fiber food.” There was no hint that these inky dark morsels might also be succulent, rich, worthy of bathing in aged sherry or being wrapped around a toasted almond. My own feeling is that when the flavor is there, people will eat fruit without being told to and children will be positively greedy for it.
I’ve recently learned that a study done by a nursery specializing in fruit trees found that people under 35 find a soft, juicy peach repulsive. These younger customers prefer a crisp, dry fruit that’s sweet, so this nursery is developing crisp peaches and plums with high sugar content and low acid. Most assuredly these will be the most boring fruits in the world to eat — nothing but a wall of sugar — but this also tells us that our food culture has indeed been changed by agribusiness. A few generations have become accustomed to eating hard fruit. When a food editor in a newspaper describes a strawberry as a crisp fruit, as one did, you might well feel that all is lost.
Finding fruit with promise
As eaters in pursuit of modest pleasures, we need to go to some trouble, but not a lot, to find those fruits with promise. We might find them in farmers markets, orchards and u-picks, and in back yards. And when we do find them, we need to ask their names and remember them, or else we can’t ask for them again. Without names, we are left babbling to a farmer about a peach that was red on the outside and yellow inside and was really good, and that’s not enough. The names of fruits can be beautiful, like Coe’s Golden Drop, a golden plum that lines the branches of the tree like giant teardrops, or they can tell us things, that a Desert Gold peach might grow in Phoenix, (and it does), or that a name given to honor someone, whether a workman named Bing or a duke or a queen. Names are poetry, history and information.
I found many exceptional fruits while researching my book — stellar plums, a plethora of grape varieties, gigantic tayberries, tiny black cap raspberries and dried fruits such as red Friar plums, pluots, pears and white nectarines. Rhubarb grows all summer, not just in May, and pawpaws are making a comeback. I also cooked with my share of tasteless supermarket fruit when I needed to test a recipe. In the end, my advice is buy all you can of whatever wonderful fruit you find and preserve it. Aside from drying and canning, excess fruit can be transformed into sauces, frozen or refrigerated. Look around you, stay close to your season, and see whether you can’t find some treasures. You will not find a wide variety of fruits, but what you find might well be those stellar varieties that will provide you with simply crafted but the most delicious fruit desserts.
Although we benefit at the table when we enjoy well-grown fruit, this isn’t just about us. Supermarkets offer red and black plums — but plums come in every color, shape, size and all have names far more alluring than a common color. All fruit families are immensely diverse, and when we settle for only the red and black plum, we are hastening the loss of diversity. Choose something else, get to know and enjoy it, and we’re helping to ensure that the world of fruit is awash in choice.
Zester Daily contributor Deborah Madison is the author many books on food and cooking, including “The Greens Cookbook” and “Local Flavors: Cooking and Eating From America’s Farmers Markets.” Her latest book is “Seasonal Fruit Desserts from Orchard, Farm and Market.”
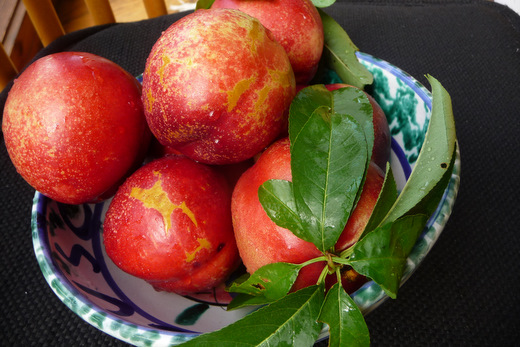
It is the nectar of gods that runs down my chin and soils my shirt. My favorite fruit is now arriving at Southern California farmers markets, and I can barely control myself. I can’t think of anything more satisfying than sinking one’s teeth into that appropriately named fruit, the nectarine. I’ve only eaten nectarines over the sink. I can’t remember ever having gotten a ripe nectarine to the table. I remove the sweet juicy and fragile nectarines from their bag and lay them on the counter next to the sink. I wash them gently under running cold water and I should then set them aside. But I don’t. I bend forward and ravenously eat them, unmindful of the dripping nectar.
Nectarines are a subspecies of peach known as Prunus persica var. nectarina. The nectarine is not a cross between a peach and plum as is sometimes suggested. In fact, the peach and the nectarine, genetically, are the same thing, with the peach having fuzzy skin and the nectarine smooth. The nectarine tree and peach tree are virtually indistinguishable, and sometimes nectarine fruits appear on peach trees and vice versa. As with peaches, the flesh of nectarines can be white or yellow. They are classified too by how easily the flesh separates from the stone or pit. Freestone nectarines separate easily and clingstone do not. Nectarines bruise more easily than peaches.
There are different cultivars of nectarines such as Arctic Star, Desert Dawn, Fantasia, Heavenly White, Ruby Grand and Snow Queen. There are more than 250 cultivars, so you are only likely to come across three or four of them. Their scientific species name, persica, indicates that they were once thought to have originated in Persia, but they originated in China and were known two millennia ago. They seem to have entered the Mediterranean before the Christian era.
The skin color of the nectarine is no indication of its ripeness, sweetness or juiciness. When buying nectarines, make sure they do not have any bruises, green tinge or shriveled skin. Look for firm fruit, but not rock-hard fruit. A ripe nectarine will have a sweet, noticeable fragrance. When shopping for nectarines, give them a gentle squeeze to test for ripeness; you’ll notice a slight softness. The problem with this method, especially at farmers markets, is that too many people squeeze them too inappropriately and they become bruised. Trust the vendor and pick a nectarine away from where people are squeezing them. Ninety-five percent of American nectarines come from California, and their season runs from May to October with the peak being June to August. Nectarines should be eaten right away and kept not more than five days in the refrigerator. (If you can resist eating them over the sink even sooner.)
Although I’m not terribly interested in nectarine recipes, given the way I eat them, one way they do get used in the Mediterranean is in a kind of sangria from La Rioja and Navarre regions of Spain called zurracapote or zurra for short. Sangria is a wine and fruit punch, but in this version, nectarines are the main fruit.
For this recipe, choose one bottle of good quality light white wine, such as a Spanish cava, a good rose or a Rioja red.
Zurracapote
Ingredients
Directions
- In a pitcher, stir together the ingredients.
- Half fill the pitcher with ice cubes and leave in the refrigerator for two hours before serving.
Zester Daily contributor Clifford A. Wright won the James Beard / KitchenAid Cookbook of the Year Award and the James Beard Award for the Best Writing on Food in 2000 for “A Mediterranean Feast.” His latest book is “Hot & Cheesy” (Wiley) about cooking with cheese.
Photo: Nectarines called Arctic Star from the Santa Monica farmers market.
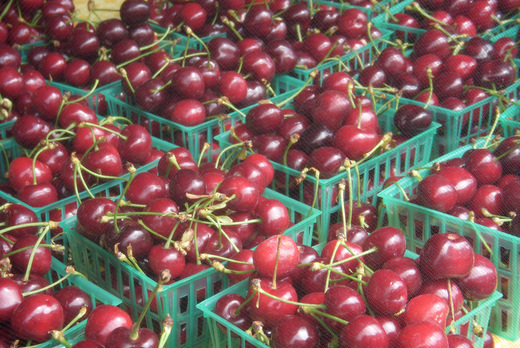
If you were a bird that followed cherries from state to state you could spend May and early June in California, June into July in the Pacific Northwest and July into August in the Midwest. You’d never be hungry. If you were a French bird you’d head to the Luberon region of Provence late in the second half of May and stay through June, then head up to Paris. I have spent many a late spring gathering cherries in this part of the world. One cherry orchard next to a house I rented provided me with enough quart bottles of preserved sweet and sour cherries and cherries in eau de vie to last through the year, with plenty left over for eating au nature as well as baking into clafoutis, strudels, cobblers and financiers (though popping one fresh, plump cherry after another into my mouth is hard to beat).
Picking cherries from a tree is gratifying. When they’re red enough to pick, they’re sweet enough to eat, and even if you eat while you pick, one tree will provide you with an abundant haul. The only thing you have to be careful about is making sure to pick the stem with the cherry (as opposed to plucking the fruit from the stem), as the fruit will lose juice and flavor if the stem is left behind. The price tag at the farmers market is a reflection of the labor that goes into picking them, as they must be hand picked with the stem on, and only when ripe.
The best cherries for baking into pies and strudels are sour cherries, also known as pie cherries. Most of the commercial production in the United States is in the Upper Peninsula of Michigan. When I was 19, I worked for a summer with migrant farm workers in Central Michigan. One day towards the middle of August, many of the people I’d gotten to know disappeared for a week “to go work in the cherries.” One family, with whom I’d been learning to cook Mexican food, brought me a few heavy bags full of small bright red Montmorency cherries when they came back. I can’t remember what I did with them then, but if they’d brought me those cherries today I’d have made this cherry strudel.
When I was working on my cookbook “Mediterranean Harvest,” I spent a day learning to make some incredible vegetable pies in the kitchen of the Aroma Cafe, a Bosnian cafe in Los Angeles owned by Amra and Adem Slipac, a couple who had fled their country with their family during the Bosnian war in 1992. While Amra taught me to make a particularly delicious coiled pie filled with potatoes and onions, her mother quietly made four huge cherry strudels. She used drained, jarred morello cherries from Trader Joe’s to fill them. If you can’t get sour cherries, you can still make this with regular cherries. Or use a mixture of the two.
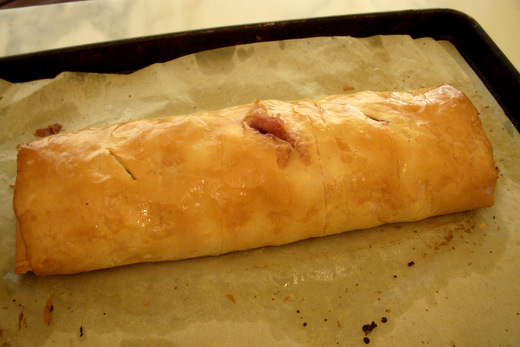 Cherry Strudel
Serves 8 to 10
Directions
- Preheat the oven to 375 F. Line a sheet pan with parchment and brush the parchment with melted butter. In a large bowl, toss together the cherries, almonds, and almond extract. Set aside.
- Place a sheet of parchment on your work surface with the long edge facing you. Lay a sheet of phyllo dough on the parchment. Brush with butter and top with the next sheet. Continue to layer all eight sheets, brushing each one with butter before topping with the next one.
- Brush the top sheet of phyllo dough with butter. Sprinkle on half the breadcrumbs. Sprinkle half the remaining breadcrumbs down the length of the dough, 3 inches in from the bottom edge. Top this line with the cherries. Mix together the remaining breadcrumbs and sugar and sprinkle over the cherries.
- Tuck the ends of the phyllo in over the cherries, then fold the bottom edge over the cherries and roll up. Using the parchment paper to help you lift the strudel, place it on the parchment-lined baking sheet, seam side down. Brush with butter and make 3 or 4 diagonal slits along the length of the strudel.
- Place the strudel in the oven and bake 20 minutes. Remove from the oven, brush again with butter, rotate the pan and return to the oven. Continue to bake for another 20 to 25 minutes, until golden brown. Remove from the heat and allow to cool for at least 20 minutes before serving. Serve warm or room temperature. You can reheat in a 300 F oven before serving to re-crisp the phyllo.
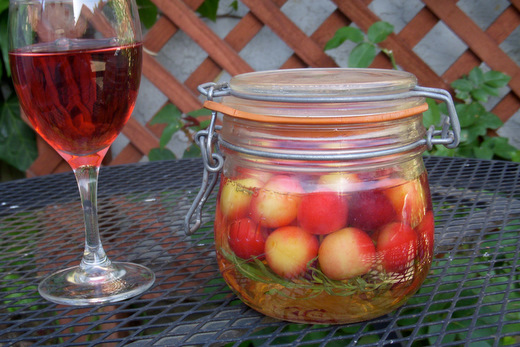 Sweet and Sour Cherry
Refrigerator Pickles
I used to make these every spring when I lived in France and could pick cherries from nearby trees. I’d process the jars in a water bath and keep them in a cupboard until I opened them. Now I opt for these quicker refrigerator pickles — they get used up quickly.
Makes 1 quart
Ingredients
Directions
- Clean and sterilize a wide-mouth 1-quart jar or two 1-pint jars. Pick through the cherries, discarding any with blemishes or soft spots. Rinse them and drain on a kitchen towel. Cut the stems with scissors to about ½ inch. Place the tarragon sprigs in the clean, dry jar and fill with the cherries.
- In a small saucepan, combine the rice vinegar and sugar and bring to a simmer. When the sugar has dissolved, remove from the heat and pour into a measuring cup. Allow to cool completely. Pour over the cherries. Seal the jars and refrigerate for at least a few days and up to a few weeks before serving. Drain and serve as an hors d’oeuvre. You could also use these as a garnish for a salad or for a rich meat like duck.
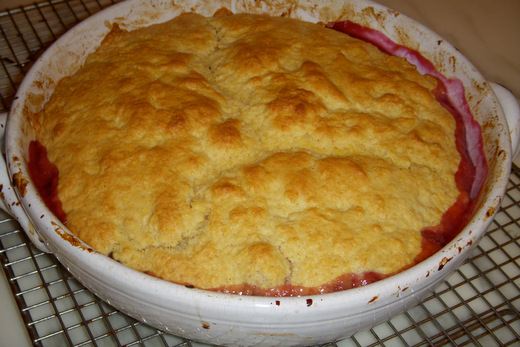 Cherry Cobbler with Cornmeal
and Buttermilk Topping
A cherry cobbler is comforting in the way a cherry pie is comforting, but it’s easier to throw it together because you don’t have to make a pie crust. The topping is a buttermilk biscuit batter made with a mixture of flours; cornmeal contributes texture and whole wheat flour adds a nutty dimension to the flavor.
Ingredients
For the topping:
Directions
- Preheat the oven to 375 F. Butter a 2-quart baking dish. Place the cherries in the dish and add the kirsch, sugar, lemon juice, and flour. Carefully mix together with a rubber spatula or a large spoon until the sugar and flour have dissolved into the liquids.
- Sift together the flours, cornmeal, baking powder, baking soda, sugar, and salt. Place in the bowl of a food processor fitted with the steel blade and pulse a few times. Add the butter and pulse to cut in the butter, until the mixture looks like coarse cornmeal. Turn on the food processor and pour in the buttermilk with the machine running. As soon as the dough comes together, stop the machine.
- Spoon the topping over the cherries by the heaped tablespoon, or use a ¼ cup measure. The cherries should be covered but may peek out here and there. Place the baking dish on a baking sheet. Place in the oven and bake 35 to 40 minutes, until the top is nicely browned and the cherries are bubbling. Remove from the heat and allow to cool to warm before serving. Serve warm (heat in a low oven for 15 minutes if necessary before serving), with whipped cream, crème fraiche, or vanilla ice cream on the side.
Zester Daily contributor Martha Rose Shulman is the award-winning author of more than 25 cookbooks. Her latest is “The Very Best of Recipes for Health,” published by Rodale.
In the late 1970s and early 1980s, the public at large was skeptical about vegetarian cooking. They could be downright hostile, especially in Texas where I began my career. Promoting my first two cookbooks was challenging, but I loved rising to the occasion.
“Ah wanna know how she cooks black-ah’d peas,” the menacing voice of an aggressive caller asked the host of a call-in radio show in San Antonio, Texas, decades before irate talk radio had become part of pop culture. Earnestly, enthusiastically, I began to describe a recipe in my first cookbook, “The Vegetarian Feast.” I explained that lots of garlic and onion were the key, how I first softened them in oil before adding the black-eyed peas, water, and … I was just about to say “bay leaf” when the caller interrupted and snarled, “She cain’t tell me ah can cook black-ah’d peas without ham hocks.” Then another caller chimed in: “Ah don’t think y’all’s food is so healthy; we have lots of Chah-nese people here, and they eat lots of vegetarian food, and Ah don’t think they have very good teeth.” Invisible in the radio studio, I smiled a bright white smile, packed up and headed north toward Dallas, cookbook in hand.
Three years later, I was on the road again on a nine-city promotional tour for my next meat-free cookbook, “Fast Vegetarian Feasts.” This was back when there was local daytime television in cities throughout the country, and publishers sent authors out to promote their books. It was long before the Transportation Security Administration era, and I traveled with a kit that would have been impossible today: two chef’s knives, a 10-inch nonstick skillet for my showy souffled Grand Marnier omelet, three bowls (one copper, two stainless), a whisk, a rubber spatula, a platter, Tupperware containers, a small bottle of Grand Marnier and a jar of honey. If I had several shows scheduled, I’d have the makings for more dishes — tortillas, tofu, soy sauce, tomatoes, poblano and serrano chiles, avocados, pasta, seasonings and oils, all in my carry-on luggage.
In some cities, after my morning talk shows and before evening book signings, I prepared beautiful sit-down lunches for the booksellers and reviewers. To avoid having to repeat shopping for the same ingredients in each place, I bought most of my supplies at the beginning of my tour in Los Angeles, and schlepped them, along with the equipment I’d need, from there to Minneapolis to Austin to Houston to New York. I packed one suitcase with everything from sesame oil to bulgur wheat, souffle dishes, pate tureens, four breadpans and two round plastic platters and bread pans. I was living in France then, so there was no going home between gigs. Clothes for six weeks in four different climates filled another bag. All this before there was pull-along luggage.
My first television appearance was a 15-minute spot on “AM Los Angeles,” L.A.’s most popular local morning show where I was asked to unravel the mysteries of tofu. I had spoken several times with the production supervisor and was set to bring in five prepared dishes and make the sixth on set. The host of the show had not been briefed; she was unaware that the dishes were supposed to look like they were hot off the stove but that in fact they would be bone cold.
She began the segment with, “Tofu, yech!” then reached for a tofu and poblano taco and said: “Tastes like cold scrambled eggs.” She wouldn’t let up. “It’s the texture I can’t stand,” she said, taking a bite of stir-fried tofu with snow peas, “and it’s so ugly,” as she slid a piece of tofu into the ginger-soy dipping sauce. She urged me to take a bite and then asked me how I liked it, but of course I couldn’t say much, my mouth being full. After the spot the stagehands, who’d never even seen tofu, polished off all of the food in minutes.
Wherever I went, the television hosts were very tall, and I was forever craning my neck to talk to them. On “Good Morning Houston,” I was halfway through my avocado taco demonstration before a live audience when a production assistant came on set with a stool and asked the host to sit down so the cameramen could get us both into the frame. When I got to the next show, I saw that the stove on the set came up to my collarbone and immediately asked the stagehands to place a platform behind the kitchen unit.
Halfway through my 8-minute spot, the tall, belle-of-a-host glanced down and, just as I was easing my carefully mounted puffed Grand Marnier omelet batter into the sizzling butter in the pan, she interrupted me to reveal not the secret of my omelet, but of my stature: “Listen y’all, Ah gotta tell ya somethin’. She’s standin’ awn a plat-fowem! Look, Ah’m gonna show ya (she steps onto the platform). See, now Ah’m gonna take ma shoes off (she takes off her shoes while I continue to cook). See how TAAH-ny she is!”
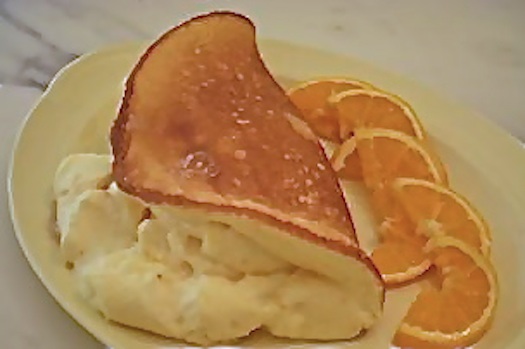
“Well, I didn’t want your viewers to think that all vegetarians are midgets,” said I, as I carefully slid the puffed, golden masterpiece out of the pan, folding it onto its garnished platter. “Et voila! Le dessert!”
Souffled Grand Marnier Omelet
Serves 2
Small pinch of cream of tartar
1 teaspoon finely grated orange zest
Small pinch of freshly grated nutmeg
1 tablespoon unsalted butter
Powdered sugar for dusting (optional)
Sliced oranges and/or strawberries for garnish
Directions
- Preheat the oven to 400ºF. Heat an oven-proof 10-inch skillet over medium-high heat. Have a platter for your omelet close at hand.
- Whisk the egg whites in a clean dry bowl or in the bowl of a standing mixer fitted with the whisk attachment. When they begin to foam, add the cream of tartar and continue to whisk at medium speed until they form medium peaks. Continue whisking while you slowly add the sugar, until the egg whites form stiff, satiny (but not dry) peaks.
- In another large bowl, beat the egg yolks and add the Grand Marnier or Cointreau, salt, orange zest, and the nutmeg. Stir ¼ of the egg whites into this mixture, then gently fold the rest.
- Add the butter to the hot pan, and when the foam subsides and the butter is just beginning to color, gently scrape in the egg mixture, using a rubber spatula. Do not stir. Immediately transfer to the oven for 2 minutes. Remove from the heat and slide out onto the platter, folding the omelet in half. Dust with powdered sugar if you wish, garnish with orange slices, and serve immediately.
Variation: Souffled Amaretto Omelet
Substitute Amaretto liqueur for the Grand Marnier. Omit the orange peel. Garnish with toasted slivered almonds.
Martha Rose Shulman is the award-winning author of more than 25 cookbooks, including “Mediterranean Harvest: Vegetarian Recipes From the World’s Healthiest Cuisine,” “Mediterranean Light,” “Provencal Light” and “Entertaining Light.”
Photo: Souffled Grand Marnier omelet. Credit: Martha Rose Shulman
 Celebrate home-style baking with 120 delicious, must-have recipes for all lovers of sweets. Enter here to win one of 5 copies!
Upcoming Events
-
see all of our
Upcoming Events
-

Vegas Uncork’d by Bon Appétit May 9th-12thTakes place on May 9, 2013Vegas Uncork’d by Bon Appétit The most anticipated foodie event of the year is bigger than ever with dozens of one-of-a-kind events that could only happen…
-

Bottle Rock Napa Valley May 9th-12thTakes place on May 9, 2013Bottle Rock Napa Valley Situated on three stages spread over 26 acres on the grounds at the Napa Valley Expo in the City of Napa, more than three…
-

Spring Open House Presented by Rodale Institute May 10th-11thTakes place on May 10, 2013Spring Open House Presented by Rodale Institute Cannot wait to get your hands in the dirt? We have everything you need to get your organic…
SmartBrief