Articles in Breakfast

A new year with new resolves for personal improvement is the best of times and the worst of times. At the top of many people’s resolutions is eating sensibly with an asterisk to give up everything that tastes good. To eat well doesn’t mean denying yourself pleasures. In fact, consider the gastronomic advantages of a one-egg omelet.
Three, two, one
A neighborhood restaurant we frequented for many years proudly publicized their three-egg omelet. The omelet was a plump 2-inches thick and settled on the plate like a seal sunning itself on a wave-washed rock.
More from Zester Daily:
After eating their three-egg omelet, I always felt like going back to bed.
Having consumed many omelets over many years, the realization hit me that what I like about an omelet isn’t the eggs. What I like is the filling.
At home I experimented. What I was looking for was a ratio of bulk: flavor that pleased my palate and wasn’t overly filling. Three eggs were never considered, and eventually two eggs gave way to one. Another significant milestone was switching from a stainless steel pan to the more forgiving qualities of a nonstick pan.
Thin one-egg omelet is a reminder of delicate crêpes
One egg creates texture not bulk and places the emphasis solidly on the filling. Just about anything sautéed, roasted or grilled can find itself tucked into the confines of an eggy bed.
Whatever the mix of ingredients, the key to a good omelet is creating a warm creaminess of melted cheese.
The combinations are limited only by your palate preferences. The salty-sweetness of sautéed ham, Comte cheese, spinach, shallots and shiitake mushrooms complement the pliancy of the egg. Grilled asparagus and Parmesan cheese, dusted with finely chopped Italian parsley leaves makes an elegant omelet perfect for breakfast, lunch or dinner. Shredded lobster, Manchego cheese, cilantro, raw red onions, a dusting of cayenne and a small amount of finely chopped ripe tomatoes transform an ordinary egg into a culinary adventure.
Adding country-fried potatoes, buttered toast with jam and crisp bacon, a tossed green salad or a bowl of fresh fruit to fill out the plate and the one-egg omelet creates an enviable meal, heavy on flavor and careful about calories.
One-Egg Omelet With Spinach, Comte Cheese, Shallots and Shiitake Mushrooms
Use any cheese of your liking. I prefer a cheese that plays well with others. Strong cheeses, such as blue cheese, will dominate the other flavors in the filling. Mild cheddar, Comte, Manchego and soft goat cheese work well.
The recipe is for one, because making each omelet individually will result in the best looking dish. If you are serving more than one, multiply the number of diners times the ingredient quantities for the filling to create the correct amount needed to make all the omelets.
Use a 9-inch nonstick pan, understanding that nonstick pans are designed to be used on low heat. Because an excessive amount of fat is not required to prevent the egg from sticking to the pan, the butter is used for flavoring. Could the omelet cook on a nonstick pan without the butter? Yes, perhaps as serviceably, but that little bit of butter adds a lot of flavor.
Serves 1
Ingredients
2 teaspoons sweet butter
2 cups spinach leaves and stems, washed, pat dried, chopped
1 shallot, washed, ends and skin removed, finely chopped
½ cup or 2-3 shiitake mushrooms, washed, root ends trimmed, finely sliced longwise
1 farm-fresh egg, large or extra large
1 tablespoon cream, half and half, whole milk or nonfat milk
⅓ cup freshly grated cheese, preferably white cheddar, Comte, Manchego or goat
Pinch of cayenne (optional)
Sea salt and black pepper to taste
Directions
1. In the nonstick pan, melt 1 teaspoon butter and sauté together the spinach, shallot and shiitake mushrooms until wilted and lightly browned. Season to taste with sea salt, freshly ground pepper and cayenne (optional). Use a high-heat or Silpat spatula to remove the sauté from the pan and set aside.
2. Beat together the 1 egg and milk until frothy.
3. On a medium-low flame, heat the nonstick pan, melt the remaining teaspoon butter and pour in the egg-milk mixture using the spatula to get every drop into the pan.
4. Swirl the egg mixture around to coat the bottom of the pan so it looks like a full moon.
5. Gently sprinkle the cheese on one half of the omelet — the half moon with the filling -and spoon on the sauté to cover the cheese.
6. When the cheese has melted and the egg is cooked the way you like, use the Silpat spatula to gently flip the empty side of the half moon on top of the filling.
7. Use the Silpat spatula to help slide the omelet onto the plate and serve hot.
One-egg omelet with shiitake mushrooms, spinach, Comte cheese and shallot filling, plus crisp bacon and Fuji apple slices. Credit: David Latt
There are a lot of Middle Eastern pastries you’re better off not trying at home. Here is one exception. It’s a crunchy little packet of ground walnuts dripping with syrup; add a cup of coffee and you’re ready to face a winter morning.
Yes, a Middle Eastern pastry for breakfast. Why not? This one is actually a pancake, a deep-fried pancake. By the way, it’s one of the oldest pastries in the world. There are recipes dating from the ninth century. This was the kind of thing you got to eat if you were the Caliph.
Its Arabic name is qataif mahshiyya, which literally means “stuffed pancakes” (in Turkish, it’s dolma kadayif; same meaning, though it’s a little surprising to see the word dolma, which generally refers to a stuffed vegetable or grape leaf). You start with a simple yeast batter and fry up smallish crêpes, on one side only. The idea is that you leave the top side half-raw. It remains tacky so you can fold it around the filling. This being a Middle Eastern treat, the filling is always ground nuts, but I suppose somebody might try a slice or two of peach.
In effect, these are sweet samosas, being folded over a filling in much the same way. (Medieval samosa recipes actually sometimes call for this sort of pancake as a wrapper.) The difference is that they’re made with leavened batter rather than kneaded dough, so they absorb syrup like a bandit. First they crunch in your mouth and then they spurt syrup, and that’s before you even get to the nut filling part.
Messy, but forgiving
These little pancake bombs are relatively forgiving for the cook. (In fact, some people don’t go to all the trouble of making the traditional leavened batter and just use pancake mix.) They’re homey-looking; nothing fancy, sort of like miniature Portuguese-men-of-war with syrup oozing out of them.
However, they do make something of a mess in the kitchen, like many a fried food. In the first place, you ought to remember that Russian proverb, “The first pancake comes out as a lump.” So even though the measurements given below should technically give you 12 qataif, don’t count on quite that many. And you’ll go through a substantial amount of oil.
As this pastry is made today, the syrup is usually flavored with rose water, or a mixture of rose water and orange blossom water. I’ve given up trying to get my fellow Americans to overcome their irrational distaste for rose-flavored pastries, so I’m recommending only the orange blossom version. You could also flavor the syrup to your taste with orange oil flavoring or a bit of fine orange or lemon zest.
Qataif Mahshiyya
For the batter:
Directions
In a mixing bowl, dissolve the yeast in 2 tablespoons warm water. When the yeast starts to bubble and give off a fermenting smell, dissolve in the remaining ¾ cup warm water and add the flour. Whisk until smooth, cover the bowl with a kitchen towel and let ferment 1 hour.
For the syrup:
Directions
Place the sugar, water and lemon juice in a small saucepan and bring to a full boil. Remove from the heat.When the bubbles subside, the syrup should be clear. Add the orange blossom water.
For the filling:
Directions
Put the walnuts, sugar, cinnamon and optional clove in a food processor and pulse until ground medium fine.
To assemble:
Directions
- Put 2 tablespoons oil in a small frying pan. When very hot, whisk up the batter and pour2 tablespoonsinto the pan, coaxing it with the measuring spoon into a 4-inch circle. Fry until the surface of the cake is bubbly and has lost its wet look. Try to avoid getting the edges of the cake oily.
- Immediately remove the cake with a spatula — without turning it over — and place on a cookie sheet or work space. Repeat with the rest of the batter, adding oil as needed. Theoretically you can end up with 12 half-done pancakes, tacky on top.
- Put 2 teaspoons of nut filling on a pancake and fold it over. The edges should stick (since you’re not deep-frying them, they’ll cook up all right if they don’t stick but won’t look so neat). Pinch the edges tightly shut and repeat with the rest of the pancakes and filling.
- Put enough oil in a 10-inch frying pan to barely cover the pancakes. Heat the oil until the edge of a pancake will sizzle if dipped into it. Fry the pancakes in batches of 3 or 4 until crisp and golden brown on both sides, turning over as needed.
- As the qataif are done, transfer them to paper towels to drain excess oil and then to the syrup, soaking both sides for at least 1 minute. Remove to a serving dish.
- If you want to be fancy, grind a couple of tablespoons of pistachio and sprinkle on the qataif.
Zester Daily contributor Charles Perry is a former rock ‘n’ roll journalist turned food historian who worked for the Los Angeles Times’ award-winning Food section, where he twice was a finalist for the James Beard award.
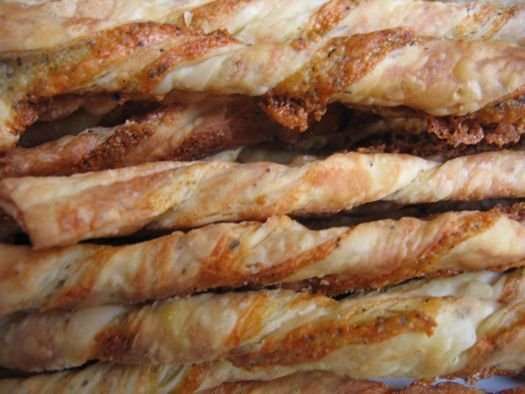
Photo: Pancake bombs. Credit: Charles Perry
It’s all about square footage, as they say in real estate. And the square footage of my refrigerator is like New York City; space is limited, so whatever is in there better be good. Besides the obvious refrigerator staples (olives, butter, prosciutto), buttermilk always has a place on the shelf. It’s one of my go-to ingredients and yet it has to be one of the most misunderstood foods around.
Mention buttermilk and immediately diet-conscious people will visibly cringe, while a few Southerners will start beaming. Someone needs to stand up for buttermilk, so here is what could be called a love letter to this luscious ingredient.
First, a few facts set the record straight. As with many tasty foods, it all comes down to bacteria. Traditionally, buttermilk is made from the liquid left over after churning butter. (The bacteria in milk ferments the milk’s lactose, and it’s lactic acid that gives buttermilk that tangy flavor.) Today, you most often see “cultured buttermilk,” which is pasteurized 1- or 2-percent milk that has been inoculated with bacteria “culture” to ferment the lactose.
Now it’s time for the science lesson: When an acid like buttermilk is combined with a chemical leavener like baking soda, gas bubbles are produced. This is what makes buttermilk a baker’s best friend — amazingly light cakes, breads and pancakes are the result of this chemical reaction.
Healthy and inexpensive
Besides baking, I use buttermilk in savory dishes such as salad dressings and dips. It adds a creaminess without that mouth coating you get from heavy cream or mayonnaise, and the tang it brings is just what a snack dip needs. Really, truly, you cannot make pancakes without it. If this pancake recipe doesn’t convince you, nothing will.
And calorie counters, take note: Buttermilk has less fat than regular milk because the fat has been removed. (A glass of buttermilk has 99 calories versus a glass of regular milk with 157 calories.) And it’s high in potassium, B12 and calcium. If you need yet another reason to try it, it’s inexpensive. (The pH level of buttermilk gives it a longer shelf life and thus a lower price than regular milk.)
If you’re really in a pinch and need a buttermilk substitute, you can make your own with milk and an acid. (But it’s not the same as using real buttermilk.)
Buttermilk Substitute
Ingredients
Directions
- Add the vinegar to a measuring cup and add enough milk to bring it to the 1-cup line. Mix and let stand for at least 15 minutes.
The Best Buttermilk Pancakes
What better way to start a holiday morning than a stack of pancakes? These not-too-sweet pancakes fluff up to about ½-inch thick, so don’t forget the syrup. And they’re guaranteed to make you a buttermilk lover.
Makes eight 3½-inch pancakes; serves 2 to 4
Ingredients
¾ cup all-purpose flour (see note)
¾ cup whole-wheat flour
1 tablespoon sugar
½ teaspoon baking soda
¼ teaspoon baking powder
5 tablespoons unsalted butter, melted and cooled
1 large egg
1 cup buttermilk
canola or vegetable oil, for greasing the griddle
maple syrup, for serving
Directions
- Place the flour, sugar, salt, baking soda and baking powder in a medium-size mixing bowl and stir to combine.
- Place the melted butter and the egg in a bowl and whisk to blend. Add the buttermilk and whisk thoroughly to combine.
- Pour the egg mixture into the dry ingredients and mix until combined, but do not over-mix. The batter should be thick and lumpy.
- Heat a griddle over high heat until very hot (a drop of water should sizzle on contact). Lightly grease the griddle with a small amount of oil and lower the heat to medium. Pour the batter onto the griddle. Don’t crowd the pancakes; you want the batter to spread easily, leaving enough room between the cakes to be able to flip them.
- Cook the pancakes until they begin to firm up and bubbles appear on the surface (watch closely; sometimes the cakes firm up before the bubbles show up), 2 to 3 minutes. Use a spatula to lift a pancake to check its bottom side; if it’s nicely browned, flip the cake. Check all pancakes before flipping.
- Continue cooking the pancakes until the second side is nicely browned, about 1 minute more.
- Serve the pancakes immediately with syrup, if desired.
Note: You can use any combination of flours that you have in your pantry. The whole-wheat flour makes them a bit more nutritious, but using only all-purpose flour results in even fluffier pancakes. Also, this recipe doubles easily.
Zester Daily contributor Laura Holmes Haddad lives with her husband, daughter and son in Los Angeles, where she writes about wine and food and runs her website, gourmetgrrl.com. Her latest collaboration is “Plats du Jour: A Journey Through the Seasons in Wine Country” with the girl & the fig restaurant in Sonoma, Calif., released in November 2011.
Photo: Buttermilk pancakes. Credit: Laura Holmes Haddad
Parents fret about how their kids eat all the time, but not on Christmas morning. Not many parents can claim kids like my three who, when they were little, followed the principle of “you snooze, you lose” at the table. They ate everything, like a swarm of locusts. “Finicky” in our house meant you asked what it was you just ate. But even for picky eaters, Christmas morning is a time of unfettered delight. Not only are there presents waiting under the tree, but usually Mom or Dad will be making something special for breakfast.
For parents, the sight of their children’s joy is motivation enough to make their dream breakfast. In our family, it was Belgian waffles with real maple syrup with thick-cut bacon and freshly squeezed orange juice, or occasionally blueberry pancakes. But there was another breakfast I sometimes made: broken pancakes, or torn pancakes. This was something that I came across in Switzerland and the former Czechoslovakia many years ago, and the kids loved it.
Basically, you make regular pancakes with raspberries or blackberries and start breaking them up as they cook. They are turned out onto a plate, sprinkled with powdered sugar and whipped cream, and garnished with mint leaves. My kids used to suck the mint leaves and then throw them away. The nice thing about this recipe is you’ll make two big pancakes to serve four, and the pancake itself doesn’t have to look pretty since it’s broken and then garnished. You can cook in a large nonstick skillet too, in which case only preheat it for a minute or two.
Broken Pancakes With Raspberries and Whipped Cream
Serves 4
Ingredients
Directions
- In a bowl, sprinkle the raspberries with 2 tablespoons sugar and let rest until needed.
- Preheat a 12-inch cast iron skillet over medium heat for 10 minutes.
- In a bowl, sift the flour, then re-sift it with the salt, the remaining 3 tablespoons sugar, and the baking powder.
- Pour the milk into a 2-cup measuring cup and add the egg yolks and beat. Add the melted butter to the milk.
- In another bowl or measuring cup, beat the egg whites with an electric or handle beater until they form peaks.
- Pour the milk mixture into the bowl with the dry ingredients. Fold in the raspberries. Then add the egg whites and fold — don’t beat — all the ingredients together. Let sit 15 to 30 minutes.
- Pour or ladle half the batter into the skillet so it reaches the sides, pushing the batter out to the sides with the bottom of the ladle. Cook for a few seconds, until the bottom sets then start breaking it up into pieces with the edge of a spatula, turning the pieces to cook all sides until golden brown, 5 to 6 minutes. Set aside while you cook the second pancake if you’re not using two skillets.
- Remove to serving plates, dust with powdered sugar and a dollop of whipped cream and a small sprig with 3 or 4 mint leaves.
Zester Daily contributor Clifford A. Wright won the James Beard / KitchenAid Cookbook of the Year Award and the James Beard Award for the Best Writing on Food in 2000 for “A Mediterranean Feast.” His latest book is “Hot & Cheesy” (Wiley) about cooking with cheese.
Photo: Broken berry pancakes with whipped cream and mint. Credit: Clifford A. Wright
Like the other 29 people in my BodyPump class at the Sag Harbor Gym this morning, I am committed to exercising away the effects of holiday overindulgence. Well, maybe not quite as committed as they are. I have no idea what everyone else was thinking as we heaved barbells over our heads in unison, but I was probably the only one who was debating what to bake when class was over. At our village’s natural foods store a little later, I saw some of my classmates crowding around the juice bar. But I wasn’t there to pick up a spirulina smoothie or a week’s worth of Master Cleanse supplies. Instead, I headed to the grains-and-seeds aisle and filled my reusable shopping bag with organic whole-wheat flour, rolled oats, flax, sunflower and sesame seeds. Then I headed home to make some waffles.
For me, the new year isn’t a time for renunciation as much as it is an opportunity to recalibrate recipes and adjust tastes for a brand-new baking season.
After almost two straight months of baking butter cookies and pecan pie, I start to crave rugged bran muffins, pumpernickel pretzels with sprouted rye berries, and johnnycakes made with stone-ground cornmeal and sweetened with molasses. I don’t consciously aim for “healthy.” It just happens that the baked goods I want to eat now are loaded with satisfying ingredients that happen to be super-nutritious. When I first started baking with these items, I didn’t even know that sunflower seeds are an excellent source of hearth-healthy vitamin E, flax seeds provide anti-inflammatory omega-3 fatty acids, and sesame seeds are rich in minerals such as copper, which is believed to relieve arthritis symptoms, as well as calcium and zinc, which promote bone health. I just liked the way seeds added crunch and flavor to my breads, muffins and cookies. Although I had heard rumors about oatmeal’s cholesterol-lowering capabilities, I kept a box of oats in the pantry not for medicinal purposes but to give my cookies, muffins, pancakes and waffles the crispy-chewy texture I sometimes prefer.
Not relying on 100 percent whole-wheat flour
On Christmas morning I might have used a stick of butter and three eggs in my waffle batter for flavor and richness. In January, I still want flavorful and rich waffles. But these days they get their flavorful quality from nutty whole-wheat flour and earthy oats. No matter how healthy a waffle is, I’m not going to enjoy it if it is heavy and dense. Instead of using 100 percent whole-wheat flour in this and other “healthy” recipes, I mix whole-wheat flour with a larger portion of white flour. The whole-wheat flour provides fiber and nutrients while the white flour contributes the gluten that will give my baked goods the structure they need to sustain a nice rise. This is where the seeds come in: They add flavor and nutrients too, but like chocolate chips suspended in cookie dough, they won’t affect the chemistry of the batter.
As with my regular waffles, I stick with buttermilk to moisten my healthy waffle batter because of its tangy taste and the bubbly texture it lends to the finished dish. The same rules that I follow when making white-flour waffles apply here: I’m careful not to overmix the batter (which will deflate its air bubbles and over-develop the gluten, making them flat and tough), I grease the grids of my iron with nonstick cooking spray before baking each batch (there’s nothing worse than tearing into the interior of your waffles as you open the iron), I try not to overfill the machine (a leaking waffle iron used to be my specialty), and I bake them on my machine’s highest setting (for a crispy exterior and a properly cooked — not raw — interior).
You could top these waffles with pats of butter and drown them in maple syrup (I won’t lie — they taste great this way). But a lightly sweetened fruit topping will add bright flavor as well as more vitamins, minerals and fiber. Try sliced bananas drizzled with just a little of that maple syrup, berries macerated in a teaspoon or two of turbinado sugar, or my personal favorite, honeyed oranges and pomegranate seeds
Waffles for the New Year
Serves 4
Ingredients
For the waffles:
For the honeyed oranges with pomegranate seeds:
Directions
- Heat the waffle iron.
- Stir together the flours, oats, sesame seeds, flax seeds, baking powder, baking soda and salt in a large mixing bowl.
- Whisk together the buttermilk, egg, honey, and oil in a large glass measuring cup.
- Pour the liquid ingredients into the bowl with the dry ingredients and stir until moistened. Do not overmix!
- Spray the grids of the waffle iron with nonstick cooking spray. Pour some batter (how much depends on the size of your waffle iron) onto the grids and spread it to the edges with a spatula. Cook the waffles until they are golden brown, 4 to 7 minutes, depending on your machine. Serve immediately, repeating with the remaining batter and spraying the grids with more cooking spray before beginning each new batch.
Zester Daily contributor Lauren Chattman is a cookbook author, freelance writer and former professional pastry chef. Her recipes have appeared in Food & Wine, Bon Appetit, Cook’s Illustrated and The New York Times. She is the author of 14 books, most recently “Cake Keeper Cakes” (Taunton, 2009) and “Cookie Swap!” (Workman, 2010).
Photo: Waffles. Credit: Lauren Chattman
I practice a simple breakfast ritual. I like to have a piece of toast, preferably dense bread like a pain de mie. I spread it with generous amounts of butter, using my grandmother’s old butter knife with the rounded point. An occasional poached egg, maybe with some tomato-chili salsa leftover from last night’s dinner? Even better. But what really ignites my morning engine and shifts me into first gear is a bowl of miso soup, a classic breakfast soup in Japan. The daughter of Japanese parents, I was born in New York and raised in Tokyo, Kamakura, San Francisco and Mexico City. I straddle East and West, but when it comes to breakfast, no matter how eclectic, the Japanese component brings me to my comfort zone.
Recently, my breakfast ritual took a sharp turn East, when soba master, Akila Inouye from Tokyo stayed with us for nearly three weeks. He and I taught more than a dozen soba-making classes in my Santa Monica home. I have held cooking classes before, but had never done anything with flour and water on such a scale. I often found myself scraping buckwheat flour dough off the hardwood floors and washing mixing bowls way past midnight. But no matter how busy we were, Akila got up at dawn to make a full Japanese breakfast. “It feels like I never left Japan,” he said.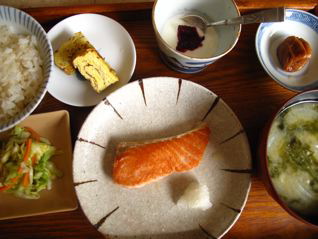
What is a traditional Japanese breakfast? Besides miso soup (see recipe below), there must be rice, and then as many side dishes as you like. What you are looking for is nutritional balance and simplicity. Bread, which was introduced to Japan by Portuguese missionaries and trades people in the 16th century, doesn’t appear on a traditional Japanese breakfast menu. For Akila, bread is like emergency food — he enjoys it, but eats it mainly when he runs out of rice. I am quite the opposite. I love rice but can happily make a crusty baguette my entire meal.
During Akila’s stay, however, my consumption of rice multiplied by the bowls full. He cooked four cups of rice every other day. It was always on standby in the rice cooker. The rice saved us when we got to be so busy with the workshops and had made no plans for dinner. Akila would also make fried rice. It was so good, I could eat it for breakfast too.
Miso soup can be whipped up in a few minutes if you have dashi, the stock, on hand. We often had dashi left over from the workshop, so all we had to do was add the miso and a combination of seasonal vegetables, seaweed, meat, seafood and tofu. Even made from scratch, miso soup is quick — dashi takes less than 15 minutes to pull together, compared to chicken stock, which takes hours. Back in February, Akila and I had made miso. It still needed to age a little so we blended it with a more mature miso for our soup. The fun of making miso soup can be in the blending and in coming up with your own favorite flavor.
Thinking about tomorrow: breakfast and bento
A wise Japanese home cook will prepare dinner with the next day’s breakfast and bento box in mind. When the leftover braised duck with ginger, or the shishito peppers and shrimp tempura Akila and I made during the workshops appeared on the table the next morning, I was elated. I often serve grilled fish, like salmon, with a Japanese breakfast. Other typical ingredients include nori to wrap the rice; fermented soybeans called natto, which are slimy, strong smelling and nutty; and pickled plums, or umeboshi. Natto is a vital source of protein in the Japanese diet and is readily available at Japanese markets. It is believed that an umeboshi a day keeps the doctor away. Both natto and umeboshi may take a bit of practice to appreciate, but give them a try. They are full of nutrients. I also like to have some fruit with plain yogurt with my breakfast. Japanese breakfast feels like dinner, but it’s never heavy or fatty. Consider the low rate of obesity in Japan. Eating a wholesome breakfast may have something to do with it.
During Akila’s visit, I’d sometimes wake up with bread cravings. I once snuck out to Huckleberry, my neighborhood bakery, for a scone to satisfy my bread fix. The one time that we dined out at an Italian restaurant, I practically finished the entire bread basket by myself. And after Akila left, I pulled out my toaster and my grandmother’s butter knife and went back to eating toast for breakfast again. But I also make traditional Japanese breakfast whenever I have fresh steamed rice on hand. With my bowl of miso soup, eclectic in one world, traditional in another, I am in my comfort zone.
Heirlooom Tomato and Tofu Miso Soup

Serves 4
Ingredients
3½ cups dashi (see recipe below)
3½ to 4 tablespoons Mugi, Koji, white or red miso
1 tomato (cut in quarters, then slice each quarter crosswise into ½-inch thick pieces)
½ square of soft tofu
2 green onions, sliced thinly
Directions
- Bring the dashi to a boil in a medium saucepan, then reduce the heat to maintain simmer.
- In a small bowl, dissolve 3½ tablespoons of the miso paste in a few tablespoons of the warm dashi. Add the mixture to the saucepan. Taste and add more miso paste, dashi or water, depending on how strong the soup tastes.
- Add the tomato and tofu, and simmer for 1 minute. Turn off heat.
- Pour the soup into individual bowls.
- Sprinkle each bowl with chopped green onion. Serve immediately
Basic Dashi
This dashi, which will keep for five days in the refrigerator, can be used for miso soup, suimono, ohitashi and other dashi-based sauces. Bonito flakes and dashi kombu can be found at Japanese markets.
Ingredients
Directions
- Using scissors, make several crosswise cuts in the konbu. This helps to extract the flavor during cooking.
- Place konbu and water in medium saucepan and let stand 15 minutes. Cook on medium heat until water is about to boil, then remove kombu (this will prevent a fishy odor).
- When the water boils, turn off the heat and add ½ cup of cold water. Let liquid cool down for a couple of minutes then gently add bonito flakes. Do not stir.
- When bonito flakes have settled near the bottom, about 3 minutes, strain them through a very fine-mesh sieve or a sieve lined with cheesecloth and discard them. Don’t stir the stock because it will cloud the dashi, which should have a light golden color.
Sonoko Sakai is a Japanese freelance writer and film producer who divides her time between Tokyo and Santa Monica. She has contributed stories and recipes to the Los Angeles Times, the former Los Angeles Herald Examiner, Saveur and Bungei Shunju (Japan). She is passionate about making soba by hand, and with master chef Akila Inouye of the Tsukiji Soba Academy, has created MazuMizu to teach Japanese home-cooking in Japan and abroad.
Photos, from top:
Japanese breakfast: rice topped with seasoned ground chicken and cut nori, umeboshi and pickled daikon, napa cabbage salad, nameko mushrooms and tofu miso soup
Japanese breakfast with salmon and, clockwise from left: carrot and cabbage salad, rice, tamagoyaki, yogurt with raspberry puree, umeboshi, daikon miso soup.
Heirloom tomato, tofu and miso soup
Credits: Sonoko Sakai
Thanksgiving can be a teaching moment as well as a culinary celebration. The first Thanksgiving, the lore goes, was a harvest celebration with English pilgrims and Wampanoag American Indians. They ate turkey, oysters, venison, corn and other native foods of Massachusetts. Our family likes to stay close to those native foods. The pilgrims did not stuff their turkey with corn bread and jalapenos, and neither do we. It is not the time for the new. Thanksgiving celebrates the old ways.
I was born in Queens. I went to high school and graduate school in New York. I lived for 14 years in Massachusetts with three little children and a wife, and then without a wife. Maybe this is the reason we have such traditional Yankee Thanksgivings even here in California, where we moved 13 years ago. Our family feels that Thanksgiving is not the time for experimentation.
Although I fondly remember Thanksgivings during my childhood, teenage years and 20s, it was about the time I met my former wife, Najwa, in 1978 that Thanksgiving became very special; something more than a holiday in November. Thanksgiving resonated with us because it was a truly secular holiday for us non-religious people. We gave thanks, of course, and when children came we stuck cutouts of pilgrims around the house. More important, our Thanksgiving menu was born, and the expectation of certain dishes became set in stone. It was a very New England Thanksgiving.
After we divorced, the kids went back and forth for Thanksgiving and Christmas, but the menu remained identical in both households year after year. In our house, we never make Thanksgiving food any other time of the year. Although we add dishes to the repertoire, one can only be removed by common consent. Recipes may alter slightly, but the food is the same. Finally, I made a little loose-leaf book of recipes for us to use.
Just a few years ago, after nearly 20 years of divorce, Najwa and I started having Thanksgiving dinners together again. Luckily, the kids, my girlfriend Michelle, Najwa’s husband Larry, and the other usual suspects all get along. The food is the same. Our family has myriad ethnic backgrounds, but you will never see hummus, lasagna, burritos, or blintz at our Thanksgiving table. One does not eat those foods at Thanksgiving.
The foods we choose are absolutely mandatory for a New England Thanksgiving: turkey, bread stuffing, cranberry sauce, pumpkin, sweet potatoes, Brussels sprouts, beets, green beans, onions, corn, muffins, pies and more. Some years we omit some because they’re labor-intensive and we’re too tired or no one wants them. It is not much of an excuse, I admit, but I never want to make the pumpkin flapjacks because they’re too much work and tricky to get right. But they always get made because my son, Seri, wants them. He’s 21 now, so he makes them. He also makes the sardine-stuffed deviled eggs. We started with 12, but now we make about 48 because, incredibly, they all get eaten. We make eggnog from scratch. It’s ridiculous because it’s so rich that all anyone can do is drink a toast, yet we make it every Thanksgiving.
Najwa always makes the pumpkin pie and the pecan pie and the cranberry-orange relish. Corn muffins and corn sticks are always on the menu. Sometimes we make the cranberry butter, which none of us want until we see it in front of us and say, “This should always be on the table.”
I make the turkey and the stuffing. I do not brine the turkey, although I have once; brining just adds more labor than is necessary and you can make a spectacular roast turkey without it. My turkey is never dry and crumbly; it’s always moist, luscious and full of flavor with crispy golden brown skin because I don’t overcook it. You need a quick-read thermometer more than you do a brining bag for perfect turkey. Everyone goes nuts over the stuffing. It’s a bread stuffing made with sausage, celery, chestnuts, fresh herbs and bourbon. Half goes into the turkey and half bakes separately. We do that because everyone wants thirds on the stuffing. Making the non-stuffed stuffing taste like the stuffed stuffing is a challenge.
We also make green beans with pine nuts, gratin of four onions, maple- and apple-cider glazed yams or roast sweet potatoes, hash of Brussels sprouts with bacon and hazelnuts, and plenty else. At the end of the Thanksgiving dinner we go for a walk, a slow walk that seems to do nothing for digestion. Then we fall asleep early and the next day, poach the carcass. This is what we do.
Clifford A. Wright’s Pumpkin Flapjacks
The key to making pumpkin flapjacks is draining as much liquid from the pumpkins as possible. We first put them on our Thanksgiving menu in 1997 when I realized I didn’t want our traditional creamed squash dish because there was already enough cream being used in other dishes. Subsequently, my son Seri became crazy about this dish and finally, around 2006, I made him make it every Thanksgiving. When cooking down the pumpkin flesh, it’s important to make sure much of the moisture is evaporated; otherwise, the flapjacks won’t hold together when you cook them.
Ingredients
3 large eggs
1½ cups unbleached all-purpose flour, sifted
1 teaspoon baking powder
½ cup or more milk
¼ cup heavy cream
Salt and freshly ground black pepper
2 tablespoons unsalted butter or vegetable oil
¼ cup fresh pomegranate seeds
Directions
- Preheat the oven to 425 F.
- If using a whole pumpkin (which you should), place in a 425-degree oven and bake until a skewer can pierce the whole pumpkin without any resistance, about 1 hour. Then cut in half, remove and discard the seeds and scrape out the flesh. Process in a food processor, in batches, then transfer to a strainer set over a large bowl and drain for at least 4 hours, preferably overnight.
- Transfer the pumpkin to a large flame-proof casserole and cook over medium heat until almost all the moisture has evaporated, 1 to 2 hours, stirring occasionally and being careful it doesn’t splatter too much.
- Beat the eggs in a large bowl and stir in the flour, baking powder, pumpkin, milk, cream, and season with salt and pepper. The pumpkin batter can be refrigerated at this point.
- When it is time to cook, heat a lightly greased large griddle over medium-high heat and drop about a ladle full (about ¼ cup) of batter on the griddle, pressing down the top with the bottom of the ladle to form 4-inch diameter flapjacks. Cook until the bottom is nearly black in sections, lowering the heat if it blackens too quickly (as in 3 to 5 minutes), then flip, using a metal spatula to gently loosen the flapjack all around and underneath. If the flapjack looks loose or as if it will break apart, let it cook longer. Once flipped, cook until the other side is nearly black, 6 to 7 minutes a side. As the flapjacks finish cooking, transfer to a greased oval metal serving platter or any pan that can go into the oven. They can be cooked up to this point on Thanksgiving morning and be kept refrigerated. When it’s time to serve, heat in the oven after the turkey comes out and is resting, for 15 minutes, sprinkle with pomegranates and serve.
Zester Daily contributor Clifford A. Wright won the James Beard / KitchenAid Cookbook of the Year Award and the James Beard Award for the Best Writing on Food in 2000 for “A Mediterranean Feast.” His latest book is “Hot & Cheesy” (Wiley) about cooking with cheese.
“Bricks.” That was the 1930s lunch counter slang for bagels. Personally, I used to think of bagels as more like rope, but the idea is the same: something flavorless and sadistically chewy. Bagels’ saving grace, of course, is that they have the perfect texture for shmearing with cream cheese.
I’ve had a change of heart. Bagels are the bomb! And they’re actually a kind of bread! (Who knew?)
Only they’re faster to make than bread, and you get to throw onions, sesame seeds or poppy seeds on top. Or whatever you want, though I don’t hold with jalapenos, sun-dried tomatoes, seaweed chips or the like.
On top of everything else, people are always amazed when you show up with homemade bagels.
I think my bagel problem was that I’d had a lot of stale ones. People don’t seem to think of a bagel as something that can get stale. Maybe it’s the hard surface that commercial bagels have-they seem hermetically sealed. The fact is, with their high surface-to-interior ratio, bagels dry out faster than, say, French bread.
A certain chewiness is built into the bagel because of the way it’s baked. Before being put in the oven, the doughnut-shaped loaves are poached in boiling water, which stiffens the surface and keeps the bagels from rising further in the oven. It’s the same principle as making pretzels. In fact, the bagel is a sort of soft pretzel.
With a fresh bagel, the texture is more enjoyable, and so is the flavor. You can make the flavor even better by allowing more rising time. A number of bagel recipes call for only 15 or 20 minutes of rising, which is enough for the bagels to reach their minimum height, but a longer rise will give a more developed bread flavor.
To me, a lot of bagels taste under-salted. Maybe the bakers are reducing the salt to compensate for the short rising time, because salt slows down yeast activity, but I suspect it’s really because the most traditional coating for bagels is not poppy seeds or onions but salt crystals (just as for pretzels). Who needs salt in the dough if it’s in the topping? But you might feel like increasing the salt in the dough.
Anyway, the following bagels may not come out as regular in shape as commercial bagels, but they’re very tasty. If you grew up on harder bagels, they may seem like a cross between a bagel and a bialy. And, hey, how bad could that be?
Anyway, I’ve never claimed these are anything but gentile bagels. Give them a try. Trust me, you can still shmear.
Bagels
4 cups bread flour
1 tablespoon sugar
1 1/2 teaspoons granulated salt
1 tablespoon oil
1 1/4 to 1 1/2 cups warm water
2 teaspoons yeast dissolved in 1/4 cup warm water for 2 minutes
Topping: 1/2 cup sesame seeds, 1/2 cup poppy seeds or 1/2 cup onion sliced into the thinnest slivers possible
2 teaspoons kosher or other coarse salt
1. Place the flour, sugar, salt and oil in a mixing bowl. Add 1 1/4 cups warm water and the dissolved yeast and knead until the dough picks up all the flour and forms a workable mass. Work in more water if needed.
2. Dump the dough onto a working surface and knead, leaning hard into it, until it forms a springy, elastic mass, working in more flour or water as needed. This will take 10 minutes. The dough will firm up a little for the first two minutes as the water works its way into the flour.
3. Lightly oil a large mixing bowl and transfer the dough to it. Cover with a clean dish towel and let rise for any period from 20 minutes to 1 1/2 hours, depending on your schedule and taste.
4. Cut the dough into 8 equal pieces and roll into balls. One at a time, roll each ball into a cylinder twice as long as the width of your hand. Pick up the end of one cylinder in the crook of your thumb, leaving the remainder hanging in back of your hand. With your other hand, pick up the other end and bring it around to touch the first end. (This is easier done than said. Basically you’re forming the dough into a ring with the ends in the palm of your hand.) Pinch the ends together firmly to form the bagel and roll the join between your palms to cement it. Squeeze and stretch to make the bagel as evenly thick as possible.
5. Set the bagel on a greased baking sheet and repeat with the remaining balls of dough. Let the bagels rise for 20 minutes.
6. Meanwhile, preheat the oven to 425 degrees and bring a 2-quart saucepan of water to the boil. Mix the sesame or poppy seeds or onion with the salt and pour onto a plate.
7. Boil the bagels, two at a time, for 1 minute. Turn over with a skimmer or slotted spoon and boil for another minute. They will swell a little, and if you didn’t pinch the ends together firmly enough, they may become slightly uncoiled. Remove the boiled bagels with the skimmer and set them to cool on a rack.
8. While the next two bagels are boiling, pick up the first two and dip one side into the topping. Set them, topped side up, on the greased baking sheet. Repeat with the rest of the bagels.
9. When all the bagels are topped, put them in the oven and bake 10 minutes. Then remove the baking sheet, turn the bagels over with a spatula and return to the oven until they’re golden brown, about 20 minutes more.
10. Remove the baking sheet and transfer the bagels to a rack. Let them cool for about 20 minutes before serving.
Notes:
The longer you let the dough rise, the larger the bagels end up.
Poppy seeds are sold in small amounts because they turn rancid. If you buy a larger quantity, keep it in the freezer.
Onion shreds do not stick to bagels very abundantly. Even if you sprinkle some shreds onto the bagels after they’re on the baking sheet, most will fall off in the oven. Commercial dried onion sticks better, but it smells like dried onion soup mix and turns excessively brown.
Photo credit: Charles Perry