Articles in Meat

After my stove, my freezers are the most important kitchen gear I own. I have a large standup one in my kitchen, a chest freezer in the basement, and the freezer that is part of my old refrigerator, also stored in the basement, and all of them are full.
I think of them as essential parts of my pantry, and their contents always enter into my plans for my next meal. As someone who likes bread for breakfast, but not the same kind every day, I store an array that can satisfy any of my moods. Sometimes I want a hearty whole grain loaf, so I pull out a slice from the loaf I baked using Joanne Chang’s recipe from “Flour.”
More from Zester Daily
» The foolproof freezer cookbook
» The perfect way to freeze fresh produce
» ‘Fresh’ soup you can make right from the freezer
If I go for something a little sweet, I have home-baked coffee cakes that are not too rich or frosted, yet have that slight sweetness, yeastiness and pull I find so satisfying. I always keep store-bought rolls, and am especially fond of ciabattas, which go from the freezer to the convection setting on my toaster oven, ready to eat by the time the coffee is brewed.
I would add that these rolls are improved by this process, for they come out with a crunchy crust after having been subjected to thick plastic bags that make their crusts flaccid. Sourdoughs, sandwich loaves, and bagels are also in my kitchen freezer awaiting their turn at the toaster oven.
Freezing meals, not just foods on sale
Of course I have cooked dishes in my freezers, and this is the most important reason to have so much freezer space. Instead of filling the spaces with foods on sale in the super market — a pile of chickens, for instance — I use my freezers as a convenience, making sure that appealing cooked dishes are available all year round and get used up in a timely way. For instance, when I am in a cooking mood I prepare thick soups to serve on those winter nights when I may not feel like cooking.
Other dishes are great candidates for the freezer, such as cabbage rolls, because the dish has so much sauce that it freezes and preserves well. And, clearly, one does not have to come from Eastern Europe to love this dish. An Irish friend dropped by recently, joined us for a cabbage roll dinner, and wouldn’t leave until he got the recipe. And I have friends I already know love this dish, so I can always come up with a last-minute meal I know will please them. I just have to mash some potatoes and dinner is set.

Staples from the freezer. Credit: Barbara Haber
The other good use I make of my freezer is to preserve foods that can otherwise go bad. Whole wheat flour is a prime example. And I keep many of my other grains in the freezer to keep away those kitchen moths that are known to invade.
My interest in convenience means that I will keep on hand cuts of meat my family enjoys. Because we all like chicken thighs, I buy them in bulk and clean and skin them before packaging and freezing so that when they thaw they are ready to go into any dish I choose. But I don’t stuff my freezers with bulky items, especially large cuts of meat or turkeys. This may be because I came across a story some years ago that I have since thought of as a cautionary tale.
A man was given a 30-pound turkey one summer, which he decided to freeze until Thanksgiving. He managed to stuff it into his old chest freezer, pushing it around the internal coils. When he went to get it, he found the turkey hopelessly stuck and impossible to retrieve because, of course, it was no longer malleable and capable of bending around the coils. He had no choice but to unplug the freezer and wait for the turkey to thaw.
Be careful about what goes in the freezer
I sometimes store foods that are available only at stores far from home, but such long-distance shopping can backfire. I have a friend who likes fresh beef tongue, something you don’t find in neighborhood groceries, so she had to travel some distance to get one. When she got home and unwrapped it, she found that it was smelly and had gone bad. In a rage, she called up the butcher who sold it and gave him a piece of her mind, emphasizing that she lived far away from his shop so that returning it wasn’t going to be easy. He told her to put it in her freezer until the next time she was in the area to which she replied, “What do you think I’m running here? A morgue?”
So I am cautious and selective about what goes into my freezers. I remind myself that I don’t think of freezing food necessarily as a way to save money, but rather as a convenience and a way to eat well. When I have a good crop of tomatoes from my garden, many go into a marinara sauce. And I have a favorite corn chowder recipe I prepare in August and pull out in February. Being so enamored of freezing food has led to some teasing by family members. Recently, I went to my basement to put away muffins I had just made when I found taped to the top of the freezer a cartoon showing a husband, wife, and their own chest freezer. The caption has the wife saying, “Do you still want this?” Tucked under her arm is an object shaped like a man and wrapped like a mummy, which she fails to recognize as a leftover corpse.
Cabbage Rolls
Serves 12
Ingredients
1 head cabbage with large tender leaves
2 medium potatoes, coarsely chopped
1 large onion, coarsely
2 eggs
1 (28 ounce) can of tomatoes
1 can sauerkraut
1 (15 ounce) can tomato soup
Juice of one lemon
1½ cups brown sugar (or less, according to taste)
2 pounds chopped beef, uncooked
2 carrots sliced
Salt and pepper to taste
Directions
1. With paring knife, make cuts around stem of cabbage, then steam for five to 10 minutes, allowing leaves to soften so they can be rolled without splitting.
2. Using a food processor, process potatoes, onion and eggs, until all lumps of potato and onion are gone.
3. In large 8-quart Dutch oven pour in the tomatoes, sauerkraut, tomato soup, lemon juice and brown sugar. Add the vegetable mixture from the food processor and the raw, sliced carrots. Salt and pepper to taste.
4. When cabbage leaves are cool and pliable, fill each one with a heaping tablespoon of meat, roll loosely and place in Dutch oven on top of ingredients. If cabbage leaves are stiff, put remaining cabbage back into the steamer until leaves are pliable.
5. Simmer the dish for 1½ hours. It tastes best the day after it is cooked.
Note: I found at a Chinese market a cabbage that is wide and flat. It has very large leaves that are easy to roll. Standard cabbages can be more difficult to handle.
Top photo: Stuffed cabbage rolls. Credit: Barbara Haber

Place a carbon steel pan on a stovetop burner on high heat and stand back. In minutes, the surface temperature will reach 600 to 700 F. When hazy smoke floats into the air, it’s time to drizzle a small amount of oil onto the pan. The oil scatters across the surface, looking for a place to hide from the heat. But there’s no escape. The oil accepts its fate, adds a bit more smoke and waits. Drop a piece of marbled meat or a beautiful medley of farm fresh vegetables into the pan and the sizzling begins. Smokin’ carbon steel is the alchemist’s apprentice, transforming fat and starch into savory sweetness.
To create beautifully charred meats and crispy skin fish filets, restaurant chefs use sauté pans designed to take high heat. Searing caramelizes the outside and locks in flavor. In the home kitchen, cast iron and stainless steel pans are favored by many, but carbon steel has advantages over both. No health issues are associated with using carbon at high heat and cleanup is easy. Like woks, once a carbon steel pan is seasoned, the surface turns black so there is no need to brandish a scouring pad and cleanser.
Working with carbon steel
More on Zester Daily:
» Bring BBQ indoors with a Korean griddle
Some additional care needs to be taken. Never soak a carbon steel pan in water or place in a dishwasher. Simply scrub with a little soap to remove particulates and grease, rinse, then heat the pan on a stove top burner until dry and the pan is ready to use again. Acidic ingredients such as lemon juice and tomatoes can affect the seasoning of the pan, but that is easily remedied by following the manufacturer’s directions.
Available in cooking supply stores, the pans are half the cost of stainless steel and twice the price of cast iron. Once seasoned according to the manufacturer’s directions, the pans are virtually indestructible and designed to last a lifetime.
The pan I use is a French-made de Buyer 12.6-inch Mineral B Element. A bit lighter than a comparably sized cast iron pan, the extra long handle never gets hot when used on the stove top. At high heat, the surface of the carbon steel pan becomes nonstick with the smallest amount of oil.
Very much like Chinese stir-frying, cooking at high heat requires all ingredients to be prepped before cooking begins. To avoid risking a burn, experts suggest using a pair of long metal tongs, 12 inches or longer to manipulate the ingredients in the pan.
Get ready for some serious heat
A good exhaust hood with a fan above the stove is also necessary. High heat’s sweet smoke can turn from pleasure to pain if unvented. Many a meal has been spoiled by the annoying screech of a smoke alarm.
Use an oil that can tolerate high temperatures. A proponent of high-heat cooking to prepare his signature crispy salmon filet, chef Taylor Boudreaux of Napa Valley Grille in West Los Angeles, Calif., recommends a blend of canola (80%) and olive oil (20%).
Keep a premixed bottle on hand in the kitchen and you’ll always be ready for a smokin’ good time.
latt-carbonsteel2
Pan Seared Bone-In Ribeye Steak
I believe a little bit of steak goes a long way, so my preferred portion is 6 to 8 ounces. Quality rather than quantity makes the difference in this supremely easy-to-make, protein-centric dish. Buy the highest quality steak available.
A good steak deserves good accompaniments that are entirely personal in nature. One person draws pleasure from a side of fries, another prefers a baked sweet potato with butter. Some diners wouldn’t eat red meat without a glass of red wine. I enjoy a charred steak with caramelized onions and shiitake mushrooms served alongside garlic-parsley mashed potatoes, a carrot-broccoli sauté and an ice-cold perfect Manhattan up with a twist. But that’s me.
The times indicated in the recipe are estimates. The thickness of the steak will affect how long the meat needs to be cooked to reach the desired level of doneness.
Serves 1
Ingredients
1 bone-in ribeye, T-bone or Porterhouse steak
Sea salt and ground black pepper to taste
½ teaspoon blend of canola oil (80%) and olive oil (20%)
1 teaspoon sweet butter (optional, see variations)
1 garlic clove, peeled, root end trimmed (optional, see variations)
½ teaspoon finely chopped chives, or the green part of a scallion (optional, see variations)
Directions
1. Wash and pat dry the steak. Season lightly with sea salt and black pepper. Set aside.
3. Place the carbon steel pan on a burner on a high flame.
4. When the pan lightly smokes, drizzle the oil into the pan. In seconds the oil will smoke.
5. Using tongs, place the steak in the pan. Press down gently along the edges and the meat next to the bone. Pressing too firmly will force juices out of the steak which would diminish the flavors.
6. Allow to cook and sizzle. Steaks are best served medium-rare. Make adjustments as to time if you prefer yours less or more cooked.
7. After 3 to 5 minutes, turn the steak over. After another 3 to 5 minutes, press against the middle of the steak. If the meat feels solid, it is cooked. If it can be pressed down easily, then it probably requires more cooking. To be certain, use a sharp paring knife to make small cut in the middle of the steak. Inspect and determine if the steak has cooked to the state of doneness you enjoy.
8. Serve hot with your preferred sides and beverage of choice.
Variations
1. Use a combination of stovetop searing and oven baking, as many restaurant chefs do. To do this, sear the steak for 2 minutes on each side, then place in a 400 F oven for 5 minutes. To remove the pan from the oven, remember to use an oven mitt. The handle that rarely gets hot on the stove top will be very hot after spending time in the oven.
2. Test for doneness as before. If not cooked to your preference, place back in the oven.
3. After removal from the oven or the stovetop, drop a teaspoon of sweet butter and a crushed garlic clove (peeled) into the pan. Spoon the butter-garlic mixture over the steak, bathing it in the sauce. Discard the melted butter and garlic before serving. Place the steak on the plate with the sides.
4. Sprinkle 1 teaspoon finely chopped chives or the green part of a scallion over the steak just before serving.
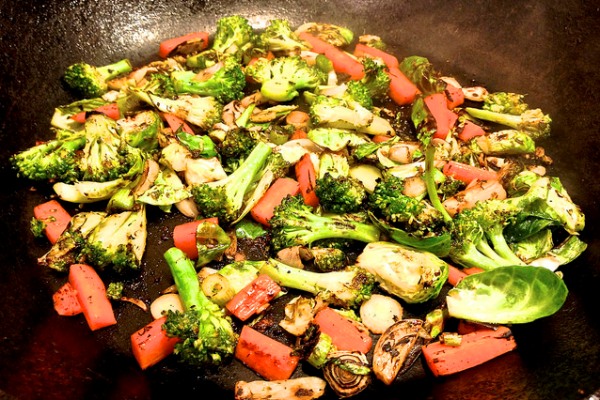
Caramelized Farmers Market Vegetables
Perfect as a side dish or as an entrée with noodles or rice, the vegetables should be charred but not overcooked so their texture is al dente. Using the freshest, highest quality vegetables will create a better tasting dish. Butter is optional, but a small amount can add a level of umami that turns a good plate of vegetables into an outstanding one.
Serves 4
Ingredients
2 large carrots, washed, root and stem ends removed, peeled, cut into rounds or 1 -nch oblongs
1 medium onion, washed, root and stem ends removed, peeled, julienned
3 garlic cloves, skins and root ends removed, smashed, finely diced
2 cups broccoli florets, washed, sliced long ways into bite-sized pieces
2 cups Brussels sprouts, root ends trimmed, cut into quarters or julienned
1 cup shiitake or brown mushrooms, washed, stem ends trimmed, thin sliced long ways
1 teaspoon blend of canola oil (80%) and olive oil (20%)
Sea salt and ground black pepper to taste
1 teaspoon sweet butter (optional)
Pinch of cayenne (optional)
Directions
1. Assemble all the vegetables on the cutting board, ready to use. If serving with steamed rice or cooked pasta, have that prepared as well.
2. Set the burner on the highest setting. Place the carbon steel pan on the burner. Allow to heat until a small amount of smoke begins to form.
3. Drizzle in the blended oil. When it smokes, add all the vegetables.
4. Using the tongs, toss the vegetables frequently to prevent burning. Toss for 3 to 5 minutes or until the vegetables are cooked al dente.
5. Remove the pan from the burner. Because the carbon steel is still very hot, continue tossing the vegetables. Add the butter and cayenne (optional). Toss well. Taste and adjust seasoning with additional sea salt and pepper.
6. Serve hot as a side dish or with the pasta or rice.
Variations
— If caramelized onions are preferred, cook them separately until they take on a golden color, then add the other vegetables.
— Substitute or add vegetables you enjoy, such as zucchini, turnips, kale or kohlrabi. Since some vegetables cook more quickly than others, learn which ones need to go into the pan ahead of the others. For instance, small diced turnips and kohlrabi would go in first before adding the other vegetables.
— Instead of adding butter and cayenne (optional), add 2 tablespoons soy sauce or an Asian sauce (optional), and for added heat, add 3 tablespoons finely chopped Korean kimchi (optional).
Top photo: Carbon steel sauté pan on high heat, smoke rising from the blended oil. Credit: David Latt

The last time I made tamales, I also made a delicious discovery: pork stock. My tamale recipe calls for simmering pork shoulder in a pot with water, an onion and a couple other simple ingredients until the meat is fall-apart tender. Some of the resulting liquid is typically used to make the masa — the cornmeal dough that forms the base of the tamales — but on this occasion I bought already-prepared masa to save some time. This left me with a couple of quarts of fragrant, delicately flavored stock.
More from Zester Daily:
» Tomato-corn soup draws flavor from bacon
» Don’t toss lobster shells, make seafood stock
What to do with it? Dump it down the drain? Freeze it for a future tamale-making session? Then a radical thought occurred to me: Why not use it to make soup?
While that idea may not seem like the stuff of anarchy to readers outside the United States, the fact is, we Americans almost never cook with pork stock. Many of us have never even tasted it, that is, outside the realm of Asian and Latin restaurants.
Why is that? Is there some kind of cultural taboo against pork stock? Would its flavor somehow overwhelm American soups and sauces?
I turned to Beatrice Ojakangas, author of “The Soup & Bread Cookbook,” for an explanation, but even she was stumped.
“We seldom encounter pork stock, if ever,” confirmed Ojakangas, whose book includes more than 100 soup recipes, yet not a single one involving pork stock. “However, I have retained the juices from fresh ham and used them in pea soup and bean soup.”
She made an interesting point. Americans will often flavor soups with pieces of ham or bacon, but for some reason we haven’t made the leap to pork stock. “I don’t know why it isn’t more highly prized,” Ojakangas admitted.

White bean soup made with homemade pork stock. Credit: Tina Caputo
Perhaps it’s simply a matter of commercial availability. You can go to just about any grocery store in the U.S. and buy chicken, beef, mushroom and vegetable stocks, but pork stock? Good luck with that. If you want to make soup with pork stock, you have no choice but to make it yourself.
The good news is that it’s really easy to do just that. There are a couple ways to go about it. You can make the stock from bones, which is cheap, but can take three hours or more. You also can make it from meat, which costs more, but takes less time and yields tasty leftover meat that can be used for some other purpose. Anne Mendelson wrote a great article for Zester that covers the basic stock-making techniques in more detail. I’m a fan of the meat-based method, because it creates the makings of a second meal for the same amount of effort.
The resulting stock is flavorful, but not overpowering, which makes it very versatile. It’s delicious as a base not only for Japanese ramen and Mexican posole, but also for pork chili and white bean soup.
Basic Pork Stock
Makes about 6 cups
Ingredients
3½ pounds pork shoulder, trimmed of fat and cut in large pieces
10 cups water
1 medium onion, quartered
3 cloves garlic, minced
1 ½ teaspoons salt
Directions
1. In a Dutch oven, bring pork, water, onion, garlic and salt to a boil.
2. Reduce heat and simmer covered, about 2 hours or until meat is very tender and falling apart.
3. Remove meat from broth and allow meat to cool. Shred meat using two forks and reserve for another use, such as tamales or pulled pork sandwiches.
4. Strain the broth. If using immediately, use a fat separator to remove fat from the broth. If not, refrigerate overnight in a couple smaller containers and skim solidified fat from the top before using or freezing.
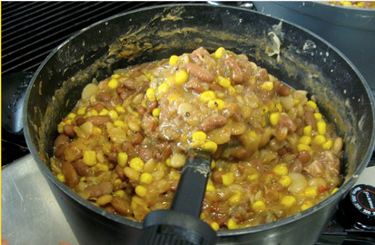
White Bean Soup
Serves 6
Ingredients
1 pound dried white beans (Great Northern or cannellini)
2 tablespoons olive oil
1 medium onion, chopped
4 cloves garlic, minced
2 celery stalks, chopped in ½ inch pieces
3 carrots, chopped in ½ inch pieces
2 dried bay leaves
4 cups pork stock
4 cups water
Salt to taste
Extra virgin olive oil for serving
Directions
1. Rinse and pick through beans to remove any pebbles. Cover with cold water and soak overnight. Drain.
2. Heat oil in a large pot over medium heat and add onion, garlic, celery and carrots. Sauté until vegetables begin to soften, about 5 minutes.
3. Add beans, bay leaves, pork stock and water to the pot. Bring to a boil and simmer gently until beans are tender, about 90 minutes.
4. Add salt to taste. If you like a thicker soup, remove ½ cup of beans, puree them and stir back into the pot.
5. Finish each bowl with a drizzle (about 1 teaspoon) of good extra virgin olive oil.
Top photo: Homemade pork stock. Credit: Tina Caputo

Classic holiday dishes are often associated with a specific religious holiday or cultural tradition. Sometimes this is so much so that meals get a bit typecast, like pumpkin pie that shows up only at Thanksgiving. But if you’re looking for that special dish that shakes up tradition or even suits a family with multiple religions or no religious tradition, consider serving goose.
More from Zester Daily:
» A bird to cook for every occasion
» How the French made roast turkey their own
Goose is a marvelous choice. There is, after all, the Christmas goose. And in the Middle Ages goose became popular among Jews and Muslims who either lived in Christian lands or who had converted, because goose meat can often be substituted for pork.
Because it is the holidays after all, the goose should be done up a bit special and I think this recipe from the region of Calabria at the toe of Italy’s boot would fit the bill for atheists and agnostics. If you’re anything else, adjust the recipe accordingly.
A Gorgeous Goose
Typically, this preparation called oca ripiena all’acqua di mare would be made with capon or chicken, but it works quite nicely with goose. The final result is a gorgeous mahogany-colored bird with crisp skin, succulent meat and a scrumptious stuffing. It’s perfect accompanied by asparagus with cream sauce.
If you don’t actually have access to clean seawater — and I can’t imagine anyone reading this will — then use bottled water salted with sea salt.
Stuffed Goose Cooked With Seawater
Serves 6
Ingredients
One 10-pound young goose (save the goose innards)
2 cups water
1 pound mild Italian sausage, casings removed, meat crumbled
¼ pound chicken liver, chopped
½ pound stale or lightly toasted French or Italian bread, diced
2 large eggs, beaten
Freshly ground black pepper to taste
2 teaspoons fennel seeds
1 teaspoon fresh rosemary, chopped
3 ounces pancetta, chopped
1 garlic clove, finely chopped
2 tablespoons dry Marsala wine
1 tablespoon extra virgin olive oil
Clean seawater or bottled water salted with sea salt as needed
Directions
1. Preheat the oven to 350 F.
2. Clean the goose, removing and saving the fat at the opening to the body cavity for another use. Tuck the wings close to the body and tie off tightly with kitchen twine. Do not salt the goose or stuffing because there will be enough salt in the sausage and the seawater basting.
3. Place the goose neck, gizzards and heart in a saucepan with 2 cups water and bring to a boil. Boil for 30 minutes, remove the gizzards and heart and chop. Set aside. Continue cooking the neck if desired with more water and save the broth for another use. Chop the goose liver.
4. Place the goose liver, sausage and chicken liver in a mixing bowl and mush together with your hands. Transfer to a saucepan and turn the heat to high and brown the sausage, about 5 minutes. Transfer the sausage mixture to a mixing bowl and mix it with the bread, eggs, black pepper, fennel seeds, rosemary, pancetta, garlic and Marsala. Stuff the goose and truss the legs. Brush the bird with the olive oil.
5. Place the bird on a rack in a roasting pan and cook until golden and the internal temperature reaches 170 F, 1¾ to 2½ hours, basting occasionally with seawater, which will have the effect of salting the bird too.
The goose is done when a skewer stuck into the meat below the leg releases juice that runs white. Make your final decision on doneness by using the meat thermometer stuck in the breast. Remove from the oven and let rest 15 minutes, then carve and serve.
Top photo: Roasted goose. Credit: Monica-photo / iStockphoto
 is one of the ingredients in the authentic succotash recipe. Credit: Glane23 / Wikimedia Commons")
That Thanksgiving belongs to New England goes without saying. Although there had been feasts giving thanks for the bounty of the land in the Virginia colony, in Spanish Florida and in British Canada, the federal holiday of Thanksgiving declared by President Abraham Lincoln in 1863 traces its lineage to the 1621 harvest celebration of Wampanoag Indians and English settlers in Plymouth, Mass.
More from Zester Daily:
» Mom’s best Thanksgiving advice
» Holiday wines worth a special occasion
Edward Winslow, one of the governing leaders on the Mayflower, left an account of that thanksgiving feast that lasted three days with 90 Wampanoag and 53 settlers. The Wampanoag brought five deer for the feast. Although there is no surviving menu from this thanksgiving we know that most of the food was brought by the Wampanoag including various waterfowl, the deer, and corn.
It’s likely that the feast was held outdoors as there was no house large enough to hold all these people. Although migrating waterfowl and turkey were plentiful at this time of year, there’s no record that turkey was on the table. There probably were no cranberries, no sweet potatoes, and no pumpkin pie, although there was squash of some kind. One of the dishes they may have eaten was sobaheg, a Wampanoag stew of corn, roots, beans, squash and various meats, perhaps a precursor to succotash.
A New England Thanksgiving of today is somewhat codified, at least in folklore. One must have a perfectly cooked turkey, or at least an understanding of how to cook the turkey if you are a first-timer. Of course you need an excellent turkey gravy. Root vegetables are typical, as is succotash, boiled creamed onions, buttered squash, cider and cranberry juice to drink. You will have at least three pies because in colonial times hosts thought it appeared stingy to offer company fewer than three pies. Probably you would serve a pumpkin pie, a mincemeat pie and a Marlborough pie, which is a glorified apple pie.
Colonial evolution of a Native American tradition
Succotash became a traditional Thanksgiving dish thanks to the Old Colony Club, created in Plymouth, Mass., in 1769. The group favored this dish as part of their annual Forefather’s Day dinner, which was celebrated in early winter.
Plymouth Succotash. Credit: Courtesy of Culinary Historians of Boston
The original succotash is a descendant of a local Native American meal based on a corn soup made with beans, unripe corn, and various meats, especially bear or fish. Over time it has evolved into a kind of boiled dinner with corned beef, chicken, salt pork, white Cape Cod turnips, potato, hulled corn and boiled beans with some salt pork. Originally, the beans used were actually dried peas, but over time lima beans have become popular.
The word succotash derives from Narragansett, a branch of the Algonquin language, the word being msiquatash. Hominy are kernels of corn that have been treated in a special way, usually soaked in a caustic solution and then washed to remove the hulls. There are different kinds of hominy with different tastes.
Plymouth Succotash
Serves 4
Ingredients
½ cup dried split peas
2 cups whole grain hominy
1 Cornish game hen (about 1½ pounds), cut in half or 2 chicken thighs and leg
1 pound beef brisket in one piece
2 ounces salt pork in one piece
1 cup water
Salt and freshly ground black pepper to taste
1 boiling potato (about ½ pound), such as Yukon gold, red or white potatoes, boiled and diced
1 small turnip, boiled and diced
Directions
1. Place the peas in a pot with cold water to cover by several inches. Bring to a boil and cook until very tender, about 3 hours. Drain, and pass through a food mill or mash until it looks like mashed potatoes. Set aside until needed.
2. Meanwhile, bring a saucepan filled with water to a boil and add the hominy. Cook until it is half cooked, about 3 hours. Drain and set aside, saving 2¼ cups of the liquid.
3. Place the game hen or chicken, beef, salt pork and hominy in a large flameproof casserole or Dutch oven and cover with the reserved broth and the water. Season with salt and pepper and bring to just below a boil and let simmer, uncovered, until very tender, about 4 hours, adding small amounts of water if it looks like it’s drying out. The water should never reach a boil, though.
4. Add the pea purée to the meats and stir so all the fat is absorbed. Add the potato and turnip, stir and cook until the potato is soft and the hominy fully cooked, about 1 hour. Serve hot. Do not boil at any time.
Note: A modern vegetable succotash can be made by combining 2 cups of reheated frozen lima beans, 2 cups of freshly cooked corn scraped from the cob, ½ teaspoon salt, 2 tablespoons unsalted butter, a dash of paprika, freshly ground black pepper and ½ cup of cream in a saucepan. Cook until bubbling hot, about 5 minutes, and serve.
Top photo: Hominy is one of the ingredients in the original succotash recipe. Credit: Glane23 / Wikimedia Commons

The 2013 World Series features a matchup between the Boston Red Sox and the St. Louis Cardinals. Many of us expect to spend a bit of time in front of the TV. And we’ll need to eat.
There are three approaches to game-time TV food. The first is junk food like tortilla chips and salsa, potato chips or popcorn. The second is approximations of what you might eat at a ballpark, such as hot dogs. The third I propose here.
More from Zester Daily:
» Danish rock fest features healthy fast food
Baseball games require a lot of TV time, so you’ll want a real meal at some point, and it should be a meal you can eat in front of the TV without much hassle. I like culturally appropriate foods, so I suggest Boston fans serve up some fish and chips and St. Louis fans serve up hot dogs. Beer and soda go without saying.
Fish and chips along with baked beans, fried clams and clam chowder are typical Boston foods, but fish and chips are perfect when you don’t want to look down at your plate during an exciting hit-and-run.
Hot dogs for St. Louis Cardinals fans
The hot dog is the perfect St. Louis food for baseball watching because you can bring it up to your mouth without taking your eyes off the called third strike. Furthermore, the invention of the hot dog, a frankfurter in a bun, is sometimes ascribed to the wife of a German named Antonine Feuchtwanger who sold hot dogs with buns on the streets of St. Louis in 1880 because his customers kept taking off the white gloves handed to them to prevent their hands from being burned while they ate. For our purposes, this story alone is good enough to declare the hot dog St. Louis food and an appropriate choice for watching the Cardinals in the World Series.
Another St. Louis food story relates the invention of peanut butter to the city in 1890, when an unknown St. Louis physician encouraged a food products company owner, George A. Bayle Jr., to process and package ground peanut paste as a nutritious protein substitute for people with poor teeth who couldn’t chew meat. No one knows where the peanut butter and jelly sandwich was invented, but that it existed around 1900 and it’s a good addition to the hot dog on the Cardinals’ menu.
The hot dog is easy enough, so here’s the recipe for fish and chips.
Fish and Chips
Serves 6
Ingredients
3 cups vegetable oil
2 cups all-purpose flour
2 cups beer (lager)
2 tablespoons extra virgin olive oil
Salt and freshly ground black pepper to taste
4 egg whites, beaten to form peaks
8 cod fillets (about 2 pounds)
Directions
1. Preheat the oil in a 12-inch cast iron skillet over medium-high heat.
2. In a bowl, prepare the batter by stirring together the flour, beer, olive oil and season with salt and pepper. Fold in the egg whites.
3. Dip the fish fillets into the batter making sure both sides are coated. (You’ll have leftover batter). Using tongs carefully place 4 fillets in the hot oil making sure you do not crowd the skillet; cook in more batches if necessary. Cook, turning once with tongs, until golden brown on both sides, 8 to 10 minutes in all. Remove and keep warm in the oven. Repeat for the remaining fish fillets. Serve with lemon wedges, tartar sauce or malt vinegar.
French Fries
Serves 6
Ingredients
4 russet potatoes (about 12 ounces each), peeled and cut into 3-inch lengths not more than ½-inch thick
2½ quarts peanut or canola oil for frying
Salt to taste
Directions
1. Dry the potatoes very well with a towel or multiple sheets of paper toweling. It is very important that the potatoes be dry.
2. Preheat the frying oil in a deep-fryer or large 12- to 14-inch skillet to 360 F. The oil should be at least 2 inches deep and no cooking should happen before that temperature is reached.
3. Cook the potatoes in five batches so they are never too crowded (otherwise the temperature of the oil will drop). Cook for exactly 5 minutes. Remove, drain and transfer to a paper-towel-lined platter. Repeat until all the potatoes are cooked. Let the potatoes cool completely, covered with paper towels. Do not salt. You can place them in the refrigerator for 8 hours if you’re not to be serving them until later in the day, but do bring them back to room temperature before proceeding.
4. Preheat the frying oil to 370 F.
5. Cook the fries in five batches again for exactly 4 minutes. Taste one fry and see whether you like it. If not, cook for another minute. As you remove the fries to drain on more paper towels, salt them immediately. Transfer the French fries to a platter and serve.
Top photos: Fish and chips. Credit: Clifford A. Wright

Scrapple is one of those regional American favorites that remain a mystery to outsiders. You’ll find it in the mid-Atlantic states. Scrapple is a hog-parts mush formed into solid blocks, or logs, sliced, floured lightly and fried in fat. I first had it in Maryland in the early 1970s and have been wild about it since.
More from Zester Daily:
» How to cook with the odd bits of the animal
One of the great regional foods of America, you’ll find it also in northern Virginia, eastern Pennsylvania, Delaware and southern New Jersey. Scrapple is made from leftover parts of hog processing, including offal such as the head, heart, liver and other innards that are boiled, bones and all, for the extraction of any gelatin. The edible matter is separated from the inedible and the meat is mixed with cornmeal and made into a mush with seasonings such as sage, thyme, savory, black pepper and salt. It is then solidified and stored.
It’s often described as Pennsylvania Dutch, but this is a misnomer. In fact, the expression is incorrect as the Dutch never settled in Pennsylvania but rather in New York. It began as a misunderstanding of the original German settlers who were the Pennsylvania Deutsch (Pennsylvania Germans). The earliest record of German settlement in Pennsylvania is in 1683 when a group of Quakers and Mennonites from the Rhineland founded the hamlet of Germantown.
These were mostly poor farmers seeking refuge from the Thirty Years’ War in America and afforded passage as indentured servants for the most part.

A fried egg with scrapple. Credit: Clifford A. Wright
Their hardscrabble lives in 17th-century Pennsylvania meant everything had to be used including the scraps of the pig slaughter, probably giving scrapple its name.
Scrapple is related to its German precursor, panhas, a kind of pudding-wurst, but probably got its English name, scrapple, in the mid-19th century from the word scraps. It’s usually dredged in flour so it will hold together when frying and develop a crispy brown crust. Scrapple is fried in butter or pork lard and eaten for breakfast with eggs. All kinds of things can accompany it, such as applesauce, grape jelly, ketchup, horseradish or mustard. Scrapple is hard to find outside of the mid-Atlantic, but both the Rapa Scrapple company and Habbersett scrapple company provide store locators, and it can be bought on Amazon too, although in amounts that might last you years.
Scrapple
Serves 4
Ingredients
¼ cup unsalted butter or pork lard
½ pound scrapple, cut into slices about ½-inch thick
All-purpose flour for dredging
Directions
1. In a skillet, melt the butter over medium heat.
2. Dredge the scrapple slices in flour, tapping off any excess.
3. Lay the scrapple in the skillet and cook, turning once, until both sides are crispy brown in about 5 minutes. Serve hot.
Top photo: Scrapple and an egg. Credit: Clifford A. Wright

Here’s a fusion dish that combines Kashmiri and Chinese influences. It’s not a new one — it appears in a 14th-century collection of recipes and medical advice that was compiled for Kublai Khan’s grandson.
More from Zester Daily:
The Mongols ruled a large territory with many peoples in it, which gave them a taste for foreign cuisines. When they roamed on the steppes, they’d had an excessively boring cuisine, which was basically nothing but boiled meat and dairy products.
This recipe is found in the book “Yinshan Chengyao,” which was written for one of the Kublai Khan’s grandsons and translated in 2000 by Paul Buell and Eugene Anderson. One of their problems was that the Chinese writing system doesn’t have a good way of spelling sounds and it has to “spell” foreign words using Chinese characters that sound kind of the same. Buell and Anderson interpreted the name of this dish as Bal-po soup, Bal-po being a name for Nepal and Kashmir. As they point out, the recipe is more like Kashmiri food.
So what we have here is something like Middle Eastern food that’s taken a turn toward India and then China. It’s lamb and chickpeas in a broth flavored with saffron, turmeric and cardamom, served with rice pilaf. The recipe specifies fragrant, non-glutinous rice, which sounds like basmati. More exactly, it says to serve the soup on top of the rice, apparently jambalaya style. But the soup also includes Chinese daikon radish, giving the effect of radish-y potatoes.
Just a touch of guesswork
The recipe doesn’t tell us everything we’d like to know. It gives a measurement for saffron that works out to one-one-hundredth of an ounce (try measuring that in your kitchen) but no measurement for the meat. So there’s a lot of room for interpretation, and I’ve chosen to modify the recipe slightly on top of that. It calls for asafetida, which to me just tastes like stale garlic. If you want that flavor, use asafetida or garlic powder to taste. I prefer fresh garlic.
And it says to cook chickpeas along with the meat, but chickpeas may need to cook for two and a half hours or more. If you want to cook the chickpeas with the meat, add a half-cup raw chickpeas and increase the water by two cups, and check the water level regularly. In any case you should end up with two to two and a half cups broth.
And then you can get a whiff of the short-lived fusion cuisine of the glittering Mongol court seven centuries ago.
Bal-po Soup (Mongolian Lamb Jambalaya, if you prefer)
Serves 4
Ingredients
For the soup:
1½ pounds boneless lamb
2½ cups water
½ teaspoon salt
4 to 5 cardamom pods, crushed
1 daikon radish, about 1 pound
1 (14-ounce) can chickpeas
¼ teaspoon pepper
¼ teaspoon saffron
½ teaspoon turmeric
Vinegar to taste
For the rice:
1⅓ cups basmati rice
3 cups water
½ teaspoon salt
Cilantro for garnish
Directions
For the soup:
1. Cut the lamb into chunks roughly 1 inch square and an inch or less thick. Put in a saucepan with the water, bring to the boil and remove the scum that rises. Add the salt and cardamom and cook until the meat is very tender, about 1 hour.
2. Remove the meat and set aside. Peel the daikon and cut into coin shapes about ¼-inch thick. Cook in the broth until translucent, 7 to 10 minutes. Set aside with the meat and keep the meat and daikon warm.
3. Degrease the broth and return to the saucepan. Drain and rinse the chickpeas and add to the broth along with the pepper, saffron and turmeric. Simmer while making the rice.
4. Add vinegar to taste.
For the rice:
1. Rinse the rice repeatedly in cold water until the water runs clear. Bring 1⅓ cup water to a boil in a small saucepan, add the salt and the rice reduce the heat to low, cover and cook 14 minutes.
2. Remove the lid, fluff the rice into a mound with a fork and poke 2-3 holes to the bottom of the rice with the fork handle. Cover the pan with 2 layers of paper towel and the lid, raise the heat to medium-low and cook 7 minutes longer.
To serve:
1. Remove the lid and paper towels and scoop the rice into 4 large soup bowls. Distribute the broth and chickpeas among the bowls. Arrange the meat and daikon slices around the rice and garnish with sprigs of cilantro.
Top photo: Mongolian lamb bal-po soup. Credit: Charles Perry