Articles in Vegetables
Chinese chefs are rightly renowned for their beautiful knifework. Some are so skilled they can turn the simplest ingredients into works of art, like a carrot into a flying phoenix or a radish into a delicate butterfly — objects that defy their modest beginnings with astonishing aplomb.
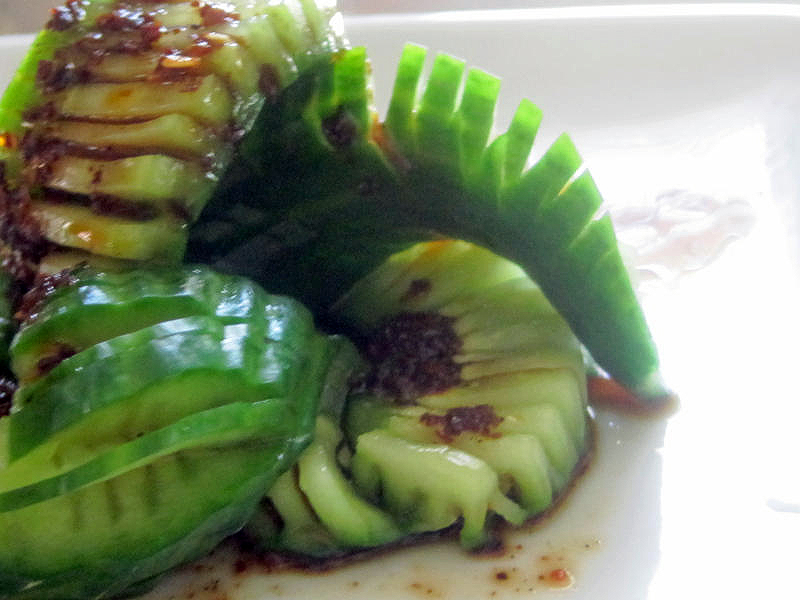
Today’s video takes a look at a particularly beautiful, yet easy, turn of the blade that results in what looks like a tiny, coiled dragon on a plate. The latticed cucumber skin has green and white interwoven with light and shadow, and tiny flecks of chili oil tantalize the nose. It is ostensibly little more than a palate teaser, but it owes its magic to a clever technique that Chinese chefs call huadao, or “flowered knives.”
To the folks in the central Chinese province of Sichuan, this pattern doesn’t look like a dragon, but rather calls to mind the traditional raincoat worn by farmers. Fashioned out of coarse palm coir, peasants used to don these simple capes while tending their fields. Elegant city people, of course, prefer fine silks and cottons, fabrics whose weaves are almost invisible. So, to their eyes, the latticework in these cucumbers echoes the rough weave of a farmer’s raincoat, or suo’i.
Though endowed with a complex beauty, these cucumbers are easy enough for beginning cooks to master, even without the Chinese chefs’ knife skills. The cucumbers are garnished with a spicy Sichuan-style vinaigrette suggested by the late chef Barbara Tropp, who had the inspired idea of adding orange peel to this vibrant chili-studded oil.
Citrus Chili Oil With Black Beans
橘香豆豉辣油
Juxiang douchi layou
Makes about ½ cups
Ingredients
1 medium orange, preferably organic
4 teaspoons fermented black beans
3 tablespoons coarsely ground dried chili pepper
2 garlic cloves
2 teaspoons peeled and finely minced fresh ginger
⅓ cup peanut or vegetable oil
1 tablespoon roasted sesame oil
Directions
1. Scrub the orange and pat dry. Peel off the zest with a potato peeler and chop it finely. (Use the rest of the orange for something else.)
2. Coarsely chop the fermented black beans, but do not rinse them. Measure out the ground chili pepper and add it to the black beans and orange peel.
3. Lightly smack the garlic cloves and peel them, but leave them more or less whole. Add the garlic and the ginger to the other flavoring ingredients.
4. Pour the two oils into a wok and add the flavorings. Slowly heat the oil until it bubbles lazily; the ingredients should never be cooked over high heat as they will brown quickly and turn bitter. When the oil is red and the dry ingredients have turned a crispy brown, turn off the heat and let the oil sit until it is cool; lightly smash the soft garlic cloves. Pour the oil, including the solids, into a covered jar and store in a cool place. Use within two weeks for the freshest flavor.
5. For the vinaigrette, use about 1 tablespoon of this chili oil and 1 tablespoon of the solids (which Chef Tropp liked to call “the goop”), and add 1 tablespoon each soy sauce, sugar and white rice vinegar; taste and adjust seasoning as wished.
Photo: Coir raincoat-style cucumbers. Credit: Carolyn J. Phillips
“Summertime, and the livin’ is easy: or so says the “Porgy and Bess” song. But there’s no easy living in the heat of summer if you’re cooking elaborate meals in the kitchen.
In colder months, I enjoy preparing complex braises and roasts, reduction sauces and delicate confections. But with the arrival of summer’s sticky heat I dream about surviving on ice-cold fresh fruit and tall glasses of ice tea and lemonade.
Grilling with easy-to-make recipes gives much-needed relief from hot kitchens and summer lethargy.
Vegetables tossed in olive oil and seasoned with sea salt and black pepper pick up sweetness as they lightly char over hot coals. Grilled carefully to avoid burning, nothing can improve on the flavors that come from food cooked on an open grill. During the hot months of the year, I turn to meals assembled with what I call the three amigos: a salsa, an appetizer and a chip.
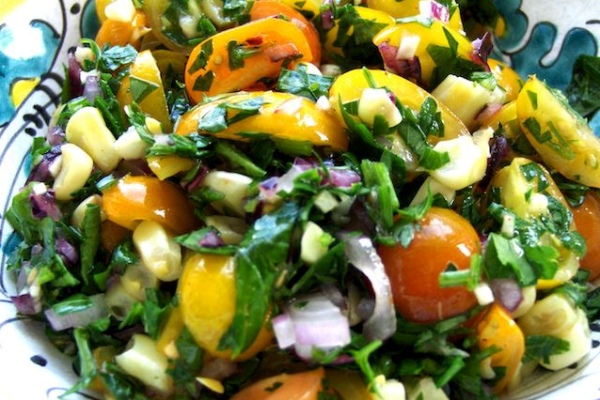
Grilled corn salsa
Adding corn caramelized from light grilling gives this salsa its distinctive sweetness. When you buy corn from the market, look for plump kernels. Avoid ears with wrinkled or shriveled kernels.
You can use any kind of ripe tomato you enjoy, but I prefer cherry tomatoes because they are sweet and they hold their shape after being cut up. For added color, select a basket with a mix of yellow and red cherry tomatoes.
Serves 4
Ingredients
1 ear of corn, husks and silks removed, washed
1 8-ounce basket of ripe cherry tomatoes, washed, quartered
1 large shallot, ends and skin removed, washed and roughly chopped
½ cup Italian parsley, washed, leaves only, finely chopped
¼ teaspoon cayenne
2 tablespoons olive oil
Sea salt and black pepper to taste
Lemon juice to taste (optional)
Directions
1. Preheat the grill to medium-hot.
2. Drizzle the olive oil on a large plate and season with sea salt and black pepper. Roll the ear of corn to coat. Using tongs, place the corn on the grill. Turn frequently to prevent burning. Remove the corn when all the sides have light grill marks. Let cool. Cut off the kernels and place in a large mixing bowl.
3. Use a rubber or silicone spatula to transfer the seasoned olive oil from the plate into the mixing bowl with the corn.
4. Add the quartered cherry tomatoes, shallot and parsley. Toss well and season with the cayenne. Taste and adjust the flavors with more sea salt, black pepper, olive oil and lemon juice (optional).
Tapenade
A secret weapon in last-minute cooking, tapenade brightens any meal either as an appetizer or a condiment. If you use pitted, canned olives, making tapenade will take 10-15 minutes.
The taste of your tapenade depends on the quality of the olives.
Serves 6-8
Ingredients
1 6-ounce can pitted olives., preferably green or kalamata olives
2-3 tablespoons olive oil
2 garlic cloves with skins
¼ cup Italian parsley, washed, leaves only, roughly chopped
¼ teaspoon pepper flakes (optional)
Black pepper to taste
Directions
1. Skewer the garlic cloves on the end of knife or a metal skewer and hold over a gas flame to burn off the outer skins. Let cool, removed any charred skins and roughly chop the cloves.
2. In a small blender or food processor, place the drained olives, olive oil, garlic, parsley and pepper flakes. Pulse until the olives are roughly chopped. Taste and adjust the seasoning with the addition of black pepper, sea salt, pepper flakes and olive oil.
3. Pulse again until the tapenade achieves the desired texture. Personally I like a tapenade that has a rustic look with the olives coarsely chopped rather than puréed.
4. Refrigerate until ready to use and serve at room temperature.
Variations
2 anchovies packed in oil, roughly chopped and added with the olives. If salted, rinse before adding.
1 tablespoon capers added with the olives.
Lavash crisps
Served in the Middle East, lavash and pita are commonly used instead of bread. Flat, unleavened lavash has a delicious, lightly grilled flavor when fresh. Making crisps makes use of lavash that might otherwise have become stale and gone to waste.
Lavash crisps have more flavor and are more flaky than commercially manufactured chips. Serve them with salsa, tapenade, dips or thin slices of cheese.
The crisps will last for weeks if kept refrigerated in an airtight container.
Serves 6-8
Ingredients
1 large or 2 small sheets of lavash
1 cup olive or safflower oil
Sea salt and black pepper to taste
5-6 paper towel sheets
Directions
1. Cut the lavash sheets into 2-inch squares by cutting the sheet in half, placing the halves on top of each other, cutting those in half and doing that again until the pieces are 2 inches wide. Cut the 2-inch wide strips into 2-inch squares and set aside. If not cooked immediately, store in an airtight container.
2. In a large frying pan or griddle, heat ¼ cup of the oil. Season with sea salt and black pepper and heat on a medium-low flame. Be careful not to burn the oil or cause it to smoke.
3. Lay a paper towel sheet on a large plate or baking sheet.
4. Add the lavash squares to the hot oil. Do not overlap. Using tongs, turn over the lavash when they are lightly browned and cook the other side. They cook quickly so watch them closely.
5. Remove the cooked crisps and place them on the paper towel. Cook another batch.
6. Place a clean paper towel on top of each layer to absorb excess oil.
7. Replenish the oil in the frying pan as needed and season with sea salt and black pepper. Allow the oil to reach the proper temperature before adding more lavash.
8. Discard the paper towels when the crisps cool. Store refrigerated in an airtight container. Serve at room temperature.
Photo: Grilled corn salsa. Credit: David Latt
Some vegetable gardening books advise the reader not to bother growing potatoes because they are cheap and plentiful in the stores and use up a lot of room in the garden. Instead, they say, use your space to grow such delectable seasonal crops as tomatoes, peppers and green beans. But, I beg to differ. I am finding great joy in growing my own potatoes and have found a way to grow them in containers so that they are not garden hogs.
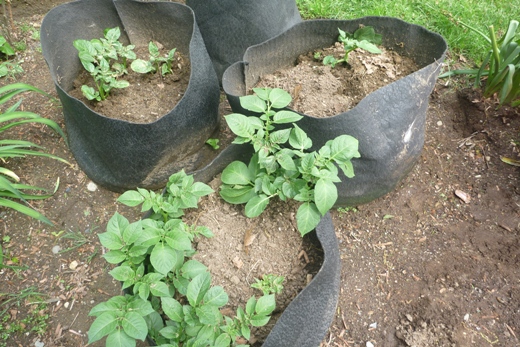
Several years ago I purchased soft felt-like pots that fold away over the winter and last for years. I stick them in odd sunny places around the garden and at harvest time I tip the whole pot into a wheelbarrow and — voila! — out pour 10 or more pounds of spuds. These pots would allow people without garden space to grow potatoes on back porches or decks, should they so desire.
I also plant several garden rows with Red Norlands, an early crop, because I love to reach into the soil in June to pull out small, thin-skinned potatoes without disturbing the plant, which goes on to produce large potatoes later in the season. I pop the small ones into a steamer and serve them with butter, salt and pepper. You can even leave out the butter because they are so sweet and flavorful. I feel great pleasure in this tactile search for good food available at my doorstep and am touched by the generosity of potato plants that in return for decent soil, sun and water produce an abundance of healthy food.
Yes, they’re healthy
Potatoes have taken a bum rap in the wake of the low-carb crazes that possess the country from time to time. These wonderful vegetables have been portrayed as carbohydrate menaces by people who ignore that potatoes have more potassium than bananas and plenty of vitamin C and B vitamins. Potatoes also are a good source of fiber, especially if you eat the skins. Their reputation for being unhealthy and fattening comes from the American predilection for eating French fries with abandon, which caused James Beard to lament: “The notion that these bits of potato — when limp, greasy, without flavor or texture and barely warm — should be served with every dish in the world is odious beyond belief.” But Beard did go on to say that a baked potato can be a great gastronomic experience when served hot with plenty of salt, pepper and butter.
This view is shared by Truman Capote, who once wrote a preface for a book of potato recipes, “The Potato Book” by Myrna Davis, where he describes a favorite lunch made up of a baked potato, sour cream and a heap of Beluga caviar, all accompanied by a bottle of 80-proof vodka. A catchy menu item, to be sure.
Potato history
The potato, so familiar to all, has had a long and convoluted history. Native to the South American Andes where archaeologists have found evidence tracing them back to 500 B.C.E., they traveled to the Old World in Spanish ships and eventually found their way back to North America by again crossing the Atlantic. Except for Ireland where potatoes had become almost the sole source of sustenance, the rest of Europe resisted them for centuries believing them to be dangerous to humans because their lumpy appearance led to superstitions that they caused such dreaded diseases as leprosy.
It took a Frenchman, Antoine Parmentier, to overcome resistance and declare the potato edible in 1772 by hosting dinners for such dignitaries as Benjamin Franklin, and serving potatoes in every course to no ill effects. But it wasn’t until the end of that century that the vegetable was routinely eaten throughout Europe. By then, the French were coming up with such dishes as Gratin Dauphinois, scalloped with cheese; Anna, thinly-sliced and baked with plenty of butter; Croquettes, mashed and deep fried and Duchesse, mashed with egg and piped through a pastry bag. These and many more dishes from the French repertoire illustrate the versatility of potatoes.
My own favorites, though, are simple affairs — potatoes added to a stew a half-hour before serving, or cut into chunks and tossed with olive oil, salt and pepper and roasted. And let’s not forget about the simple baked potato, which becomes a meal when served topped with cottage cheese and plenty of pepper, and a low-calorie meal at that.
But my all-time favorite is a family recipe we always called Skinny Potatoes in which they are thinly sliced, piled into a pan where a coating of oil has been heating and cooked until crisp on one side, then turned to crisp up the other. Nigel Slater has a similar recipe, but grates the potatoes and tucks garlic into them as they cook.
These dishes run through my mind when I head for the garden and gaze at my potato plants which, by the way, require no work. Their vines need no support, and when I pile more soil onto the plants as they rise up in the bins, I will get more potatoes. And, when I harvest a potato, it smells of sweet earth, a fragrance not found in bags of supermarket spuds.
Skinny Potatoes
Serves 4
Ingredients
1 pound of all-purpose potatoes
3 tablespoons of cooking oil
Salt to taste
Directions
1. Scrub potatoes, and if the skins are thin leave them on.
2. Slice them thin, using a food processor fitted with a slicing blade or by hand on the slicing side of a box grater.
3. Heat the oil in a wide, shallow pan and add the potatoes. Sprinkle with salt. Cook over low to medium heat for about 15 minutes until the bottom is crisp and golden.
4. Slip a spatula under them and loosen them as they cook so that they don’t stick to the pan.
5. When the bottom is crisp and brown, place a large plate on top of the pan and turn out the potatoes. Then slide the potatoes back into the pan to cook the other side. Sprinkle on more salt and serve.
Photo: Potatoes are easy to grow in containers. Credit: Barbara Haber
The arrival of asparagus signals that summer’s bounty is close at hand. But asparagus can seem like an old partner, familiar and not very exciting. Pushing the boundaries with the addition of caramelized garlic, onions and almonds transforms an old friend into an exciting, new companion.
Growing up, my mother served only canned asparagus so my earliest association of the plant was with the words “soggy” and “tasteless.” After a visit to Paris during college, I discovered the deliciousness my mother missed.
In pursuit of that wonderful fresh taste, I grew asparagus in our garden. Having been warned that it would take several years for the plant’s roots to become hearty enough to produce edible, thick, sweet stalks, I patiently tended the plants through three seasons.
As a dozen barbed heads poked their way through the crumbly soil, I let them extend 10 inches above ground in their pursuit of the sun before I snipped them off and hurried them into the kitchen.
Finding the best produce
In those days, my preferred preparation of asparagus was decidedly old school: cooked in boiled water with salt in an asparagus steamer I had purchased from a kitchen supply store during a time I bought all manner of infrequently used specialty items, such as a truffle shaver and corn on the cob holders.
Steamed for 10 minutes and plated, the asparagus were a beautiful dark green. Unfortunately they were inedible. The stalks were woody and otherwise flavorless.
While I no longer attempt to grow my own, asparagus appears affordably and frequently in our local farmers markets. Through years of trial and error, I sought out those farmers who grow superior-tasting asparagus. Producing a superior crop appears to require an ideal climate, rainfall and soil chemistry.
At the Pacific Palisades, Calif., farmers market, Mr. Yang, a farmer whose family has 11 children, produces some of the best I have eaten. He grows both varieties, asparagus as fat as my thumb, as well as pencil thin stalks bound tightly with thick rubber bands.
Caramelized to perfection
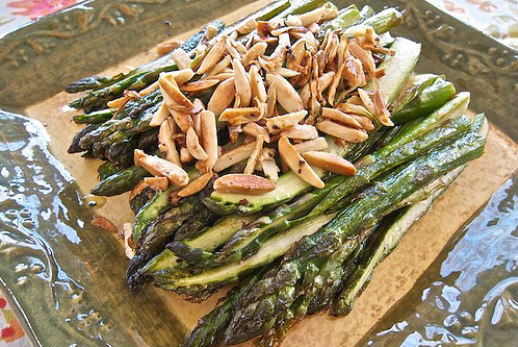
Each variety has advantages and champions. Personally I like the fat, green asparagus more than the thin ones. To make them easier to eat and to expose their innards to caramelization, I slice them in half. To complement their crisp spring flavor, I sauté them in seasoned olive oil and add sautéed onions, garlic and almond slivers.
The garlic and almonds are cut into the same sliver shape, so the slight differences the eye misses between savory and sweet bits, your palate notices immediately.
Asparagus with Caramelized Shallots, Garlic and Almond Slivers
When buying asparagus, look for well-formed stalks and heads. Avoid ones with dents or stalks that are shriveling, which is a sign of age. Asparagus will keep for a week or longer in the refrigerator if the white ends are trimmed and the stalks are placed in 2 inches of water.
Serves 4-5
Ingredients
Directions
- Pencil thin asparagus can be used whole as can thick asparagus. I prefer to cut thick asparagus in half, the long way, so the inside is as caramelized as the outside, but that is a matter of taste. Over a medium flame, heat the olive oil in a large frying pan and season with sea salt and pepper, about ¼ teaspoon of each.
- Place a paper towel on a large plate or baking sheet.
- Sauté the asparagus in batches, using tongs to turn the stalks for even cooking. Lightly brown and remove, placing the cooked asparagus on the paper towel to drain.
- When you have finished sautéing the asparagus, in the same pan, sauté the shallots, garlic and almonds slivers until lightly browned.
- Return the cooked asparagus to the frying pan and toss with the caramelized shallots, garlic and almonds.
- Taste and adjust seasoning with additional olive oil, sea salt or black pepper. Serve warm.
Variations
- Cook the shallots, garlic and almonds separately and place on top of the cooked asparagus when serving.
- For heat, dust the shallots, garlic and almonds with a pinch (or two) of cayenne or ¼ teaspoon pepper flakes.
- Along with the shallots, garlic and almonds, sauté until lightly browned 2 shiitake mushrooms, washed, dried, stems trimmed, sliced to resemble the almond slivers.
- To serve as an entrée or a side dish, cut the asparagus into 2-inch pieces and add 2 cups cooked pasta, seasoned with 1 tablespoon sweet butter. Toss well and dust with freshly grated Parmesan cheese.
Zester Daily contributor David Latt is a television writer/producer with a passion for food. His new book, “10 Delicious Holiday Recipes” is available from Amazon. In addition to writing about food for his own site, Men Who Like to Cook, he has contributed to Mark Bittman’s New York Times food blog, Bitten, One for the Table and Traveling Mom. He continues to develop for television but recently has taken his passion for food on the road and is now a contributor to Peter Greenberg’s travel site and the New York Daily News online.
Photo: Asparagus with caramelized shallots, garlic and almond slivers. Credit: David Latt
My cookbook collection has always tended to be a mishmash of things that struck my fancy at odd moments. Maybe the most miscellaneous exhibit of all is a smattering of books that stands today as inexhaustibly fascinating records of a time before the sun had set on the British Empire or many American missionary outposts.
I treasure, among other works, the 1958 edition of “The Kenya Settlers’ Cookery Book and Household Guide,” still offering advice on cucumber sandwiches and safari preparations to members of a Scottish Presbyterian women’s guild in Nairobi 30 years after the book was first published. I love the bilingual (English and Thai) “YWCA Cook Book, Bangkok,” which in 1967 was comforting Western exiles with recipes for sloppy Joes and green split pea soup while providing an invaluable illustrated guide to many Southeast Asian vegetables, herbs, fruits and fish. My favorite of the lot, however, is “Rangoon International Cook Book.”
This amazing document went through several editions. Mine is the first. It appeared in 1954, seven years after the assassination of General Aung San, principal architect of the post-World War II Burmese campaign against British rule, and six years after Burma had achieved independence. Aung San’s widow, Khin Kyi, was serving as national minister for social justice when the Women’s Society of Christian Service of the Methodist English Church decided to publish a cookbook reflecting the culinary omnium-gatherum of Rangoon, “where many countries and races meet, and share friendship as well as food.”
Unlike the cheerful plagiarists who churn out many such works, the Women’s Society actually credited sources of previously published recipes. That was why during my research for a biography of Irma Rombauer and Marion Rombauer Becker in the mid-1990s I came across some scraps of Rangoon-to-Cincinnati correspondence regarding permission to use several recipes from “The Joy of Cooking.” Eventually I managed to buy my own copy of the book.
The drab little 1954 volume was a fund-raiser for the city’s Methodist English High School, where Aung San and Khin Kyi’s 9-year-old daughter, Suu Kyi, was a student. Like many other cookbooks-for-a-cause, it is freely peppered with ads — in this case from the likes of San Loo Chow Restaurant (“the FINEST Shanghai CHINESE COOKERY In Town”), Nam Seng kitchenwares shop and the Rangoon agency of KLM Royal Dutch Airlines. The contributors crammed in some advice on nutrition (via Betty Crocker) and infant feeding along with several pages of suggested menus, a seasonal guide to local market produce and an English/Burmese/Hindi glossary of names for foods.
The Women’s Society and the school — to alumni, MEHS — clearly were a lot more ethnically and culturally diverse than a merely trilingual glossary suggests. The several Chinese menus probably owed much to the book’s Fujian-born editor, Mary Brewster Hollister (the daughter of a Methodist missionary family and a prolific author of children’s books and novels about China), and her sister, Karis Brewster Manton. Other menus include “English Four O’Clock Tea,” two American-style picnics, “Indian Buffet Dinner,” “Pakistan Luncheon” and a nine-course “Burmese Meal for Guests” that had been specially solicited from the beloved “Mrs. Aung San.”
The 500-odd recipes are even more multifarious. The sources range from American manufacturers’ brochures, Ladies’ Home Journal or McCall’s clippings, and Clementine Paddleford’s This Week column to the wife of the Ceylonese ambassador. A Burmese grande dame had been persuaded to part with her recipe for delicate spirals of candied ginger. A Rangoon caterer specializing in mohinga, the splendid Burmese soup-stew of fish and rice noodles, divulged her renowned version. A Texan serving with the Technical Cooperation Administration (a Cold War foreign assistance program of the U.S. State Department) shared his grandiose blueprint for a home-style barbecue.
In the bread chapter, South Indian dosai, idli and an accompanying yogurt (“curd”) chutney occupy a page facing oatcakes, potato scones and bacon-studded pancakes with syrup (the first two Scottish, the third Dutch). “Cereal, Lentil and Noodle Dishes” embraces Burmese coconut rice, American Midwestern Johnny Marzetti, Pakistani biryani (“A Mohammedan Festival Dish”) and a version of Amoy rice vermicelli that Mary Brewster Hollister apparently brought from China — luckily arriving to find Fujianese in Rangoon manufacturing the right kind of noodles.
The contributors had not the slightest idea of spelling out foolproof directions for non-cooks, or indeed cooks outside their own ethnic group. They often measured ingredients in the local units of viss and tical. They assumed that, like them, other people would regularly use Indian-style jaggery and atta for Western brown sugar and whole-wheat flour, or resort to tropical substitutes for the fruits in apple tart or peach crisp pie.
Some recipes are fairly intelligible, others filled with obstacles. So it was only a few weeks ago that I ventured to cook anything from the book. Trying to find a potluck dish for a mushroom-themed reception and lecture, I homed in on two adjacent recipes in the vegetable chapter, Hill Mushroom Curry from Nellie Isaac (a teacher at MEHS) and Mushroom Curry from Mrs. David Tin Hla (wife of the Rangoon YMCA general secretary). I’d never made a mushroom curry in my life, but why not?
I did, however, want to find out first what “hill mushrooms,” or taung-bho-hmo, were. My pal Naomi Duguid, whose book “Burma: Rivers of Flavor” is due out this fall, wasn’t sure. But she promptly put me in touch with a friend in Myanmar: the writer, artist, activist and MEHS alumna Ma Thanegi, a sometime political ally of Aung San Suu Kyi.
Thanegi explained that taung-bho-hmo grow on anthills during the summer rains. There are two types; the smaller sounds like the “hill mushrooms in bud” recommended in the recipe. Neither they nor the thicker ones disparaged by Nellie Isaac as “apt to be coarse” are yet in season, but Thanegi undertook to send photos when local women start selling them. With luck, I may hit on a good American substitute.
Meanwhile, with little idea of what might come closest to the flavor and texture of the original, I fell back on the line of least resistance and expense by using ordinary white mushrooms and improvising a hybrid of both versions. I omitted Nellie Isaac’s water spinach (“rabbit greens” or Kazunywet), used fresh chiles instead of dried, opted for Mrs. Tin Hla’s onions and lemongrass and threw in a bit of my own garam masala. The dish may or may not accurately represent the two versions that inspired it, but it does prove that mushroom curry is a great idea.
Burmese-Inspired Mushroom Curry
Serves 12 to 15
This is one of those Southeast Asian dishes in which the main flavoring ingredients are reduced almost to a paste, usually by pounding in a mortar or whizzing in a food processor — which you may prefer to my chosen tactic of mincing or chopping the seasonings one at a time. (I think the frying goes better with ingredients added in sequence instead of all at once.) I also cook the mushrooms separately before combining everything, so that they absorb more of the golden turmeric color.
These amounts yield enough for a party, but can easily be halved. Experiment as you like with the proportions of garlic, chiles and other seasonings. I took the liberty of using full-flavored Malaysian shrimp paste instead of the “best fish sauce” specified by Nellie Isaac, but would be glad to be corrected if this is a blooper.
Ingredients
Directions
- Peel or trim all the fresh flavoring ingredients from garlic through chiles as necessary. Separately mince each very fine with a heavy sharp knife (I use a Chinese cleaver). Chop the onions fairly fine. Set aside all these sauce ingredients in separate piles.
- Cut off the mushroom stems and save for another use. Cut any large caps into quarters or halves; leave small ones whole. Set aside while you make the sauce paste.
- Scoop out the shrimp paste onto a small (about 4 inches square) piece of aluminum foil. Fold over the edges to make a square packet, squashing the paste flat as you do so. Set the packet over a gas burner on low flame or an electric one preheated to medium-high for about 1½ minutes. Turn with tongs, heat for 1 more minute and remove from the heat. Open the package and scrap out the shrimp paste into a small condiment bowl. (If using fish sauce, skip this step.)
- Choose a wide, heavy saute pan or Dutch oven. (These amounts are too large for a wok.) Set it over high heat until a drop of water spits fiercely on contact. At once add ¼ cup of the oil. When it is barely starting to smoke, add the garlic and stir-fry for 20 to 30 seconds. Add the ginger and lemongrass; reduce the heat slightly and stir-fry for another 20 to 30 seconds. Add the shallots, chiles and shrimp paste (or fish sauce). Reduce the heat just a bit more and stir-fry for another 2 to 3 minutes. Add the onions, with another slug of oil if the sauce paste is starting to stick. Give everything a good stir and cook, stirring frequently, until the onions are softened and partly translucent, about 5 to 7 minutes. Scrape the mixture into a heatproof bowl, rinse out and dry the pan, and get ready to continue.
- Heat the pan as before and add another ¼ to ⅓ cup of the oil. When it is not quite smoking, stir in the turmeric and garam masala. Dump in the mushrooms, reduce the heat to medium or medium-low and toss to coat the mushrooms evenly with the yellow-tinted oil. Continue to cook, stirring constantly, until they begin to release their liquid; add a little more oil as necessary if the pan becomes dry. When the juices are fully released, raise the heat to high or medium-high and cook, stirring constantly, until the liquid is almost completely evaporated.
- Reduce the heat to medium-low. Scrape the reserved cooking sauce into the pan, stir to distribute everything evenly, and let cook for 2 to 4 minutes longer. Turn out into a serving dish and squeeze the lime juice over the mushrooms. Serve hot or at room temperature, garnished with fresh cilantro.
Anne Mendelson is a freelance writer, editor, and reviewer specializing in food-related subjects. She has worked as consultant on several cookbooks, was a contributing editor to the late lamented Gourmet, and has been an occasional contributor to the New York Times Dining Section and the Los Angeles Times Food Section. Her biography of Irma Rombauer and Marion Rombauer Becker, Stand Facing the Stove (Henry Holt 1996), won widespread critical praise for its insights into the history of modern American cooking. In 2000 – 2001 she held a fellowship at the Dorothy and Lewis Cullman Center for Scholars and Writers at the New York Public Library, working on a study of food history in New York City. (Part of this research, a survey of pre-European foodways among the Lenape Indians, won the 2007 Sophie Coe Prize in Food History at the Oxford Symposium on Food and Cookery.) Her most recent book is Milk, a cultural-historical survey of milk and fresh dairy products (Knopf 2008).She is now working, with a grant from the Guggenheim Foundation, on a study of how the global Chinese diaspora is influencing Chinese food in America.
Photos: Top, Freshly picked mushrooms. Credit: iStockPhoto
Bottom, “Rangoon International Cook Book.” Credit: Anne Mendelson
I have rarely met a cauliflower dish that I didn’t like (well, since my boarding school days, but that’s a lifetime ago). This cruciferous vegetable lends itself to salads and curries, soups and beignets, gratins and pasta dishes.
Mediterranean cuisines, those of Italy and of Greece in particular, love cauliflower. They pickle it; marry it with capers, anchovies and onions; stew it with tomatoes and olives and feta. Deep-fried cauliflower served with a pungent tahini sauce is one of my favorite Middle Eastern mezes. Tunisians make a marvelous tagine with cauliflower, tomatoes, onions and olives that they serve with couscous.
Under-Appreciated Vegetables
One of an occasional series on vegetables that should get more love
When I lived in Paris I would buy huge choux-fleurs in my market every week and transform them into soups, gratins and choux-fleurs à la grecque (which wasn’t Greek at all), just like my neighbors did. When I ate at Jamin the first time, back when it was Joël Robuchon’s restaurant, he served an ethereal purée of cauliflower soup that was probably equal weights butter, cream and cauliflower, strained to a silky texture that I will never forget. Indians, too, know what to do with cauliflower. For years I’ve been going to the Los Angeles restaurant Bombay Café just for their cauliflower frankie (a type of wrap sandwich).
Now that we have fancy purple and golden cauliflowers alongside the white ones at many farmers markets, this vegetable is beginning to develop a bit of a cachet and a price tag, but I’ll settle for a nice white cauliflower for under $2.
The trick with cauliflower is to cook it enough, but not to overcook it. Those who don’t like the vegetable are probably still informed by memories of overcooked cauliflower served in a college or boarding school dining hall with a gloppy cheese sauce. You’ll get over it when you try these Mediterranean cauliflower dishes.
Pasta With Cauliflower, Tomato Sauce and Olives
Serves 4
Throughout Italy and Greece, and in North Africa, you’ll find this triumvirate of cauliflower, tomatoes and olives in all sorts of dishes.
Ingredients
Directions
- Bring a large pot of generously salted water to a boil and add the cauliflower. Boil for 5 minutes and transfer to a bowl of ice water. Drain and blot dry. Cover the pot; you’ll use the water again for the pasta. Quarter the cauliflower florets and set aside.
- In a wide frying pan, or in a 3-quart saucepan, heat the oil over medium heat and add the garlic and red pepper flakes. Cook, stirring, until fragrant, about 1 minute.
- Add the tomatoes, sugar, thyme, and salt, and bring to a simmer. Simmer over medium-low heat, stirring often, until thick, 10 to 15 minutes. Stir in the cauliflower and the olives and simmer a few minutes more. Taste and adjust seasonings.
- Bring the water back to a rolling boil. Add the pasta and cook until the pasta is al dente. Add a ladleful of the pasta water to the pan with the tomatoes and cauliflower. Drain the pasta and toss with the cauliflower/tomato mixture and the parsley. Sprinkle the cheese over the top and serve at once.
Advance preparation: The recipe can be made through Step 2 as much as a day before serving. Keep in the refrigerator overnight, or on the stove, off heat, for a few hours.
Cauliflower With Red Onion, Capers, Parsley and Vinegar
Serves 4 to 6 as an antipasto
Ingredients
Directions
- Bring a large pot of water to a boil. Add a generous amount of salt, and the cauliflower. Cook for 5 to 8 minutes, or until tender. Transfer to a bowl of ice-cold water, then drain.
- Meanwhile, place the sliced red onion in a bowl and cover with cold water and 1 teaspoon red wine vinegar. Let sit for 5 minutes. Drain and rinse in several changes of water.
- In a large bowl, mix together the garlic, parsley, capers, champagne vinegar and olive oil. Season to taste with salt and pepper. Add the cauliflower and toss together. Let marinate, stirring from time to time, for 30 minutes if possible before serving. Serve warm, cold or at room temperature, with plenty of Italian bread for soaking up the marinade.
Advance preparation: This keeps well in the refrigerator for up to 5 days. You should replenish the parsley, which will have faded after a day.
Deep-Fried Cauliflower
Serves 6 as a meze
Much as I shun most deep-fried food, I can never resist this Middle Eastern classic.
Ingredients
For the cauliflower:
For the tahini garlic sauce:
Directions
- Bring a large pot of generously salted water to a boil. Fill a bowl with ice water. When the water reaches a boil, add the cauliflower and parboil for 4 minutes. Transfer to the ice water, then drain thoroughly. Pat the florets dry with paper towels.
- Heat the oil in a deep-fryer, a wok, or a large saucepan to 360 to 375 F. Drop in the cauliflower, a few florets at a time, and deep-fry to a golden brown, turning the florets in the oil so they cook evenly. This should take no more than 3 minutes. Remove from the oil using a deep-fry skimmer or a slotted spoon, and drain briefly on paper towels, then set the florets on a rack and sprinkle with salt.
- Purée the garlic cloves with ¼ teaspoon salt in a mortar and pestle. Transfer to a bowl, and whisk in the sesame tahini. Whisk in the lemon juice, beginning with the smaller amount. The mixture will stiffen up. Gradually whisk in up to ¾ cup water, until the sauce has the consistency of thick cream (or runny yogurt). Add the red pepper flakes if using, and salt to taste.
- Drizzle cauliflower florets with garlic tahini sauce, sprinkle with chopped parsley and serve.
Advance preparation: The cauliflower may be blanched several hours or even a day ahead, and held in the refrigerator. Make sure to blot dry before frying.
The sauce keeps, tightly covered, in the refrigerator for a week, but the fresher it is, the better. It will thicken as it sits. Thin out each time with water or water and lemon juice.
Variation:
Zester Daily contributor Martha Rose Shulman is the award-winning author of more than 25 cookbooks. Her latest is “The Very Best of Recipes for Health,” published by Rodale.
Photo: Colorful cauliflower at the market. Credit: Martha Rose Shulman
I recently spent two weeks in the Midi-Pyrénées in France. Mission: Cook, write, walk and read. Destination: a small town called Montségur at the foot of Chateau Montségur, an old castle. The first order of business on a Monday morning was, naturally, to go to the local market and stock up on food for the week. Markets in this area are not fancy food halls like those that recently opened in Copenhagen, where I live, nor are they designed to supply fresh food to urban areas. These markets are run by farmers who’ve been coming to town every morning for generations, selling what they have harvested or produced. So, right there in the medieval center of the town of Mirepoix, we found the small market where I could buy everything needed for a week in the mountains.
Surprisingly, Mirepoix has a kind of hippie New Age feel: a few snowboarders, young guys with dreadlocks and baggy pants; kids eating vegan food and drinking herbal tea; elderly people in flower-power clothes with long gray hair and a smattering of French housewives out shopping with their baskets. A few tourists, like ourselves, on the lookout for something different, completed the picture.
A time for turnips
Every time I visit a market I become excited, deluged with a flood of ideas about meals I want to cook. In Mirepoix, I picked up Swiss chard so fresh and green the cold winter seemed to disappear simply by looking at it. I bought winter vegetables, too: turnips and Brussels sprouts. It’s interesting how food sometimes has its moment, like a new record you listen to constantly for three months. I have the same tendency with ingredients, and right now turnips are the thing. I cook turnips all the time. Usually I just rinse them, cut top and bottom off, then cut them into wedges and pan fry them slowly in butter, and season with a bit with salt and pepper, then a dash of apple vinegar at the last minute.
Because I was in France, cheese, bread and wine were a given. Unfortunately I do not speak French, but my husband does, so while I tried all the cheeses, my husband did his best to translate. I ended up with three different cow milk cheeses. Two were from the mountains and tasted of grass and fresh air. The third had a softer texture and sharper taste and came from cows that had grazed near a lake. As a gift, the cheese man picked up one of his sausages and pointed it at me as he said, very enthusiastically: “Snack, snack.” Then he wrapped it in paper and placed it in my bag with my cheese. I walked away feeling very fortunate.
Mandatory bread and cheese
I found another vendor with a very small stand and two kinds of Tomme de Savoie-style cheeses, one more mature than the other. I bought both, as well as fresh yogurt. At one of three stalls selling bread, I bought a pain de champagne, which was tasty with just the right balance of sourness and texture.
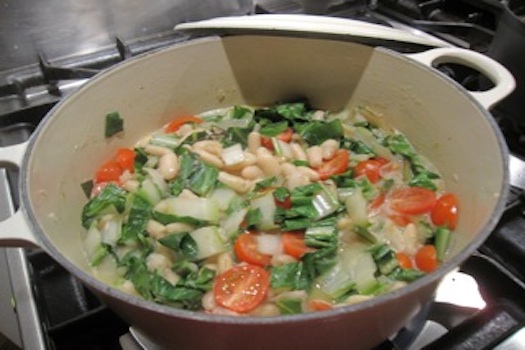
Back up in the mountains, I cooked a lot of simple bean dishes; most of our meals were bean stew, salad, bread, a bit of cheese, and of course red wine. I felt connected with the wonderfully gifted food writer M.F.K. Fisher, rediscovering how to cook in a small kitchen with very little room and craving hearty simple food. I think white beans are going to replace turnips, and I will have to come up with a lot of different summer recipes with white beans.
On our way home, we stopped in Paris for two days and stayed in Saint-Denis, home to one of Europe’s biggest food markets (92 Bis Rue Gabriel Péri). Every week, 40,000 people shop there. By 10 a.m. on Sunday morning, it was already filled with an international crowd. A sea of food cultures was in the process of being exchanged. The market is not fancy at all; it has no gourmet edge or aesthetic, just piles of meat, fish, vegetables. Cheese, breads and yogurt are sold, too, along with honey, a variety of baklava.
A long cue of shoppers waited with their bottles to get raw milk from big steel barrels. They lined up to buy halal meat from butchers: meat, kidneys, liver and of course, Margaux sausages.
On our way home, we bought some of the best croissants in Paris from Patisserie Lannois (41 Rue Gabriel Péri), so flaky and buttery. The Saint-Denis market, like the one in Mirepoix, represented everything food should be about: life, exchange, culture and joy.
My Favorite Bean Stew
Ingredients
Directions
- Soak the beans overnight in cold water.
- The next day, discard the water. Peel garlic and onions. Cut the garlic in half, and the onions into wedges. Cut the celery into thin slices.
- Place garlic, onions and celery in medium size pot with the beans, olive oil, chili flakes, bay leaves, rosemary and water. Bring to a boil and let simmer for 45 minutes.
- While the beans are simmering rinse the Swiss chard and cut into slices, cut the tomatoes in half, add to the beans and let simmer for 5 more minutes and season with salt and pepper.
- Serve with a green salad.
Trine Hahnemann is a Copenhagen-based chef and caterer and the author of six cookbooks, including “The Scandinavian Cookbook.” She has catered for artists such as the Red Hot Chili Peppers, Soundgarden, Elton John, Pink Floyd, Tina Turner and the Rolling Stones. Her company, Hahnemann’s Køkken, which runs in-house canteens, counts the Danish House of Parliament among its clients. Trine writes a monthly column in Denmark’s leading women’s magazine Alt for Damerne.
Photo: White bean stew. Credit: Trine Hahnemann
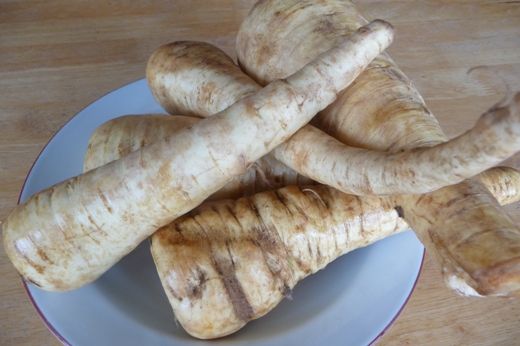
The parsnip must be the most surprising root vegetable. It’s a slightly gnarly, wedge-shaped white tuber the sight of which isn’t promising. Then it’s cooked and the wonderful glorious parsnip reveals itself. I love the expression of someone who’s never eaten a parsnip before.
The most remarkable thing about parsnips is how naturally sweet and spicy they are. In the economic sense, this is a disadvantage and attraction for the plant. It’s a disadvantage because blander root vegetables usually win out in popularity because they can be combined with more foods, for example, the potato. It’s also a plant that doesn’t produce much food given the room it takes up in the garden. But the attraction is a root vegetable that truly doesn’t need much and is easy to cook.
Globetrotting parsnip history
In classical times, Greek and Roman authors were not clear whether they were referring to the parsnip or carrot or both when they mentioned the daucos, as do both Hippocrates (circa 460-370 B.C.) and Dioscorides in the first century. The Roman naturalist Pliny (A.D. circa 23-79) described pastinaca as referring to either parsnips or carrots, and maybe both.
One of the odd things about the parsnip is that it is originally from the Mediterranean, but hasn’t been terribly popular there since the Renaissance when Maestro Martino da Como gave a recipe for deep-fried parsnips in his “Libro de arte coquinaria” (“Book of the Art of Cookery”) written in 1450. Today, it’s much more associated with cooking in North America.
The parsnip made the voyage to the Americas by way of the West Indies where it was introduced in 1564 on Margarita Island off the coast of Venezuela. It didn’t grow well in the tropical climate of the Caribbean and its popularity moved on to Virginia where it was being grown by 1609.
It was dispersed by Native Americans, for the most part, and was first mentioned in Massachusetts in 1629, where it became a very popular vegetable. Westfield, Mass., became the capital of the parsnip, and when I grew them in my garden down the road in Arlington, I would leave them in the ground to over-winter, digging them up in the spring.
How to grow, choose and store parsnips
Parsnip (Pastinaca sativa L. subsp. sativa) is a member of the Umbelliferae family, as are carrots. In Arabic, the plant is called “white carrot” (jazar abyad). Although the leaves can be eaten, I don’t know anyone who does as the prized edible part is the fat wedge-shaped root.
Parsnips grow best in a very deep, well-dug place with fine loamy soil that has not been enhanced with manure. Manure will make the roots fork. Parsnips can be left in the ground through the winter and harvested in spring before the plant begins to grow again.
Whether from your garden or the store, choose parsnips that are relatively smooth-skinned and straight because you end up wasting a lot of the crooked ones when peeling. Avoid very large parsnips if you think peeling them will be easier: They will be woodier tasting in their centers. But, whatever size parsnip you use, cut them in half lengthwise and then cut out any woody looking sections in the middle of large parsnips with a paring knife.
Also, avoid parsnips that have a lot of hairy-looking rootlets as well as ones that are limp. Store parsnips in the refrigerator in plastic bags, which will make the roots sweeter. They can keep for a month this way.
A simple preparation
Cut the parsnips into ¾-inch cubes, place in a baking dish with some butter or olive oil and salt and bake at 400 F until golden and tender in about 30 minutes. That’s all you need to do for one of the finest root vegetables around.
Zester Daily contributor Clifford A. Wright won the James Beard / KitchenAid Cookbook of the Year Award and the James Beard Award for the Best Writing on Food in 2000 for “A Mediterranean Feast.” His latest book is “Hot & Cheesy” (Wiley) about cooking with cheese.
Photo: Parsnips. Credit: Clifford A. Wright
Zester Giveaway
 Fall in love with recipes, inspired by New Orleans. Enter here to win one of 5 copies!
Upcoming Events
-
see all of our
Upcoming Events
-
Vermont Brewers Festival July 19-20Took place on July 19, 2013Vermont Brewers Festival Welcome to the 21st Vermont Brewers Festival. An Artisan Craft Beer Festival celebrating Artisan Craft Beer and the Brewers who brew them….
-
Kirkland Uncorked July 19-21Took place on July 19, 2013Kirkland Uncorked Kirkland Uncorked is a regional showcase of art, food and wine of the picturesque shores of Lake Washington in Kirkland, WA taking place…
-
Food & Wine Conference July 19-21Took place on July 19, 2013Food & Wine Conference The Food and Wine Conference brings together bloggers, small business owners, winemakers, chefs, public relations professionals, traditional media, new media, authors…
SmartBrief