Articles in Desserts
The gooseberry has a long and illustrious history, in literature and in the kitchen. The Normans ate green gooseberry sauce with mackerel, and pigeons were stuffed with gooseberries. For dessert, there were gooseberry pies, tarts, pastries, puddings, jellies, jams and even a gooseberry wine celebrated by the English writer Charles Lamb.
Finding the goose in the gooseberry
There has been a lot of speculation about just where the “goose” in gooseberry comes from. Some sources say they are called gooseberries because they were used in a sauce for roast goose. Others say it is a corruption of the Dutch word Kruisbes or the German Krausbeere — or Crossberry. The species name grossularia means “curl” or “crisped,” which probably refers to the leaves, and that may have been corrupted into “gooseberry.”
The Oxford English Dictionary, however, says plants so often have names associating them with animals that the inappropriateness or illogic of the pairing does not provide sufficient grounds for believing that the name is an etymological corruption.

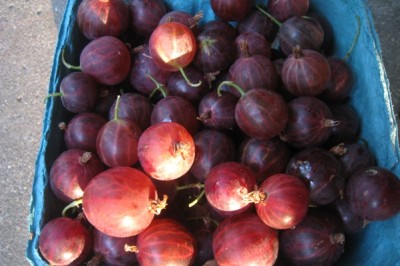
Gooseberries with their “tops and tails” still attached. Credit: Terra Brockman
No matter how the name came to be, gooseberries were so common in Elizabethan England that Shakespeare used the expression “not worth a gooseberry.” A few centuries later, Anton Chekov wrote a short story called “Gooseberries,” in which a man’s brother pines for the countryside: ” ‘Country life has its advantages,’ he used to say. ‘You sit on the veranda drinking tea and your ducklings swim on the pond, and everything smells good . . . and there are gooseberries.’ ”
Growing up in the country, my family always picked wild gooseberries in our woods. We picked them hard and green since it seemed the wildlife ate them by the time they turned purple-black. They were tart little suckers, needing an equal amount of sugar to make them into a palatable pie or crisp.
But my sister Teresa now grows varieties that have beautiful red berries about three times the size of wild gooseberries, and they are meant to be picked ripe for eating fresh. Her main type, Hinnomaki Red, is a Finnish variety that is considered a dessert-quality berry. They have a perfect sweet-tart balance, and a wonderfully firm, meaty texture. I like to eat them plain like grapes, but I’m no fool, and now and then I splurge and make a Gooseberry Fool.
No fool like a gooseberry fool
Arguably the most famous dish made from gooseberries is a fool, a dessert made of stewed fruit mixed with milk, cream or custard. The “fool” is probably named after older fruit trifles — the use of “fool” in the sense of “foolish or silly” being suggested by “trifle.” In any case, gooseberry fool has been an English favorite for centuries.
Gooseberry Fool (adapted from “Mrs. Beeton’s Book of Household Management,” 1861)
Ingredients
1 pint gooseberries, topped and tailed
1 tablespoon butter
¼ cup sugar, or to taste
2 – 3 tablespoons water
1 cup heavy cream, whipped
Directions
1. Put the gooseberries in a non-reactive saucepan with the butter, sugar, and the water.
2. Cook very gently until the gooseberries are soft enough to mash, about 30 minutes.
3. Put them through a sieve or food mill and add more sugar to taste.
4. Fold the gooseberry puree into the whipped cream.
5. Chill for several hours and serve in a glass bowl.
Gooseberry Fool with Yogurt
This is a modern, healthier take on the classic Gooseberry Fool.
Ingredients
2 pounds gooseberries, topped and tailed (or keep them on for a little extra fiber)
1 cup Greek yogurt
¼ cup sugar
Directions
1. Put the gooseberries in a shallow 9-inch baking dish, sprinkle on the sugar, and bake uncovered in a 350 F oven for 20 to 30 minutes.
2.When they are cooked, tip them into a sieve set over a bowl to drain off the excess juice. Reserve about a quarter of the cooked gooseberries to use as a topping.
3. Place the rest of the gooseberries into a food processor, add 4 tablespoons of the reserved juice and process into a thick purée and then let cool.
4. Put the yogurt into a bowl, and fold in half the purée. Spoon into serving glasses.
5. Top each glass with a spoonful of the reserved purée and then a spoonful of the reserved gooseberries. Chill and serve.
Top photo: Red gooseberries. Credit: Terra Brockman
Fresh fruit and vegetables reign supreme in summer. If you have a home garden and a green thumb, you are harvesting tomatoes, lettuce, zucchini and yellow squash.
We have a small garden limited by the amount of sun that reaches a back yard shaded by overhanging trees. Perfect for us human beings who want relief from summer’s oppressive heat, that shade stunts the growth of sun-loving fruits and vegetables.
Luckily, our next-door neighbors converted the ornamental garden in the front of their house into a full-fledged vegetable garden with rows of tomatoes, squash, herbs, eggplant and corn. At the back of their property, they dug up another area and planted a large strawberry bed.
Last week we were beneficiaries of their largess when they presented us with a basket of produce and, much to our delight, a large bowl of freshly picked strawberries.
Fat and bright red, the strawberries were deliciously sweet. My wife’s favorite summer dessert is strawberry shortcake, so I decided to make that dessert for her. Making more biscuits than we needed, I gave half a dozen to our neighbors as a thank-you present.
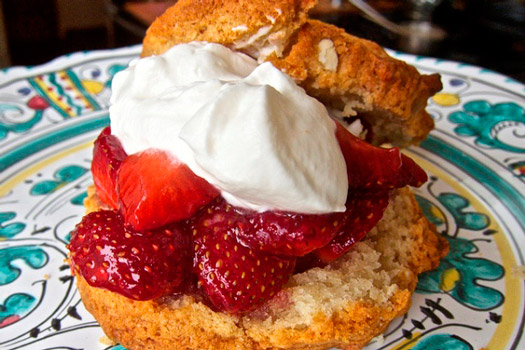
Strawberry Shortcake Biscuits with Candied Ginger
Since this is a summer dessert, I indulged in all of nature’s wonderful bounty by using plenty of sweet butter and cream. If you want to hold back a bit, whole or nonfat milk can be substituted for cream.
Cutting up candied ginger takes a bit of work because the resulting bits and pieces stick to the knife. The advantage of ginger in the biscuits is it adds flavor and a bit of heat. You can achieve a different flavor without the heat by using another candied fruit such as pineapple or papaya.
To create the biscuits, you can use a biscuit cutter or a recycled tin can. I like to use a tomato paste can, washed, with the top and bottom lids removed.
Serves 10-12
Ingredients

Fresh strawberries from the garden. Credit: David Latt
2 cups all purpose flour
¼ cup granulated sugar for the biscuits
2 cups heavy cream
¼ teaspoon sea salt
¼ cup sweet butter, chilled, cut into small pieces
1 tablespoon finely chopped candied ginger
4 teaspoons baking powder
6 cups strawberries, washed, stems removed, quartered
1 tablespoon powdered sugar for the strawberries
½ tablespoon powdered sugar for the cream
Directions

Biscuit dough, flavored with candied ginger, can be cut with a tomato paste can. Credit: David Latt
1. Preheat oven to 400 F. Place a Silpat sheet or parchment paper on a large cookie sheet or baking tray.
2. Place the quartered strawberries in a nonreactive bowl. Sprinkle on the powdered sugar and gently mix well. Set aside for 30 minutes. Cover and refrigerate if longer than 30 minutes. The sugar will macerate the fruit and produce a sweet strawberry juice in the bowl.
3. In a large bowl, use a fork to mix together the flour, granulated sugar, sea salt, candied ginger, baking powder and sweet butter. Slowly add 1 cup of cream, a quarter cup at a time. Stir well.

Biscuit dough on Silpat sheet, out of the oven. Credit: David Latt
4. Lightly flour a work surface. Using your hands, gently flatten the dough into a rounded shape, 1-inch in height.
5. Cut out and lay the biscuits on the cookie sheet. Leave 2-inch separation between the biscuits.
6. After you make a first group of 5 to 6 biscuits, reform the remaining uncut dough into a rounded shape, 1 inch in height and cut out another batch. Reshape the dough and cut out the biscuits several times until you have used all the dough and created 10 to 12 biscuits.
7. Place the biscuits in the preheated oven and bake 10 to 15 minutes. Turn the cookie sheet every 5 minutes and check to make sure they brown evenly and do not burn.
8. Remove when they are lightly browned all over and let cool on a wire rack.
9. Using a wire whisk, whip 1 cup of heavy cream and ½ tablespoon powdered sugar in a mixer until light and fluffy. Keep covered and refrigerated until needed.
10. When the biscuits have cooled, use a serrated knife to cut them in half one at a time, by placing them on their sides and carefully cutting through each one, being careful they don’t crumble. (The uncut biscuits can be made ahead several days and kept in an airtight, refrigerated container.)
11. Just before serving, place the bottom half of a biscuit on a plate with a large spoonful of strawberries. Ladle on a generous portion of whipped cream and drizzle on the strawberry juice. Top with the other half of the biscuit and serve.
Top photo: Strawberry shortcake biscuits with candied ginger. Credit: David Latt
Here are two facts: I am a big purchaser of artisanal bread, and artisanal bread is expensive. I am entirely willing to pay $10 for a handcrafted, certified organic loaf that delivers honest flavor, outstanding texture and, preferably, maximum nutrition. But when half of it sits uneaten on the counter for several days, I become anxious. I am entirely too thrifty to throw several dollars’ worth of bread in the garbage. So I incorporate stale bread into my cooking until there is nothing left but crumbs.
Sure, I have toasted leftover bread for breakfast, made grilled sandwiches with it for lunch, and made croutons galore for salads and soups. But as a former pastry chef and incurable sugar fiend, I tend to look at bread and think, “How can I turn it into a dessert?”
The obvious answer is bread pudding. But there are quicker and easier ways to turn a wedge of sourdough into something sweet at the end of the day. Here are a few:
Dessert French toast: French toast has all of the rich egginess of bread pudding, without the fuss. I hear that in France, French toast is commonly considered a dessert. You can make a single portion if you’re home alone and craving something sweet (not that I’d know anything about scarfing down a few slices of baguette dipped in egg, vanilla and cream, sautéed in butter, and topped with caramel sauce and ice cream when I have the house to myself). If ice cream and caramel sauce aren’t your thing, you can top your dessert French toast with fruit, jam, syrup, whipped cream or grated chocolate.
Sweet tartlets, bruschetta and panini: Leftover slices of peasant bread are easily transformed into individual fruit tarts. Just butter your lightly toasted bread, top it with some thinly sliced peaches, sprinkle with sugar and place under the broiler until the sugar melts and caramelizes. Or make sweet bruschetta: Toast the bread and top it with ricotta or goat cheese cheese, raspberries and a drizzle of honey. Panini are another option. Sandwich some nutella and sliced bananas between two slices of sourdough, butter the outside and place in a panini press for a few minutes.
Cobblers, crisps and brown betties: I wouldn’t use bland supermarket white bread to top a baking dish full of fruit, but cubes of artisanal bread make a cobbler topping. For a simple fruit crisp, use large whole-wheat bread crumbs, or call it a brown betty if you’d like.
During the summer months, I often use my leftover bread to make traditional panzanella, with tomatoes, herbs and a vinaigrette. While contemplating a large hunk of leftover pane di casa last week, I thought, “Why not try something similar with juicy stone fruit for dessert?” Before I toasted my bread cubes in the oven, I coated them with some melted butter and brown sugar. My peaches weren’t quite as juicy as my tomatoes, so I poured some sparkling wine over them, with the idea that it would give my panzanella a Bellini-like flavor. After the bread cubes cooled and crisped up, I tossed them with the sliced fruit and wine, and then topped each portion with a dollop of crème fraîche.
Panzanella With Peaches, Plums or Nectarines
Makes 4 servings
Use any top-quality bread here, but realize that the character of your bread will determine the character of your dessert. Brioche, Pullman or challah cubes will make a refined panzanella. Chewy cubes of sourdough will give you a more rustic result.
Ingredients
4 cups country bread, cut into 1-inch cubes
6 tablespoons unsalted butter, melted
½ cup plus 2 tablespoons packed light brown sugar
¼ teaspoon ground cinnamon
¼ teaspoon ground ginger
¼ teaspoon salt
2 ripe peaches, plums, or nectarines, pitted and thinly sliced
½ cup peach nectar or sparkling wine
¼ cup crème fraîche, mascarpone, or sour cream
Directions
1. Preheat oven to 350 F. Place bread cubes in a large bowl.
2. Whisk together the butter, ½ cup brown sugar, cinnamon, ginger and salt in a small bowl. Add to bread cubes and toss to coat.
3. Place coated bread cubes on a parchment-lined baking sheet and bake until toasted and caramelized, 10 to 12 minutes, stirring once or twice for even toasting.
4. Let cool completely on baking sheet. Watch carefully, to make sure sugar isn’t burning.
5. While the bread is cooling, combine the fruit with the remaining 2 tablespoons of sugar, mashing a fork to release some juice. Stir in sparkling wine or peach nectar.
6. Place bread cubes back in the large bowl and toss with the fruit. Let stand, stirring occasionally, until bread begins to absorb fruit juice, about 10 minutes.
7. Spoon into dessert bowls, top with any accumulated juices and crème fraîche and serve.
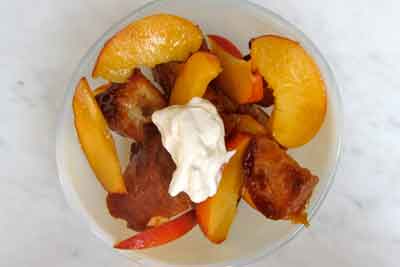
Photo: Sweet panzanella with nectarines and crème fraîche. Credit: Lauren Chattman
Nordic countries have outstanding berries; sweet and tasty, often small. The most popular in Denmark is the strawberry. The season starts around our midsummer celebration, Sankt Hans Aften, or St. John’s Eve, on June 23, and sometimes before. As a child growing up, we always had the first strawberries on midsummer night.
In the first few weeks, the berries are expensive, but then prices start to slide down to normal. Many families serve strawberries every day in the season, which can last from three to eight weeks depending on the weather. It is a popular berry to grow in home gardens, especially varieties like Dybdahl and Senga Sengana. Freshly picked and served with sugar and crème, this is a national summer dessert.
A new look at Danish tradition
Right now Denmark is experiencing a food revolution with Noma as the leading star. We have new farmers and a bigger variety of produce than ever. A lot of chefs here say that the new Nordic movement started because we lacked an interesting food culture. It’s not so much that; we do have a strong food culture, but it was considered third tier, after French and Italian. Now Denmark is experiencing an evolution of its tradition with more variety and closer attention paid to the season.
We are also experiencing a restaurant boom. We prefer as a culture to cook and eat at home, but that is changing with the new generations. Still, it is very expensive to dine out here, given the 25% VAT tax and a minimum restaurant salary of $20 per hour.
Strawberries have always been part of the tradition, usually served simply, raw with milk or with the cold fruit porridge.
I’ve never tasted better strawberries than the Danish varieties. As a little girl I picked them with my granny. We would go home with our summer treasure, rinse and freeze one batch and use the other to make cordials, jams and preserves.
Danish strawberries are all about versatility
Strawberries are eaten with raw oat flakes and cold milk in the morning and cut in slices and served on rye bread, open sandwich style. They’re made into cold soups and drinks with fresh mint, preserved whole for dessert, added to ice cream and sorbet, mixed with rhubarb for marmalade, tossed in salads with watermelon and feta and fresh mint, mixed with a little good quality raspberry vinegar and served with blue cheese.
The Danish dessert equivalent to tiramisu is “rød grød med fløde,” a fruit porridge served cold with cream. Almost any American, who has visited Denmark has been ask to try to pronounce the name of this dessert (oej goej mej floeje), which is almost impossible, and for some reason it always makes Danes laugh! It is nonetheless easy to prepare.
Serve the fruit porridge with cream or whole milk, never low-fat milk. The porridge has an intense flavor and high acidity which the cream balances. This is an important part of the taste.
Rød grød med fløde (Danish strawberry porridge)
Serves 6
Ingredients
4 pounds strawberries, rinsed and halved
400 grams (14 ounces) sugar
1 vanilla pod, halved lengthwise
4 tablespoons cornstarch
¼ cup of water
2 to 3 tablespoons caster sugar to sprinkle
2 to 3 cups cream
Directions
1. Place berries, sugar and vanilla bean in a pot and bring to a boil. Remove any white scum from the surface, lower the heat, and let simmer for 20 minutes.
2. Dissolve cornstarch in the water, and stir into porridge. Keep stirring as mixture returns to a boil. As soon as it starts thickening turn off the heat.
3. Pour into a serving bowl, sprinkle with a thin layer of caster sugar, and cool completely.
Serve with cold cream.
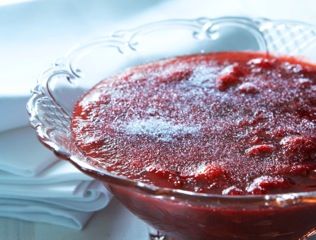
Photo: Danish strawberry dessert Rød grød med fløde. Credit: Trine Hahnemann

At my house, cooking for the kids often involves leftovers. Specifically, using up ingredients that they’ve taken a bite of and abandoned on the countertop. This is most often fruit. These banana, apple and more recently, strawberry, peach and nectarine corpses break my heart but have inspired our weekly muffin-making sessions.
My daughter Penelope drags her step-stool to the counter and helps me measure and mix, and about 30 minutes later we’ve got fresh muffins to eat or freeze. The sugar-pecan topping can be included or not, depending on how much sugar your child has already inhaled that day. The muffins are just as tasty without.
This is an indestructible, go-to muffin recipe because you can add any fruit you like and the whole-wheat flour will go unnoticed by the little ones. I love using fresh blackberries or peaches in the summer but if you want to use fresh strawberries, make sure to cut the tops off and cut them in half before using. (This is a great recipe for using up those on-the-brink berries and fruit.)
Cook’s notes: Rinse and thoroughly dry fresh berries before adding them; you don’t want any excess water in the batter. If you’re using frozen berries, don’t defrost them before adding them to the batter. The best tip for fruit muffins: gently toss the fruit in flour before folding them into the batter so they don’t sink to the bottom of the muffin cup. (Use a bit of the flour called for in the recipe rather than adding additional flour, which will throw off the recipe.)
Kid-Friendly Fruit Muffins
Makes 12 muffins
Ingredients
For the topping (optional):
⅓ cup sugar
3 tablespoons all-purpose flour
Grated zest of ½ lemon
2 tablespoons unsalted butter, melted
⅓ cup pecans, finely chopped
For the muffins:
1 cup all-purpose flour
1 cup whole-wheat flour
¾ cup granulated sugar
2 teaspoons baking powder
½ teaspoon baking soda
½ teaspoon ground cinnamon
grated zest of ½ lemon
¼ teaspoon salt
1 large egg, beaten
5 tablespoons unsalted butter, melted
1 cup buttermilk
2 cups fresh berries, 2½ cups frozen unsweetened berries, unthawed, or 1 leftover banana, mashed; or 3 to 4 fresh peaches or nectarines chopped fine
Directions
1. Preheat the oven to 375 F. Grease 12 standard muffin cups with butter or nonstick baking spray. (You can also use any leftover muffin tin liners you have lying around.)
2. To make the topping, in a small bowl, stir together the sugar, flour and lemon zest. Stir in the melted butter until the mixture is crumbly. Add the pecans and stir to combine. Set aside.
3. To make the muffins, in a bowl stir together the flour, sugar, baking powder, baking soda, cinnamon, lemon zest and salt. In a small bowl mix together the egg, melted butter, and buttermilk. Make a well in the center and add the egg, melted butter, and buttermilk mixture.
4. Stir just until evenly moistened; don’t overmix. (The batter will be slightly lumpy.) Add the berries or fruit and gently them fold in with a large rubber spatula just until evenly distributed.
5. Try not to break up the fruit. Again, do not overmix.
6. Spoon the batter into the prepared muffin cups, filling each to a bit above the rim of the cup. If using the topping, top each muffin with a tablespoon or so, dividing it evenly.
7. Bake on the middle rack of the oven until the muffins are golden and a toothpick inserted into the center comes out clean, 25 to 30 minutes. Transfer the pan to a wire rack and let cool for at least 15 minutes.
8. Unmold the muffins. Serve warm or at room temperature. The muffins will keep in an airtight container in the refrigerator for up to three days; just bring to room temperature or reheat in a 400 F oven for 5 minutes before serving.
Photo: Kid-friendly fruit muffins. Credit: Laura Holmes Haddad
I hate to bake. That’s not to say that I can’t bake. I just don’t like it very much.
Over the past 10 years, I’ve baked a lot. When I got married, I gained not only a husband, but also a stepson, and I quickly learned that baked goods go a long way with boys. I don’t want to be stereotypical and say that the way to a man’s heart is his stomach, but the evidence is compelling. It may not be the best way to express love, but making delicious desserts is a simple and satisfying way to show almost anyone that you care.
Cooking is a necessity and therefore something most of us take for granted. Dessert is an “extra” — a treat we don’t have to have.
So I’ve become a baker. And I’ve learned a few things about baking over the years. These top five secrets have made baking desserts easier, and the recipients happier.
1. Remember the end goal: happy eaters.
If you’re someone who loves dessert, then you’re more likely to be a baker. I’d rather have a salty snack than a sweet one anytime. So for me, baking is about making other people happy. Real bakers say they love the meticulous nature of baking and find comfort in the almost scientific precision that baking requires. What they fail to tell the rest of us is that the greatest pleasure of baking is its capacity to evoke awe and joy. Baking is a crowd-pleaser. Perhaps not in the process (because for me, baking is not a cook pleaser), but in the delivery from cook to eater, and in the eater’s obvious pleasure as the sweet carbohydrate goodness is consumed.
2. Know your audience.
In my opinion, there is no point in making a 14-layer cake with home-dried strawberries and freshly grated coconut for a 3-year-old’s birthday party. I don’t mean that children don’t appreciate fine baked goods — I have a daughter who loves croissants more than cake. However, on the day your child’s birthday party, you may wish (as I frequently have) that you’d put more effort into foods that provide sustenance for kids who don’t want to take time to eat and less effort into baking. Let’s face it, most kids will eat any kind of cake that’s put in front of them. Why go to the extra trouble of making a fancy dessert when the birthday boy just wants a thick slice of chocolate cake? Sometimes the simplest desserts are the best.
Of course, the flip side of this rule is that there are times to go all out with baking. I recently went to a grown-up party of food-preservers where someone brought dozens of homemade profiteroles. She was a real baker, and she knew that she’d be bringing this finely crafted dessert to an informed audience who would really appreciate her skill and hard work. We did.
3. Don’t make “mini” anything.
I love tiny desserts, as I love anything miniature. But after too many failed batches of tiny cupcakes, I’ve recognized my limits. Baking is not a good multitasking activity, and as a mom I live my life as a multitasker. The proper baking time for tiny baked treats is short, and the window for perfection is shorter. In my opinion, mini baked goods should be left to the professionals. They get paid to give baking their undivided attention.
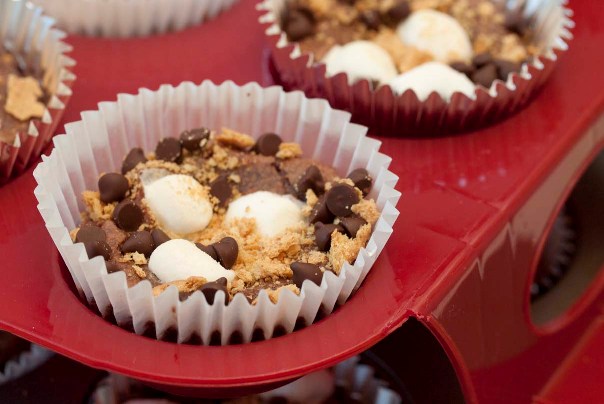
I do, however, make individually portioned baked goods when it seems like the path of least resistance. I recently invented a recipe for brownie s’mores, simply so I could avoid making cupcakes for my daughter’s class at school. Making brownie s’mores involves nothing more than scooping brownie batter into cupcake liners and topping each portion with graham cracker crumbs, chocolate chips and marshmallows near the end of the baking time.
4. Chocolate chips make (almost) everything better.
If you’re not a chocolate lover but bake for someone who is, embrace the chocolate chip, or chocolate shavings, if you bake primarily for adults. For chocolate fans, a little chocolate will cover a multitude of baking sins. And for the non-chocolate lover, eating something with chocolate chips is much more palatable than eating something that’s made entirely of chocolate.
5. Avoid any baked good that you do not like to eat.
Remember Rules 1 and 2: You are not only the cook, but the consumer as well. No matter how much time and effort you spend in making baked perfection – if you don’t like it, the whole thing becomes a complete waste of time (and makes you irritable as the rest of your audience gobbles up your treats.) Cook for yourself as well as your family.
For instance, I don’t like cakes, which I know is controversial, but that’s just who I am. So our family rarely eats cake. I only make them when someone has a birthday or on the rare special occasion when coconut cake is required.
The special case of coconut cake
Coconut cake is the one exception I made to my cake-hating rule. If you’re from the South, as am I, then you’ll understand. There are certain holidays when family tradition requires coconut cake with seven-minute frosting for dessert. I’ve learned to make it well and it’s become my signature cake for two reasons. First, the seven-minute frosting is almost magical and it will make any yellow cake (even a slightly over-baked one) taste moist and delicious within 24 hours. Second, and perhaps more importantly, this cake is made only for special occasions, which means that people don’t expect me to bake a coconut cake at the drop of a hat. This is perfect for someone who doesn’t like to bake and doesn’t like to eat cake.
I made brownie s’mores for dessert tonight. My youngest daughter was covered in chocolate within seconds and she looked so cute that I couldn’t resist asking her how she liked her dessert. She looked up at me sweetly and said, “I don’t want to talk, I’m too happy.” Moments like these make me think that I may grow to love baking after all.
So when you bake, make yourself happy, both in terms of the process and the results. And send me your cake recipes.
Brownie S’mores
Makes 24 cupcake-sized brownies
Special Equipment:
2 cupcake pans that make 12 cupcakes each (if you only have one cupcake pan, just bake in two batches.)
24 cupcake liners
“small” (2 tablespoon) cookie scooper
1 sifter or fine mesh sieve
Ingredients:
1 ¾ cup sugar
1 ½ sticks butter- melted and slightly cooled
3 tablespoons water
2 eggs
1 tablespoon vanilla extract
1 ⅓ cup all-purpose flour
¾ cup cocoa powder
½ teaspoon baking powder
¼ teaspoon finely ground salt (or ½ teaspoon coarse sea salt)
1 cup mini-chocolate chips (¾ cup for batter and ¼ cup for topping)
1 graham cracker- crushed between your fingers to create crumb topping
¾ cup mini-marshmallows (you need 72 marshmallows if you want 3 marshmallows per brownie)
Directions:
1. Heat oven to 350 F.
2. Line cupcake pans with cupcake liners.
3. In a large bowl, combine sugar, butter, water, and vanilla extract. Stir until well-mixed.
Add two slightly beaten eggs and stir to combine.
4. Sift dry ingredients and add to wet ingredients. (I don’t like to do dishes, so I put a sieve over my bowl of wet ingredients and sift them directly into my bowl. This way I don’t have to clean a second bowl.)
5. Mix to combine wet and dry ingredients, then add ¾ cup of mini-chocolate chips.
3. Place one scoop (approximately 2 tablespoons) of batter into each cupcake liner.
Bake for 7 to 8 minutes, until a crust forms around the edges of the brownies, but the center is still slightly wet.
4. Evenly divide reserved toppings (¼ cup mini-chocolate chips, marshmallows, and graham cracker crumbs) between 24 brownies. Return cupcake pans to oven and bake no longer than 2 to 3 additional minutes. (The marshmallows will deflate if you bake them too long.)
5. Be careful not to over-bake the brownies. They are done when a crust should form on top of each one. If you put a toothpick into the center of a brownie, brownie dough will still cling to it slightly when you pull it out.
Note: As you may have guessed, I’m a pretty lazy baker, but I do believe it’s important to sift the dry ingredients. This will help distribute them throughout the batter with less mixing and help you eliminate any hard clumps of cocoa that always seem to form in the cocoa container.
Photo: Brownie s’mores. Credit: Susan Lutz
Zester Daily contributor Susan Lutz is a photographer, artist and television producer. A native of Virginia’s Shenandoah Valley, she currently lives in Los Angeles, where she is writing a book about heirloom foods and the American tradition of Sunday dinner. She also blogs about the subject at Eat Sunday Dinner.
Face it, you don’t always have frozen filo on hand, and how many people make their own? But sometimes you just want something crisply flaky and nutty. Something baklava-ish.
The 13th century is here to help. A Syrian cookbook from that period, “Kitab al-Wusla ila al-Habib” (“The Link to the Beloved”), includes a pastry that must represent one of the intermediate steps that took place along the road to the invention of filo. The 13th-century product is much simpler than filo, and it has a charm of its own: It is crumbly-crisp with an appetizing browned aroma.
The book gives two names for it. One is kul wa-shkur – Arabic for “eat and give thanks” — which is still the name of a Syrian pastry, though the modern version is made with multiple layers of filo and a nut filling, while 13th-century kul wa-shkur consists of single sheets of a sort of ultra-thin fried pasta, merely scattered with nuts.
The other name is qarni yaruq, which means “split belly” in Turkish. When you make it, you see what that means: The pasta sheets are folded over and no effort is made to attach the edges, since there’s no filling, so the packets remain open on the sides. This general shape is still characteristic of kul wa-shkur today, in fact modern kul wa-shkur is, in effect, small baklava-type pastries formed by folding over, rather than stacking or rolling.
The Turkish connection
At an Istanbul food history conference some years ago, I presented a paper on Turkish influences on Arab food before the period of the Ottoman Empire, and in it I happened to mention qarni yaruq. Was it really something invented by Turks? It’s possible. The Turks did have a tradition of layered breads and pastries going back to their nomad days in Central Asia, but the reason for this pastry having two names is lost in time. Still, I said, the existence of a Turkish name must imply some Turkish connection.
The Turks were fascinated and slightly scandalized by this news. In present-day Turkey, karni yarik (the modern spelling) is not the name of a pastry — it’s a long eggplant split lengthwise, stuffed with ground meat and stewed. When I told Turks about qarni yaruq, they reacted like Americans wrestling with the idea that “the tomato is really a fruit.” A Turkish radio station had to interview me about my bizarre discovery.
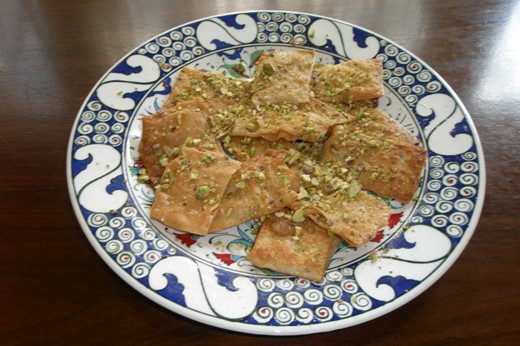
When this pastry fries, it looks a little like fried won tons, tan and slightly blistered, but it’s really something unique. You make it with noodle paste enriched with butter, which is what makes it fry up with such an appealing crumbly texture.
One note: You may be intrigued to see some of these fritters puff up. Fun to watch, but the puffed ones don’t cook up as evenly as flat ones and don’t develop the proper split-bellied look of open edges. Prevent puffing by brushing the paste with butter all the way to the edges.
Another note: The original recipe says to fry the pasta in sesame oil, which is rather hard to find in this country, even in Middle Eastern markets. (What’s needed is raw sesame oil, not the toasted oil used as a flavoring in Chinese cuisine.) You can substitute a neutral oil such as canola (or, if you’re the sort of person who tries to stay away from health food, clarified butter). Or, I suppose, you could use peanut oil and substitute peanuts for the pistachios. That would certainly scandalize them in the 13th century.
Qarni Yaruq
Serves 4
Ingredients
For the syrup:
¾ cup sugar
½ cup plus 1 tablespoon water
½ teaspoon lemon juice
½ teaspoon rose water or orange blossom water, or 1 pinch cinnamon
For the pastry:
6 ounces (1½ sticks) butter, well softened
1 cup flour
4-5 tablespoons water
Oil for frying
For serving:
⅔ cup pistachios, minced
Directions
1. Combine the sugar, water and lemon juice in a small pan and heat, stirring occasionally, until it boils and turns clear. Set aside to cool.
2. When cool, flavor with rose water, orange blossom water (or a mixture of the two) or cinnamon.
3. To make the pastry, work 1 ounce (¼ stick) of the butter into the flour. Add water to make a firm paste, as if you were making noodles, and knead hard for 10 minutes. Cover and set aside for ½ hour.
4. Cut the lump of paste in half and cover one half. Lightly dust the other with flour and put it through your pasta maker. When you’re getting close to the finest setting, cut the sheet of paste in half, leave one half on a plate or any handy surface and put the other half through the finest setting.
5. Transfer this thin sheet of paste to a work surface. Cut in half (the reason for this is that it’s hard to fold long lengths of paste when it’s this thin) and square off the ends.
6. Melt the remaining butter in a pan and generously brush the top of one of the two lengths of paste with butter.
7. Carefully fold over one of the long ends; you will have a folded sheet about 8 inches long and two inches wide. Cut into approximate squares and transfer them to a very lightly floured work surface; you should have anywhere from 4 to 6 squares, looking like sad and empty ravioli.
8. Repeat with the remaining sheet on your work surface. Then repeat this process with the sheet of paste that set aside earlier, the one that has not yet been put through the finest setting. Finally go through this whole process again with the lump that you covered when you started using the pasta maker.
9. Put about ¼ inch of oil in a large frying pan and heat over high heat until one of the pieces of paste will start sizzling immediately when put in. Reduce the heat to medium high and fry, watching them carefully, and turn over when lightly browned and blistered on one side; the sign is that the edges will visibly start to brown.
10. To serve, arrange the qarni yaruqs on plates, drench with sugar syrup and sprinkle with the minced pistachios.
Photo: Qarni yaruq Credit: Charles Perry
Whenever I travel, I try to live by the adage, “When in Rome … ” In Iceland I sampled pungent hákarl, or putrid shark, while in Cambodia I ate slithery snakehead fish. What lingers in my mind most is dragon fruit plucked fresh from the vine in Vietnam. Possessing hot pink skin; thick, green spines; black-specked white or rosy flesh; and a grenade-shaped body, the juicy dragon fruit remains one of the flashiest and most memorable foods around.
Thanks to a recent U.S. Department of Agriculture ruling, this flamboyant fruit no longer needs to be a mere memory for me. This spring, the U.S. began importing dragon fruit, or pitaya, from its native soil of Central America. Countries such as Belize, Honduras, Costa Rica and Panama can now stock U.S. markets with this exotic produce.
A member of the cactus family, dragon fruit thrives in tropical climates. Hence I could consume it in Vietnam and other parts of Southeast Asia. Likewise, the sultry weather in Latin America, the West Indies, California, Hawaii and Florida support its cultivation.
This nocturnal plant blooms under a full moon. In the wild, night creatures such as bats and moths pollinate its white-and-yellow flowers. On commercial farms, though, workers must go out after sundown and perform this task by hand.

This spring the U.S. began importing dragon fruit. Credit: Kathy Hunt
For those who’ve never tried dragon fruit, this may seem like a lot of effort to grow such an odd-looking food. Trust me — it’s worth the work: This is a highly healthful and versatile treat.
Low in calories, dragon fruit serves up healthy doses of calcium; vitamins A, B, and C; and phosphorus. It’s also high in fiber, with 1 gram in 3 to 5 ounces of fresh fruit and roughly 10 grams in 3.5 ounces of dried fruit. A lot of nutritious eating gets packed into one small fruit.
Opinions differ on its flavor. To me, dragon fruit resembles a pleasant combination of kiwis, grapes, pears and a hint of vanilla. Others liken and refer to dragon fruit as a strawberry pear. I can see why. Similar to an unripe or winter pear, the mild flesh is a tad gritty but subtly sweet and juicy. Unlike a pear, its whitish or pinkish flesh is flecked with tiny, black, edible seeds reminiscent of a kiwi’s.
Light and refreshing, dragon fruit pairs well with a variety of foods. It goes nicely with ginger, lemon, lime, mango, mint, papaya, passion fruit, strawberries and seafood. It likewise has an affinity for balsamic vinegar and simple syrup.
You can eat dragon fruit raw, scooped directly from its skin, or cut up and added to salads. You can puree or juice it and add it to cocktails or make it into preserves. It does well in ice creams, sorbets, smoothies and even stir-frys. If you don’t want to tackle an entire fruit, you can enjoy it in commercially produced teas, fruit blends, liqueurs and energy drinks.
Dragon fruit can be found in Latin American and Asian markets as well as some gourmet shops. You can buy it fresh, canned or dried. In season from August to December, fresh dragon fruit should have blemish-free skin that yields when gently squeezed or pressed. Avoid those with bruised or withered skin.
Keep in mind that there are three varieties of dragon fruit, two of which have shocking magenta skin. If you see a yellow dragon fruit, don’t assume that it’s spoiled or unpalatable. It’s simply the white-fleshed variety of this fruit.
Placed in a plastic bag and refrigerated, fresh dragon fruit will keep for up to five days. To serve, cut the fruit in half and scoop out the flesh. You can also peel the fruit with a paring knife and then cut it into slices.
Straw Dragon Sorbet
Makes 4 cups
Ingredients
Directions
- Place the dragon fruit, strawberries, simple syrup and lime juice in a blender and puree until smooth and well combined. Taste and add more simple syrup if desired.
- If you own an ice cream maker, pour the mixture into the bowl of the ice cream maker and follow the manufacturer’s instructions for sorbet. Otherwise, pour the pureed fruit into a shallow pan and place it on a flat surface in your freezer.
- Remove the pan after 30 minutes and stir to break up the sorbet. Return the pan to the freezer for another 30 minutes, removing to stir again. Repeat until the sorbet has achieved the desired consistency.
- Scoop and serve.
Top photo: The flesh of a cut-open dragon fruit. Credit: Kathy Hunt
Zester Giveaway
 Fall in love with recipes, inspired by New Orleans. Enter here to win one of 5 copies!
Upcoming Events
-
see all of our
Upcoming Events
-
The Little Paris Kitchen Book Signing and Cooking Demonstration July 18thTook place on July 18, 2013Rachel Khoo’s The Little Paris Kitchen Book Signing and Cooking Demonstration Join us at your local Williams-Sonoma store for a special book signing and cooking demonstration with…
-
California Wine Festival July 18-20Took place on July 18, 2013California Wine Festival Wine, food, music, sun and sea. Experience the quintessential California wine tasting and enjoy hundreds of California’s finest vintage wines, delicious gourmet…
-
Vermont Brewers Festival July 19-20Takes place on July 19, 2013Vermont Brewers Festival Welcome to the 21st Vermont Brewers Festival. An Artisan Craft Beer Festival celebrating Artisan Craft Beer and the Brewers who brew them….
SmartBrief