Articles in Holidays
We’re hurtling straight toward the cookie season … pardon me, the holiday season. That’s the time when we’ll be needing lots of little treats.
We especially need orange-flavored treats. Once upon a time, oranges were strictly a winter pleasure, and something about this most optimistically colored fruit still echoes in the holiday aesthetic.
Nuts are an old-time holiday treat too. Voila, here we have exotic cookies with an impressively ancient pedigree that are stuffed with almonds and candied orange peel and sweet spices.
These cookies, however, are ravioli. That’s right, they’re ravioli baked cookie-fashion. The 1691 German cookbook known as “Vollständiges Nürnbergerisches” Koch-Buch categorizes them as kucheln, or little cakes, but the cookies are what they really are — sweet, crisp, crunchy cookies.
I know, the idea of German ravioli puzzles you. Well, there was a lot of French and Italian influence on upscale German cookery in the 17th century, and Mediterranean ingredients such as almonds and oranges were luxury goods north of the Alps. Mandeln Raffioln must have just seemed a natural concept.
The perfect thin pasta
Why not bake ravioli? You can finally use that very finest setting on your pasta machine (if it has six settings), the one you’d never dare use for making boiled ravioli, since these don’t get tossed around in cooking. The result is odd but pleasing — a disk of ground almonds, orange zest and spices surrounded by a square of crisp, browned paste. This cookie is unique in being practically fat-free. The only fat in it is oil in the almonds and orange peel, plus 1/36 of an egg yolk per cookie.
Or let’s call it an approximate square. The recipe says to roll the pasta as thin as possible (the thinner, the crisper), and the sheet that comes out of the finest setting on a pasta machine is likely to be somewhat oddly shaped. Go with it. You can trim the ravioli with a chef’s knife to make them as neat as possible, but these cookies strongly tend to be what we call rustic in appearance no matter what you do.
Wonton skins are convenient and perfectly square, but they’re also relatively thick and make a chewier cookie. If you want to substitute them, put 1½ teaspoons of filling in the center and fold one corner over to the opposite one to make a triangle, and figure on about 48 cookies.
Orange flavor to spare
If you don’t have any candied orange peel, use an apple peeler to remove the top layer of peel from two or three oranges, taking as little of the white part of the peel as possible. Mince the peel and boil it with 1 cup water and 1 cup sugar until it darkens and becomes translucent, 10 minutes. Drain the peel and discard the syrup. If you remove the zest with a super-fine grater instead of a peeler, it will include scarcely any of the bitter white peel and will need only a minute or two of boiling.
The original 1691 recipe called for about ¼ cup minced pistachios, but they’re out of season this time of year, so I either ignore that measurement or substitute one dried cranberry per cookie. The original recipe also called for rose water, but I’ve given up on getting most Americans to eat anything with rose water in it; I’m convinced they associate the flavor with soap. Anyway, why use rose water when orange blossom water suits the recipe better?
Mandeln Raffioln
Makes three dozen
For the paste:
For the filling:
Directions
- For the filling, put the flour and ½ cup sugar in a bowl and mix. Add egg whites and enough water to make a kneadable dough. Transfer the dough to a floured work surface and knead until smooth and elastic, about 10 minutes. Let rest, covered, at least ½ hour.
- Meanwhile, grind the almonds in a food processor. When they are as fine as coarse sand, add the orange blossom water so they don’t turn oily as you process them to a paste. Add the orange peel, pepper, mace, cardamom, a good pinch of cinnamon, the yolk and the ¾ cup sugar and process to a thick paste. You will have about 1½ cups filling.
- Divide the dough into four parts. Remove one to work on and cover the remaining three while you work. Roll the piece of dough in flour and run it through your pasta machine, starting at the coarsest setting and moving to the finest, flouring lightly at each pass. You will probably have to divide the dough in half at some point.
- Cut one sheet into oblongs. Fold over to make a square and pinch to seal. Or use a ravioli mold.
- Arrange on greased baking sheets. Bake at 350 F until the edges and bottoms are browned. Remove, toss with sugar and cinnamon and transfer to a rack to cool.
Zester Daily contributor Charles Perry is a former rock ‘n’ roll journalist turned food historian who worked for the Los Angeles Times’ award-winning Food section, where he twice was a finalist for the James Beard award.
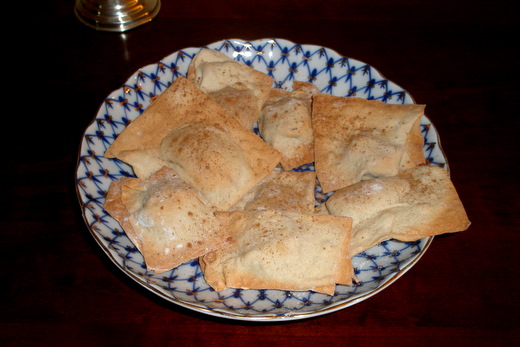
Photo: Ravioli cookies. Credit: Charles Perry
In a perfect world, we would start making food for Thanksgiving on Halloween. In reality, even experienced cooks don’t do this. Most of us cook the whole meal on Thanksgiving Day. Ever been in a grocery store on the Wednesday night before Thanksgiving? Point proved.
Completing an entire Thanksgiving meal the day of is certainly reasonable and achievable, even for beginners. Here are 10 tips to get you going. Some are sure to horrify purists. But heat is heat and flesh is flesh. When they meet in an oven, the bird will cook.
1. Go over your recipes the night before.
Know your plan of action. If there’s time and you’re not too tired, chop onions, celery, and carrots and hold them in the refrigerator in zip bags. Get out the turkey’s roasting pan and any baking dishes you haven’t used all year. Check them because they might need washing.
2. Set the table the night before.
Psychological readiness is good for the cook and good for the guests. I had a friend who was a slow and dawdling cook. Her mother told her to always have the table set. Her family was fooled every time that dinner was imminent. In a more practical sense, a ready table spares last minute drawer-frenzy. Get out all serving platters and bowls for turkey, gravy, cranberry sauce, salad and all vegetables — plus decide on every serving fork, spoon and tongs.
3. Don’t serve too early.
And don’t serve a meal this big too late, either. That’s hard on the digestive system. If you serve about 5 or 6 p.m. you’ll have plenty of time to make your menu from turkey to dessert. Before a meal this big, you don’t need nibbles and snacks around the house, just some nuts to stave off hunger.
4. Start with a fully defrosted turkey.
None of the information here applies if you’ve forgotten to defrost your turkey. If you’ve bought a frozen one the night before, you are in trouble. Yes, you can try sticking a blow dryer up the turkey’s cavity, but you will not only create a heated incubator for bacteria in the cavity, you will end up with a gross blow dryer you’ll never want to touch again.
If caught short the night before, buy a fresh turkey. If you’re so unlucky that fresh turkeys are sold out, but a smallish frozen one — 10 to 12 pounds. You can defrost it safely — still wrapped — in a sink filled with cold water. Change the water every 30 minutes, calibrating one 30-minute soak per pound of turkey. A 10-pound turkey will take about five to six hours to defrost.
5. Tackle the clamp.
Fresh or frozen, the turkey’s drumsticks are constrained for shipping by the meanest thing in cooking — the clamp. Whether metal or plastic, the bird comes with no directions on how to free the drumsticks. You’ve got to open the cavity to remove the giblets. In my struggles to remove the clamp, I’ve drawn blood. That’s because, at least with the metal ones, the maneuver is counterintuitive.
Metal clamp: With a towel, pull the upside-down “U” toward you. With your other hand, find the strength to lift the loosest drumstick up, over and out of the clamp. Once the first drumstick is free, the second one will come over and out easily. But the clamp is still in the bird! Squeeze its sides in, and push it away from you. It will slide out.
Plastic clamp: Snip it with scissors, free the drumsticks, reach in and remove the bag of giblets.
6. Skip brining the turkey and just salt and pepper the bird before it goes in the oven.
You need no elaborate brining step or roasting-temperature schemes for a tasty and nicely browned turkey. Season simply with salt and pepper, inside and out, underside and on top (breast). You can wear rubber gloves if you’re grossed out by the bird’s cavity.
Some recipes have you start at a high temperature, turn it down, give the bird a few flips so the bottom is on top and back over again. This is ridiculous. A turkey isn’t pizza dough. Let it be. Once seasoned and in the oven, you’ll have no contact with this bird for another hour, so move on with your life.
7. Have the essential equipment.
- Towels for gripping the clamp, holding on to a warm (and slippery) drumstick at carving time.
- Oven mitts for both hands to prevent burns on your hands and arms.
- Instant-read thermometer.
- Turkey lifter that looks like mini-snow-chains and acts as a sling. This device lays across your roasting pan with handles draping over the sides. The turkey goes on top. When done, all you have to do is grab the handles and lift. You can find turkey lifters at dollar stores.
- Roasting pan with low sides because high sides prevent heat from getting down into the bottom of the turkey, precisely where the dark meat that takes the longest to cook is situated. If all you have is a roaster with high sides, elevate the turkey on a rack inside the roaster. Your best bet is a disposable aluminum roasting pan with shallow sides you throw away when roasting’s done.
- Mesh strainer for straining clear pan juices after roasting.
- Aluminum foil to tent turkey when it comes out of the oven
- Extra large cutting board to carve turkey.
8. Always use a meat thermometer.
Turkeys are tricky. The breast meat cooks first, but it’s still attached to the bird while it waits for the dark meat to finish. White meat is ready at 170 F, dark meat at 175 to 180 F. To take a reading, insert it in the dark meat, which takes the longest to cook. Newer digital thermometers stay in the turkey for the entire roasting time and beep when the set temperature is reached.
A 10- to 14-pound turkey should be cooked at 350 F for 2 to 2½ hours. A 14- to 18-pound bird should cook at 325 F for 2½ to 3½ hours.
If you don’t have a meat thermometer, here’s the old-fashioned method. Gently pull a drumstick (use a towel to hold on) away from the body. Where the skin has stretched, use a small knife to make a cut to expose the meat. Take a look. If you see red juices or pink meat, keep roasting. Check for doneness at 15-minute intervals until juices run clear. I like this method because no one will see the cut.
9. After the turkey has roasted an hour, add about 2 cups of water to the bottom of the pan.
This is the beginning of your gravy or natural pan juices.
10. If, after carving, parts are undercooked, microwave them for a minute or two.
No one will know.
Zester Daily contributor Elaine Corn is a James Beard Award-winning cookbook author and food editor. A former editor at the Louisville Courier-Journal and the Sacramento Bee, Corn has written six cookbooks and contributed food stories to National Public Radio.
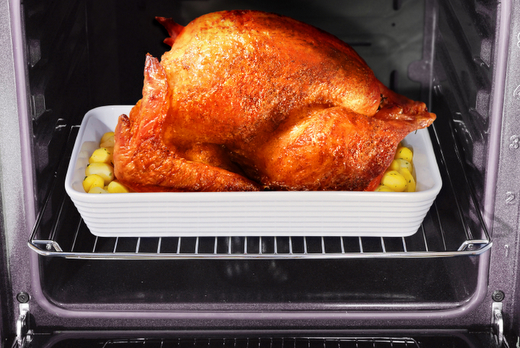
Photo: Turkey in the oven. Credit: Sergiy Serdyuk

Thanksgiving is almost upon us. With the guest list finalized and all your favorite recipes organized, there is only one unanswered question: what to do with the turkey liver?
Even people who love chicken livers view turkey liver as too much of a good thing.
Whoever has the job of prepping the turkey on Thanksgiving Day frequently looks with bewilderment at the large double-lobed liver in the bag tucked ever so neatly inside the turkey.
Following my mother’s lead, my solution is to turn lemons into lemonade or, in this case, turkey liver into pâté.
My mother prepared chopped liver using a shallow wooden bowl and a beat-up, double-handled, single-bladed mezzaluna knife that her mother had given her.
She would cut up and sauté the turkey liver with a chopped up onion. Two eggs would go into boiling water. Once hard-boiled, they would join the sautéed liver and onion in the wooden bowl, which she would hand to me along with the mezzaluna.
While she prepared the turkey, she put me to work.
As a 9-year-old, I would sit on a stool with the wooden bowl on my lap, rocking the mezzaluna back and forth, chopping up the livers and hard-boiled eggs.
Periodically my mother would check on my progress and, when everything was reduced to a fine chop, she would retrieve the bowl, add melted chicken fat and mix everything together.
Just before our guests arrived for Thanksgiving dinner, she transferred the chopped liver to a serving bowl and put it on the dining room table with a plate of saltines and the other appetizers, a platter of black pitted olives, whole radishes and vegetable crudités.
Mushroom and Garlic Turkey Liver Pâté
My mother liked her chopped liver rustic style. It is a matter of taste, but I prefer turkey liver when it is made with a food processor, creating a smooth pâté.
To balance the richness of the liver, the pâté needs sweetness (caramelized onions), saltiness (sea salt), heat (black pepper) and earthiness (hard-boiled egg and mushrooms).
Serves 8
Ingredients
Directions
- Wash the uncooked liver and pat dry. Using a sharp paring knife, remove and discard all fat and membranes. Cut liver into half-dollar-sized pieces.
- Place the eggs into a pot of boiling water. Cook 10 minutes, remove from water, let soak in cold water to cool, remove and discard shells.
- In a large sauté pan over a medium flame, melt the butter and lightly brown the onions, mushrooms, parsley and garlic. Add the pieces of turkey liver and sauté until lightly brown, being careful not to overcook the liver, which should be pink inside. Season with sea salt and black pepper.
- Using a rubber spatula, scrape the sautéed liver and vegetables into a large food processor, add the hard-boiled eggs and pulse. Slowly add olive oil, a little at a time. Use the rubber spatula to push any accumulation off the sides of the mixing bowl.
- Continue pulsing and adding small amounts of olive oil until the pate is creamy. Depending on the size of the turkey liver, you might use more or less of the olive oil. Taste and adjust the seasoning with sea salt and pepper.
- Use the spatula to transfer the pâté from the food processor to a serving bowl. Cover with plastic wrap and refrigerate. The pâté can be kept in the refrigerator 1-2 days.
- Before serving, take the pâté out of the refrigerator, place on the counter out of the sun and allow to come to room temperature. Serve with crackers, toast points, fresh sourdough or French bread.
Variations
- Instead of Italian parsley, use 1 teaspoon finely chopped fresh rosemary leaves.
- For a denser pâté, use 1 hard-boiled egg instead of 2.
- Add ¼ teaspoon cayenne powder to the sauté for heat.
- Add 1 slice bacon, finely chopped to the sauté and brown until crisp.
- Add 1 teaspoon balsamic vinegar to the sauté.
- Sprinkle 2 tablespoons red onion or scallions, finely chopped, over the pâté just before serving.
Zester Daily contributor David Latt is a television writer/producer with a passion for food. His new book, “10 Delicious Holiday Recipes” is available from Amazon. In addition to writing about food for his own site, Men Who Like to Cook, he has contributed to Mark Bittman’s New York Times food blog, Bitten, One for the Table and Traveling Mom. He continues to develop for television but recently has taken his passion for food on the road and is now a contributor to Peter Greenberg’s travel site and the New York Daily News online.
Of course, we all have favorite family recipes, especially at holidays, and no other holiday beats Thanksgiving for having a focus almost entirely on food. In most families, one member becomes the designated producer of the Thanksgiving dinner, and in my family that person, happily, is me. I say happily because the meal doesn’t seem authentic to me unless I eat the same food I had as a child. One year, when I accepted an invitation to have Thanksgiving at the home of a friend, I found myself the next day preparing another Thanksgiving dinner just for my family because I had so missed the dishes that resonate for me. Above all, I had missed the turkey stuffing that has come to be the only one I like.
Most stuffing, especially what one finds in turkey dinners in family restaurants, tends to be a pasty mass of bready stuff seasoned with an oversupply of dried sage, a texture and a flavoring unpleasant to me. And when one dines in the homes of others, the stuffing may well be the one featured on the latest November cover of one of the glossy food magazines that invariably offer innovative Thanksgiving recipes just to break the monotony of the holiday meal. While they sometimes offer more-or-less traditional recipes that include such standard ingredients as cornbread, oysters or sausages, these recipes usually rely on clever ingredients such as fennel, spinach, pecans and toasted brioche. Such medleys might be fun to try at some other time of year, but, these stylish ensembles have nothing to do with my beloved stuffing recipe, which is for me the most symbolic dish on my Thanksgiving menu.
Aunt Hannah’s semi-secret recipe
For me, recalling Thanksgiving meal means the memory of my mother impatiently waiting for my father to return from a football game so that we can all sit down to eat. And, I am also reminded of the teasing I endured from an older brother who enjoyed watching me go white around the mouth when I had reached the limits of anger. In other words, Thanksgiving brings with it some memories that are not always delightful in that Norman Rockwell way, but a true reflection of the habits and style of an individual family.
My family’s stuffing recipe has taken on a meaning beyond Thanksgiving in that it reflects the way recipes came into my family. Many families have one member who is understood to be a wonderful cook, and in my family that was my grandmother’s sister, Hannah. She lived in a nearby city, and every time we visited her, we came back with a recipe for whatever delicious dish she had served.
My mother’s favorite cookbook, “The Settlement Cookbook,” which I inherited from her, is stuffed with bits of paper with recipes written in her beautiful hand: a chocolate cake made with brown sugar, a fruit salad dressing made with pineapple and lemon juice, and an elaborate salmon patty dish I used to enjoy and almost forgot. To me, these recipes for dishes my mother loved are like letters from her, affirmative statements about how delicious life can be. And I am pretty sure that the dishes were first tasted at the home of Aunt Hannah.
I tested my migratory theory of how recipes came into my family several years ago when Aunt Hannah’s two daughters traveled to my city and I met them for lunch. We had loads of family news to discuss, and during a lull in the conversation, suddenly, apropos of nothing, I burst forth with “How do you make your Thanksgiving stuffing?”
The sisters caught one another’s eye, eventually turning their gaze at me and one said: “This is going to sound strange to you, but we always make our stuffing with corn flakes.” I had never before heard of anyone using that ingredient for the festive bird. This was the one, true and only acceptable stuffing for Thanksgiving, and just as I had suspected, the recipe was introduced by fabulous Aunt Hannah. The stuffing it produces has great texture that allows the stuffing to hold its shape and not go all limp, yet it is moist from having absorbed the juices from the turkey. Said juices also combine well with the stuffing ingredients, which are few and simple:
Aunt Hannah’s Turkey Stuffing
Makes enough for a 16-pound bird
Ingredients
Directions
- Melt the butter in a sauté pan over medium-high heat.
- Add onion, celery, green pepper and sauté until brown.
- Combine with bread crumbs, eggs, water, sugar and salt and pepper and mix well.
- Add cornflakes and mix lightly.
- Use this mixture to stuff the bird.
Barbara Haber is a food historian and the former curator of books at Radcliffe’s Schlesinger Library at Harvard University where she built a major collection of cookbooks and other books related to food, and influenced the recognition of food history as a viable field of academic and professional study. She founded the Radcliffe Culinary Friends, which supported the library’s culinary collection and provided a forum for food writers from across the country to present their work to an appreciative audience. She also held monthly gatherings, called “First Monday,” where local chefs and writers came together to hear talks on timely food-related topics.
Barbara’s books include “From Hardtack to Home Fries: An Uncommon History of American Cooks and Meals” and “From Betty Crocker to Feminist Food Studies: Critical Perspectives on Women and Food,” which she co-edited. She has written numerous articles and reviews including “Home Cooking in the White House” published in “White House History.” She is currently working on a book about food and World War II in the Pacific tentatively called “Cooking in Captivity.”
She is a former director of the International Association of Culinary Professionals and currently serves on the awards committee and chairs the Who’s Who Committee of the James Beard Foundation. She is a frequent speaker on topics related to the history of food as well as popular food topics, and has appeared on television’s “The Today Show,” “Martha Stewart Living” and The Cooking Channel. Barbara was elected to the James Beard Foundation’s “Who’s Who’s in Food and Beverages” and received the M.F.K. Fisher Award from Les Dames d’Escofier.
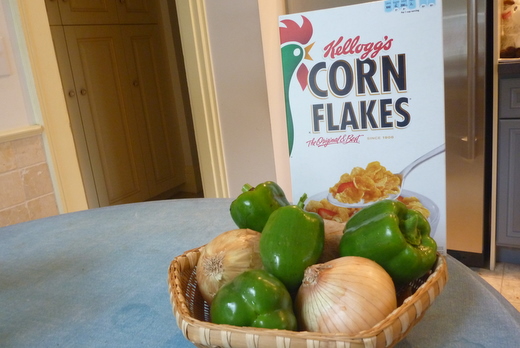
Photo: Cornflake stuffing ingredients. Credit: Barbara Haber
Our image of the first Thanksgiving is a fanciful one created in grammar schools across the nation. We imagine pilgrims sharing turkey, sweet potatoes, cranberry sauce and pumpkin pie with the Wampanoag tribe in Plymouth, Mass., in 1621.
In fact, there was no turkey on the table although there was water fowl, lobsters and clams, and five deer brought by the Indians. There were no cranberries, no sweet potatoes and no pumpkin pie, although there was some kind of squash.
Nonetheless, Americans still like to assemble the traditional foods that reflect our flawed notion of a historically correct menu and preserve the continuity of our culinary culture. So we have turkey, and corn bread, and pumpkin pie and sweet potatoes.
Except in New England, few families serve up lobster on Thanksgiving, yet lobster should be one of the most traditional of Thanksgiving foods because it more than likely appeared at the first Thanksgiving.
Although our family doesn’t have lobster every Thanksgiving, a lobster stew is an ideal part of a traditional Thanksgiving menu. Besides, it’s nice to serve it first, perhaps long before you sit down for dinner, and that way you keep the hungry hordes at bay with a delicious and traditional dish.
A historic stew
First, be aware that lobster stew is a two-day affair. That’s actually ideal for Thanksgiving because you can make it Wednesday night and then just reheat it Thursday. Lobster stew was once considered poor people’s food in Maine. Horror writer and Maine native Stephen King, whose family was poor when he was a child, describes how his mother kept lobster stew on the stove and would hide it out of embarrassment when company came.
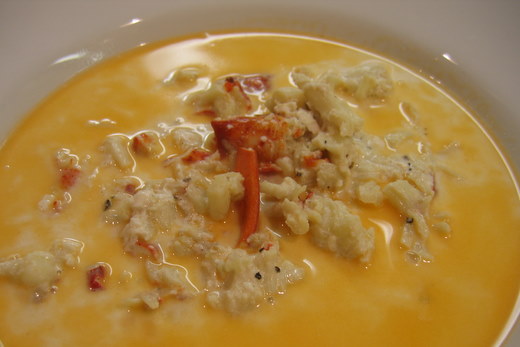
The Pulitzer Prize-winning Maine poet Robert P.T. Coffin advised that lobster stew should be half lobster and half liquid. Sometimes you will find white wine or sherry in lobster stew, which is the first type of lobster stew recipe I’m familiar with. The recipe in “Accomplished Cook” (published in London in 1685) by Robert May uses claret. The lobster stock called for is made from the shells of the lobster you used to get the meat. Boil the shells in water to cover for two hours.
Lobster Stew
Makes 4 to 5 regular soup servings or 8 appetizer-type servings
Ingredients
Directions
- In a stockpot, bring an inch of water a boil over high heat, then add the live lobster, partially covered and cook on high for 12 minutes. Remove the lobsters and, when they are cool enough to handle, crack them and remove all the meat from the arms, claws, body, legs and fan tail. Chop into pieces not larger than ¾ -inch. Set aside along with any tomalley and coral you find in the lobster.
- Place the shells in a large pot and cover with water. Bring to a boil over high heat and boil for 1 hour. Remove and discard the lobster shells and strain the broth, setting aside 1 cup.
- In a large pot, melt 5 tablespoons butter over high heat then cook the lobster, stirring, until bubbling vigorously, about 2 minutes. Add the milk and cream slowly. Add the reserved 1 cup of lobster broth. Add the sherry and season with salt and pepper. Cook on high heat until tiny bubbles appear on the edges. Turn the heat off. Let cool and place in the refrigerator overnight.
- Bring water to a boil over high heat in the lower portion of a double-boiler. Pour the lobster stew into the top part of a double-boiler and heat, stirring occasionally, over medium-high heat until very hot but not bubbling, 10 to 15 minutes. Add the remaining tablespoon of butter and, once it has melted, serve with crackers.
Zester Daily contributor Clifford A. Wright won the James Beard / KitchenAid Cookbook of the Year Award and the James Beard Award for the Best Writing on Food in 2000 for “A Mediterranean Feast.” His latest book is “Hot & Cheesy” (Wiley) about cooking with cheese.
Photo: Lobster stew. Credit: Clifford A. Wright
African-American calendars are slightly different. Along with Christmas and Memorial Day, Easter and the Fourth of July, they include such specifically African-American Holidays as Kwanzaa in December; Pinkster Day, a holdover from Dutch Pentecost celebrations; and Juneteenth, the Emancipation celebration that ushers in the summer season. Juneteenth’s genesis goes back to the days of enslavement, and thoughts of the day the enslaved referred to as the day of Jubilee.
It began in whispers on Sept. 22, 1862, as a trickle, titillation, a corner of hope. Word slowly spread. Overheard by house servants plying heavy silver ladles and proffering bone china platters, it was passed along in unheated cabins where moss and rags plugged up the holes to keep out the winds of the upcoming winter. It was whispered over bowed backs in cotton fields, murmured in tobacco barns among the leathery leaves. It was shared in the boiling houses over vats of steaming cane juice: President Lincoln had issued a proclamation that gave the seceding states 100 days to abandon their pro slavery positions. Could it be?
Word spreads across the South
Then, on Jan. 1 1963, the day of the Jubilee finally arrived. As magnificent as the tidings were, news of the Emancipation Proclamation didn’t travel with the speed of today’s modern information. Instead it made its way slowly across the American South. Many plantation owners felt it best to withhold the information until crops had been gathered in. Yet, slowly but surely like a rising tide that enveloped the land with the sureness of inevitability, the word passed through the tobacco fields of Virginia, through the rice-growing marshlands of the Carolina and Georgia low country, through the cotton fields of Mississippi and Georgia and out to the indigo plantations of the Sea Islands where Africa’s descendants had been able to maintain their ways. It sped along the cane breaks on Louisiana’s sugar plantations, where some of the slave owners were black themselves. Finally it made its way into the hinterlands of Texas.
“The people of Texas are informed in accordance with a Proclamation from the Executive of the United States, all slaves are free.” So read Gen. Gordon Granger from the balcony of the Ashton Villa in Galveston on June 19, 1865. The day of Jubilee had finally arrived. It had taken its time getting to Texas, but two years, six months and 19 days after Lincoln’s Emancipation Proclamation, those who had worked in slavery’s fields could finally lay their burden down. As the word spread throughout the state, a flurry of spontaneous and joyous celebrations broke out that are the ancestors of today’s Juneteenth festivities.
Black Texans celebrated their red-letter day with a fervor that made the holiday a second Christmas. The celebrations grew and flourished. They included entertainment ranging from heartfelt prayers of thanksgiving offered up by preachers in sonorous tones to cake walks and parades with lots of high stepping horses. New clothes were the thing at celebrations where the survivors of this American holocaust were often the guests of honor.
A focus on the food
The backbone of all of these festivities, though, is the table. Those who had toiled in sorrow’s kitchen commemorated their liberty with some serious high-on-the-hog eating. Picnics and barbecues were the hallmarks of the festivities, with tables covered with bright cloths offering specialties like barbecued ribs and fried chicken, along with variations on summer produce like black-eyed peas, peaches and watermelon.
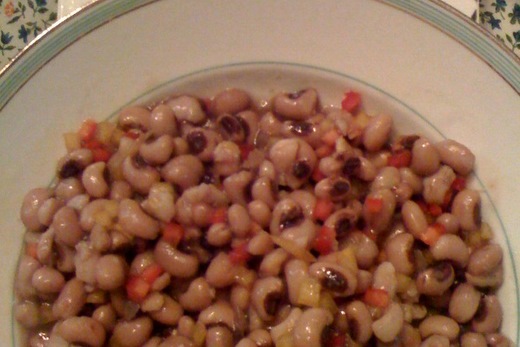
Today’s festivities are more likely to include beauty competitions and baseball games than the sermonizing of the past. The uniquely Texan holiday and the emancipation that it honors, though, has struck a chord with African-Americans around the country and increasing numbers north and south are celebrating Juneteenth in a variety of ways. The date became one of Texas’ 14 official holidays in 1979. All of the varied celebrations involve a shared meal of some sort, more often than not a barbecue. I like to think that somewhere on the table is the black-eyed pea dish that Texans call Texas caviar.
Texas Caviar
Ingredients
Directions
- Drain the black-eyed peas and place them in a non-reactive bowl.
- Add the remaining ingredients and stir well to make sure that all of the ingredients are mixed.
- Cover with plastic wrap and refrigerate for at least five hours. Serve chilled or at room temperature.
Jessica B. Harris, a contributor to Zester Daily, is the author of the new book, “High on the Hog: A Culinary Journey from Africa to America,” and 11 other books on African-American foodways.
Photo: Texas caviar. Credit: Jessica B. Harris

France has the third largest Jewish population — about 600,000 — in the world after Israel and the United States. Over the centuries Jews have migrated from North Africa, Poland and Russia, and today some 300,000 live in Paris. For 2,000 years, Jews have played a profound role in the evolution of French cuisine, and yet their contribution is barely acknowledged.
In researching my new book, “Quiches, Kugels, and Couscous: My Search for Jewish Cooking in France,” I learned that Jews originally came to Marseilles with the Romans in the first century. And yet they’ve always been regarded, to some degree, as outsiders by an essentially Catholic country. Scars of anti-Semitism have made French Jews cautious, even with people like me who come seeking recipes. This may explain why the country’s Jewish culinary contributions have been overlooked.
When I approached French Jews to gather recipes, their first response was often that they didn’t know any Jewish dishes. They consider the food they eat as French — they shop for seasonal produce at their local markets, and like all French people, obsess about their next meal. But when older French Jews talk about the recipes of their childhood, the descriptions resonate with memories: traditional dishes like carp served cold with sauce verte, a green parsley sauce so French it is mentioned in Taillevent’s famed 14th-century cookbook. Carp with sauce verte, or carpe à la juive, survives mostly as a Jewish holiday dish.
Isolated communities like the Jews of Alsace or the Juifs du Pape in the south of France often retain otherwise forgotten recipes, like a tian of salt cod with spinach, once eaten for Purim and probably during lent for Catholics.
A heavenly beurre blance sauce
Another Alsatian specialty is fish choucroute (sauerkraut) with heavenly beurre blanc sauce, a dish appreciated by kosher customers. In Strasbourg, where everybody eats sauerkraut, there is even a theater and restaurant called Choucrouterie built in an old sauerkraut factory. In the Middle Ages people wrote about the stinky Jewish Sabbath stews with cabbage. Who knows which came first, the Jewish or the gentile version?
The modern Jewis macaron
More recently, French Jews put their own touch on macarons, a very French dessert. The modern Jewish macaron is associated with Boulay, a town about 25 miles north of Nancy. It seems the recipe originated with a Jewish wine salesman named Bines Lazard who began selling the macarons in his shop, Maison Lazard, in 1854 where they were proclaimed the best in France. The same robust cookies, made from the traditional almonds, sugar and egg whites, are sold as macarons de Boulay to this day.
During the Middle Ages, Jewish merchants were international traders. For centuries they provided the sole avenue for products like grain, salt, salted and dried fish and spices to reach France. Can you imagine French cuisine without those staples? As historian Henri Pirenne comments on this period, “if the Jews were so favoured, it was only because they were indispensable.”
Beef as a Sabbath dish in pot au feu
During the eighth to 11th centuries, centers of Jewish commerce and learning sprang up throughout France, and Jewish food traditions were introduced: southern and northern, Sephardic and Ashkenazic. In the 10th century, Benjamin Tudela, the first Jewish census taker, dubbed what is now northern France and southern Germany Ashkenaz because of its Jewish population. Here Jews could no longer rely on olive oil from the south and used goose fat instead. Cold weather vegetables like cabbage and horseradish root were more prevalent than spinach and chickpeas. Beef became the Sabbath dish in pot au feu as opposed to the lamb or goat used in Hamim or Adafina to the south. Kugels, knaidlach (which we know as matzo balls), chopped liver, all well-known Ashkenazic recipes, started in this area and moved east.
On force-feeding of geese to produce foie gras
The most famous Talmudic scholar of this period was Rashi, whose home in Troyes, in the Champagne region, became one of the most important centers of Jewish life in Europe. Rashi’s commentaries on the Talmud and the Torah give fascinating glimpses into the cooking of northern France during this period. A thinker who knew about both religion and agriculture, he condemned the force-feeding of geese to produce foie gras, and the excessive amounts of goose fat that was essential to Jewish cooking in those days. “Israel will one day pay the price for these geese,” he wrote, “… for having made these beasts suffer while fattening them.”
Throughout history French Jews have been grain merchants, cattle merchants, chocolate makers and chefs. They have worked at les Halles and Rungis and have enjoyed their version of French food, without the pork. They have made French food their own, just as their culinary traditions have seeped into the foods of their regions. In France, for instance, matzo or pain azyme is not simply the unleavened bread of Passover, but a well-loved diet food, marketed to women across the country, from all backgrounds since the Middle Ages.
French cuisine could not be what it is today without the influence of the country’s Jews.
Almond Macarons
Makes about 5 dozen.
Ingredients
Directions
- Preheat the oven to 300 degrees F and line a baking sheet with parchment paper.
- Whip the egg whites to almost-stiff peaks in the bowl of an electric mixer.
- In another bowl, stir together the sugar and ground almonds. Fold the sugar and almond mixture gently into the egg whites in 3 batches.
- Drop teaspoons of the batter onto the baking sheet, and bake for about 15 minutes or until just dry.
Joan Nathan is the author of ten cookbooks including the recently published “Quiches, Kugels and Couscous: My Search for Jewish Cooking in France” (Knopf, November 2010). She is a regular contributor to The New York Times, Food Arts Magazine, and Tablet Magazine, among other publications.
Photo: Joan Nathan Credit: Michael Lionstar
Greg, the man who cut my hair (and Julia Child’s hair, too) for many years when I lived in Boston, came from a family that was originally from Puglia at the southeastern tip of Italy. He and his wife went back often to visit relatives. A haircut with Greg always took a good deal longer than it should have because we spent a lot of time in the very pleasurable Italian exercise of talking about food and recipes and family traditions. “Like pizza gaina,” Greg said one year around Easter. “You ever had pizza gaina?”
“Well, no.”
“It isn’t Easter without pizza gaina,” he said and began to recount the recipe, which took a while because there’s a lot that goes into it.
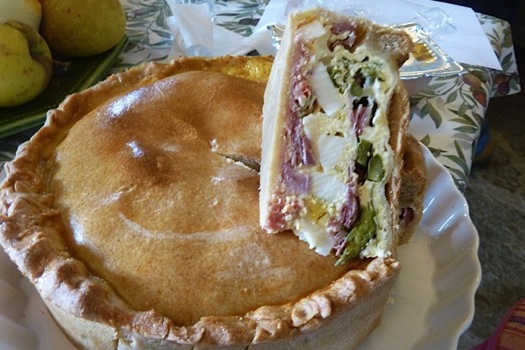
Turns out pizza gaina is Italo-American for pizza chiena which is Campanian for pizza ripiena, aka pizza rustica, a legendary treat, a thick pie. You could call it Italian quiche and not be far wrong — rich with salumi, eggs and cheeses, pizza ripiena by any name is served up at Eastertide from Naples to Bari and points south. It’s a staple for Pasquetta, or Easter Monday, a national holiday in this sensible country, when families debark for the countryside bearing picnics of leftovers from Easter lunch. Pizza ripiena is both a centerpiece of the elaborate picnic and a handy tool for filling up children’s empty stomachs before the main course comes out.
Actually, pizza ripiena makes a wonderful presentation for any kind of feasting, but I think it tastes best of all when it’s consumed al fresco, preferably accompanied by a sparkling spritz of prosecco and Campari (prosecco and limoncello also goes down well).
I’ve experimented with a lot of different recipes for pizza ripiena, pizza chiena, pizza gaina over the years. The following is one I came up with recently. It was a huge hit at a Pasquetta picnic on the sunny, olive-studded terraces below a friend’s farmhouse in Cortona. I made some adjustments from the classic, most significantly using steamed asparagus instead of traditional artichoke hearts, but I’m sure that somewhere in the Mezzogiorno italiano at some time in the past asparagus has been used. It’s an accommodating recipe — you more or less make do with what you have.
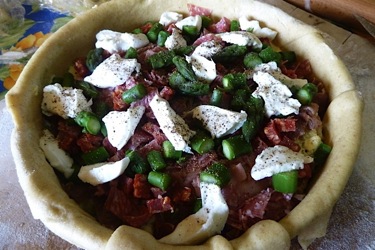
However, you must use the best salumi (Italian cured pork products: prosciutto, salame of various kinds, mortadella if you can find it) and cheeses available. The ricotta must be as fresh as possible, it goes without saying, and drained in a fine-mesh sieve overnight to get rid of excess whey. Pecorino should be Toscano or Sardo — not pecorino Romano which is too strong for this dish. (Best quality provolone could be substituted.) As for the mozzarella, above all it should be Italian, made from buffalo milk and as fresh as you can get. Don’t ever, for anything, use that weird rubbery supermarket cheese called, for reasons that are unclear, mozzarella. It is not. Once you’ve assembled all these ingredients, you’re good to go.
But first you have to make the dough for the pie crust. For that, I used a dough I learned from Salvatore Denaro, a great chef who works at the Arnaldo Caprai Winery in Montefalco, Umbria, where he offers delightful cooking classes (find out more at arnaldocaprai.it). Salvatore’s recipe sounds like every Italian farmhouse recipe, full of “quanto basta” (as much as you need) and similar intuitive measurements. Basically, you take equal amounts of dry white wine (at room temp), water (also room temp) and extra virgin olive oil, combine them in a bowl with a pinch of salt and then add flour (equal parts of all-purpose and semolina) until you have a soft but not the least bit sticky dough. Knead it a bit, form it into a ball, then set it in a bowl, cover with plastic wrap, and let it rest for several hours or even overnight. It’s actually hard to get more specific than that, but here goes.
Pizza Ripiena
Rustic covered pizza with salumi, asparagus, eggs and four cheeses
Makes 10 to 12 servings, more if served with lots of other things as part of a buffet or picnic.
For the crust:
Ingredients
Directions
- Combine the liquids in a large mixing bowl and stir in a big pinch of salt.
- Now start adding the flours — a cup of all-purpose, a cup of semolina, stirring each addition in but not worrying if the combination is a bit lumpy. Keep this up until you’ve added 4 cups.
- Now knead the dough gently in the bowl. It should all come together very well into a soft dough that is malleable and not at all sticky. If necessary, add another half cup of all-purpose and then, if needed, another half cup of semolina. But you shouldn’t have to add more than 5 cups flour total to get the right consistency. The remaining cup is for the board, when you roll the dough out.
- Shape the dough into a ball and set in the rinsed-out mixing bowl. Cover with plastic wrap and set aside for several hours. If you think it’s wise, you can refrigerate it overnight.
For the filling:
Ingredients
mortadella, coppa, capocolla, etc. — it could all be one kind of salumi but it’s best to have a mixture; you could also add some sliced cooked ham)
1 pound slightly aged pecorino toscano, pecorino sardo or provolone, cut in half-inch cubes
1 pound fresh buffalo milk mozzarella, in big dice
4 hardboiled eggs, peeled and quartered or sliced
1 pound fresh ricotta, drained in a fine-mesh sieve
7 raw eggs plus 1 egg yolk
about ½ cup chopped mixed green herbs: parsley, basil, chives, etc.
1 cup freshly grated parmigiano reggiano
½ pound asparagus, cut in one-inch lengths and steamed until tender
plenty of freshly ground black pepper
Directions
- When you’re ready to make the pizza, take the dough out of the refrigerator if necessary and let it warm up to room temperature. Set the oven on 400 F. Have ready a spring-form pan about 10 inches in diameter and 3 inches high.
- Cut the dough in two unequal “halves” and roll the larger half out to fit the springform pan. Roll the dough as thin as you can and tuck it well into the angle of the pan. Let the excess hang over the top edge.
- Chop the salumi into coarse pieces and scatter half of them over the bottom of the pan. Top with half of the cubed cheese and half the diced mozzarella. Arrange the boiled egg quarters over the top.
- Combine the ricotta with 6 of the raw eggs in a bowl and beat just to mix well. Stir in the chopped green herbs and the grated cheese. If the mixture seems too thick, add the seventh egg, beating to mix thoroughly. Spoon half of this mixture over the top of the stuff in the pan.
- Now continue with the remaining layers — remaining salumi, remaining cheese and mozzarella. Scatter asparagus over the top, then spoon the rest of the egg-Parmigiano mixture on top. Add plenty of freshly ground black pepper.
- Now roll out the second piece of dough to fit the top of the pan — again, making as thin a crust as possible. Set the dough on the top, trim off any excess with scissors but leave enough of the top and bottom to be able to crimp them together.
- Mix the egg yolk with a teaspoon of water, beating well, then paint the entire top of the pie, including the crimped crust around the edge. There is no need to pierce steam holes in the top crust but if you’re feeling clever, you could use the excess dough to make a pastry pattern on the top.
- Transfer to the preheated oven and bake for 45 to 65 minutes or until the top is golden and the smell is fragrant. Remove from the oven to a cake rack and let sit for several hours or even overnight before cutting into the pizza. If you must refrigerate it, be sure to let it come back to room temperature before serving.
Nancy Harmon Jenkins is the author of several books, the latest of which is her newly revised “The New Mediterranean Diet Cookbook.” Her other food books include, “Cucina del Sole: A Celebration of the Cuisines of Southern Italy” and “The Essential Mediterranean,” which looks at a dozen foods key to understanding Mediterranean cuisines. She also wrote “Flavors of Tuscany,” “Flavors of Puglia” and “The Mediterranean Diet Cookbook.” She is working on a book on Atlantic salmon. A former staff writer with The New York Times, Nancy continues to contribute to the Times in addition to writing for The Washington Post, Saveur, Food & Wine and other national publications. She currently divides her time between a Tuscan farmhouse and a home on the coast of Maine where she was born and raised. She has lived and worked throughout the countries of the Mediterranean, at various times making a home in Spain, France, Italy, Lebanon, and Cyprus as well as in Hong Kong and England. You can read more of her food writing on her site, NancyHarmonJenkins.com.
Photo: Pizza ripiena, aka pizza gaina. Credit: Nancy Harmon Jenkins