Articles in Holidays

The most overlooked food at Thanksgiving is the gravy. Cooks are working so hard on all the cranberry specialties and other dishes, and wrangling room in the fridge for the turkey, the sweet potatoes, the pies, and everything else that they forget how important the gravy is. In our kitchen, the turkey gravy starts with turkey stock some weeks before Thanksgiving — and we make a lot of it.
The stock for the gravy is very important and should be given as much attention as anything else you make for Thanksgiving. It is the basis to not only the gravy but to the flavoring of the non-stuffed stuffing you might make.
This recipe makes a rich stock that can be turned into excellent gravy. The stock can be refrigerated overnight. Then you skim the surface of the congealed fat and it is ready to use or you can freeze it.
Do not salt the stock or gravy until the last moment. It is best to make the stock for the gravy days before Thanksgiving. I usually make the turkey stock about a week before Thanksgiving by buying some cheap turkey wings or backbones to use for the broth.
Turkey Stock
Makes 8 or 9 cups
Ingredients
4 pounds turkey (preferably), goose, or duck parts (such as carcasses, wings, legs and necks)
3 carrots, sliced
2 celery stalks, chopped
2 medium onions, quartered and separated
2 leeks, split lengthwise, washed very well under running water and chopped (Be sure to separate the leeks under the water to wash thoroughly.)
Bouquet garni consisting of: 6 sprigs fresh parsley, 6 sprigs fresh thyme, 3 sprigs fresh sage, 1 bay leaf
10 peppercorns
6 quarts cold water
Directions
1. Preheat the oven to 425 F.
2. Place all the collected meat parts in a roasting pan, then brown, about 40 minutes. Transfer all the meat and any juices to a large stock pot with all the other ingredients. Deglaze the pan with a little water and turn it into the stock pot too. Add the remaining water.
3. Bring to a boil over high heat, then reduce to low and simmer, partially covered, skimming the surface of foam, for 6 hours.
4. Pour the broth through a chinoise (cone-shaped strainer) or colander and discard all the bones and vegetables. Strain again through a cheesecloth-lined strainer and return to a smaller stock pot.
5. Place the pot over a burner on high heat and boil until a third of the liquid has evaporated.
6. Let cool in the pot and then refrigerate overnight to let the fat congeal. Remove the fat by skimming off with a skimmer or ladle.
7. Place the stock pot with the turkey stock over high heat and bring to a boil. Boil until reduced to about 10 cups. The stock is now ready to use in making gravy. It can be frozen at this point for up to 6 months.
Turkey Gravy
Makes 6 cups
This gravy can be made relatively quickly once the roasting turkey has emitted enough fat. It can be made Thanksgiving morning, before the turkey is put in the oven, by using another fat, such as butter, goose, or duck fat, but it is best with turkey fat. I usually let the gravy sit on a very low burner for hours so that the turkey neck I add becomes very tender and gives the gravy even more flavor.
Ingredients
½ cup melted turkey fat from the roasting turkey (or butter, goose, or duck fat)
Turkey giblets and/or neck (and any other collected duck or goose giblets), chopped
½ cup unbleached all-purpose flour
8 cups Turkey Stock (see above)
¼ cup cognac or brandy
½ cup heavy cream
Salt and freshly ground black pepper
Directions
1. Place the fat in a large saucepan and heat over high heat and add the giblets. Add the flour to the melted fat and cook until sizzling and a very light brown roux has formed, about 3 minutes.
2. Whisk in all of the turkey stock slowly, reduce the heat to medium-low, add the turkey neck, if using, and cook until a consistency of your liking for gravy. Taste the gravy, season with salt and pepper, and continue cooking until blended. Add the cognac and cream and continue cooking until reduce to about 6 cups, then keep warm until needed, not boiling nor bubbling. Season with salt and pepper.
Note: If the gravy is not thick enough, stir in 2 tablespoons corn starch with ¼ cup water into the gravy and cook 15 minutes at a gentle boil and until thickened (you shouldn’t have to do this).
Variation: Remove the turkey neck and pull off any soft pieces and return the pieces to the gravy.
Photo: Gravy in a gravy boat. Credit: StockFood

A lot of people say they don’t like turkey because it’s too dry. They are referring to the white meat, by far the most popular part of the turkey for most Americans. The white meat comes from the breast, and modern turkeys are raised to have large breasts (those Americans!). A turkey is a naturally moist and delicious tasting bird, so if you associate breast meat with dry and crumbly meat that’s because of one thing only: The cook overcooked the turkey. Once a turkey is overcooked there’s no going back, it’s ruined. A roasted turkey should never taste dry.
So, when cooking turkey you must pay attention. I recommend using thermometers, in fact, at least two of them in different parts of the turkey. One of the reasons people overcook turkeys is because the U.S. Department of Agriculture, many cookbooks, supermarkets — everybody — instructs you to cook the turkey until it has an internal temperature of 180 F. This is plain crazy and a recipe for disaster. The internal temperature measured in the middle of the breast should be 160 F. To achieve this, you should always use a quick-read thermometer and never rely solely on a pop-up timer in the turkey or any roasting rules-of-thumb. You should also pull the turkey out at 155 F because the turkey doesn’t stop cooking just because you pulled it out of the oven. Let the turkey rest 20 to 30 minutes before carving.
Now you get to the good part. I’m speaking of the dark meat, namely the thigh and legs. I’ve never understood why one would forgo the most delicious and flavorful part of the turkey for the bland white meat. There’s a reason that the expressions describing a person as “oh, so white bread” or “oh, so white meat” exist. It means that person is dull and and common. And that’s white meat. White meat is fine, when properly cooked, moist and flavorful. It certainly makes good sandwiches. However, it doesn’t nearly have the depth, character, and full flavoredness of dark meat, which is, after all, even more moist and rich than properly cooked white meat.
There’s also some secret meat not to be overlooked, and if you’re not the carver you may not know about it. It is important to start carving by separating the leg from the thigh. Some people leave the leg, the drumstick, whole, but you can carve off its meat too. Then you pull off the thigh and slice it. This is the dark meat.
We use the word “carving” but not all this is done with a two-pronged fork and carving knife. A lot of it is done with your hands by pulling. Now, on the underside of the turkey, mostly ignored by everyone because we’re all set on getting to the table, are bits of juice- and fat-soaked dark meat that can’t be carved but must be pulled off in bite-size increments. This is the meat — the best meat as far as I’m concerned — that you’ll see the carvers popping into their mouths as they carve.
This is why I always carve the Thanksgiving turkey.

Thanksgiving celebrates family and traditions. Shaped by a lifetime of expectations, most people think the meal must include turkey, stuffing, gravy, cranberry sauce and sweet potatoes.
Dessert is more variable, although pumpkin pie often seems to be on the menu. In our house apple pie and bread pudding are also constants.
For this Thanksgiving, I’ve decided to bend tradition and bring a flourless chocolate cake to the table.
On a late summer trip to the Berkshires, I was won over by French pastry chef Jean Yves and his deliciously light, flourless chocolate cake.
Knowing I was coming to the area for a visit, he invited me to a hosted tasting at Patisserie Lenox, the cozy shop he and his wife Yulia Bougouin own and operate in Lenox, Mass..
Bringing French pastry to the Berkshires
Chef Yves’ pastries are exactly what one expects to find in a French bakery: light and flaky croissants, richly flavored puff pastries with a light custard filling, airy and buttery brioche, brightly colored macaroons, chocolate glazed éclairs, fresh fruit tarts and elaborately decorated cakes.
What one doesn’t expect in the Berkshires is a French bakery.
The area is renowned for the art and music festivals that dominate the summer season. Performances at Jacobs Pillow Dance and concerts at Tanglewood are the prominent but not the only arts celebrations in the area.
The bakeries and restaurants in Lenox are good but definitely not French. So the natural question to put to Yves is why the Berkshires?
Marriage made in the kitchen
Sitting down for coffee and a slice of his cake, Yves smiled as he talked about how he created one of his signature confections, a two-layer, flourless chocolate cake with a ganache filling.
As a young man, he worked at elegant Le Grenouille on the Upper East Side of New York.
The job demanded he create new desserts to satisfy an always hungry, upscale clientele. He remembered the densely flavored chocolate and thick whipped cream he employed to make rich chocolate cakes when he worked in a German bakery. He applied French patisserie techniques to those ingredients.
The result was a cake that combined the essence of chocolate and cream without being heavy. It’s dense with flavor and light on the palate.

Jean Yves, wife Yulia Bougouin and daughter Sonya at Patisserie Lenox in Lenox, Mass. Credit: David Latt
He looked down at his hands before he explained how he found himself in the Berkshires.
Having worked in New York City, in the kitchens of well-known chefs and on Long Island in his own bakeries, he freed himself from a life that was falling apart when he discovered a soulmate in a young Russian chef who was as proud of her soups as he was of his cakes, tarts and pastries.
This was a marriage made in the kitchen. Yves and Bougouin decided to raise their young daughter in the second home he had built in the woods and recast their lives in the Berkshires.
The flourless chocolate cake — topped with cocoa powder, swirls of freshly made whipped cream and hand-dipped chocolate-covered whole almonds — was one of the ways he celebrated his new life and business in Lenox.
Patisserie Lenox Flourless Chocolate Cake
Use good quality ingredients for better tasting cakes. Avoid butter, cream and chocolates made with artificial ingredients and stabilizers.
Serves 6-8
For the cake
6 eggs
12 ounces of bittersweet chocolate
1 cup of sugar
¾ cup of water
2 cups of whipped cream
¼ cup cocoa powder
10 chocolate-covered almonds or coffee beans or whole berries (optional)
For the ganache
1 cup of heavy cream
1 pound bittersweet chocolate
½ pound of butter
3 cups of whipped cream
1 cup of egg white
2-3 tablespoon granulated sugar
Directions to make the cake
1. Whip 6 eggs and 1 cup of sugar until you reach three times the original volume.
2. Cut chocolate into small pieces, the size of chocolate chips, or use chocolate chips.
3. Pour ¾ cup boiling water over the chocolate, mix to melt the chocolate. Let cool but not harden.
4. Mix the eggs, melted chocolate and whipped cream and gently fold them together.
5. Line two ¼ sheet pans with parchment paper.
5. Divide the mixture and pour into the pans.
6. Cook in a preheated, 350 F oven for 20 minutes.
7. Remove the cake from the oven. It may be a bit jiggly and will look as if it is not done.
8. Refrigerate overnight.
Directions to make the mousse
1. Bring the cream to a gentle boil, pour into the chocolate, mix to melt the chocolate.
2. Mix in the butter to create the ganache.
3. Whip egg whites with 2 tablespoons sugar, until the mixture peaks.
4. Sweeten the whipped cream with one tablespoon sugar.
4. Fold the egg whites into the ganache and mix in 2 cups of whipped cream at the same time.
Directions to complete the cake
1. Place the two refrigerated cakes on a work surface. Pour and smooth out ¾ of the mousse on top of one of the cakes.
2. Flip the second pan so that that cake ends up in the first pan. Remove the parchment from the top of the newly assembled “sandwich” cake.
3. Refrigerate for a couple of hours until the cake is set.
4. Put a large plate, serving platter or cutting board on top of the pan. Flip the pan so the “sandwich” cake slides out of the baking pan.
5. Take off the second parchment paper and smooth out the rest of the mousse on top of the cake.
6. Dust the cake with cocoa powder so the top is completely covered.
7. Decorate with the remaining whipped cream and top with chocolate covered almonds or coffee beans, or berries.
Photo: Jean Yves’ flourless chocolate cake. Credit: David Latt

Here’s a little treat that combines two favorite flavors of this season, cranberries and oranges. I suppose by nature it’s a party snack, but you might serve your Thanksgiving guests a couple of cranberry-orange baklavas to munch on during the dinner proceedings, maybe in place of biscuits or muffins.
By Middle Eastern standards, it’s culinary heresy. Confectioners do sometimes make orange-peel baklava there, (I’ve seen portokalli baklava on a Turkish restaurant menu of the 1930s.) but they certainly don’t use cranberries. Though people relish sweet-and-sour flavors in that part of the world, there seems to be a feeling that sweet-sour is appropriate for meat dishes, not for pastries.
Sweets are supposed to be purely sweet, possibly because they’re traditionally consumed by themselves in the middle of the day, not as part of a meal, where a sour flavor might blend in amongst all the others.
Conversely, the bitter-sweet combination is enjoyed — indeed expected — in pastries; think of all those nut fillings. And it’s largely avoided with meat, so go figure. Anyway, this taste for bittersweet sweets certainly explains how orange-peel baklava arose. I, for one, like sweet-sour sweets. Give me rhubarb pie, give me cheesecake with raspberry sauce, give me lemon drops! And the combination of cranberry and orange summons up warm memories of every Thanksgiving meal I’ve ever enjoyed, though when I was young and foolish, I confess, I didn’t like cranberries, or maybe it was just the cranberry jelly.
This recipe was inspired by the orange baklava in a pastry manual by Necip Ertürk, generally known as Necip Usta (roughly, Master Chef Necip). His name is pronounced ne-JEEP oos-TAH, by the way. He was one of the leading Turkish chefs from the 1950s to the 1970s, serving at a bunch of top Istanbul restaurants and even at a Hilton operation in the United States.

Cranberry-orange baklava. Credit: Charles Perry.
As a sign of his status, he wore a huge toque, which, in photos, looks about 2 feet tall. He’s considered old-fashioned by the Turkish chefs who are currently experimenting with their own style of nouvelle cuisine, but he was a sort of Escoffier figure to an earlier generation.
He never went near a cranberry, at least not when he was making pastries. I’m doing that for him, whether he would have wanted it or not.
Cranberry-Orange Baklava
Yields 24 to 33 pieces
Ingredients
For the syrup:
6 tablespoons sugar
2½ tablespoons water
¼ teaspoon lemon juice
Optional: 1 teaspoon orange blossom water
For the cranberry filling:
3 oranges, or 1 tablespoon candied orange peel
6 ounces dried cranberries, a little over 1½ cups
For the pastry:
About ⅔ pound frozen filo dough
2 sticks unsalted butter, divided
Directions
For the syrup:
1. Put the sugar, water and lemon juice in a small saucepan. Bring to the boil and cook until clear, 2 to 3 minutes. Set aside. When cool, add the optional orange blossom water.
For the cranberry filling:
1. Use a microplane zester to remove only the glossy, colored zest from the peel of the oranges. (If using candied peel, mince finely.)
2. Mix with the cranberries and process in the food processor until the size of large sand, but not until the mixture becomes terribly sticky. Divide into four equal portions and set aside.
For the pastry:
1. Thaw the filo dough in the refrigerator for three hours or more.
2. Meanwhile, use ½ stick softened butter to grease a baking sheet generously. When the filo is thawed, melt the rest of the butter in a small saucepan and keep warm.
3. Heat the oven to 400 F.
4. Open the package and carefully unfold the filo on a large workspace and measure it (the measurements on packages are sometimes only approximate). For this recipe we want to end up with 4 stacks of filo strips about 4 inches wide and 12 to 14 inches long — exact size is not crucial — so figure out how you want to accomplish this, discarding any excess length. Thawed filo cuts easily with scissors.
5. Cover the three stacks of strips you’re not working on with a kitchen towel to keep the dough from drying out. Carefully separate one 4-by-12-inch sheet and lay it down on the buttered baking sheet. Brush it with melted butter, and top with 5 or 6 more sheets, buttering each one. Some filo sheets will tear apart or be wasted in some other way, but don’t worry.
6. Finally arrange one-quarter of the cranberry filling in a long, compact line down the middle of the top sheet. Using a spatula, carefully lift up one side of the stack and fold it over the filling, then roll it up, ending with the seam side down. Use a sharp knife to cut the roll into 6 to 8 lengths.
7. Repeat this process with the remaining 3 stacks of filo, making 24 to 32 short lengths of baklava. Set the baking sheet in the oven and bake until the pieces are puffed and golden brown, 10 to 15 minutes.
8. Remove the baking sheet and transfer the pieces to another baking sheet or a work surface.
9. After a minute, brush the pieces with the syrup.
Will keep about 3 days tightly covered.
Photo: Cranberry-orange baklava. Credit: Charles Perry

This moon-cake recipe is Cantonese on the surface, but it envelops a Suzhou-style crunchy nut and fruit center. It was adapted from the repertoire of renowned Sichuanese chef Chen Kenmin. (His son, Chen Ken’ichi, later gained fame as “Iron Chef Chinese” on the Japanese program “Iron Chef.”)
Homemade moon cakes are as different from store-bought as night and day, but few Chinese make their own anymore, perhaps because a good recipe has (at least until now) been hard to find.
Although the recipe may appear long, don’t be discouraged — it’s not difficult. And it produces moon cakes that are fresh, flavorful and not overly sweet, with caramel deepening the colors and aromas. Dark brown sugar and butter are used in the center instead of the usual white sugar and lard in this updated version, and both dried cranberries and green pumpkin seeds glitter like colorful sequins, adding gently tart and nutty touches to these beloved pastries. If you are interested in some other delectable fillings — such as red Chinese dates with toasted walnuts or red bean paste with steamed chestnuts — please follow the link here.
Fruit and Nut Moon Cakes – 五仁月餅 Wuren yuebing
Makes 10 large three-inch moon cakes, or about 30 one-inch mini moon cakes
Ingredients
For the caramel:
2½ cups powdered sugar
1 cup filtered water (divide in half)
3 tablespoons white rice vinegar or cider vinegar
For the fruit and nut filling:
1 heaping cup (about 25 large) dried red Chinese dates
1 cup filtered water
½ cup hulled pumpkin seeds
¼ cup dried cranberries, or golden raisins
¾ cup chopped toasted walnuts
½ cup toasted sesame seeds
½ cup sliced almonds
¼ cup Chinese rose-scented white liquor (Meiguilu), or vodka
2 tablespoons caramel (recipe above)
1½ tablespoons unsalted butter, softened
¼ cup dark brown sugar, packed
¼ teaspoon sea salt
1 tablespoon flour
1 tablespoon rice flour (Mochiko brand recommended)
For the pastry:
2⅔ cups regular white Asian flour (which has a lower gluten content)
¾ cup plus 1 tablespoon caramel (recipe above)
½ cup peanut or vegetable oil
Extra flour as needed
For the glaze:
1 egg yolk
2 teaspoons Chinese rose-scented white liquor (Meiguilu), or vodka
1 tablespoon caramel (recipe above)
Directions
1. To make the caramel, place the powdered sugar and ½ cup water in a steel pan (so that you can easily see the sugar change color). Bring the mixture to a boil over high heat, cover for a few minutes so that the steam washes down the sugar crystals, and then uncover. Add the vinegar and bring the pan back to a boil without stirring. Quickly boil the sugar syrup for about 10 minutes, until it starts to turn amber. When it is an even golden brown, lower the heat to medium-high and then add the rest of the water – be careful, as the caramel will boil furiously at this point, so direct the pan away from your face. As the boiling starts to simmer down, stir the caramel with a silicone spatula until the caramel is smooth. Pour the caramel into a heatproof measuring cup and let it cool to room temperature; you should have about 1¼ cups.
2. For the filling, cook the dates in the water until they are soft and the water has been absorbed. Remove the dates from the heat, and when cool enough to handle, pit them if they are not already pitted. Carefully chop them into a fine paste, using a knife so that you can remove any pits or shards that you come across. Place the date paste in a medium work bowl. Add the rest of the filling ingredients to the date paste and mix well. Divide it into 10 even mounds if you are making large moon cakes or 30 small mounds if you are making the mini cakes. (You may make the filling ahead of time and refrigerate it covered.)
3. To make the dough, place the flour in a medium work bowl. Make a well in the center and pour in the oil and caramel. Mix these together gently to form a very soft dough. Sprinkle about 2 tablespoons flour on a smooth work surface and roll the dough out into an even 20-inch rope; cut this into 10 pieces, each 2 inches wide. (If you are making the mini cakes, roll it into an even 15-inch rope and cut it into ½-inch pieces.) Roll each piece into a soft ball; cover the dough you are not immediately working on.
4. Heat the oven to 325 F; place a rack in the upper third of the oven to keep the bottoms of the pastries from burning; you will cook one sheet of pastries at a time. Line two cookie sheets with either Silpat or parchment paper. Mix together the glaze; have two pastry brushes, a thin spatula, your moon cake mold, and a pastry scraper ready. Dust the inside of your moon cake mold heavily with flour and knock out the excess.
5. Large moon cakes: Working on one pastry at a time, pat out one piece of dough into a 5- to 6-inch circle, making the center slightly mounded; place a portion of the filling in the center and wrap the dough around the filling. Lightly roll the now large ball between your palms so that the soft dough evenly covers the filling. Roll one side of the ball in some flour and then place the ball flour side down inside the moon cake mold. Press lightly but firmly on the ball so that it fills the mold. Then, turn the mold upside-down and whack it on your counter to release the pastry; it may take a few tries before it comes loose. Place the pastry on the prepare cookie sheet. Use one pastry brush to dust off any excess flour and use the other pastry brush to coat the moon cake all over with the glaze; repeat with the rest of the dough and filling until you have 10 moon cakes. Small moon cakes: Do the same thing as above, only roll the dough out into circles about 3 inches wide; the filling should be rolled into balls roughly 1 inch in diameter.
6. Bake the moon cakes until they are a golden brown, around 25 minutes for the small cakes and 35-40 minutes for the large ones. Cool the pastries completely and serve them cut in wedges, preferably with cups of hot tea.
Tips
– The best Chinese dates are found in herbal shops where the turnover is fast and the dried ingredients are at their best. Look for plump, shiny dates with no sign of insects or powder at the bottom of the bag.
– Chinese dates that are sold as “pitted” were done so by machines, so beware of the occasional pit or chips.
– The dough is best made by hand, as food processors and mixers will excite the gluten in the flour and make the pastry tough. And, both patting out the dough and rolling it between the hands softens the caramel in it so it becomes more malleable.
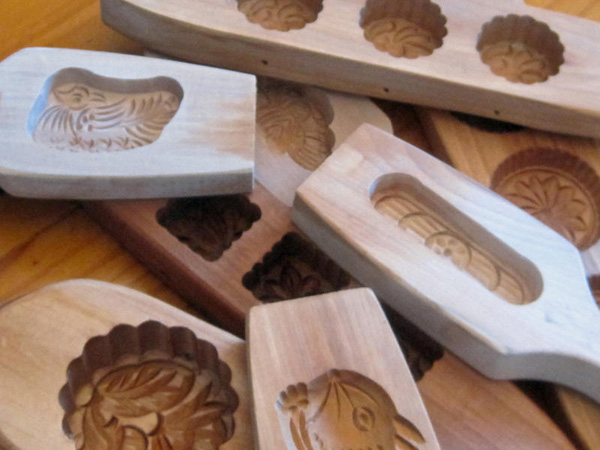
– If you don’t have such a mold (which can easily be found online or sometimes in Chinese housewares shops) you can use any other 3-inch cake mold, or even a plain cupcake mold to shape the pastries. (Note: true round moon cake molds are about 1¼ inches deep and 3 inches across, while the smaller molds with three 1-inch-square depressions can be used for mini moon cakes; shallower ones than that are used for making confections like green bean tea cakes, or lüdou gao.)
– Moon cake molds come in many sizes and shapes. You can make moon cakes in just about any that are deep enough to hold two layers of pastry plus a generous layer of filling, which means at least 1-inch deep. The larger round molds I use have a little over a half cup capacity, while the small square ones hold about two tablespoons.
– This pastry has a high sugar content, so to protect the bottoms of the moon cakes from burning before the pastries are completely cooked, place the racks in the upper third of your oven and use either double-thick sheets or two baking sheets placed on top each other for extra insulation.
– Store the cooled moon cakes in a covered container. They can be preserved for longer storage if packed in freezer bags and frozen.
Top photo: Brushing glaze onto the moon cakes. Credit: Carolyn Phillips

The Dragon Boat Festival is one of the three great traditional Chinese celebrations that have been honored for thousands of years, the others two being Mid-Autumn Festival and Chinese New Year.
Many reasons are given for this summer holiday, which falls on the fifth day of the fifth lunar month (on June 23 in 2012). The two most popular explanations are, first, that it commemorates the day that the poet and official Qu Yuan committed suicide and, second, that it is a festivity in honor of China’s national symbol, the dragon. Even today, those Chinese who are more traditionally minded say they are the descendants of dragons, for many of China’s most ancient gods had bodies that were at least partially dragon-like.
So, both reasons are plausible, both are buried in the mists of history, and both have their fervent adherents. Two customs have been handed down to us from these separate camps and are now vital parts of the day’s celebrations: dragon boat races and rice tamales. The dragon boat races seem self-explanatory, but the tamales do need a bit of help.
Qu Yuan (340 to 278 B.C.) served during the late Warring States period and killed himself in desperation after his king banished him and other loyal courtiers due to the evil influence of corrupt advisers. It is said that Qu committed ritual suicide by sinking into a river while holding a heavy rock; the commoners who heard of this valiant man’s sacrifice ran to the river’s edge and threw bundles of rice into the water so the fish would not touch his body. (Some say the dragon boat races came about from the people trying to save him.) They were too late, but the tradition lingered on through the centuries.
This practice of making tamales and racing boats continues today, a celebration of patriotism and dragons, of food and culture, of fun and sacrifice — all the puzzle parts that make up the world that is China.
Shanghai’s sweet rice tamales
滬式豆沙核桃粽
Hushi dousha hetao zong
Makes 16 small tamales
Ingredients
16 large dried bamboo leaves (zongye), plus a few extra just in case
1½ cups sweet round glutinous rice (Sho-chiku-bai brand recommended)
2 tablespoons roasted sesame oil
1 cup sweetened red bean paste, canned or homemade
½ teaspoon salt
½ cup chopped walnuts
Lots of cotton kitchen string
Boiling water
Directions
1. Soak the bamboo leaves in hot water until soft and green. Trim off about 1 inch from both ends, then wipe both sides of the leaves with a towel; cover the leaves to keep them moist. Place the rice in a strainer and rinse it under running water; drain.
2. Heat the sesame oil in a wok over medium-high heat until it begins to smell fragrant, and then add the bean paste, salt and walnuts. Stir-fry the bean paste to remove any canned taste and give it a nice creaminess. As soon as the bean paste is gently bubbling, scrape it into a small work bowl and let it cool to room temperature. Then, divide the bean paste into 16 pieces and roll each one into a little ball.
3. Bring about a gallon of water to boil in a 2-gallon pot while you are busy wrapping the tamales.
4. Fold a leaf as directed in the video, with the shiny side on the inside and a slight fold at the bottom to keep the rice from squirreling out. Use a spoon to place a scoop of the rice into the cone and place a bean paste ball on top. Scoop some more rice on top of the bean paste so it is completely covered.
5. When you fold the leaf ends over the cone, allow about a half-inch of slack in the fold so they are not tight. This will give the rice the chance to expand as it cooks and be light and fluffy. When you fold over the leaf ends onto the cone, shake the tamale a bit – you should hear a rattling noise, which means that you’ve wrapped it perfectly.
6. Give the tamale a bit of slack as you tie it up. The way to do this is to wrap the string around the tamale as gently as if you are tying a string around a baby’s wrist. Make the string hold the leaves flat against the tamale and keep the tamale in its desired shape, but don’t pull the string tight at any time.
7. To wrap the string Shanghai style, loop it lengthwise around the tamale a couple of times and then wrap it around the center in an even spiral. Tie the knot off and keep one string long so you can tie 6 to 8 tamales together.
8. When all the tamales have been filled and tied, lower them gently into the boiling water, cover the pot and boil them for about 5 minutes to set their shape. Then remove the cover, lower the heat to a simmer and cook the tamales for about 2 hours. Add more boiling water if needed to completely submerge the tamales, and check them at 15 minute intervals to make sure they don’t need more water.
9. Remove the tamales from the boiling water and drain. Eat them right away or cool down and store in a plastic bag in the refrigerator. To reheat, steam them until heated through.
Photo: Shanghai’s sweet rice tamales. Credit: Carolyn J. Phillips
One of the easiest, oldest and most appropriate dishes to make for New Year’s Eve celebrations is one that rarely pops into people’s minds. Besides being simple, zabaione is one of Italy’s most famous holiday desserts doable in our American kitchens. Also spelled “zabaglione,” it’s delicious foam of emulsified Marsala wine, egg yolks and sugar. It’s known as a spoon sweet.
Zabaione is old too and has an interesting history. All kinds of theories have been advanced about the origins of zabaione — that it comes from the Greeks, or the Latin word sabaium, a kind of yeast, or from the French word sabayon (actually the French derives from the Italian), or from the French expression chaud bouillon (hot bouillon), or that it was invented by a Franciscan monk, Pasquale de Baylon (1540-1592), who lived in the Parish of Saint Thomas in Turin at the time, or from the 17th-century chef of Carlo Emanuele I of Savoy.
More than likely zabaione is Sicilian in origin, derived from the Sicilian word zabbina (also called zarbinata and zabb, which refers to the foam of the whey resulting from the boiling of the milk for ricotta and means “to whip while cooking,” which is exactly what you do to make zabaione. Zabbina derives either from the Arabic words jabbān (jubna) meaning “cheese” or zarb, meaning the thick part of curdled sweet milk mixed with an acidic liquid, that is, according to the early 19th-century lexicographer G.W. Freytag, author of “Chrestomathia Arabica,” thought also to be the root of the custard dessert zabaione.
The first mention of something like this “creamy foam made from beating egg yolks with sugar and the addition of Marsala wine in a bain-marie” can be traced to the 15th century where it was called xabaione or zebaion. In Sardinia, the groom is often handed a bowl of zabaione to give him strength on his wedding night. Zabaglione was originally served hot, but today it is served cool. One last piece of advice: You’ll want to use a high quality Marsala, such as that made by Florio and not some cooking wine. Either dry or sweet Marsala can be used.
Zabaione
Serves 4
Ingredients
Directions
- Combine the egg yolks, sugar and Marsala in the top of a double boiler. In the bottom portion, bring enough water to touch the bottom of the top part to a boil over high heat, whisking the egg mixture swiftly all the while. Continue until well blended, thick and frothy, about 4 minutes after the water starts to boil. Remove from the heat immediately.
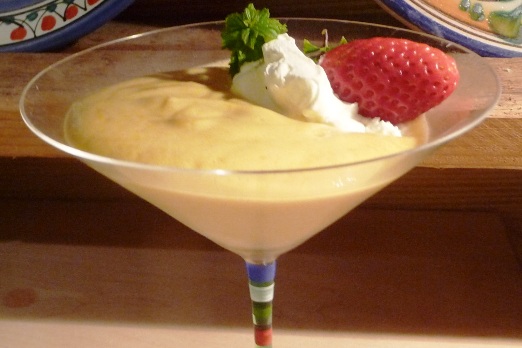
- Pour into 4 large wine glasses or, preferably, martini glasses, and place in the refrigerator for at least 4 hours covered with plastic wrap. Garnish with strawberries, mint leaves and whipped cream, if desired.
Zester Daily contributor Clifford A. Wright won the James Beard / KitchenAid Cookbook of the Year Award and the James Beard Award for the Best Writing on Food in 2000 for “A Mediterranean Feast.” His latest book is “Hot & Cheesy” (Wiley) about cooking with cheese.
Photo: Zabaione. Credit: Clifford A. Wright
Make no mistake — I love sweets. Yet, after several holidays spent gorging on candy, pies, cookies and cakes, my sweet tooth starts to develop a major toothache. Rather than abstain from desserts altogether, I reach for a tin of golden shortbread. Rich, delicate and only slightly sugary, this Scottish baked good is the perfect replacement for all those cloying treats.
A rich history
Shortbread dates to the Renaissance and the baking of crumbly cakes known as shortcakes. Like shortcakes, this small, pale cookie gets its fragile texture from the generous amount of butter used to make it. Both take their names from an antiquated definition of short, which refers to brittleness.
Although its exact birth date remains unknown, shortbread appeared in the first Scottish cookbook, which was published in 1736, “Mrs. McLintock’s Recipes for Cookery and Pastry-Work.” Since it was festive and easily transported, shortbread was often given as a gift, and came to be associated with the Christmas season and Scottish New Year’s Eve or Hogmanay. It later shrugged off its special, holidays-only status and became an integral part of everyday teas throughout Great Britain.
Everything is better with butter
Traditionally, shortbread derives its luscious taste simply from the inclusion of high-quality, unsalted butter. In fact, its original ingredient list consisted solely of three parts flour, two parts butter and one part sugar. The small amount of sugar and overall simplicity of the recipe no doubt influence why I think of shortbread as the ideal, not-too-sweet goody.
To enhance shortbread’s velvety yet fine nature, recipes customarily call for a mixture of flours. For softer cookies, plain wheat flour is combined with rice or corn flour in a ratio of 2:1 — two parts wheat, one part rice or corn flour. When crunchiness is the goal, semolina flour replaces the rice or corn. To give either type of cookie a light, melt-in-your-mouth aspect, the flours are sifted together.
The shape is up to you
Once the flour, butter and sugar have been combined, the dough is pressed into and baked in a round, carved, ceramic mold. After cooling slightly, it’s cut into wedges. That is the classic way to make shortbread.
However, you can also form the dough into a rounded or squared log and slice off individual cookies. When I make shortbread in this manner, I prick the cookies’ tops with the tines of a fork to add a bit of decoration. Then bake the rounds or squares on a baking sheet.
Sometimes I opt to press the dough into a square baking dish, decorate the top with sugar, dried fruit or chopped nuts and bake it as a block. After allowing it to cool for 30 minutes, I slice the shortbread into squares or slender sticks. These cookies can then be dipped in melted chocolate or served as is.
The variations don’t end with cookie shape or ovenware. There are the vast flavorings to consider. I could take a tip from history and season my cookies with salt as Queen Victoria’s Balmoral shortbread recipe did, or I could copy the bakers of the 19th century and include ground coriander and whole caraway seeds.
If historical recipes leave me uninspired, I could follow the regional route. Pitcaithly bannock, which hails from Pitcaithly, Scotland, is enhanced with blanched almonds and candied citron and/or orange peel, while Dorset shortbread is made with light brown, raw sugar known as demerara.
Because shortbread marries nicely with a diverse range of foods, you can flavor it with anything from almonds or anise to toffee or thyme. Herbs, cheeses and nuts all compliment its rich wholesomeness. Sweet ingredients such as dried berries and chocolate likewise boost its buttery taste. Truly, the only limit to good shortbread is your imagination.
When sealed in an airtight container, the cookie will keep for four weeks. However, with something as tasty as shortbread in my house, it never lingers long enough to reach that use-by date.
Almond Shortbread
Makes 1 dozen cookies
Ingredients
Directions
- Preheat the oven to 350 F. Grease an 8-inch-square baking dish.
- In a food processor or blender, pulse ¼ cup of the blanched almonds and 1 teaspoon of sugar until finely ground. Sift the ground almonds into the flour.
- Using an electric mixer and in a large bowl, beat the butter until soft and creamy. Add the sugar and beat again until fluffy. Add the almond extract and blend until incorporated.
- With a spatula, mix in the flour until just combined. Don’t overmix the ingredients or else you’ll end up with a tough cookie.
- Press the dough evenly in the greased baking dish. Spread the remaining ¼ cup chopped almonds over the top of the dough and press lightly on top to set. Bake until golden on top, 15 to 18 minutes.
- Place the baking dish on a wire rack and cool for 30 minutes. Cut the shortbread into 12 squares, remove the squares from the baking dish and place on the wire rack. When the shortbread has completely cooled, either serve or place in an airtight container for up to 4 weeks.
Zester Daily contributor Kathy Hunt is a syndicated food writer whose work has appeared in the Chicago Tribune, Los Angeles Times, Baltimore Sun and VegNews, among other publications. She currently is working on her first cookbook.
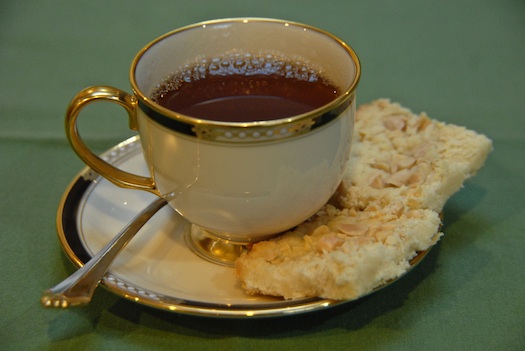
Top photo: Homemade shortbread. Credit: Kathy Hunt