Articles in Desserts

Was there pumpkin pie at that first legendary Thanksgiving? My bet is there was.
You will recall from grade school that the first grand feed was held in Plymouth, Mass., in 1621 by the Pilgrims to mark their first harvest — and the fact they were alive. This was something to celebrate, given that 50% of their compatriots didn’t make it through the first year. We know they the feast lasted more than three days, but exactly what was on the menu remains a bit of a mystery.
The English being English, the reports of the event mention only the meat. We know they invited about 90 Wampanoag who brought plenty of venison, and the Englishmen managed to bag a week’s worth of unnamed game birds, so there’s a pretty good chance wild turkeys were among them. As far as cranberry sauce and mashed potatoes, marshmallow-topped yams and Campbell’s green bean casserole, or even pie, the record is silent. We know they had no potatoes, marshmallows or Campbell’s soup.
More from Zester Daily:
» Yes, it’s gluten free: Have this pie and eat the crust too
But there’s a semi-decent chance they might have sent the kids into the cranberry bogs to pick the autumn fruit and stewed some sort of condiment out it. After all, this sort of thing was popular enough in England at the time. And they probably did have pie, an English staple if ever there were one, though apple pie would have been out of the question — not because they wouldn’t have been familiar with it. Apple pie is mentioned as early as the 14th century, and the cookbooks familiar to the Puritans included plenty of apple pie recipes. The trouble was, any apple trees in Massachusetts would have been no more than seedlings.
What were the other options? Back across the Atlantic, pie shells — or “coffins,” as they were known — could be filled with just about anything: pigeons, mutton haunches, minced meat, baby pigs, rabbits. For a lark, four and twenty live blackbirds might be tucked away in a pie crust and released at the dinner table. Fruit and vegetables were popular fillings as well, often sweetened, but not always. Pumpkins, or pompions, as they were called, had taken up root in England long before the Mayflower sailed and consequently pumpkin pie recipes showed up early, though not in a form the test kitchens at Libby’s would recognize. John Gerard recommended baking them sliced with apples in the 1590s. Hannah Woolley’s popular 17th-century culinary guide, “A Gentlewoman’s Companion,” described a “pompion pye” made by sautéing pumpkin pieces with thyme, rosemary, marjoram, cinnamon, nutmeg, cloves and pepper. These are mixed with eggs and sugar and layered in the pie shell with apples and currants. To serve the pie, you lift off the lid, stir the pumpkin to a purée and replace the lid.
Apparently, there were parts of England where pumpkins were cultivated specifically for a custardy apple pumpkin pie. It’s reasonable to surmise that early New England settlers made something similar but with just pumpkins. Maybe pompion pye, made of familiar native squash, was one of the exotic European preparations the Wampanoag guests got to taste in 1621.
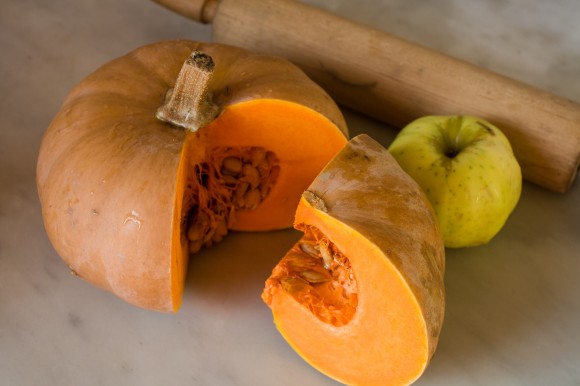
Inside the pumpkins. Credit: Michael Krondl
Certainly the kind of smooth pumpkin custard-filled pie we’re familiar with became commonplace in New England. Amelia Simmons’ “American Cookery” from 1796 has a couple of recipes for it as well as a variant made with apples mixed with squash. All these are based on old-world models, on pies filled with a sweet purée of potatoes, chestnuts, quinces or even African yams. The main difference: In the king’s English, these were called “baked puddings”; in America they eventually came to be “pies.”
No Libby’s for this apple pumpkin pie
Compared to 100 or more years ago, today’s cook is presented with both advantages and impediments to making a decent pumpkin pie. Canned pumpkin is ubiquitous, almost all of it made by Libby’s, from a pumpkin variety called Dickinson that resembles a giant, tan football. Finding your own cooking pumpkin, however, isn’t always easy.

Pumpkins for pie. Michael Krondl
There are plenty of those big, happy, orange pumpkins, but they are intended for carving jack-o’-lanterns, not eating. Their flesh is scrawny, insipid and altogether useless for pie, or any other culinary effect. Like the Libby’s variety, cooking pumpkins tend to be the color of butternut squash, with a thick layer of orange flesh. The so-called cheese pumpkin is one kind that can be found at farmers markets this time of year. But even these, you can’t just roast and use. To get the desired density for a custard-type pumpkin pie, the roasted pumpkin flesh needs to be lightly puréed (a food processor or food mill will do the job) and then drained. The easiest way to do this is to line a large sieve or colander with a coffee filter. After two or three hours, the consistency will approximate what comes from a Libby’s can.
Is it worth the effort? That’s not the sort of question a Puritan would ask.
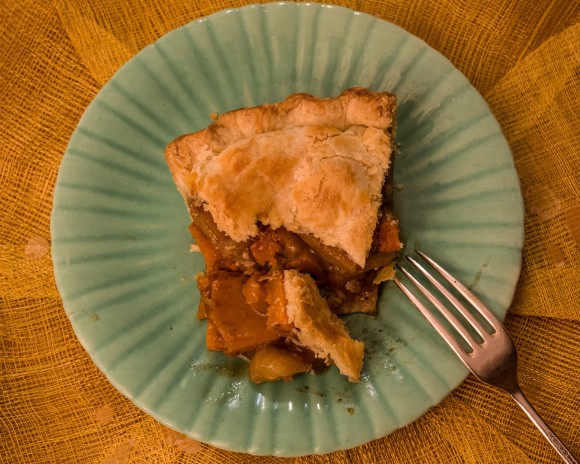
Apple Pumpkin Pie slice. Credit: Michael Krondl
Apple Pumpkin Pie
Adapted from “The Great Little Pumpkin Cookbook”
Prep time: about 1/2 hour
Cook time: about 1 hour
Total time: 1 1/2 hours plus time needed to make pastry
Yield: 8 to 10 servings
While this doesn’t exactly reproduce the consistency of the old British custardy pumpkin apple pies, it is a tasty departure from the usual autumn staples. If a cooking pumpkin isn’t available, a butternut squash will serve the same purpose.
1 recipe double crust pie pastry (recipe follows)
1 1/2 pounds cooking pumpkin or butternut squash
1 pound firm cooking apples such as Northern Spy, Baldwin or golden delicious
2 tablespoons cider vinegar
3 tablespoons flour
3/4 cup dark brown sugar
1/2 teaspoon cinnamon
Large pinch nutmeg
Large pinch cloves
1 egg, lightly beaten
Directions
1. Roll out half of the pastry for a bottom crust and place in a 9-inch pie pan. Refrigerate.
2. Preheat oven to 425 F.
3. Scoop out the pumpkin seeds, cut the pumpkin into 1-inch strips, cut away the peel and slice the strips into 1/8-inch thick pieces. (You should have 4 cups.)
4. Peel, quarter and core the apples. Cut into 1/4-inch slices.
5. In a large bowl, toss the pumpkin with the apples, vinegar, flour, brown sugar, cinnamon, nutmeg and cloves. Arrange in the pastry-lined pie pan.
6. Brush the edge of the dough with the beaten egg.
7. Roll out the remaining dough and place on top of the filling. Crimp the edges. Cut vent holes in the top crust and brush the top with the egg.
8. Set on the bottom shelf of the oven. Bake 20 minutes. Lower temperature to 350 F. Continue baking until golden brown and the pumpkin offers no resistance to a knife or skewer, about 1 more hour.
9. Cool at least 2 hours before serving. Serve at room temperature or slightly warm.
Double Crust Pie Pastry
Prep time: 10 minutes
Total time: 10 minutes plus 2 or more hours of chilling
Yield: Makes enough dough for 1 double crust or 2 single crust pies.
Ingredients
2 1/3 cups all-purpose flour
1/2 teaspoon salt
8 tablespoons unsalted butter, cut into small pieces
6 tablespoons lard or vegetable shortening
about 1/3 cup ice water
Directions
1. Sift together the flour, and salt. Add the butter and shortening. Using your hands or a pastry cutter, break up the two fats in the flour until the mixture is about as fine as rolled oats.
2. Add just enough water to moisten the flour. Toss to form a rather dry dough. Do not overmix. Gather the dough together and wrap in plastic film. Refrigerate at least 2 hours.
Note: The dough may be made ahead and refrigerated for up to 3 days or frozen for several months.
Main photo: Apple Pumpkin Pie. Credit: Michael Krondl

Yes, It’s Gluten Free: Have This Pie And Eat the Crust Too
by: Martha Rose Shulman
in: Holidays w/recipe
For years my sister, who cannot tolerate gluten, has foregone stuffing at Thanksgiving, and carefully scraped her pumpkin pie filling away from the crust. But I’ve been working on gluten-free pie crusts, and now I can accommodate her.
I’ve played around with several of my own gluten-free combinations and have a couple that I like a lot, but they are tricky to roll out. So I looked around this year for commercial gluten-free flour mixes and found a couple that worked for me. My goal was to find a flour that I could substitute for wheat flour in the pie crust formulas that I use regularly for my pies and tarts.
More from Zester Daily:
» Make your own gluten-free pie crust mix
I made both pâte sucrée (sweet dough) and flakier pâte brisée using two different gluten-free flour mixes, Bob’s Red Mill Gluten Free Pie Crust and King Arthur Gluten Free Multipurpose Flour. I liked the results, for both crusts and flours (although I did not use the formula on the Bob’s package for the crust so can’t vouch for that). Note that the Bob’s Red Mill Gluten Free Pie Crust is not their gluten-free flour product; that product contains fava bean flour and definitely won’t taste right in pie crust (I’ve tried). I have adapted Jacquy Pfeiffer’s pâte sucrée and pâte brisée recipes for these gluten-free versions.
For Thanksgiving pies like pumpkin and pecan, I use the pâte brisée most often because it is less sweet and goes better with these traditional fillings. But for fruit tarts — say if you are making an apple pie — the pâte sucrée is a great choice.
I can’t overemphasize the importance of weighing (in grams) rather than measuring for pastry. I consistently found that the gluten-free flour mixes had a much smaller volume to weight ratio than regular flour, which on average (depending on weather, how long it has been stored, how much it has been aerated) measures about 1 cup per 120 to 125 grams. But the gluten-free weighed more per cup, about 150 grams. The recipes will work best if you weigh.
Gluten-Free Pâte Brisée
Prep time: Ideally, 2 to 3 days total, but only 20 minutes active work
Cook time: 30 to 35 minutes
Total time: 55 minutes – 3 days
Yield: Two 9-inch crusts
This is a flaky pastry with just a small amount of sugar. You can also use it for savory tarts; just leave out the sugar. You will have a more accurate and consistent outcome if you use a scale and the gram weights rather than a measuring cup.
Ingredients
222 grams (8 ounces) unsalted French style butter, such as Plugrà (82% fat), at room temperature, plus a very small amount for the pans
6 grams (approximately 3/4 teaspoon) salt
30 grams (approximately 2 tablespoons) sugar
375 grams (approximately 2 1/2 cups) gluten-free flour mix or pie crust mix, preferably Bob’s Red Mill Gluten Free Pie Crust mix or King Arthur Gluten Free Multipurpose flour, sifted
80 to 92 grams (6 to 7 tablespoons) water, as needed
Directions
1. Place soft butter, salt and sugar in the bowl of a standing mixer and mix on low speed for 1 minute. Add flour and mix on low speed just until ingredients come together. Add 6 tablespoons of the water and mix only the dough comes together. If it does not come together right away, add remaining water. Do not over mix.
2. Scrape mixture out on a sheet of plastic wrap and flatten it into a square. Wrap well and refrigerate overnight.
3. The following day, remove dough from refrigerator, weigh and divide into two equal pieces. Refrigerate one piece while you roll out the other.
4. Very lightly, butter a 9-inch pie dish or tart pan. You should not be able to see any butter on the dish. Roll out the dough – it is easiest to do this on a Silpat — and line the pie dish or tart pan. Ease the dough into the bottom edges of the pan and crimp the top edge. Pierce the bottom in several places with a fork and refrigerate uncovered for several hours or overnight. If freezing, refrigerate for 1 hour, then double wrap in plastic wrap, then in foil. Label, date, and freeze. (Roll out and freeze the other half of the dough if not using).
5. To pre-bake pie crust, heat oven to 325 F. Line crust with parchment and fill with pie weights. Place on a baking sheet and place in the oven for 15 minutes.
6. Remove from oven and carefully remove parchment and pie weights. Return to oven and bake 15 to 20 minutes, until lightly browned and dry.
7. Remove from oven and allow to cool completely.
Gluten-Free Sweet Tart Dough
Prep time: Ideally, 2 to 3 days total, but only 20 minutes active work
Cook time: 30 to 35 minutes
Total time: 55 minutes – 3 days
Yield: Two 9-inch crusts
Essentially a pâte sucrée, this dough should remain cold when you roll it out. Ideally, you should give it another overnight rest once rolled out, uncovered in the refrigerator, so that the pastry dries out even more. If you don’t have the extra day, give it at least an hour.
Ingredients
168 grams (6 ounces) unsalted French style butter, such as Plugrà (82 percent fat) at room temperature, plus a very small amount for the pans
1 gram (approximately 1/4 teaspoon) fine sea salt
112 grams / approximately 1 cup confectioners’ sugar, sifted
39 grams / approximately 1/3 rounded cup skinless almond flour, sifted
7 grams / 1 1/2 teaspoons vanilla extract
63 grams / approximately 1 extra-large egg plus 1 to 2 teaspoons beaten egg
315 grams / approximately 2 cups plus 1 1/2 tablespoons gluten free flour mix or pie crust mix, preferably Bob’s Red Mill Gluten Free Pie Crust mix or King Arthur Gluten Free Multipurpose flour, sifted
Directions
1. In a standing mixer fitted with paddle attachment, or in a bowl with a rubber spatula, cream butter and sea salt on medium speed for about 1 minute. Scrape down sides of bowl and paddle with rubber spatula and add confectioners’ sugar. Combine with butter at low speed. Once incorporated, scrape down bowl and paddle. Add almond flour and vanilla extract and combine at low speed.
2. Gradually add egg and 1/4 of cake flour. Beat at low speed until just incorporated. Stop machine and scrape down bowl and paddle. Gradually add remaining flour and mix just until dough comes together. Stop machine from time to time and scrape crumbly mixture that separates from dough on sides and bottom of bowl, then restart machine to incorporate into dough. Do not overbeat. Dough will be soft to the touch.
3. Cut a large piece of plastic and scrape dough out of bowl onto plastic. Gently press into a 1/2-inch thick rectangle. Double-wrap airtight in plastic and refrigerate overnight or for at least 3 hours.
4. The following day, remove dough from refrigerator, weigh and divide into 2 equal pieces. Refrigerate one piece while you roll out the other.
5. Very lightly butter a 9-inch pie dish or tart pan. You should not be able to see any butter on the dish. Roll out the dough — it is easiest to do this on a Silpat — and line the pie dish or tart pan. Ease the dough into the bottom edges of the pan and crimp the top edge. Pierce the bottom in several places with a fork and refrigerate uncovered for several hours or overnight. If freezing, refrigerate for 1 hour, then double wrap in plastic wrap, then in foil. Label, date, and freeze. (Roll out and freeze the other half of the dough if not using).
6. To pre-bake pie crust, heat oven to 325 F. Line crust with parchment and fill with pie weights. Place on a baking sheet and place in the oven for 15 minutes. Remove from oven and carefully remove parchment and pie weights. Return to oven and bake 15 to 20 minutes, until lightly browned and dry. Remove from oven and allow to cool completely.
Main photo: Pecan pie with gluten-free pâte brisée. Credit: Martha Rose Shulman

Despite the myths that get bandied around about what was served at the first Thanksgiving, the only report we have, from Pilgrim chronicler Edward Winslow, says simply that the Wampanoag contributed five deer. The claim that there was turkey on that day is pure speculation. As for dessert, we might speculate on that, too. We can guess from the letters of settlers such as William Horton that they found ways to work with the “great store of fruits” they discovered (“Chronicles of the Pilgrim Fathers,” Alexander Young). Since the British have long had a love affair with the apple, they no doubt made use of the many species that grew wild here.
More from Zester Daily:
» Secret to apple crisp will spare you from a frantic holiday
American history meets Italian tradition
The proverbial turkey feast with all the trimmings persists, even in households like the one I grew up in, where Italian cooking prevailed every other day of the year. The immigrants weren’t newcomers to thanksgivings. To all peoples with peasant traditions, the autumn feast is a familiar ritual. You could call ours a fusion Thanksgiving. The bird was dressed with bread-and-pork sausage stuffing; the pureed sweet potatoes were baked under a buttery, sweet walnut crust; and fennel bubbled in a béchamel-and-parmigiano gratin. No Thanksgiving ever began without garlicky stuffed mushrooms and the perfunctory antipasto platter, and there was always pumpkin pie for dessert — made from fresh zucca, of course.
I added my own rituals when I began cooking for myself. In the spirit of the harvest the early settlers enjoyed, apples are always on the table in one form or other. This year, they will be stuffed with amaretti, the delicious almond cookies of Lombardy. The dish hearkens back to my life in Italy, where I learned to stuff peaches with crushed amaretti for baking — a summer recipe of the Piedmont. In the autumn, I must substitute apples, with no regrets.
Choosing the right apples
Apples have as much a practical as a symbolic meaning for me. It seems a pity not to include them when they are so fresh and juicy in their season, especially now that there are such magnificent apples in the farmers markets. Besides, what fruit is associated as much as the apple with fertility, the underlying invocation behind all harvest celebrations?
Step1
These baked apples offer an alternative for guests who don’t like pumpkin pie (there have been more than a few of them at my Thanksgiving table over the years). Topped with good vanilla ice cream or thick cream in the English fashion, they are unbeatable comfort food on Thanksgiving or at any other time of the apple season to follow roast turkey, ham or game of any kind.
Granted, they are best made with the proper variety for the purpose — and disappointing with those that are unsuitable. Proper baking apples will keep their shape and juiciness during cooking. Apples that are richly flavored and perfectly wonderful for eating may disintegrate in the oven and burst into a froth; some turn mealy and tasteless or just don’t soften during baking. I have experimented with numerous varieties and found the most success with Fujis, Romes, Braeburns, Macouns and Northern Spies that are neither too large nor too small. As for the amaretti, no purchased cookies beat Lazzaroni Amaretti di Saronno for flavor. You can buy them at any food specialty store nowadays. Alternatively, use another good-quality almond cookie or substitute dry almond biscotti.
One of the best things about these baked apples is that they taste better made a day or two ahead, so that the flesh of the fruit has time to absorb the flavors of the filling. Just reheat at 400 F for 10 to 12 minutes before serving.
Experimenting with different varieties of baking apples: here, Macoun, Braeburn and Rome. Credit: @Nathan Hoyt
Baked Apples With Amaretti Filling
Prep time: 30 minutes
Cooking time: 45 to 60 minutes
Total time: 1 ¼ to 1 ½ hours
Yield: 6 individual portions
Ingredients
6 tablespoons white sugar, divided
6 ounces amaretti, crushed into coarse crumbs
1 tablespoon chopped candied orange peel, or substitute the zest of 1 orange
6 medium (8 to 9 ounces each) Fuji, Rome, Braeburn, Macoun or Northern Spies apples
Juice of half a lemon
4 tablespoons melted unsalted butter
Vanilla ice cream or Devon cream for serving
Directions
1. Preheat oven to 350 F. Select a shallow, flame-proof baking pan on which the apples will fit without crowding. Sprinkle 1 tablespoon of the sugar across the bottom of the pan.
2. In a small bowl, combine the amaretti crumbs and candied orange rind or orange zest; set aside.
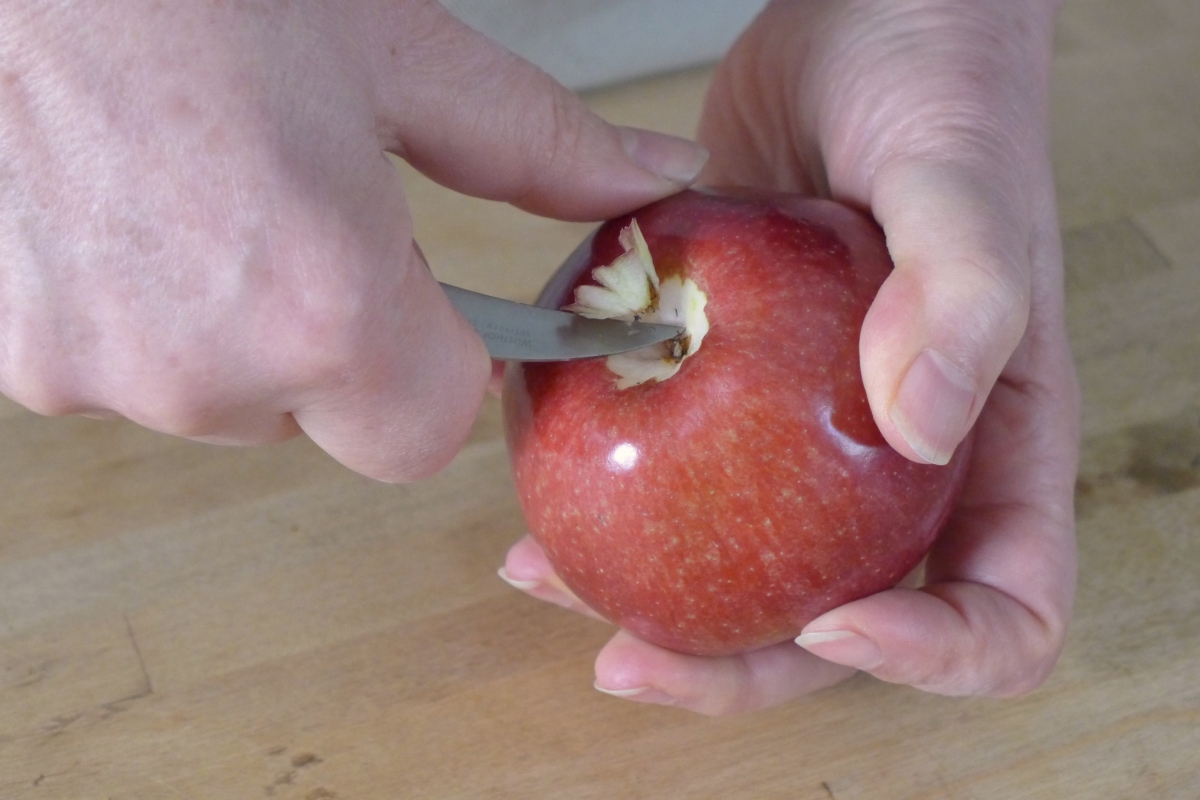
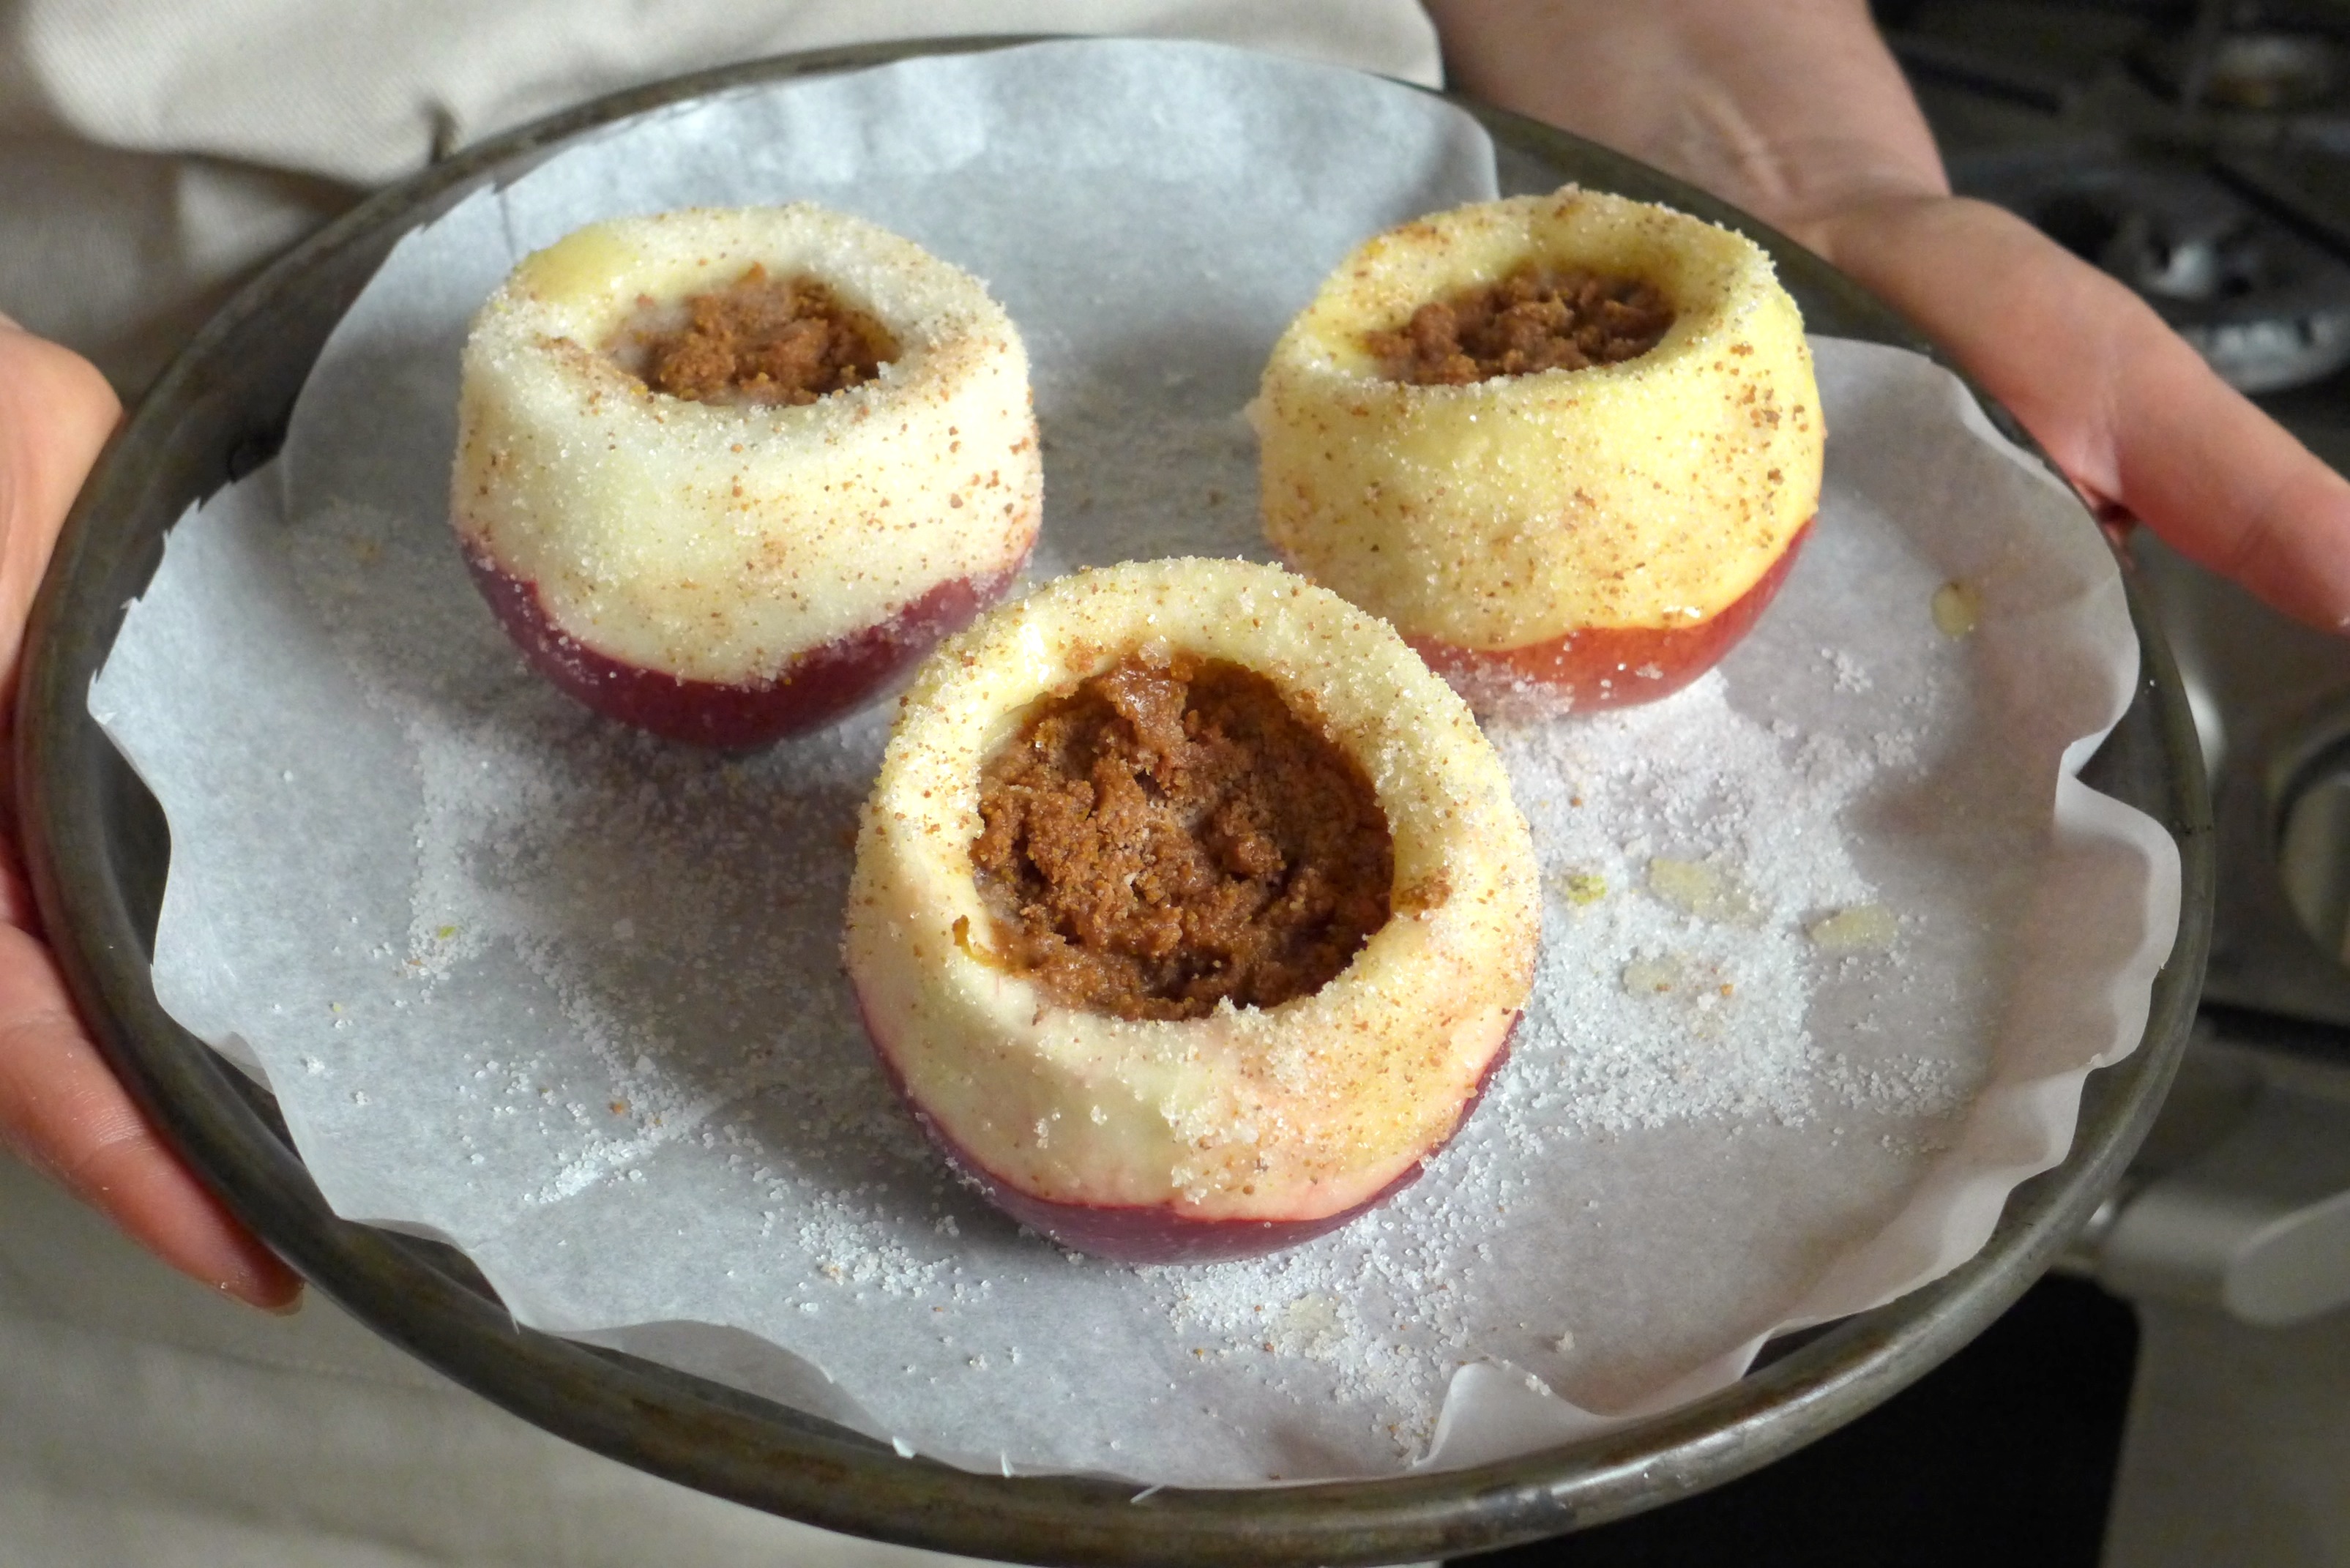
3. Prepare the apples (see step-by-step photos below). With a paring knife, trim off the hairy blossom end at the bottom of each apple. Preferably using a melon baller, core the apples, working from the stem down to carve out an ample stuffing cavity without puncturing the bottom. Brush the flesh inside and out with lemon juice as you work to prevent it from turning brown. With a paring knife, peel the skin off halfway down, leaving the skin on the bottom halves intact. Enlarge the opening at the top to show more stuffing, if you like. When all the apples are prepared, brush each with some of the melted butter and immediately roll the top of each apple in some of the remaining sugar to coat.
4. Transfer the apples to the baking pan. Spoon the filling into each cavity and scatter some on top. Sprinkle any remaining sugar over all, and dribble the remining butter on top of the filling.
5. Place the apples on the center rack of the oven. Bake until they are soft but not collapsed and the juices bubbly, 45 minutes to 1 hour (cooking time varies depending on the apple size and variety).
6. Remove the pan from the oven and turn on the broiler. Slide the apples about 2 inches under the broiler flame until the tops caramelize nicely, 1 to 2 minutes, watching them carefully to prevent burning.
7. Serve warm with vanilla ice cream or heavy cream.
Main photo: Baked apples with amaretti filling. Credit: © Nathan Hoyt

What moistens the lip and what brightens the eye, What calls back the past, like the rich Pumpkin pie? — John Greenleaf Whittier, “The Pumpkin,” 1850
Scottish and Irish immigrants brought many Celtic Halloween traditions with them to the United States, including that of carving jack-o’-lanterns. But the pumpkin they embraced for the practice is a true American.
More from Zester Daily:
Tracing its long family tree back to at least 3000 B.C., the pumpkin and other squashes probably originated in the Tamaulipas mountains in Mexico. One of the Three Sisters — along with climbing beans and corn — pumpkins formed a major part of the diet of early Americans. By 1000 B.C., the pumpkin arrived in what is today the United States. And by the time the English settled in Jamestown, Va., in 1607, Native Americans had developed sophisticated recipes and uses for the pumpkin.
A popular recipe was a type of pudding sweetened with maple sugar, similar in spirit to English puddings. Nowadays, pumpkins strut their stuff in pies, not unlike those baked by my English ancestors. Long a symbol of autumn in the United States, pumpkins now see the light of day primarily for ornamental reasons. Ninety percent of pumpkins end up carved into jack‑o’‑lanterns, and the rest make their way into cans as pumpkin-pie filling or puree. Every grocery store stocks pumpkins, piled in heaps at the entrance.
Seeing all those pumpkins whets my appetite. So, I just baked my first pumpkin pie of the season.
Canned pumpkin puree confession
Yes, I confess: I used to follow the recipe on the label of the Libby’s can of pumpkin puree. To show you that I don’t slavishly follow recipes, I added a ¼ teaspoon of vanilla and heaping spoonfuls of all the spices, as well as a big hit of freshly grated nutmeg. Sometimes, I used cream instead of evaporated milk, an ingredient actually not out of line because many vintage cookbooks of the 19th century mention using cream or a mixture of cream and milk.
And, yes, I know that making your own puree is far more earth-friendly. I’m all for that. But since I cannot find those nice little sugar pumpkins and other types for sale right now, I use the “traditional” method, as I know it. My mother never used anything but Libby’s. But I am sure my grandmothers struggled with the food-mill method of creating puree from boiled or roasted pumpkin.
Regardless of the method, some things don’t change when it comes to pumpkin pies. First of all, the aroma. It fills the house as the pie is baking, and that brings back all sorts of memories. School days, leaf forts, decorating the front porch for trick-or-treaters, choosing the candy to give out at Halloween.
And the smell of cinnamon. I don’t know about you, but I nearly swoon when I catch a whiff of Saigon cinnamon. I try to restrain myself and not dump too much into the custard mix. The rich aroma of freshly grated nutmeg pumps up the flavor of the pie, too, not to mention that of cloves and ginger. The medieval overlay of these spices causes me to think about the ties to my cultural past. Because of that, for me, autumn signifies the aroma of these spices.
Hearkening back to pumpkin pies past
I’m intrigued by the fact that I’m standing in my kitchen in Virginia — one of the first areas settled by English men and women from 17th-century England, some my own ancestors — and I’m baking a dish based on flavors and techniques dating back to those days. Baked puddings abound in traditional English cooking. Yes, pumpkin pie is basically a baked pudding, even though it goes by the name “custard pie” these days and wears a crust.
Take a look at Mary Randolph’s “Pumpkin Pudding,” a very English and yet very American recipe, from her 1824 cookbook, “The Virginia Housewife”:
Stew a fine sweet pumpkin till soft and dry, rub it through a sieve, mix with the pulp six eggs quite light, a quarter of a pound of butter, half a pint of new milk, some pounded ginger and nutmeg, a wine glass of brandy, and sugar to your taste. Should it be too liquid, stew it a little dryer; put a paste [crust] round the edges and the bottom of a shallow dish or plate, pour in the mixture, cut some thin bits of paste, twist them and lay them across the top and bake nicely.
Pumpkin pie is not only for dessert any more, either. I find pumpkin pie a great breakfast food, just as many people did in the past.
I’ll probably make another pumpkin pie very soon. For some reason, I see only a small sliver left in the pie pan.
Pumpkin Pie
Yield: 1 (9-inch) pie
Ingredients
For the crust:
1 partially baked 9-inch pie crust
Dry beans (for shaping the pie crust)
For the filling:
1 (15-ounce) can pumpkin puree
1 heaping teaspoon ground cinnamon
½ heaping teaspoon ground ginger
¼ heaping teaspoon ground cloves
⅛ teaspoon freshly grated nutmeg
½ cup granulated sugar
¼ cup brown sugar
3 large eggs
1 (12-ounce) can evaporated milk or 1½ cups heavy cream or whole milk
For the garnish
Whipped cream
Ingredients
For the partially baked crust:
1. Preheat oven to 400 F.
2. Arrange the dough in the pie pan, crimping the edges, pressing down slightly to anchor the dough to the edges of the pie pan.
3. Place two sheets of aluminum foil, slightly overlapping, over the dough in the pan. Press down gently and make sure that the foil touches all the surfaces. Pour in enough dry beans to come to the edge of the pie pan. This allows the pie crust to retain its shape.
4. Bake 15 minutes with the beans. Then slowly remove the foil and beans by grabbing the corners of the foil and pull up and out. Bake the crust 5 more minutes.
5. Let cool almost completely on a rack.
For the filling:
1. Preheat the oven to 350 F.
2. Place all the ingredients in a large bowl, in the order given, whisking after each addition.
3. Pour into the partially baked pie shell.
4. Bake about 45 minutes or until a sharp knife inserted into center comes out clean. Check throughout the baking. If the edges of the crust get too dark, place a ring of foil over the exposed pie crust. At that point, the surface of the pie along the edges will have puffed up and cracked slightly.
5. Allow to cool. Serve with whipped cream garnish.
Main photo: Pumpkins. Credit: Cynthia Bertelsen

Pears and Rioja are a marriage made in Spanish heaven, but although the region of La Rioja is synonymous with wine and bull running (one ponders the connection), it also has another claim to fame. The small town of Rincón de Soto may be little more than a main plaza, modern town hall, church and railway line, but it is on the map of European culinary produce thanks to pears.
In the Rioja Baja, a gently terraced swath of fertile fields, orchards and plane trees with ever-dancing leaves, the famous vines take second place to pears, peaches, cherries, cauliflower, onions, sprouts and cardoons. The growing area is defined by a natural margin: the Ebro River that separates it from the mountains of Navarre to the north, and the craggy, Riojan hills, where a network of dinosaur footprints remains eerily well-preserved.
More from Zester Daily:
» Cold weather, hot dessert
» What Dickens missed: The wit and wisdom of watercress
» Secret to apple crisp will spare you from a frantic holiday
» Yeast breads a staple among European holiday foods
» Cocktail hour: Organic vodka with a touch of basil
Protected status for pears
Pears have been grown for centuries on the riverbanks. Over the years, many trees were abandoned, but the town’s success in gaining DOP (Protected Designation of Origin) status for the pears has been a big boost in maintaining the orchards.
At the annual Jornadas de Exaltacion or pear festival in late September, the pear cookery competition is always keenly contested. There is also a kids’ competition. As the tension mounts, everyone chomps on hot chorizo sausages on bread, and in the evening there are pears poached in Rioja. The party carries on into the wee hours. It’s a day, indeed, of exaltation.
In Spain, the preference is for large Conference pears, although connoisseurs favor the delicate flavor of the smaller Blanquilla.
In 1747, the latter was enjoyed at the court of Philip V, where it was described as “an exquisite fruit,” and the royal pastry cook recommended it for drying, confits or preserving in syrup. Sometimes known as a “water pear,” the Blanquilla is crisp, juicy and aromatic. As it ripens, the Blanquilla becomes highly perfumed and meltingly soft, and the bright lime-green skin takes on a reddish tinge.
Blanquilla vs. Conference pears
The Blanquilla, however, is more difficult to grow, and it nearly disappeared in the 1960s, as agriculture became more intensive. It was largely replaced by Conference pears, which have green-yellow, naturally russeted skins and buttery flesh. However, it’s the local geography and climate that give these highly prized Rincón pears their special balance of sweetness and acidity, as well as their keeping quality and texture that allows the fruit to hold up when cooked.
Pruning and picking of these varieties is still done by hand. The pears are delicate and easily bruised, and each one is picked with care. They must be held by the base and raised upward so the stalk snaps clean from the branch. The pears are placed into padded containers to avoid damage and transported within six hours of picking to one of the local packing stations, where teams of women pack them in perfect formation. Each one a swaddled infanta, each one a perfect taste of La Rioja.
olla
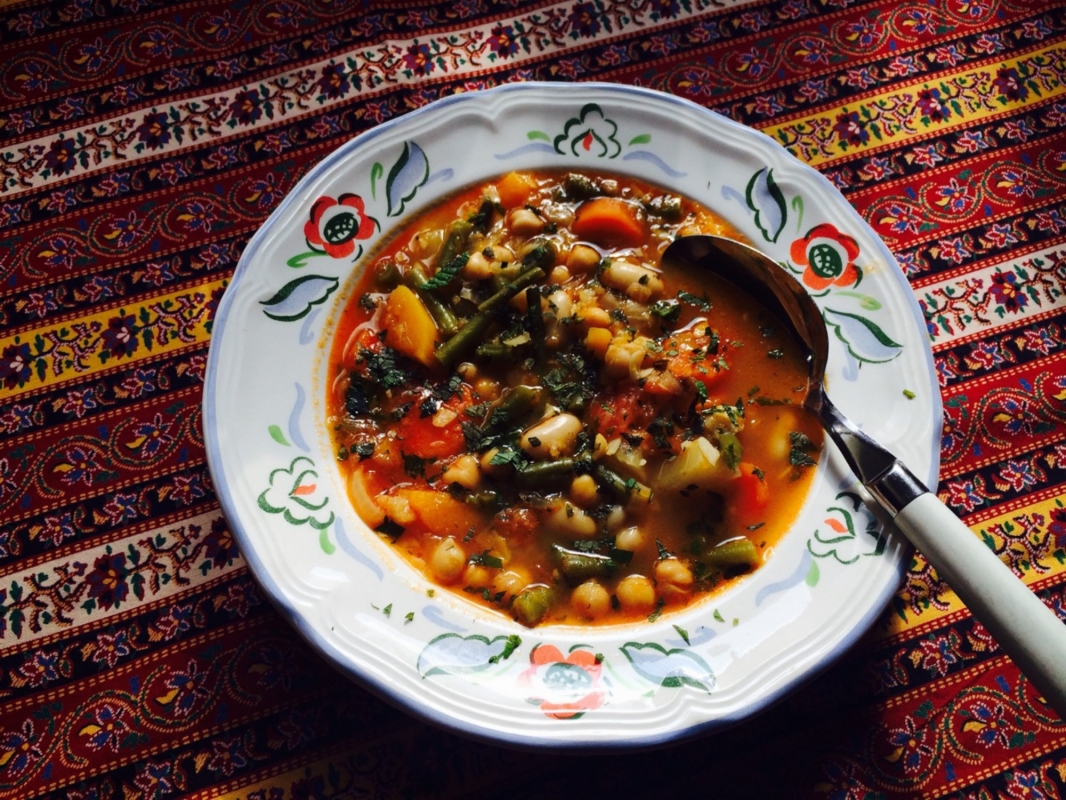
Olla Gitana
Olla means a tall, pot-bellied cooking pot, and this vibrant, autumnal stew probably originates with Roman travelers who arrived in Spain in the 1450s, settling mostly in Andalusia. A stew created for times when there was little meat for the pot, this dish is probably vegetarian more by default than choice. The vegetarian ethos has spread these days beyond the big cities, although in many a pueblo ham is still classed as a vegetable and they would probably regard this as a good dish to serve before a juicy lamb chop or veal escalope.
Prep Time: Overnight if you soak the beans; 30 minutes if you use canned beans.
Cook Time: 1 hour
Yield: 4 servings
Ingredients
1 cup dried chickpeas (or 2½ cups cooked chickpeas)
1 cup dried white beans (or 2½ cups cooked beans)
2 cups chopped green beans
1 butternut squash or small pumpkin, seeded, peeled and cubed
1 medium carrot, sliced
2 firm Conference pears, peeled, cored and chopped
2 bay leaves
4 cups vegetable stock
Salt and black pepper
1 large onion, diced
¼ cup olive oil
2 cloves of garlic, diced
One small slice of stale country bread, crust cut off and fried in oil
¼ cup toasted almonds
A pinch of saffron, lightly crushed and soaked in a little hot water
3 medium tomatoes, peeled and chopped
½ tablespoon pimentón de la Vera (smoked Spanish paprika)
Chopped, fresh mint
Directions
1. Soak the chickpeas and beans overnight. Drain and put into a pot with fresh water, bring to a boil. Simmer for about 30 minutes until soft. Drain, place in a large casserole.
2. Add the green beans, pumpkin, carrots, pears, bay leaves, stock, salt and pepper. Bring to a boil, then simmer for 15 to 20 minutes until everything is tender.
3. In a pan, fry the onion slowly in the oil for at least 15 minutes, until soft and golden.
4. Meanwhile, pound the garlic, bread, almonds, saffron and a pinch of salt in a mortar until well combined. Stir in a ladle of stock from the bean pot.
5. Add the tomatoes to the onion mixture, fry over medium heat for 5 minutes. Add the pimentón to the mixture, cook for another minute. Add the onion-and-tomato mixture to the bean pot.
6. Cook for about 5 minutes, then add the contents of the mortar to the pot. Simmer a little longer; add salt and pepper to taste. Sprinkle with mint, serve.
Duck Breast With Honey-Spiced Pears
The success of this dish depends on the delicate balance of sweet and savory flavors.
Prep Time: 10 minutes
Cooking Time: 30 minutes
Total Time: 40 minutes
Yield: 2 servings
Ingredients
2 duck breasts
A little olive oil
2 level tablespoons butter
¼ cup honey
3 cloves
1 tablespoon mixed peppercorns (white, green and pink)
1 cinnamon stick, snapped in half
2 ripe Conference pears, peeled, cored and halved or quartered
Juice of 1 lemon
Salt
Directions
1. Fry the duck breast in a little olive oil (15 to 20 minutes, depending on thickness and preference). Set duck breast aside to rest for 5 minutes; slice and arrange on serving plates.
2. Melt the butter in a small saucepan over medium heat, add the honey and spices. Cook gently for a few minutes, until the honey melts and starts to bubble.
3. Add the pears, turn gently in the butter mixture until the edges start to caramelize.
4. Add the lemon juice; salt to taste.
5. Remove the pears, arrange alongside the duck. Strain the sauce and drizzle over the duck.
Ham and Pear Parcels
Prep Time: 20 to 30 minutes
Yield: 4 to 6 parcels
Ingredients
½ cup plus 2 tablespoons of cream, curd or ricotta cheese
¼ cup blue cheese
1 small pear, peeled and diced
A few walnuts, chopped
Black pepper
6 to 8 slices of jamón serrano (cured Spanish ham)
Chive strands
Directions
1. Mash the soft cheese with the blue cheese.
2. Add the pear and walnuts to the cheese mixture, season with black pepper to taste.
3. Spread on slices of cured Spanish ham and roll into tubes. Tie decoratively with chives.
4. Use any surplus filling on crackers.
Pears Poached in Muscatel and Spices
Prep Time: 20 minutes
Cooking Time: 30 minutes
Total Time: 50 minutes
Yield: 4 servings
Ingredients
4 whole large (or 8 small), firm Conference pears, peeled
3¼ cups Moscatel wine
A few black peppercorns
3 cloves
Juice of 1 lemon
1 cinnamon stick, snapped in half
Toasted, slivered almonds (optional)
Directions
1. Place pears in a pan just large enough to allow them to remain upright.
2. Pour wine over the pears, add all the other ingredients except for the almonds.
3. Bring the ingredients to a boil; cover, simmer for 30 minutes or until tender.
Optional, serve sprinkled with almonds.
Rioja Pear Cake
Prep Time: 40 minutes
Cooking Time: 40 to 50 minutes
Total Time: 1 hour 20 minutes to 1 hour 30 minutes
Yield: 6 servings
Ingredients
8 firm Conference pears
Red Rioja wine, plus sugar and cinnamon to taste
1¾ sticks butter, softened
1 cup caster sugar, plus 1 tablespoon
4 medium eggs, separated
1 generous teaspoon vanilla extract
1½ cups self-rising flour
2 tablespoons chopped walnuts
Salt
Whipped cream
Directions
1. Preheat the oven to 350 F.
2. Peel and slice the pears. Place into a pan, add sugar and cinnamon to taste, and pour in enough wine to cover the fruit. Bring gently to a boil, reduce heat and lightly poach until tender. Drain the pears, saving the liquid. Set pears aside.
3. Cream the butter and sugar, beat in the yolks one by one; add the vanilla extract.
4. Add the flour, mix until well-combined.
5. Whisk the egg whites with a pinch of salt until snowy. Carefully fold them into the cake mixture. Pour into a buttered, 9-inch-round cake pan with a removable base.
6. Arrange the pears in a neat pattern over the top of the cake. Sprinkle with the nuts and a tablespoon of sugar. Bake for 40 to 50 minutes, until the top is well risen (although it will shrink back down), and a toothpick comes out clean.
7. Reduce the wine until it is syrupy, serve with the cake and whipped cream.
Main photo: Pears are the star of a festival in Rincón de Soto, Spain. Credit: Clarissa Hyman

Anybody who grows tomatoes during the summer reaches that fall day when the weather may have cooled (though not so far in this scorching September in Southern California), the tomato plants look brown, and it’s time to decide whether or not to pull them. They may still be sporting a fair amount of fruit, but that fruit stays green. Some may blush, but they will never be juicy, sweet, red summer tomatoes.
More from Zester Daily:
» Best of the season: apple-pumpkin pie
» Use up those cherry tomatoes
» Master the spontaneous frittata
This is the point at which I pull my browning plants, but not before harvesting the green tomatoes. I feast on the obvious: fried green tomatoes (I didn’t grow up with them, but I learned to love them during the 12 years I spent in Texas) and fried green tomato sandwiches. I even make green tomato relish and green tomato pickles like the ones I used to shun at the deli when I was a kid (I liked the dill pickles much better). But I also make the not-so-obvious: Mediterranean green tomato frittatas, pasta with green tomato pesto, and salads with green and red tomatoes that cry out for Russian dressing. One of my new favorite green tomato dishes is an amazing sweet tart. It’s an adaptation of a recipe in a cookbook by the late Bill Neal, who was renowned for his Southern cooking, and I will now be making it every fall as my tomatoes go from red to green.
Green tomatoes are not at all like red tomatoes, and they don’t resemble tomatillos, which have a much more pungent flavor and a different texture. They are hard, and they hold back their flavor until you cook them. Interestingly, their nutritional profile is not too different from ripe tomatoes, though they don’t have the antioxidant-rich lycopene present in red fruit.
Green Tomato Tart. Credit: Martha Rose Shulman
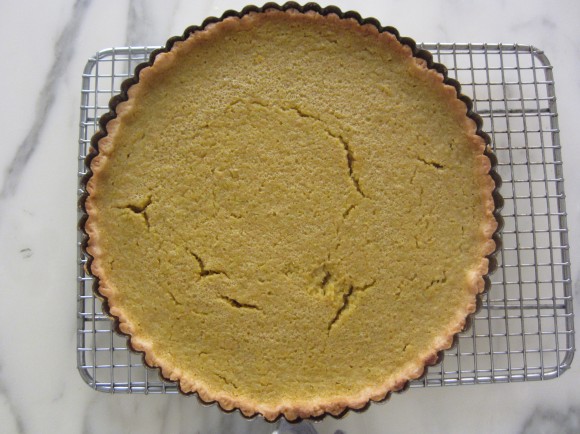
Sweet Green Tomato Tart
This is based on a recipe by the late Bill Neal, a great Southern cook and baker. It is an unbelievable tart, and somewhat mysterious: It tastes a bit like a lemon tart, but the green tomatoes contribute texture and body, as well as their own fruity flavor; then there are the spices that are reminiscent of pumpkin pie. The original recipe is sweeter than mine, though this is plenty sweet. Neal says to blanch and peel the green tomatoes, but I found that they were very difficult to peel, so I didn’t. The peels don’t get in the way.
Prep time: 15 minutes
Baking time: 30 minutes
Total time: 45 minutes
Yield: 9-inch tart, 8 servings
Ingredients
9-inch sweet pastry, fully baked
1 pound (450 grams) firm green tomatoes
3/4 cup (165 grams) organic sugar
2 tablespoons (20 grams) flour
1/2 teaspoon (1 gram) ground ginger
1/2 teaspoon (1 gram) ground cinnamon
1/8 teaspoon (pinch) salt
2 eggs, beaten
2 tablespoons fresh lemon juice
Finely grated zest of 1 lemon
Directions
- Preheat the oven to 350F. Set the tart shell on a baking sheet.
- Slice the tomatoes and place into a food processor fitted with the steel blade. Pulse until roughly pureed and transfer to a fine strainer set over a bowl. Let drain for 15 minutes.
- Meanwhile, sift together the sugar, flour, ginger, cinnamon and salt.
- Return the tomatoes to the food processor and add the sugar mixture. Pulse until well combined. Beat the eggs and add to the processor, along with the lemon juice and zest. Pulse again until well combined. The mixture should be processed until it is a coarse puree. Pour into the baked tart shell.
- Bake 30 minutes in the middle of the oven, or until the filling is set. Don’t touch as the top is sticky and will adhere to your finger. Just jiggle the baking sheet gently to make sure the tart is set. Remove from the heat and cool on a rack.
Oven-Baked Green Tomato and Feta Frittata
This baked frittata has Greek overtones. It puffs in the oven, though it will deflate soon after you remove it. I prefer to serve it at room temperature. It’s a good keeper and packs well in a lunchbox.
Prep time: 15 minutes
Cook time: 45 minutes
Total time: 1 hour
Yield: 6 servings
Ingredients
1 pound green tomatoes
Salt and freshly ground pepper to taste
9 large eggs
2 tablespoons low-fat milk
About ½ cup fine cornmeal, or a combination of flour and fine cornmeal, for dredging
3 tablespoons extra virgin olive oil (more as needed)
2 garlic cloves, minced or pureed
2 tablespoons snipped chives
1 tablespoon chopped fresh marjoram
3 ounces feta, crumbled (about 3/4 cup)
Directions
- Preheat the oven to 350F. Core the tomatoes and slice about 1/3 inch thick. Season with salt and pepper.
- Beat the eggs and milk together in a large bowl and season with salt and pepper (I use about 1/2 teaspoon salt). Quickly dip the tomato slices into the egg mixture and dredge lightly in the flour or cornmeal. Place on a parchment-covered baking sheet. Heat 2 tablespoons of the olive oil in a 10-inch cast iron skillet over medium-high heat and fry the sliced tomatoes for 2 to 3 minutes on each side, just until lightly colored. Transfer to a rack set over a sheet pan, or to paper towels. You’ll probably need to do this in batches, so you might need to add more oil before adding the second batch. Quarter half the fried tomatoes. Wipe away any cornmeal residue from the pan.
- Stir the garlic, chives, marjoram, feta and the quartered fried green tomatoes into the beaten eggs.
- Return the skillet to medium-high heat and add the remaining tablespoon of oil. Swirl the pan to make sure the sides are coated with oil, and pour in the eggs, scraping every last bit of the mixture out of the bowl with a rubber spatula. Tilt the pan to distribute the eggs and filling evenly over the surface and gently lift up the edges of the frittata with the spatula, to let the eggs run underneath during the first minute or two of cooking. Distribute the whole fried green tomato slices over the surface of the frittata, turn off the burner and place the pan into the preheated oven. Bake 25 to 30 minutes, until puffed, set and lightly colored. Allow to cool for at least 10 minutes before serving. Serve hot, warm or at room temperature.
Main photo: Green tomatoes on the vine. Credit: Martha Rose Shulman

The ancient Roman seaside city of Rimini, about 75 miles southeast of Bologna and birthplace of legendary film director Federico Fellini, evokes la dolce vita in more ways than one. If Bologna is dubbed “Bologna la grassa,” or “Bologna the fat,” for its celebrated cuisine, the ancient road from Bologna to Rimini, once a vital trade route through Emilia’s rich plains, is today the nerve center for the artisanal gelato industry.
More from Zester Daily:
» The secret to the ultimate in ice cream
» Sorbet’s magic ingredient: rhubarb compote
So when the Italian Trade Commission recently invited me to join the jury for the Gelato World Tour Finals in Rimini, I accepted gratefully. Over three days in September, I watched 24 gelatièri, small gelato producers, from around the world, make about 14,330 pounds of their nominated recipes in Piazzale Fellini. The frenzied contestants from three continents gathered in Rimini to churn out their entries under big tents, whipping up fresh batches throughout the day to keep up with a crowd of 70,000 that was slurping its way through the expo. They were breaking all the flavor rules which, when it comes to cuisine in Italy, can be unbending. “It’s about inclusion,” said James Coleridge, a Canadian from Vancouver who won the 2014 Gelato World Tour North America title. “People are using Persian ingredients like saffron and rosewater and Japanese salted cherries; [vendors from] the Philippines are making gelato with purple yams.”
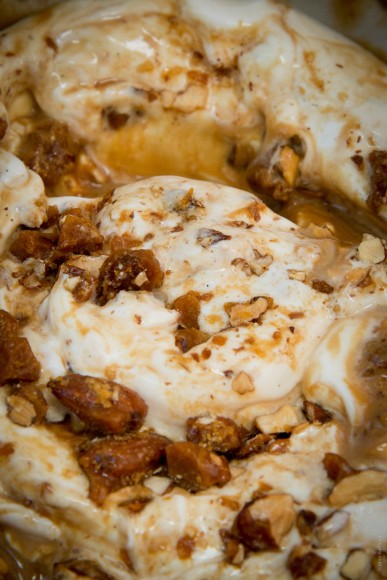
“Mandorla Affogato” (“Drowned Almond”) from Cow and the Moon in Sydney, Australia, won first place. Credit: Dino Buffagnani, Gelato World Tour
On the final day, “Drowned Almond” was declared the winner. The champion, John Crowl of Sydney, Australia, announced that his shop already had “a huge line out the door and down the street following the news,” and that his winning flavor, a fusion of Madagascar vanilla bean gelato, roasted caramelized almonds, Kenyan coffee and salted caramel sauce, was being made nonstop all day to keep up with the demand. “This award proves that even a foreigner can be a great gelato artisan if he or she studies hard and works with passion and tenacity every day,” he said.
The judging wasn’t easy. “Grumpy’s Heart” (Italy), a revelation of Sicilian pistachios that are considered princely even in Italy, placed second. “Hazelnut Heart” (Italy), a blissful delivery of toasted Piedmont hazelnuts, took third. Other juror favorites were “Texas Pecan Pie” (from Austin, Texas), based on Texas pecans, Texas whiskey and caramel; and Sollér Orange Sorbet with Mint and Cardamom (Spain). Gelatière Salvatore Versace, who emigrated from Italy to the U.S., won hearts with his rags-to-riches tale about making it big in Miami with a string of gelato parlors. He captured a “People’s Honorable Mention” with his “Scents of Sicily,” which reproduced authentic flavors of the Sicilian confection using tangy sheep’s milk ricotta and blood oranges.
With nearly half of the finalists from countries outside Italy, it became clear the taste for gelato, which began its journey in an 18th-century Italian pushcart, is circling the globe at a dizzying pace.
How this happened to an artisanal food is, ironically, a function of industrial history.
Gelato revolution
Gelato is at least as old as Mesopotamia, but its modern history began in Bologna in 1931, when Otello Cattabriga pioneered the first machine that could scrape, stir and incorporate air into a liquid gelato base to create its characteristic structure and creaminess. In 1934, he added an electrical motor, creating the first vertical batch freezer. In 1946, Poerio and Bruto Carpigiani, two brothers from Bologna, patented the first automatic machine, making it possible to produce gelato in larger quantities. The equipment was designed for small-scale gelato production. In just a few years, gelaterias proliferated in Italy and throughout the world.
Today, Carpigiani, sponsor of the Gelato World Tour, is said to be the largest artisanal gelato machine company in the world. A gelato school and museum are integral parts of its headquarters on the outskirts of Bologna. Unlike the training of a chef, which takes years of grueling experience, initiates can study gelato at the Bologna school and come out with a toque in four weeks.
Not to say that making gelato is quick and easy. Even when using specialized dairy bases, fruit, nut and chocolate pastes manufactured for gelatièri, gelato producers have to transform the ingredients into a finished product. They can make their gelato using these bases, or they can make it from scratch. Some combine the bases with fresh ingredients. “Gelato isn’t made like paint-by-number because it’s made by hand,” said finalist Matthew Lee of Tèo Gelato, Espresso and Bella Vita, of Austin, Texas, “but the best ones are made from scratch.” Like Lee, Coleridge uses only raw, unprocessed ingredients daily. “Maybe three people out of 500 are making truly artisanal gelato,” he said.
True gelato: It’s artisanal, it’s fresh
You might ask, just what is meant by “artisanal,” or handmade, in the world of gelato? In nearby Parma, cheese artigiani still make their 800-year-old Parmigiano-Reggiano by hand using state-of-the art stainless-steel vats and temperature-controlled storage rooms. Likewise, gelato makers today practice an ancient craft with the benefit of modern equipment. True gelato must be made fresh daily, ideally several times daily, to preserve its flavor and silkiness and avoid crystallization into hard ice cream. Genuine “artisanal” denotes an entirely handcrafted product working with raw, unprocessed natural ingredients every day. “It’s about making the best, not the most,” said Coleridge, a former baker, mountain climber and the first non-Italian to win the title, International Gelato Master of the Year, at Florence Gelato Festival in 2012. “We’re custodians of an old world process, protecting it against the industrialized world.”
However, unlike Italian producers who have to fight foreign imitators of their old cheeses, salumi and such, gelato needs no specific terroir. It requires only a willing entrepreneur with a sweet tooth.
Main photo: Gelato World Tour winners of the “world’s best gelato” category: John, left, and Sam Crowl of Cow and the Moon in Sydney, Australia. Credit: Dino Buffagnani, Gelato World Tour

Pasta lovers, save room for dessert. Pasta can be enjoyed not just as a first course, but for dessert too! Pasta as a sweets course may sound trendy, but Italians have been making all sorts of desserts with it for centuries. From cutting-edge modern creations to traditional almond-pasta pie from Emilia, there are hundreds of sweets made with every shape of pasta, from angel hair to ziti. Plus, dozens of dessert ravioli.
Modern pasta desserts
Want a change from the same old, same old? Jumbo pasta shells coated in cocoa is one of my favorites from the many modern pasta desserts in Italy today. Luca De Luca and the team at the Garofalo pasta company near Naples taught me this recipe while I was in Italy researching my book “Pasta Modern.” “Pasta shells can be filled with almost anything: vanilla custard, chocolate pudding, panna cotta, semifreddo, sorbet, granita, whipped cream and fresh berries, yogurt and honey — there are endless possibilities,” Luca said.
More from Zester Daily:
» Reviving Italian-American classic recipes
“Leave the gun, take the cannoli” is a popular line from “The Godfather,” showing just how popular the Italian dessert is. As anyone who’s ever tried knows, making cannoli shells is a huge challenge. It’s hard even for the most experienced home cooks. But now there’s a fun solution: cannoli made with pasta instead! Mezzi maniche, “half sleeves,” or little pasta tubes, are boiled then fried to create a crunchy, tasty container for the creamy sweet ricotta cannoli filling. They are a perfect pop-in-your-mouth, one-bite size. The fried mezzi maniche pasta are even good plain! Toss them in sugar and serve them with melted chocolate or with ice cream.
Spaghetti Sundae, a really fun, whimsical, kid pleaser, is spaghetti tossed in melted chocolate and served just like a sundae, deliciously cold-topped with your favorite sundae fixings.
It’s so simple you don’t even need a recipe. Just melt chocolate with a little olive oil and toss it with cooked pasta. Then top with any of the usual toppings: whipped cream, chopped nuts, sprinkles. Olive oil helps make the chocolate easier to melt, even in the microwave, and creates a super silky sheen. Olive oil also keeps the pasta from sticking together once it cools.
Fried pasta desserts
In Italy they have a saying, Fritti sono buoni anche gli zampi delle sedie — “Fried, even chair legs are delicious.” Pasta is certainly at the top of the list of delicious fried treats.
There are fried pasta desserts in almost every region of Italy. In Sicily, they fry a little forkful of angel hair and serve it topped with honey and chopped pistachios. It’s like a pasta cookie, crunchy on the outside and chewy in the center. In Tuscany and central Italy, they make a variation by frying thicker tagliatelle noodles nests, called nidi di tagliatelle per Carnevale. To make them, a few strands of fresh egg noodles are clumped into a little nest and fried. Since the noodles aren’t boiled first, only fresh egg pasta, not dried pasta, is used because it is softer. In Tuscany, the treat is created using chocolate noodles, made by incorporating cocoa powder into the pasta dough. The fried nests are drizzled with brandy-infused warm honey and topped with toasted almonds. In Emilia-Romagna, the nests are simply topped with confectioners’ sugar.
Dessert ravioli
Almost every region has its own sweet dessert ravioli, tortelli or mini-calzone recipes, with variations in fillings and shapes. Too difficult for me to recreate, but delicious for you to try if you are ever in Italy, are the chocolate ravioli filled with chocolate ricotta mousse and served in fresh strawberry puree from Osteria Pastella in Florence.
Ravioli filled with pureed chestnuts, chocolate, espresso, rum and ground nuts, caggiunitte, are an Abruzzo specialty. Lombardy’s specialty pasta dessert is fried tortelli filled with either jam or chocolate. I especially like the earthy combination of pureed chickpeas and jam filling in panzarotti con ceci of Puglia and Basilicata. Usually, ravioli can be tricky to make, because you have to get the dough very thin and seal them carefully since they’re going to be dashed about in rapidly boiling water like tiny ships in a storm. But because these ravioli are baked rather than boiled, you can make them thicker and don’t have to worry about them opening. It’s an easy way to work with dough.
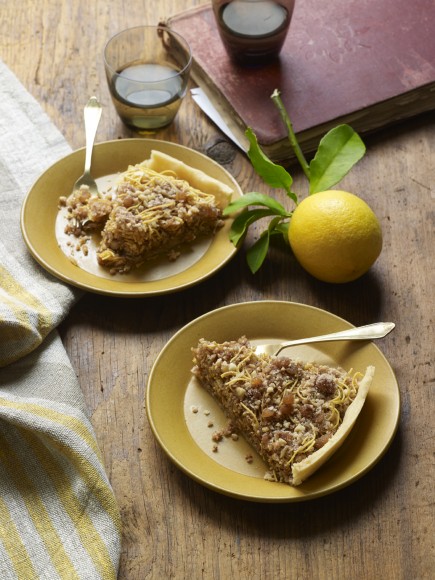
Torta Ricciolina, or angel hair pasta pie. Credit: “Dolci: Italy’s Sweets” by Francine Segan
Angel Hair Pasta Pie (Torta Ricciolina)
From: “Dolci: Italy’s Sweets,” by Francine Segan
Prep Time: 5 minutes
Baking Time: 45 minutes
Total Time: 50 minutes
Yield: 8 servings
Angel hair pasta, seasoned with chocolate and almonds, bakes into one of the most unusual, delicious pies I’ve ever tasted.
To make this classic Bolognese dessert, you absolutely must use fresh, not dried, egg pasta. If making your own pasta seems daunting, buy ready-made fresh instead. Most supermarkets sell ready-made fresh.
This is a great make-ahead dessert, as it’s much better the day after, once all the flavors have melded.
Ingredients
8 ounces, about 1 1/2 cups, whole blanched almonds
3/4 cup granulated sugar
Zest of 1 lemon
2 ounces, about 1/3 cup, finely chopped candied citron or candied orange peel
1 tablespoon unsweetened cocoa powder
1/2 pie crust, store bought or homemade
8 ounces fresh thin egg-pasta, such as tagliatelline or angel hair, store-bought or homemade
6 tablespoons butter, thinly sliced
1/3 cup rum
Directions
1. Grind the almonds and sugar in a food processor until it resembles coarse sand. Pulse in the zest, candied citron or orange peel, and cocoa powder until well combined. Divide into 3 parts.
1. Preheat the oven to 350 F. Line a 9- or 10-inch pie pan with the pie crust. Pot lots of holes in the bottom and sides of the crust with a fork.
3. Divide the pasta into three parts, with one part being slightly larger than the other two.
4. Line the pie pan with the larger portion of pasta and sprinkle with 1/3 of the almond mixture. Lift the pasta with the tip of a knife so it is loose and free form. Do not press the pasta down. Dot the pasta with thin slices of the butter.
5. Top with another layer of pasta sprinkled with a third of the almond mixture and more butter. Repeat for a third and final layer.
6. Loosely cover with aluminum foil, bake for 25 minutes, then remove the foil and continue baking uncovered for another 20-25 minutes until the top is golden and the center set.
7. Remove from the oven and immediately sprinkle the top of the pie with the rum. It will hiss and absorb quickly, with most of the alcohol evaporating, leaving just a lovely aroma and flavor.
8. Allow to cool to room temperature. Serve, preferably after it’s rested overnight or for 24 hours, topped with confectioners’ sugar.
Jumbo pasta shells coated in cocoa. Credit: “Pasta Modern” by Francine Segan
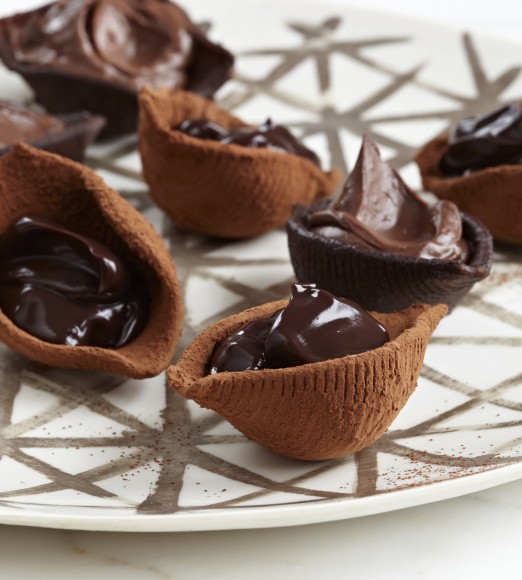
Chocolate Stuffed Shells (Conchiglioni dolci al cacao)
From: “Pasta Modern: New & Inspired Recipes from Italy,” by Francine Segan
Prep Time: 5 minutes
Cook Time: 15 minutes
Total Time: 20 minutes
Yield: 24 large shells, serves 4 to 6
Use just cocoa powder for unsweetened shells that become a gorgeous reddish-brown color, or sweeten the cocoa powder with confectioners’ sugar for a lovely dark-colored sweet shell. Using a teaspoon, fill the shells with anything you like. Pictured here is milk chocolate and dark chocolate pudding.
Other fun options:
Ice cream, slice of banana, dollop fudge sauce and chopped nuts for a mini sundae
Ricotta, sugar, mini chocolate chips for a soft cannoli
Mascarpone cheese, sugar and drop of coffee for an instant tiramisu
Cream cheese, fruit jam and fresh fruit for Italian-style cheesecake
Ingredients
24 jumbo shells
Salt
1/4 cup cocoa powder
1/2 cup confectioners’ sugar
Fillings and garnishes: about 2 cups total of gelato, custard, whipped cream, fruit, yogurt, etc.
Directions
1. Cook the shells in lightly salted boiling water until al dente and drain.
2. For sweeter shells, put the cocoa powder and confectioners’ sugar, to taste, into a sturdy plastic food storage bag. Toss the shells, a few at a time, into the bag until fully coated with cocoa powder. For less-sweet shells, toss them in just cocoa powder. Fill with anything you like.
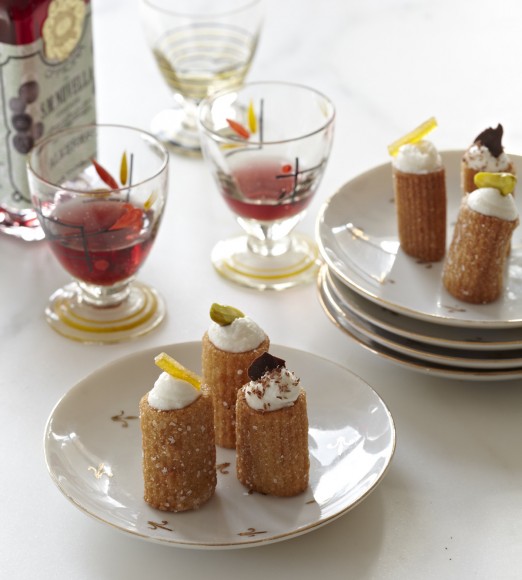
Mezzi maniche, or little pasta tubes, are boiled then fried to create a crunchy, tasty container for the creamy sweet ricotta cannoli filling. Credit: “Dolci: Italy’s Sweets” by Francine Segan
Cannoli Pasta Bites (Mezzi Maniche Dolci)
From: “Pasta Modern: New & Inspired Recipes from Italy,” by Francine Segan
Prep Time: 15 minutes
Cook Time: 20 minutes
Total Time: 35 minutes
Yield: 4 to 6 servings
Try this recipe once and, like me, I bet it will become one of your go-to desserts.
There are lots of ways to vary it. One of my favorite variations is to fill the fried pasta with mascarpone cheese sweetened with sugar and then dust with instant coffee granules and cocoa powder, for a riff on tiramisu.
Ingredients
1 cup ricotta
2 tablespoons granulated sugar
1 tablespoon finely chopped dark chocolate or mini chocolate chips
1 tablespoon minced candied orange peel
Pinch of ground cinnamon
1/4 pound mezzi maniche
Salt
Vegetable oil
Optional garnishes: chopped pistachios, chopped candied cherry or orange peel, cocoa powder or chopped chocolate
Directions
1. In a bowl, using a fork, mix the ricotta, sugar, chocolate, candied peel and cinnamon until well combined. Refrigerate until ready to use.
2. Cook the pasta in boiling salted water until very tender, about 1 minute longer than al dente. Drain the pasta well. Meanwhile, heat about 1 inch of vegetable oil in a very small saucepan until hot, but not smoking. Add half of the pasta and fry until golden and crisp, about 2 minutes. Remove with a slotted spoon and drain on a paper towel. Repeat with the remaining pasta.
3. When room temperature, roll the fried pasta in granulated sugar, then fill each with the ricotta mixture, either using an espresso spoon or by piping it in with a pastry bag. Garnish, if you like, with chopped pistachios, candied orange peel, grated chocolate or other toppings.
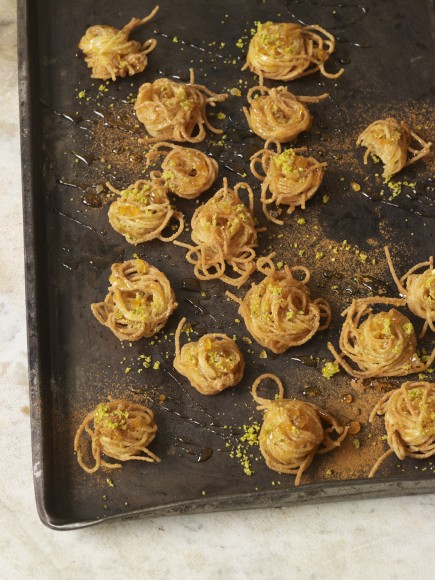
In Sicily, they fry a little forkful of angel hair and serve it topped with honey and chopped pistachios. Credit: “Pasta Modern,” by Francine Segan
Sicilian Pasta Crisps (Pasta Fritta alla Siciliana)
From: “Dolci: Italy’s Sweets,” by Francine Segan
Prep Time: 5 minutes
Cook Time: 20 minutes
Total Time: 25 minutes
Yield: 6 servings
Twirled forkfuls of honey-sweetened spaghetti, crunchy on the edges and soft in the center — scrumptious and a snap to prepare.
Ingredients
1/3 pound angel hair pasta
Salt
Sunflower or other vegetable oil
1/4 cup honey
Zest of 1/2 orange, or 2 tablespoons finely minced candied orange peel, 2 teaspoons orange blossom water
Pistachios, finely crushed
Ground cinnamon
Directions
1. Cook the pasta in salted water according to package directions. Drain.
2. Meanwhile, in a small bowl, combine the honey, orange zest or candied orange peel, orange blossom water and 2 tablespoons of boiling water.
3. Put about 1/4 inch of oil in a small frying pan and heat until hot, but not smoking. Twirl small forkfuls of the pasta, drop them into the hot oil, and cook until golden and crisp at the edges. Turn, and cook on the other side for just a few seconds. Drain the pasta crisps on a plate lined with paper towels.
Arrange the pasta crisps on serving plate. Serve warm, drizzled with the honey mixture and topped with a sprinkle of pistachios and a pinch of cinnamon.
Sweet Chickpea Ravioli (Panzarotti con Ceci)
From: “Dolci: Italy’s Sweets,” by Francine Segan
Prep Time: 45 minutes
Cook Time: 25 minutes
Total Time: 1 hour, 10 minutes
Yield: 4 dozen
Ingredients
For the filling:
1 1/2 cups cooked chickpeas (canned, or 4 ounces dry, soaked overnight and boiled until tender)
1 cup best-quality cherry jam
2 to 4 tablespoons sweet liqueur such as Amaretto, limoncello, mandarino, or a combination
Zest of 1/2 lemon
Honey or sugar, to taste
Ground cinnamon, to taste
1 egg
For the dough:
16 ounces, about 3 1/2 cups, all-purpose flour
1/2 cup granulated sugar
1/4 teaspoon salt
1/2 cup white wine
2 tablespoons olive oil
Confectioners’ sugar
Directions
1. For the filling: Process the chickpeas through a food mill until you get a nice thick, smooth paste. Then mix in the jam and liqueur to taste. Stir in the zest and cinnamon to taste, and then add sugar or honey, if you like. Once you have tasted it and are happy with the flavor, then mix in the egg. You can make the filling several days ahead. Refrigerate until ready to use.
2. For the dough: Sift the flour, sugar and salt onto a clean work surface and make a well in the center. Heat the wine in a saucepan or in the microwave. Pour the oil and 1/4 cup of the wine into the well and incorporate the flour, a little at a time, until dough forms. Add warm water, a little at a time, if the dough feels tough. Knead the dough until smooth. Put into a plastic bag or wrap in plastic wrap.
3. To assemble: Preheat oven to 350 F. Line 2 or 3 baking sheets with parchment paper.
4. Spread out a large clean cotton cloth onto a work surface for assembling and cutting the ravioli.
5. Leaving the rest covered, take a small section, about an 1/8 of the of dough, and either pass it through a pasta maker (#3 hole size, not thinner) or use a rolling pin to create a 3 to 4-inch wide strip of dough. Make just 2 strips at a time, so you can fill and cut the ravioli without having the waiting dough get dry.
6. Lay a sheet of dough onto the cloth and drop a tablespoonful of the filling on the sheet, about 1 1/2 inches apart. Top with another layer of dough. Using your fingers, press the top layer of dough around the filling and using a ravioli cutter, cut out square-shaped ravioli. Repeat until you’ve used up all the dough and filling.
7. Put the ravioli onto the baking sheet and bake for about 25 minutes until golden.
8. Eat warm, sprinkled with powdered sugar or cold dipped in honey or mosto cotto or vin cotto.
Main photo: Chocolate ravioli make for a sweet treat. Credit: Osteria Pastella