Articles in Baking

I never thought of myself as a beet fanatic. Sure, I like this versatile root vegetable well enough, but only recently realized that beets are pivotal to the menu at my restaurant, the Lostine Tavern — roasted, raw, pickled and puréed. Along with two types of pickled beets, we feature beetroot on a hugely popular open-faced sandwich, grated beet in our tossed salad and a riveting beet panzanella salad. But the best-selling item of all is the chocolate beet cake.
That’s right: This cake contains beets. A curious item for a tavern in the heart of Oregon’s cattle country, but that’s how good this is.
It’s become so popular, some customers ask for it before they order their meal while others request it for birthday cakes. So tasty and moist, it has caused more than one avowed beet hater to eat his words.
More from Zester Daily:
» 5 habits for a farm-to-table lifestyle
» How Chef Rick Gencarelli spun Portland street food into gold
An irresistible tower of three-tiered chocolate layer cake with fluffy dark chocolate frosting, this cake is a scene-stealer and a crowd-pleaser that belongs on any holiday table. The fact that it’s a veggie cake is both a nutritional plus and a conversation piece.
Why beets?
True enough, beets are a root vegetable, but using them in desserts is not as crazy as it sounds.
Beets have the highest concentration of sucrose among all vegetables. They are, after all, the source for granulated sugar.
Just like using carrot cake or pumpkin quick bread, beets are moisture insurance in cake baking. Fully cooked in simmering water and then pureed, the beets stealthily mingle with the cocoa powder, sugar and oil in the batter. Dark red beets tinge the color of the batter a shade toward red velvet cake. For anyone to know there are beets in this cake, you’ll have to tell them. Then, delight in their surprise.
Good desserts
Some may be happy to know that beets are a unique source of phytonutrients with strong antioxidant and anti-inflammatory benefits. I just love knowing I’m getting another dose of veggies into my kids’ dessert.
The earthy sweetness of the beets heightens the flavors of the chocolate, rendering a cake that is none too sweet. I use this recipe for everything from birthday cupcakes to everyday snack cakes. It mixes in a single bowl and makes either three 8-inch round layers, two 9-by-13-inch sheet cakes or a lot of cupcakes.
The cake layers form a great base for embellishment with layers of cherry preserves and whipped cream, a light snow of powdered sugar or a scoop of vanilla ice cream with chocolate sauce.
For the holidays, however, I take this cake to the hilt, slathering chocolate cream cheese frosting between three cake layers for a table centerpiece that is sure to capture everyone’s attention.
Beet Chocolate Cake
Prep time: 15 minutes
Cook time: 20 to 25 minutes
Total time: 35 to 40 minutes
Yield: 8 to 10 servings
Ingredients
2 1/2 cups puréed cooked beets
6 eggs, beaten
3/4 cup good-quality cocoa powder
1 teaspoon vanilla
2 1/2 cups vegetable oil
3 3/4 cups granulated sugar
3 3/4 cups all-purpose flour
1 tablespoon baking soda
1 1/2 teaspoons salt
Directions
1. Preheat the oven to 350 F.
2. Oil three 8-inch-round cake pans and line them with parchment paper.
3. In a small mixing bowl, beat the beets and eggs. Combine the cocoa powder, vanilla and oil in a large measuring cup.
4. In a large mixing bowl, whisk the sugar, flour, baking soda and salt until combined. Add the cocoa powder mixture to the flour and stir with a rubber spatula until well combined. Add the beet mixture and stir just until combined.
5. Pour the batter into the prepared pans. Bake until the sides of the cake pull away from the pan and a wooden skewer slid into the cake’s center comes out clean, 20 to 25 minutes.
6. Cool the cakes for 10 minutes and tip them out of the pans onto wire racks to cool completely.
Dark Chocolate Cream Cheese Frosting
Prep time: 10 minutes
Ingredients
6 ounces bittersweet chocolate
3 sticks unsalted butter (12 ounces), room temperature
12 ounces cream cheese, room temperature
1 tablespoon vanilla
3 cups sifted confectioner’s sugar
1. Melt the chocolate in a bowl over a pan of simmering water. Remove from the heat and set aside to cool to room temperature.
2. In a stand mixer, use the whisk attachment to beat the butter and cream cheese until perfectly smooth. Add the vanilla and scrape down the sides of the bowl.
3. Add the confectioner’s sugar and blend on medium speed until it is fully incorporated. Add the cooled chocolate mixture and blend on medium-high speed until it is very smooth and light.
4. Spread one-third of the frosting on top of each of the cooled cake layers and stack them to create three tiers. Leave the sides unfrosted.
Main photo: Beet Chocolate Cake. Credit: Lynne Curry

Christmas is for sharing, and some of the best gifts to share are the ones you’ve made yourself. The only snag about edible gifts is that once you’ve conceived and created them, put them up in clever containers and wrapped and labeled them with a holiday flourish, it can be a bit of a wrench to part with them. Steel yourself — or better still, make enough to keep some for yourself.
Winter chutneys go beautifully with a holiday ham, meat or game pie, or pâté en croûte. This super-simple date chutney (see recipe below) — a recipe from my mother, who used to make it every Christmas — is a double pleasure because it’s just a leisurely chopping and mixing job. There’s no cooking at all, so the apartment is not invaded with penetrating vinegary fumes. It benefits from keeping for a few weeks, so the flavors ripen nicely and will last for several months.
If you have herbs growing in your garden or terrace, the more robust perennial ones like rosemary, thyme and winter savory will still be good to go. Throw some in a food processor with sea salt and grind till fine for a wonderfully aromatic herby salt (see recipe below). The color when freshly ground is a delicate herbaceous green. This will fade after a few weeks, but the flavor lingers on. Add a note to the gift label with serving suggestions: It’s wonderful scattered over roast vegetables either before they go into the oven or as they come out (for even more flavor) or sprinkled onto focaccia or other bread before baking.
More from Zester Daily:
» Apple chutney: Backyard fruit makes sweet, spicy delight
» Maple-nut fudge: Easy as pie for holiday gifts
» Edible Christmas gifts put indulgence under the tree
The softer, more delicate herbs work best in a moist mix like pesto. Instead of the usual basil-pine nut combo, try one with pumpkin seeds, loads of flat-leaf parsley and grated Parmesan or Grana Padano, whizzed together to a verdant paste. A bright green blob floated on top of deep orange pumpkin soup is a thing of beauty, or you can stir it into pasta or risotto or serve with cold turkey, duck breasts or grilled fish.
Around Christmas here in Alsace, France, on the border with Switzerland and Germany, baking reaches fever pitch at this time of year. Whether you visit friends at home, buy bread at the baker’s or attend the local hunt, you will be plied with Guetzli (Switzerland), bredele (Alsace) or Weihnachtsbrödle (southern Germany) at every turn. And here I have to own up to my sad little secret: I really, really don’t care for them and find that, at a time of major carb-overload, most are just not worth the calories (for me). However, I do make an honorable exception for Brunsli (see recipe below), moist, dark chocolate, almond-laden cookies laced with Kirsch brandy from Basel, Switzerland.
Finally, if life gives you lemons, make citrons confits, or salted lemons (see recipe below), which will bring a golden Mediterranean glow to your kitchen and make an especially welcome midwinter gift. In this recipe, from chef Thierry Voisin, former chef at Les Crayères in Reims, France, the lemons are first blanched, then packed into jars and covered with a sweet-salty syrup. They are a bit softer and less briny than the kinds packed in a jar with kosher salt, and they’re ready to use sooner than the salt-packed quarters. The finely diced peel (discard the pith) gives a bright, zesty lift to meat stews, tagines, couscous and all manner of vegetable dishes.
Fresh (Uncooked) Date Chutney
Fresh (Uncooked) Date Chutney. Credit: Sue Style
Prep time: 10 minutes (15, if you don’t use a food processor)
Total time: 10 to 15 minutes plus 2 to 3 weeks of maturing
Yield: Makes 4 1-pound (450-gram) jars
Ingredients
1 pound (450 grams) pitted dates
1 pound (450 grams) raisins or sultanas
1 pound (450 grams) apples
1 pound (450 grams) onions
1 pound (450 grams) brown or raw sugar
1 tablespoon salt
Plenty of freshly ground pepper
1/2 teaspoon cayenne
2 cups (1/2 liter) cider vinegar or wine vinegar
Directions
1. Put the pitted dates and raisins or sultanas in a food processor.
2. Quarter and core the apples (don’t peel) and chop them roughly.
3. Add the apples to the food processor along with the peeled and chopped onions.
4. Add brown or raw sugar, salt, pepper, cayenne and vinegar and process thoroughly till quite finely chopped and well mixed. (Alternatively, chop dates, raisins/sultanas, apples and onions finely together, then tip them into a bowl and stir in the sugar, salt, pepper, cayenne and vinegar.)
5. Spoon into clean, dry jars and label.
Note: The chutney is best when matured for a couple of weeks, and it will keep for several months.
Herby Salt
Prep time: 10 minutes
Total time: 10 minutes
Yield: 2 4-ounce (100-gram) jars
Ingredients
1 tablespoon fresh thyme leaves, stripped off stalks
1 tablespoon winter savory leaves, stripped off stalks
10 sage leaves, torn
7 ounces (200 grams) sea salt (sel de Guérande or similar) or kosher salt
Directions
Put the thyme, savory and sage leaves in a food processor, add the salt and process till fine. It will turn a beautiful jade green color. This will fade after a week or two, but the flavor will remain hauntingly herby.
Pumpkin Seed and Parsley Pesto
Pumpkin Seed and Parsley Pesto. Credit: Sue Style
Prep time: 10 minutes
Total time: 10 minutes
Yield: about 1 cup pesto
Ingredients
1 good bunch of flat-leaf parsley, leaves only (about 1 ounce, or 30 grams)
2 tablespoons hulled green pumpkin seeds
2 tablespoons grated Parmesan or Grana Padano
Pinch of salt
1 small clove garlic, mashed
6 tablespoons olive oil
Directions
1. Put parsley leaves, pumpkin seeds, cheese, salt and garlic in a blender.
2. Blend until well-chopped, stopping to scrape down every now and then — add a little water if necessary to make the blades turn.
3. Pour in the olive oil in a steady stream and continue blending till very smooth, scraping down if necessary.
4. Tip into a dish or jar and cover tightly.
5. The pesto will keep in the fridge, unopened, for up to a month. Once broached, cover with a thin layer of olive oil to exclude air.
Basler Brunsli
Basler Brunsli. Credit: Sue Style
Prep time: 25 minutes (plus 1 hour to refrigerate the dough and 1 hour to allow the Brunsli to dry out before baking).
Cook time: 5 minutes
Total time: 2 hours 30 minutes
Yield: Makes 20 to 30, depending on size
Ingredients
4 ounces (100 grams) dark chocolate, (Lindt Excellence, for example)
5 ounces (150 grams) sugar, plus extra for rolling out dough
8 ounces (250 grams) ground almonds
2 tablespoons flour
2 tablespoons unsweetened cocoa powder
1/2 teaspoon ground cinnamon
2 egg whites
Pinch of salt
2 tablespoons Kirsch
Directions
1. Melt the chocolate in a bowl set over a pan of simmering water (or microwave for 1 to 2 minutes). Stir till smooth, then set aside till cooled but still melted.
2. Mix together in a large bowl the sugar, ground almonds, flour, cocoa powder and cinnamon.
3. Beat the egg whites in a bowl with a pinch of salt till snowy but still creamy — don’t overbeat or they will be hard to incorporate smoothly.
4. Fold the egg whites into the dry ingredients.
5. Stir in the cooled, melted chocolate and Kirsch and press the mixture together to form a firm dough. (It’s a good idea to use latex gloves because the dough is very sticky.)
6. Refrigerate the dough for 1 hour.
7. Sprinkle a working surface with sugar (do not use flour) and roll or pat out the dough to about half an inch (1 centimeter) thick.
8. Cut into shapes with cookie cutters (hearts, Christmas trees, half-moons etc.) and lay them on a baking sheet lined with non-stick baking parchment. Recycle any trimmings and cut out more shapes.
9. Leave the unbaked Brunsli at room temperature for 1 hour to dry out a little, otherwise they fall apart when baked.
10. Heat the oven to 475 degrees F (240 degrees C) and bake Brunsli for 5 minutes — they will turn a shade paler and start to dry out a bit around the edges, but should remain moist in the middle.
11. Remove Brunsli from the oven and let cool on a rack.
12. Once cool, pack in cellophane bags and tie with pretty ribbons, or store in an airtight tin.
Salt-Preserved Lemons
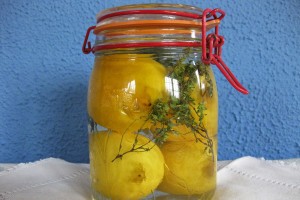
Salt-preserved Lemons. Credit: Sue Style
Prep time: 5 minutes
Cook time: 15 minutes
Total time: 20 minutes, plus 2 to 3 weeks’ maturing
Yield: Makes 4 preserved lemons.
Ingredients
4 lemons, untreated
4 ounces (100 grams) salt
5 ounces (150 grams) sugar
2 cups (1/2 liter) water
3 to 4 sprigs of fresh thyme
Directions
1. Put the lemons in a saucepan, cover with cold water and bring the water to a boil.
2. When the water boils, tip it away; repeat the process twice more.
3. Press the drained lemons firmly into a Mason or Kilner glass jar.
4. In the same pan, dissolve the salt and sugar in 2 cups of water and pour it (hot) over the lemons.
5. Push the thyme down into the liquid.
6. Snap the lid shut while the lemons are still hot.
7. Cool, refrigerate for 2 to 4 weeks before using (or bestowing on favored friends). The lemons will keep for several months.
Main image: An herbed salt. Credit: Sue Style

A new cookbook serves up breakfast inspiration. Eight innkeepers who have served more than 184,200 breakfasts in their collective 150 years of feeding happy guests joined together to write “Eight Broads in the Kitchen” (Winters Publishing, 2014).
The book includes advice on stocking your pantry and a wide range of sweet and savory dishes and many muffins, scones, waffles and breads. Recipes include unusual breakfast fare like refreshing chilled peach soup, Maryland blue crab quiche and birchermuesli, a classic Swiss dish of rolled oats, fruit and nuts created by Dr. Maximilian Bircher-Benner in the early 1900s as a health food.
Below are six recipes that range from those simple enough for a workday to others perfect for a leisurely weekend, and all sure to brighten any morning.
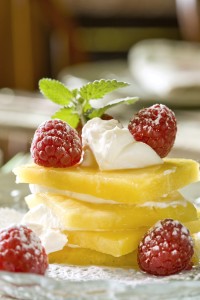
This pineapple napoleon is quick and easy to make. Credit: “Eight Broads in the Kitchen.”
Pineapple Napoleon
The William Henry Miller Inn
Prep time: 15 minutes
No cooking time
Yield: 8 servings
Ingredients
1 ripe pineapple
8 ounces cream cheese, softened
1/2 cup sour cream
4 tablespoons pineapple ice cream topping, such as Smuckers
3/4 cup sifted confectioners sugar, plus more for dusting
Dash of salt
Fresh berries, for garnish
Directions
1. Remove top of pineapple and cut rind off so that you are forming a “square.” Slice pineapple into thin square slices. Use an apple or pineapple corer to remove the tough center.
2. Using a sharp knife, carve out the good pineapple inside the rind of the pineapple to use as “center slices.”
3. Mix cream cheese, sour cream, ice cream topping, confectioners sugar and salt, and stir until creamy.
4. Layer slices of pineapple with cream. Each serving uses 3 or 4 slices of pineapple. Top with fresh raspberries, strawberries, or your choice of berries, and a generous sprinkling of confectioners sugar.
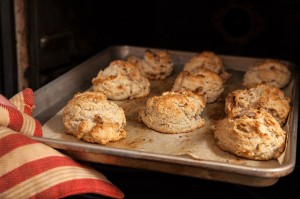
These scones are made with white chocolate and cranberries. Credit: “Eight Broads in the Kitchen”
White Chocolate and Cranberry Scones
The White Oak Inn
Prep time: 10 minutes
Baking time: 12 minutes
Yield: 12 to 14 scones
The secret to good scones is to keep all the ingredients cold and handle the dough as little as possible.
Ingredients
2 cups flour
2 tablespoons sugar
4 teaspoons baking powder
1/2 teaspoon salt
1/3 cup butter
2 eggs
1/2 cup half-and-half or heavy cream
1/2 cup white chocolate chips
1/2 cup dried cranberries
Directions
1. Preheat the oven to 425 F.
2. Mix together flour, sugar, baking powder, and salt. Cut in butter, using either the pulse setting on a food processor or by hand with a pastry blender. Mixture should resemble coarse crumbs, with no visible chunks of butter.
3. Separate one of the eggs, setting the white aside. Beat the yolk with the other whole egg and the half-and-half. Add this to the dry mixture, along with the white chocolate chips and cranberries. Stir with a fork until barely mixed.
4. Turn dough onto a floured board and knead gently, about 6 to 8 times. Roll or pat dough out to 1/2-inch thickness. Cut into rounds with a biscuit cutter.
5. Place on an ungreased baking sheet about an inch apart and brush the tops with the reserved egg white.
6. Bake for 10 to 12 minutes or until top is golden brown.
ZESTER BOOK LINKS

“Eight Broads in the Kitchen”
Winter Publishing, 192 pages, 2014
» Click here to buy the book
Blueberry Cornmeal Pancakes
The Beechmont Inn Bed and Breakfast
Prep time: 5 minutes
Cooking time: 20 minutes
Yield: Sixteen 4-inch pancakes
Cornmeal adds a delightful crunch and bit of sweetness.
Ingredients
2 cups flour, plus 1 tablespoon for blueberries
1 cup ground cornmeal
1/3 cup sugar
2 teaspoons baking powder
1/2 teaspoon baking soda
3/4 teaspoon cinnamon
1/2 teaspoon salt
1 cup plain yogurt
1 1/2 cups milk
4 large eggs
6 tablespoons unsalted butter, melted
1 teaspoon vanilla
2 tablespoons grated orange zest
2 cups blueberries
Directions
1. In large bowl, combine the 2 cups of flour, cornmeal, sugar, baking powder, baking soda, cinnamon and salt. Use a whisk to blend.
2. In a separate smaller bowl, blend the yogurt, milk, eggs, melted butter, vanilla and orange zest.
3. Pour the liquid ingredients into the flour mixture and blend, being careful not to overmix. Lightly coat the blueberries with a tablespoon of flour and add blueberries to mixture.
4. Preheat an electric griddle to 350 F. Cook pancakes on hot griddle until done.
5. Serve with warm syrup and your favorite bacon or sausage.
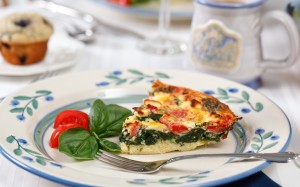
This veggie quiche can be made with seasonal vegetables. Credit: “Eight Broads in the Kitchen”
Crustless Veggie Quiche
The White Oak Inn
Prep time: 10 minutes
Cook time: 40 minutes
Yield: 6 servings
Vary the vegetables based on what’s in season. Change the seasonings with the ingredients: For an Italian twist combine tomatoes, onions and artichokes and Parmesan with traditional Italian herbs such as oregano, basil and parsley. For a Mexican flair, use chorizo, green chilies, tomatoes and onions, topped with Monterey jack cheese.
Ingredients
2 tablespoons butter
1 cup diced onion
1 large yellow or green zucchini, sliced into 1/4-inch slices
1 teaspoon dried basil
1 teaspoon dried oregano
5 eggs
3/4 cup milk
1/4 cup flour
1 teaspoon baking powder
1 cup fresh diced tomatoes
1/2 cup cheddar cheese, shredded
1 cup feta cheese, crumbled
Directions
1. Preheat the oven to 350 F. Spray a 9-inch pie plate with cooking spray.
2. Melt butter in a skillet and sauté the onion until translucent. Add the zucchini. Sprinkle with basil and oregano. Sauté for about 3 or 4 minutes.
3. Combine the eggs, milk, flour and baking powder in a blender or food processor.
4. Spread the onion/zucchini mixture in the bottom of the pie plate. Spread the diced tomatoes, cheddar and feta cheeses evenly over top. Gently pour the egg batter over all.
5. Bake for about 40 minutes or until set in the middle. Let sit for 10 minutes before slicing into 6 wedges.
More from Zester Daily:
Raised Waffle
Brampton Bed and Breakfast Inn
Prep time: 10 minutes, plus refrigerate overnight
Cook time: 20 minutes
Yield: 8 waffles
These waffles are light and crispy on the outside and soft on the inside. The batter is best made in advance and will keep refrigerated for up to three days.
Ingredients
2 1/4 cups whole milk, divided
1 tablespoon dry yeast
2 cups unbleached flour
2 tablespoons ground cornmeal
1 teaspoon salt
1 tablespoon granulated sugar
1 stick, 4 ounces, unsalted butter, melted
2 large eggs, lightly beaten
Directions
1. Put the 1/4 cup milk into a large mixing bowl and sprinkle yeast on top. Let stand for 5 minutes. Yeast will dissolve and start to bubble.
2. In a separate large bowl, mix flour, cornmeal, salt and sugar. Set aside.
3. To another large bowl, add the 2 cups warmed milk (make sure milk is less than 110 F or it will kill the yeast), melted butter, eggs and bubbly yeast mixture, and whisk until everything is well incorporated. Add flour mixture 1/2 cup at a time, whisking vigorously after each addition. The batter should be smooth.
4. Cover with plastic wrap and set bowl on a large rimmed cookie tray to catch the overflow if necessary, as the batter will double in volume. Refrigerate overnight.
5. In the morning, preheat the waffle iron to high.
6. Whisk batter and then it will deflate. Let batter rest for 15 minutes at room temperature.
7. Pour about 3/4 cup of batter per waffle onto hot waffle iron. Bake until waffles are golden and edges are crisp.
8. Serve topped with warm maple syrup, any berries of your choice, or lightly sweetened fresh pineapple.
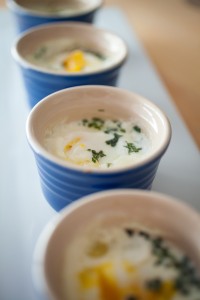
The secret to these garden baked eggs is the thyme. Credit: “Eight Broads in the Kitchen”
Garden Baked Eggs
Chambered Nautilus Bed and Breakfast Inn
Prep time: 5 minutes
Cook time: 20 to 30 minutes
Yield: 6
The real secret to this recipe is the thyme. It enhances the flavor of both the eggs and veggies. Serve with your favorite muffins, breads or potatoes.
Ingredients
12 eggs, 2 per person
1/2 cup half-and-half
Salt and pepper
1 teaspoon thyme (dried or fresh)
2 cups of your favorite chopped vegetables such as green and red peppers, asparagus, broccoli, zucchini, yellow squash, mushrooms, green onions
1/2 cup cheddar cheese, shredded (to sprinkle on top)
Chives, chopped
Directions
1. Preheat the oven to 350 F. Spray six (6-ounce) ramekins with cooking spray.
2. Blend eggs, half-and-half, salt, pepper and thyme (a 4-cup measuring cup with pouring spout is useful).
3. Fill ramekins with 1/3 cup chopped vegetables.
4. Put egg mixture in ramekins over the vegetables. Top with cheddar cheese and chives.
5. Bake for 20 to 30 minutes or until set.
Main caption: Cornmeal is added to these blueberry pancakes for a delightful crunch and bit of sweetness. Credit: “Eight Broads in the Kitchen”

During a hosted visit to explore the city of Napa, I stayed at the Inn on Randolph in a leafy neighborhood within walking distance of downtown. Waiting to meet chef Paul Fields, I was offered a golden brown chocolate chip cookie, a good litmus test of a baker’s skill.
More from Zester Daily:
» Gluten-free finger millet from India
» A gluten-free cookbook for every need
All too often chocolate chip cookies are overly sweet or undercooked. In either case, that puts one’s teeth on edge. When chef Fields joined me, I complimented him on the cookies. With pride he explained they were gluten-free.
The Inn on Randolph is one of the few gluten-free upscale inns in the country. Fields was challenged by owner Karen Lynch to create flavorful, quality dishes that gastronomic visitors to Napa Valley would enjoy.
Fields makes virtually everything he serves from scratch using local ingredients. Many ingredients come from the inn’s gardens and fruit trees. He doesn’t make wheat-based breads and pastries. So to satisfy the need for morning carbohydrates, the day I stayed at the inn, he served a hot plate of Beluga lentils, a poached egg, roasted carrots and squash, with maple chicken sausages.
Anyone who bakes knows how well wheat flour mixed with a liquid and a fat creates elastic dough and batters. Many supermarkets and health food stores carry gluten-free flours made from a variety of plants: chickpeas, corn, chia, buckwheat, rice bran, barley, arrowroot, amaranth, nuts, potato, millet, quinoa and tapioca. But these flours have flavors and binding properties different from wheat.


Chocolate chip cookies are part of my childhood sense memory. They evoke my mother’s kitchen, where my sister and I vied to eat the first cookie warm from the oven.
Fields’ cookies passed my-mother-used-to-make-these-cookies test. They had the right amount of chewiness and sweetness with a lovely melted chocolate flavor. They were delicious.
Inn on Randolph Chocolate Chip Cookies
Fields suggests making a good supply of the gluten-free flour blend. The flour recipe below will make 6 dozen cookies. With the holidays coming up, the flour will not go to waste. Store the blend in an airtight container in a cool, dark pantry or in the refrigerator.
Having a good supply of pre-shaped frozen cookie dough is a great help for spur of the moment holiday celebrations.
Prep time: 30 minutes
Freezer time: 10 to 12 minutes or overnight
Cooking time: 10 to 15 minutes
Yield: 3 dozen cookies
Ingredients
3 sticks unsalted butter, room temperature soft
2 1/4 cups dark brown sugar
1 egg
2 teaspoons vanilla extract without alcohol
2 teaspoons baking powder
2 3/4 cups Inn on Randolph flour blend (see below)
8 ounces chocolate chips of your choice: milk, dark or a blend of the two
Directions:
1. Preheat oven to 350 F.
2. In a mixing bowl, combine softened butter and brown sugar. Mix to combine and break up any lumps. Stir until smooth.
3. Add egg and vanilla. Mix until fully incorporated into the butter and sugar. In a separate bowl, mix baking powder with gluten-free flour blend.
4. Add the flour mixture to the butter and sugar mixture and mix well until most of the flour is incorporated. Leave some of the flour unblended.
5. Add chocolate chips. Fold together the unblended flour and the chocolate chips to prevent the chips from sticking to one another. Then mix together with the batter until no flour can be seen. Scoop out the cookies with a 1-ounce scoop or with a large spoon. Prepare a nonstick baking sheet or a baking sheet covered with parchment paper or a Silpat sheet. Place the balls of dough next to each other.
6. Freeze a minimum of 10 to 12 minutes or overnight. If the cookies are going to be baked on another day, transfer the frozen balls to an airtight container and return to the freezer.
Just before baking, remove from the freezer. Place the balls on a nonstick baking sheet or a baking sheet covered with a Silpat sheet or a piece of parchment paper. Remembering that as the cookies bake, they will expand, leave 4 inches of space between each ball of dough and the sides of the baking sheet.
7. Bake for 10 to 15 minutes to desired doneness. Remove from oven and cool on a wire rack.
Inn on Randolph Flour Blend
Weight is more accurate, but you may use cup measures. Store the blend in an airtight container in a cool, dark pantry or in the refrigerator.
Prep time: 10 minutes
Ingredients
1 1/2 cups or 167 grams sorghum flour, superfine
3/4 cup or 101 grams cornstarch
1/2 cup or 82 grams potato flour, finely ground
3/4 cup or 117 grams potato starch, unmodified
1/2 cup or 56 grams tapioca flour
Directions
Measure out each dry ingredient.
Mix together. Stir well.
Store in an airtight container.
Main photo: Gluten-free chocolate chip cookies made by chef Paul Fields for guests at the Inn on Randolph, Napa, Calif. Credit: David Latt
In the video, Fields shows how to freeze the cookie dough in individual portions.

Cantucci, crunchy almond biscotti, are a Tuscan classic. Created in Siena, they are popular throughout Italy. While in the United States we sometimes dunk cookies in milk, Italians traditionally dip them into the famed golden-amber dessert wine — vin santo.
Cantucci are easy to make and last for months, so they are terrific cookies for the holidays, to serve or to give as a special homemade gift. The dough is easy to work with, and the cookies come out perfect every time. One key to the great flavor is the addition of vin santo, which provides a nice aroma and a subtle fruity balance. Another is the touch of honey, which keeps the cantucci wonderfully moist.
More from Zester Daily:
» Cookies for breakfast
» Pasta for dessert
» 5 Italian coffees you won’t find stateside
» After-dinner drinks, Italian-style
There are dozens of ways to vary the recipe, so you can make several different batches. For a hint of orange tang, add 1/4 cup finely minced candied orange peel to the batter; for chocolate cantucci add 1/2 cup chopped dark chocolate; and for anything goes cantucci add 1/2 cup of your favorite dried fruit, such as chopped dates, apricots or figs. Substitute a different nut for the almonds or omit the nuts completely.
In Italy these luscious cookies are also featured as an ingredient in many desserts such as whimsical chocolate salami, an adorable dessert that really looks like a salami, especially the way Italians serve it: coated in confectioners’ sugar and tied with kitchen twine like real salami. When it’s sliced, the nuts and cookie bits add to the salami look, too. Think of it as a giant truffle!
Cantucci (Almond Biscotti)
From “Dolci: Italy’s Sweets” (Stewart, Tabori & Chang)
Prep time: 10 minutes
Bake time: 30 minutes
Total time: 40 minutes
Yield: About 2 dozen
Ingredients
3 cups Italian OO flour or cake flour, plus more as needed
3/4 granulated sugar
1/3 cup honey
2 eggs
2 yolks
2 tablespoons unsalted butter
1/2 teaspoon baking powder
1/2 cup vin santo
1/4 teaspoon salt
1 cup whole almonds, skins-on
Directions
1. Preheat the oven to 350 F. Line a baking sheet with parchment paper.
2. In a large bowl combine the flour, sugar, honey, eggs, yolks, butter, baking powder, vin santo and salt. Using your hands, knead until dough forms, then add the almonds. If the dough is too moist add a little extra flour. Divide the dough into 3 sections. The dough will be a little sticky, that’s normal.
3. Put the dough onto the prepared baking sheet. Using wet hands, mold each section into a log shape, about 10 inches long and 2 inches wide. No worries about it being perfect. The dough will come together while it bakes.
4. Bake for about 25 minutes then remove from the oven, but keep the oven on. Allow the dough logs to rest for 5 minutes, keeping them on the baking tray. While still hot and on the baking tray slice the logs on the diagonal, about 3/4 inches wide, using a sharp knife and one firm cut. Put the slices back into the oven and continue to cook for about 5 minutes, until lightly golden.
Chocolate “Salami” (Salame al cioccolato)
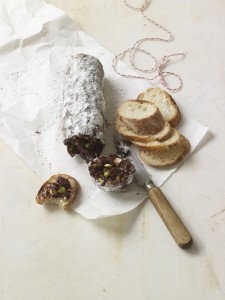
This whimsical dessert looks like salami, but it is really made of biscotti. Credit: “Dolci: Italy’s Sweets” (Stewart, Tabori & Chang)
From “Dolci: Italy’s Sweets” (Stewart, Tabori & Chang)
Prep time: 10 minutes
No cooking, but needs 2 hours refrigeration to set
Yield: 4 to 6 servings, makes one 6-inch “salami”
Note: Vary it any way you like: Add a shot of freshly brewed espresso or liqueur instead of the rum; try different kinds of nuts or even add dried or candied fruit if you like.
Ingredients
2 ounces dark chocolate
1/2 cup superfine sugar
5 tablespoons unsalted butter, softened
1 cup chopped cantucci
1/4 cup coarsely chopped nuts such as pistachios, hazelnuts or almonds
1 tablespoon rum
Confectioners’ sugar
Directions
1. Melt the chocolate in a glass bowl in the microwave or over a pan of simmering water. Allow to cool to room temperature. Reserve.
2. Beat the sugar and butter with a spatula or electric hand mixer until creamy and smooth. Stir in the chocolate, cookies, nuts and rum until well combined.
3. Spoon the mixture onto a sheet of plastic wrap or parchment paper and form into a salami shape, about 6 inches long and 2 inches thick. Wrap well and refrigerate until firm, about 2 hours.
4. To serve, roll the salami in confectioners’ sugar and tie with kitchen twine, so it looks even more like real salami.
Main photo: Cantucci are easy to make and last for months, so they are terrific cookies for the holidays, both to serve or give as a special homemade gift. Credit: Corsini Biscotti Company

If you want a moist autumn cake, put a persimmon in it. Or, in the case of this recent obsession I call persimmon pudding cake, make that four to six persimmons, depending on size.
This cake has been a project.
Many years ago while I was having dinner with friends, a dessert came to the table. It was humbly wrapped in the tin foil used by the woman who made it before she gave it to my host. He unfolded the protective flaps of crinkly tin foil away from treasure inside. It was a square the size of an uncut pan of brownies. Instead of the matte look of chocolate, this cake was dark as mahogany and glistened as if it had been dipped in honey.
Before me was persimmon cake. Of course I’d experienced persimmon fudge, persimmon pie and persimmon bread. But I was not to forget the taste reminiscent of gingerbread and a rich consistency firm enough to chew but soft and lush, like cheesecake meets mousse.
By persimmon season the next autumn, I tried to replicate the cake. The recipe was gone with the passing of the woman who had baked it. I hunted persimmon trees in my neighborhood that yielded the proper fruit, the Hachiya persimmon. This is different than the small persimmon eaten like an apple, which is the Fuyu. The Hachiya is big and heart-shaped and needs to be so fully ripe that to the touch it feels like there’s a loose gland under its thin skin.
When the fruit is ready, astringency should have yielded to sweetness. At this point, the Hachiya pulp can easily be scooped out of the skin, and the somewhat slimy neon-orange pulp can be puréed in a food processor.
I tried using the pulp in applesauce cake, but it was too runny. Then cider cake, which was too juicy. I tweaked gingerbreads. I made steamed persimmon pudding in an old pudding mold that I lowered into simmering water. With each effort, when I inverted the pan onto a serving platter, the dish drooled juices or fell apart. I added flour, cut back on liquid, increased leavening. Still, it was not right.
It wasn’t quite “CSI: Persimmon” at my house, but close. I knew that the woman who first made the cake I loved had come to California from West Virginia. Considering her age and regional traditions, I had a hunch. I went to an old “Joy of Cooking” and found the recipe for persimmon pudding that wasn’t steamed at all, but baked.
Again, results were too runny. I cut back on cream and some of the sugar. The trick was to change “Joy’s” one-bowl dump method to a technique typical of more structured cakes. For this, the butter and sugar were beaten first.
On my last try, I also had in the house a huge bag of home-dried pluots from my brother-in-law’s tree. He had dried them without citric acid, so they were dark and ugly. On impulse, he’d dusted his entire haul with chile powder. They were spicy!
I cut the pluots into small dice and added them to the persimmon batter, then baked it much longer than the “Joy” recipe and started it a higher temperature, hoping it would cook through while staying moist without being soupy.
Success is the recipe below. If you don’t have ugly dark home-dried pluots, which I’m sure you do not, use raisins, apricots, dates or dried plums (not prunes).
Persimmon Pudding Cake
Prep time: 45 minutes
Baking time: 1 hour, 15 minutes to 1 hour, 50 minutes
Ingredients
1 1/2 teaspoons chile powder (such as New Mexico or ancho chile powder)
1 cup diced dried raisins, pluots, dates, apricots or plums ½ cup sugar
1 cup light brown sugar, packed
1 stick butter, soft
3 eggs
2 cups puréed persimmon pulp (from 4 to 6 very ripe Hachiya persimmons)
1 cup all-purpose flour
1 teaspoon baking soda
1 teaspoon baking powder
2 teaspoons cinnamon
2 teaspoons powdered ginger
1/2 teaspoon grated nutmeg
1 1/2 cups cream
Directions
1. Butter a deep 9-inch square pan. To catch drips, prepare to set baking dish on a baking sheet or a large sheet of foil. Heat oven to 400 F.
2. In a bowl, toss the chopped dried fruit with chile powder; set aside.
3. Cream sugars and butter very well. Add eggs one at a time, beating only until each is absorbed. Stir in persimmon pulp.
4. In another bowl, sift baking soda, baking powder, cinnamon, ginger and nutmeg.
5. With mixer on low speed, add flour and cream alternately to the persimmon batter in three helpings, ending with flour. Stir in chile-dried fruit.
6. Scrape batter into the buttered baking dish. To catch drips, set on a rimmed baking sheet or a sheet of foil.
7. Bake at 400 F for 15 minutes. Reduce heat to 350 degrees F and bake 60 to 70 minutes more. Insert a toothpick near the center. If batter sticks to the toothpick, bake 10 to 15 minutes more. Center will just barely jiggle.
8. Cool in pan on a cooling rack no longer than an hour. Set a timer! Loosen by running a knife around the edges. Flip cake onto a serving platter. A bit of juice may pool around the cake.
9. Let stand until the cake cools completely. Serve with dollops of whipped cream on each piece.
Main photo: Persimmon Pudding Cake. Credit: Elaine Corn

Skip The Pie: Go For Turkish Pumpkin Dessert
by: R. Eckhardt & D. Hagerman
in: Thanksgiving w/recipe
Pumpkins are a fixture at autumn farmers markets in Turkey, where they grow so large that they’re often cut with saws and sold in halves or by the slice. Like Americans, Turks love their pumpkin both savory — in soups, stews and as stuffed vegetables — and sweet.
Perhaps the most prized Turkish dessert is kabak tatlisi (literally, “pumpkin sweet”), wedges of pumpkin simmered in a syrup made by using sugar to leach the gourd of its natural juices. Because the recipe doubles or triples easily and the result keeps well for a day or two in the refrigerator, it’s a perfect dessert for holidays that demand do-ahead short-cuts, like Thanksgiving.
More from Zester Daily:
» Raising the pumpkin bar: A pie-free dessert
» A magical turn for Turkish color wheel of sweets
A sweet dessert tamed by nutty toppings
I’ve been a pumpkin lover all my life, yet until recently, kabak tatlisi, which is often served on its own or with kaymak (Turkish clotted cream), left me cold. Then I sampled it in Hatay province in southeast Turkey, where the pumpkin is served drizzled with tahini (that is a Turkish pantry staple) and sprinkled with crushed walnuts. The tahini’s slight bitterness tames the cloying sweetness of the pumpkin and crunchy walnuts complement the pudding-soft texture of the vegetable. The tahini’s oil content lends a rich, satisfying mouth feel, but since it’s made up mostly of vegetable, kabak tatlisi settles lightly in the stomach.
Though Turkish cooks usually make kabak tatlisi in a covered pan on top of the stove, I’ve found that the dish cooks wonderfully — and with less bother — in the oven. It emerges a lovely burnt orange, tinged with brownish bits from the caramelization.
Do not fear the sugar
Be prepared. This recipe calls for what will seem like a lot of sugar. Resist the temptation to cut back. The sugar is there to pull liquid out of the pumpkin. Yes, the result is super-sweet, but kabak tatlisi isn’t meant to be eaten in American pumpkin-pie-sized wedges. Just a few cubes per diner — three or four little bites of caramel-y, tahini-nutty sweetness to end a meal — will do.
Resist also any urge to reduce cooking time by cutting the pumpkin into smaller pieces than this recipe indicates, or it will turn to mush before it caramelizes and the syrup has reduced. Be sure to use unadulterated tahini, without peanuts or peanut butter. Its bitter edge is essential to the success of this dish.
Plan ahead: the pumpkin must “soak” in the sugar for 8 hours (or overnight) before baking.
Caramelized Pumpkin with Tahini and Walnuts (Firinda Kabak Tatlisi)
Note: This recipe can easily be doubled, halved, cut into thirds. The rule of thumb is one part sugar to two parts pumpkin. Do not serve kabak tatlisi hot out of the oven. Room temperature or slightly chilled is best. Make sure your tahini is at room temperature when you serve.
Prep time: Up to 1/2 hour to prep the pumpkin; 8 hours to “soak” the pumpkin
Cook time: 45 minutes
Yield: Serves 8
Ingredients
1 1/2 pounds peeled pumpkin
3/4 pound (1 1/2 cups white sugar)
12 tablespoons pure tahini, at room temperature and whisked to remove any lumps
3/4 cup chopped walnuts
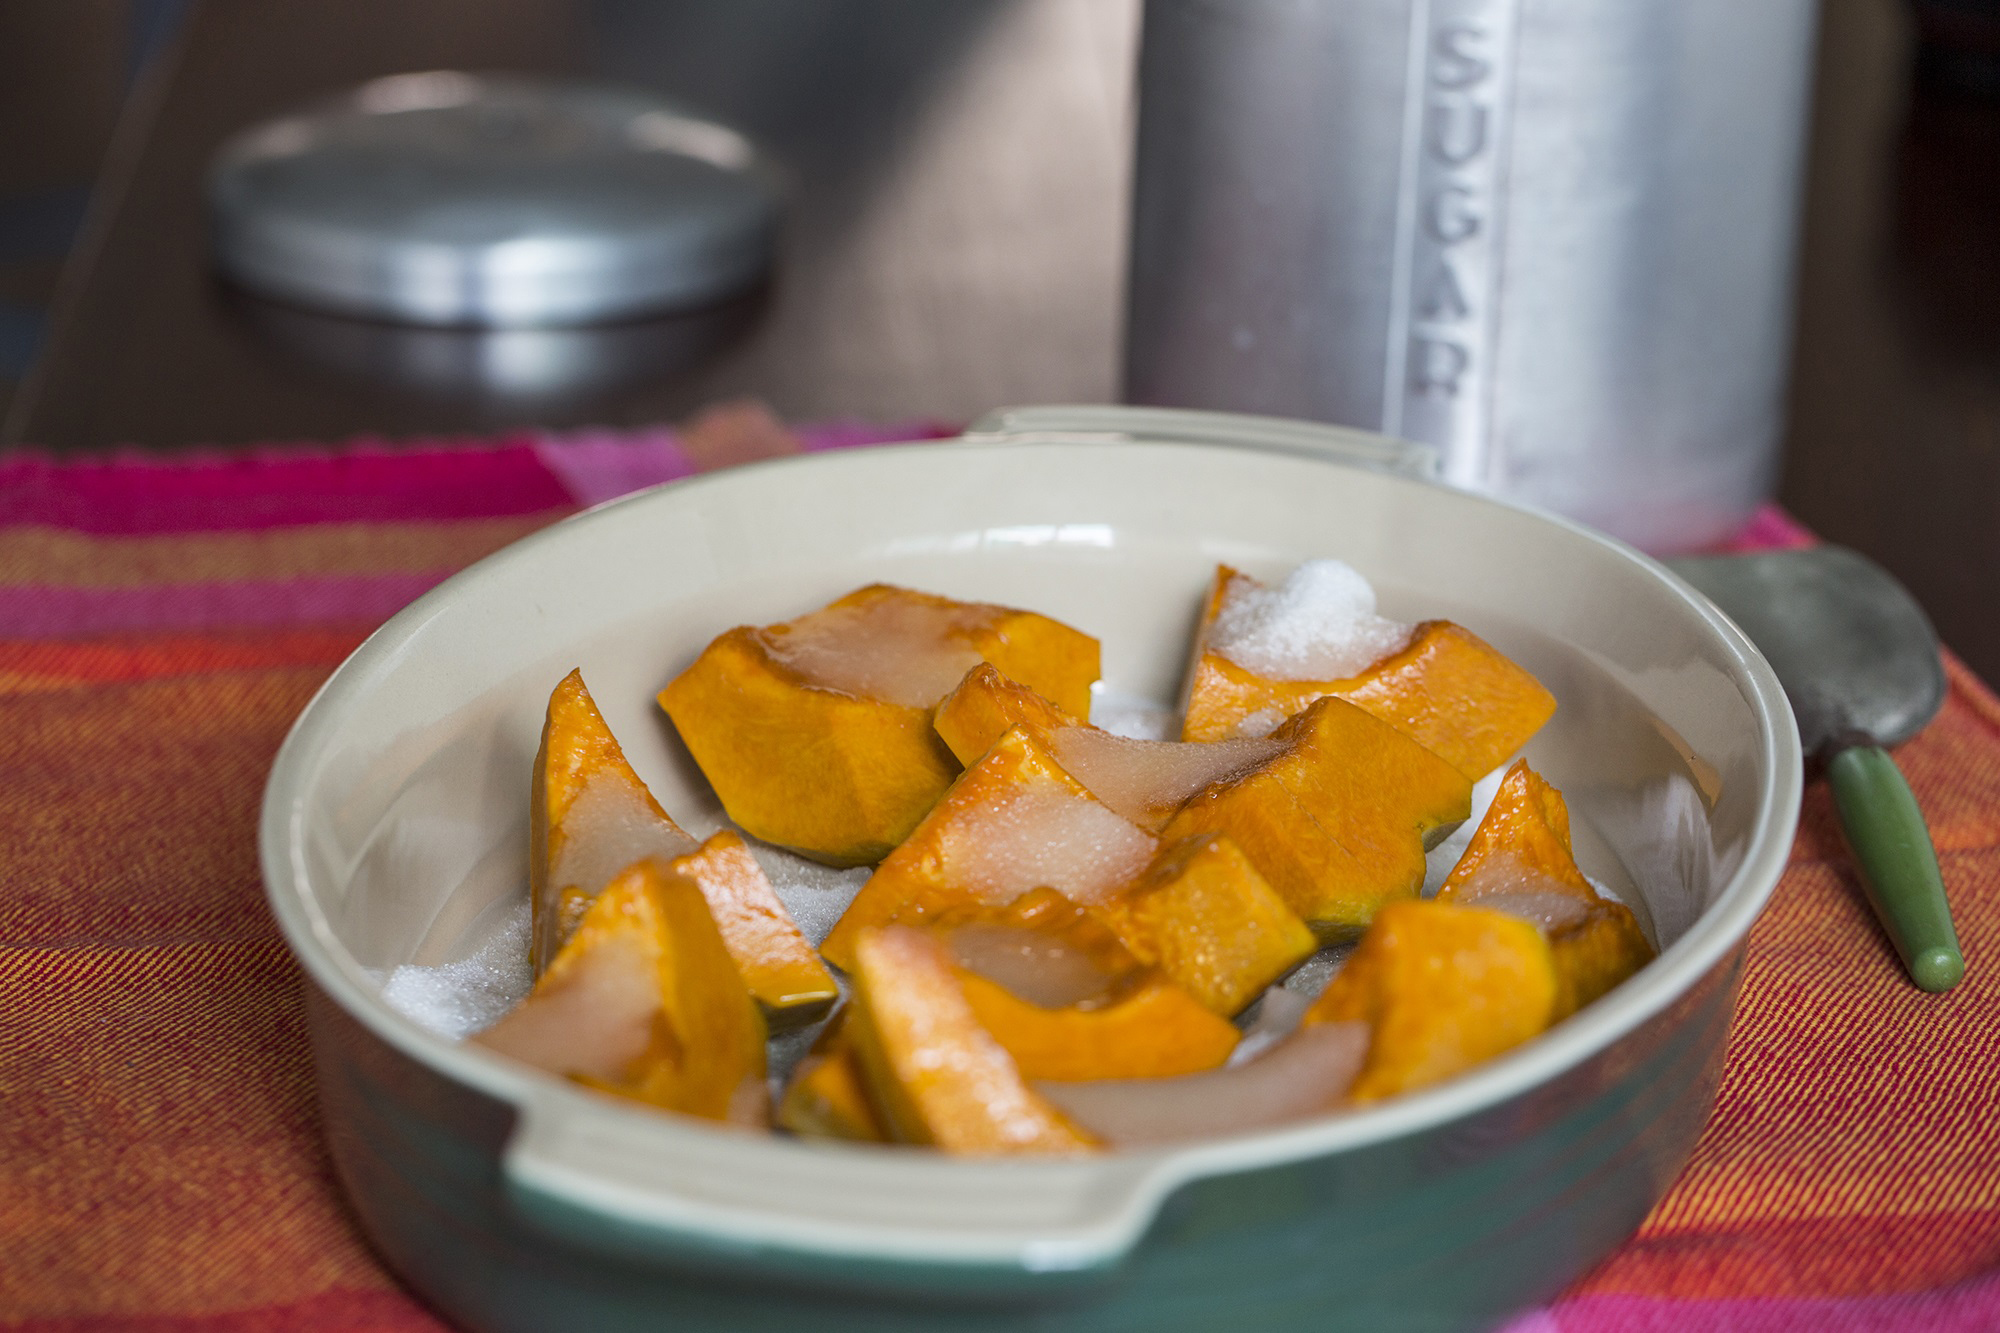
This Turkish pumpkin dessert features pumpkin wedges “soaked” for hours in sugar to draw out the liquid from the gourd. Credit: David Hagerman
Directions
Prepping the pumpkin:
1. Cut the pumpkin into wide (3-inch) wedges and/or large (4-by-4-inch) chunks.
2. Arrange the pumpkin pieces in a baking dish or tray just large enough to hold them closely, but without crowding.
3. Sprinkle the sugar over the pumpkin and cover the dish with plastic wrap.
4. Leave the pumpkin at room temperature for 8 hours or overnight. Turn the pumpkin pieces occasionally – once every few hours, or once before bed and once after you get up — to expose all sides to the sugar.
Baking the pumpkin:
1. Preheat the oven to 350 F.
2. Before baking, turn the pumpkin pieces one last time in what has likely become a mixture of syrup and lumps of wet granulated sugar.
3. Place the baking dish on the middle rack of the oven and bake for 40 minutes, gently turning the pumpkin pieces and basting with the sugar syrup once or twice.
4. Check the pumpkin for doneness by piercing a piece with a sharp knife. There should be no resistance.
5. Baste the pumpkin once more, then raise the heat to 400 F and continue to bake until it shows bits of caramel brown in some spots and the syrup bubbles, about 10 to 15 minutes.
6. Cool the pumpkin in its baking dish.
7. To serve, cut the pumpkin into small cubes or wedges and carefully transfer to bowls or plates. Spoon a bit of syrup over it, if you like, or leave it in the dish. Drizzle 1 1/2 tablespoons of tahini over each serving of pumpkin and sprinkle with walnuts.
Main photo: This prized Turkish dessert, kabak tatlisi, features pumpkin wedges simmered in a sweet sugar-based syrup and topped with tahini and walnuts. Credit: David Hagerman

Was there pumpkin pie at that first legendary Thanksgiving? My bet is there was.
You will recall from grade school that the first grand feed was held in Plymouth, Mass., in 1621 by the Pilgrims to mark their first harvest — and the fact they were alive. This was something to celebrate, given that 50% of their compatriots didn’t make it through the first year. We know they the feast lasted more than three days, but exactly what was on the menu remains a bit of a mystery.
The English being English, the reports of the event mention only the meat. We know they invited about 90 Wampanoag who brought plenty of venison, and the Englishmen managed to bag a week’s worth of unnamed game birds, so there’s a pretty good chance wild turkeys were among them. As far as cranberry sauce and mashed potatoes, marshmallow-topped yams and Campbell’s green bean casserole, or even pie, the record is silent. We know they had no potatoes, marshmallows or Campbell’s soup.
More from Zester Daily:
» Yes, it’s gluten free: Have this pie and eat the crust too
But there’s a semi-decent chance they might have sent the kids into the cranberry bogs to pick the autumn fruit and stewed some sort of condiment out it. After all, this sort of thing was popular enough in England at the time. And they probably did have pie, an English staple if ever there were one, though apple pie would have been out of the question — not because they wouldn’t have been familiar with it. Apple pie is mentioned as early as the 14th century, and the cookbooks familiar to the Puritans included plenty of apple pie recipes. The trouble was, any apple trees in Massachusetts would have been no more than seedlings.
What were the other options? Back across the Atlantic, pie shells — or “coffins,” as they were known — could be filled with just about anything: pigeons, mutton haunches, minced meat, baby pigs, rabbits. For a lark, four and twenty live blackbirds might be tucked away in a pie crust and released at the dinner table. Fruit and vegetables were popular fillings as well, often sweetened, but not always. Pumpkins, or pompions, as they were called, had taken up root in England long before the Mayflower sailed and consequently pumpkin pie recipes showed up early, though not in a form the test kitchens at Libby’s would recognize. John Gerard recommended baking them sliced with apples in the 1590s. Hannah Woolley’s popular 17th-century culinary guide, “A Gentlewoman’s Companion,” described a “pompion pye” made by sautéing pumpkin pieces with thyme, rosemary, marjoram, cinnamon, nutmeg, cloves and pepper. These are mixed with eggs and sugar and layered in the pie shell with apples and currants. To serve the pie, you lift off the lid, stir the pumpkin to a purée and replace the lid.
Apparently, there were parts of England where pumpkins were cultivated specifically for a custardy apple pumpkin pie. It’s reasonable to surmise that early New England settlers made something similar but with just pumpkins. Maybe pompion pye, made of familiar native squash, was one of the exotic European preparations the Wampanoag guests got to taste in 1621.
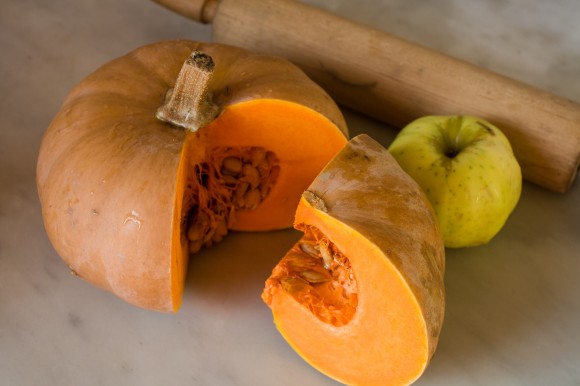
Inside the pumpkins. Credit: Michael Krondl
Certainly the kind of smooth pumpkin custard-filled pie we’re familiar with became commonplace in New England. Amelia Simmons’ “American Cookery” from 1796 has a couple of recipes for it as well as a variant made with apples mixed with squash. All these are based on old-world models, on pies filled with a sweet purée of potatoes, chestnuts, quinces or even African yams. The main difference: In the king’s English, these were called “baked puddings”; in America they eventually came to be “pies.”
No Libby’s for this apple pumpkin pie
Compared to 100 or more years ago, today’s cook is presented with both advantages and impediments to making a decent pumpkin pie. Canned pumpkin is ubiquitous, almost all of it made by Libby’s, from a pumpkin variety called Dickinson that resembles a giant, tan football. Finding your own cooking pumpkin, however, isn’t always easy.

Pumpkins for pie. Michael Krondl
There are plenty of those big, happy, orange pumpkins, but they are intended for carving jack-o’-lanterns, not eating. Their flesh is scrawny, insipid and altogether useless for pie, or any other culinary effect. Like the Libby’s variety, cooking pumpkins tend to be the color of butternut squash, with a thick layer of orange flesh. The so-called cheese pumpkin is one kind that can be found at farmers markets this time of year. But even these, you can’t just roast and use. To get the desired density for a custard-type pumpkin pie, the roasted pumpkin flesh needs to be lightly puréed (a food processor or food mill will do the job) and then drained. The easiest way to do this is to line a large sieve or colander with a coffee filter. After two or three hours, the consistency will approximate what comes from a Libby’s can.
Is it worth the effort? That’s not the sort of question a Puritan would ask.
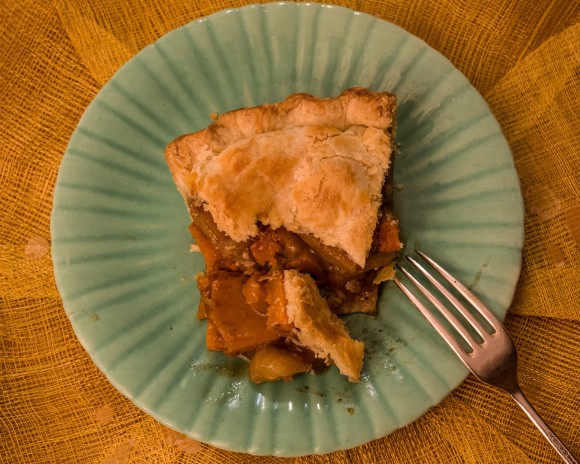
Apple Pumpkin Pie slice. Credit: Michael Krondl
Apple Pumpkin Pie
Adapted from “The Great Little Pumpkin Cookbook”
Prep time: about 1/2 hour
Cook time: about 1 hour
Total time: 1 1/2 hours plus time needed to make pastry
Yield: 8 to 10 servings
While this doesn’t exactly reproduce the consistency of the old British custardy pumpkin apple pies, it is a tasty departure from the usual autumn staples. If a cooking pumpkin isn’t available, a butternut squash will serve the same purpose.
1 recipe double crust pie pastry (recipe follows)
1 1/2 pounds cooking pumpkin or butternut squash
1 pound firm cooking apples such as Northern Spy, Baldwin or golden delicious
2 tablespoons cider vinegar
3 tablespoons flour
3/4 cup dark brown sugar
1/2 teaspoon cinnamon
Large pinch nutmeg
Large pinch cloves
1 egg, lightly beaten
Directions
1. Roll out half of the pastry for a bottom crust and place in a 9-inch pie pan. Refrigerate.
2. Preheat oven to 425 F.
3. Scoop out the pumpkin seeds, cut the pumpkin into 1-inch strips, cut away the peel and slice the strips into 1/8-inch thick pieces. (You should have 4 cups.)
4. Peel, quarter and core the apples. Cut into 1/4-inch slices.
5. In a large bowl, toss the pumpkin with the apples, vinegar, flour, brown sugar, cinnamon, nutmeg and cloves. Arrange in the pastry-lined pie pan.
6. Brush the edge of the dough with the beaten egg.
7. Roll out the remaining dough and place on top of the filling. Crimp the edges. Cut vent holes in the top crust and brush the top with the egg.
8. Set on the bottom shelf of the oven. Bake 20 minutes. Lower temperature to 350 F. Continue baking until golden brown and the pumpkin offers no resistance to a knife or skewer, about 1 more hour.
9. Cool at least 2 hours before serving. Serve at room temperature or slightly warm.
Double Crust Pie Pastry
Prep time: 10 minutes
Total time: 10 minutes plus 2 or more hours of chilling
Yield: Makes enough dough for 1 double crust or 2 single crust pies.
Ingredients
2 1/3 cups all-purpose flour
1/2 teaspoon salt
8 tablespoons unsalted butter, cut into small pieces
6 tablespoons lard or vegetable shortening
about 1/3 cup ice water
Directions
1. Sift together the flour, and salt. Add the butter and shortening. Using your hands or a pastry cutter, break up the two fats in the flour until the mixture is about as fine as rolled oats.
2. Add just enough water to moisten the flour. Toss to form a rather dry dough. Do not overmix. Gather the dough together and wrap in plastic film. Refrigerate at least 2 hours.
Note: The dough may be made ahead and refrigerated for up to 3 days or frozen for several months.
Main photo: Apple Pumpkin Pie. Credit: Michael Krondl