Articles in Baking

If you have a sweet tooth, you’re probably sweet on peanut brittle.
On a recent visit to the elegantly rustic Goodstone Inn in the beautiful horse country around Middleburg, Va., instead of a piece of standard-issue chocolate at the evening turn-down, the inn had placed a cellophane-wrapped bag of peanut brittle on the pillow.
Because this is Virginia where peanuts are an important crop, the brittle used locally grown legumes and was made in the inn’s kitchen by executive chef William J. Walden.
They were delicious. Crisp, not too sweet, with lots of peanut flavor. I was impressed that the inn’s chef made the nighttime treat. That seemed so much more personal.
Walden explained that he took great pride in his brittle. At first unwilling to share the recipe, he at last relented.
What I liked best about his brittle was the way he used baking soda to increase the brittle’s volume so that instead of a flat sheet, the candy had a lighter quality.
According to Walden, getting that aeration right will require experimentation because altitude and humidity affects how the baking soda interacts with the other ingredients.
Goodstone Inn Peanut Brittle
Once you make your own brittle, you will find it difficult to go back to store-bought candy. Be sure to store the brittle in an airtight container.
Serves 6 to 8
Ingredients
Directions
- Melt the butter and brush it over a half sheet pan lined with parchment paper, making sure that you cover it well with the butter. Set aside and reserve.
- Combine the sugar, corn syrup and peanuts in a heavy gauge pot.
- Using a wooden spoon, stir vigorously over high heat until an amber color is reached. Do not scorch! Use a wooden spoon for better results.
- Once the caramel is a dark amber, add the baking soda and turn off the heat and stir. A chemical reaction will occur, and the mixture will begin to rise.
- Immediately pour out on to your buttered tray lined with parchment and spread evenly.
- Cool completely at room temperature until hard and stiff. Break into aerated pieces and serve on a decorative plate or platter.
- Store in an air-tight, moisture-free container.
Variations
- Instead of peanuts, use almonds, cashews, hazelnuts, pine nuts or walnuts.
- Add ¼ teaspoon pure vanilla extract to the sugar and corn syrup.
Zester Daily contributor David Latt is a television writer/producer with a passion for food. His new book, “10 Delicious Holiday Recipes” is available on Kindle. In addition to writing about food for his own site, Men Who Like to Cook, he has contributed to Mark Bittman‘s New York Times food blog, Bitten, One for the Table and Traveling Mom. He continues to develop for television but recently has taken his passion for food on the road and is now a contributor to Peter Greenberg‘s travel site and the New York Daily News online.
Photo: Goodstone Inn in Middleburg, Va. Credit: David Latt
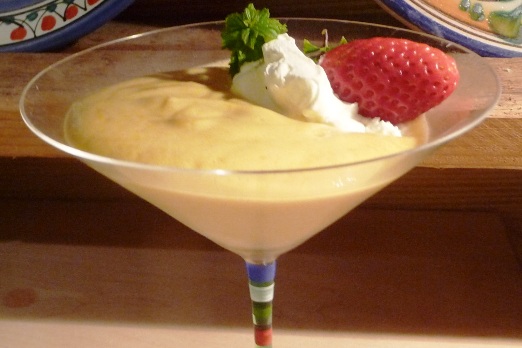
One of the easiest, oldest and most appropriate dishes to make for New Year’s Eve celebrations is one that rarely pops into people’s minds. Besides being simple, zabaione is one of Italy’s most famous holiday desserts doable in our American kitchens. Also spelled “zabaglione,” it’s delicious foam of emulsified Marsala wine, egg yolks and sugar. It’s known as a spoon sweet.
Zabaione is old too and has an interesting history. All kinds of theories have been advanced about the origins of zabaione — that it comes from the Greeks, or the Latin word sabaium, a kind of yeast, or from the French word sabayon (actually the French derives from the Italian), or from the French expression chaud bouillon (hot bouillon), or that it was invented by a Franciscan monk, Pasquale de Baylon (1540-1592), who lived in the Parish of Saint Thomas in Turin at the time, or from the 17th-century chef of Carlo Emanuele I of Savoy.
More than likely zabaione is Sicilian in origin, derived from the Sicilian word zabbina (also called zarbinata and zabb, which refers to the foam of the whey resulting from the boiling of the milk for ricotta and means “to whip while cooking,” which is exactly what you do to make zabaione. Zabbina derives either from the Arabic words jabbān (jubna) meaning “cheese” or zarb, meaning the thick part of curdled sweet milk mixed with an acidic liquid, that is, according to the early 19th-century lexicographer G.W. Freytag, author of “Chrestomathia Arabica,” thought also to be the root of the custard dessert zabaione.
The first mention of something like this “creamy foam made from beating egg yolks with sugar and the addition of Marsala wine in a bain-marie” can be traced to the 15th century where it was called xabaione or zebaion. In Sardinia, the groom is often handed a bowl of zabaione to give him strength on his wedding night. Zabaglione was originally served hot, but today it is served cool. One last piece of advice: You’ll want to use a high quality Marsala, such as that made by Florio and not some cooking wine. Either dry or sweet Marsala can be used.
Zabaione
Serves 4
Ingredients
Directions
- Combine the egg yolks, sugar and Marsala in the top of a double boiler. In the bottom portion, bring enough water to touch the bottom of the top part to a boil over high heat, whisking the egg mixture swiftly all the while. Continue until well blended, thick and frothy, about 4 minutes after the water starts to boil. Remove from the heat immediately.
- Pour into 4 large wine glasses or, preferably, martini glasses, and place in the refrigerator for at least 4 hours covered with plastic wrap. Garnish with strawberries, mint leaves and whipped cream, if desired.
Zester Daily contributor Clifford A. Wright won the James Beard / KitchenAid Cookbook of the Year Award and the James Beard Award for the Best Writing on Food in 2000 for “A Mediterranean Feast.” His latest book is “Hot & Cheesy” (Wiley) about cooking with cheese.
Photo: Zabaione. Credit: Clifford A. Wright
For butterscotch fundamentals, Teresa Urkofsky, pastry instructor at American River College in Sacramento, Calif., tells it straight.
“The essential ingredients are brown sugar and butter,” she says. “It can be light brown sugar or dark brown sugar.”
Urkofsky makes butterscotch pudding on top of the stove. She browns the sugar and butter, letting it lightly caramelize, then adds milk and cornstarch. “I like the low reaction temperature with cornstarch. You don’t have to cook out a flour taste,” she says.
She tempers in eggs, pours it into serving bowls and stashes them in the refrigerator.
There is no question that she loves it. “It’s such a round, beautiful flavor that might remind you of home.”
Where did butterscotch come from?
Memories of butterscotch may be a from-scratch effort, or the quick method from the boxed butterscotch pudding mix introduced by JELL-O in 1936. The origin of butterscotch is rather murky. Food historian Ken Albala, who teaches history at the University of the Pacific in Stockton, Calif., found an obscure, older origin of butterscotch.
“There’s a company called Parkinson’s of Doncaster, which is in southern Yorkshire, which started marketing their own brand of butterscotch in 1848,” he says. “I couldn’t find reference to the word in print until about 1852 or 1853.”
The very mention of Yorkshire in England scotches any belief that the “scotch” in butterscotch has anything to do with Scotland. Albala says the Scottish connection is an etymological myth. And Albala has one more butterscotch bummer.
“Of course, it doesn’t contain Scotch.”
There’s Scotch in this butterscotch
That’s right, there’s no Scotch in butterscotch, unless you’re talking about the butterscotch pudding at Sacramento’s Grange restaurant.
It’s made by pastry chef Jackie Phongsavath. She works in a basement dessert corner, and yes, she puts Scotch in butterscotch. She has to go upstairs to the restaurant’s bar to ask for it. The bartender usually gives her well Scotch, something like Dewar’s.
Don’t mess with a destination dessert
Grange’s butterscotch pudding has become something of a destination dessert. Typical of most staff at high-end restaurants, menus get tweaked too often. Once, the butterscotch pudding came off the menu — a marketing fiasco.
“I thought there was going to be a riot at the corner of 10th and J” in downtown Sacramento, recalls Chef Jackie.
So the staff brought it back. But this time it was retooled for a guaranteed consistency. A new, daring recipe it is, because it defies the essence of butterscotch. There’s no butter, brown sugar or thickener.
Without these traditional elements, how does Chef Jackie get to butterscotch?
With technical twists you can probably accomplish at home.
First, she separates 30 eggs for the yolks. “I’m probably not world champion, but I usually get that task done in about three minutes,” she says.
Recipe’s secrets revealed
She was allowed to reveal the new recipe’s two prevailing secrets. One is a shortcut: Guittard-brand butterscotch chips. Taste test after blind taste test proclaimed the chips gave the best taste and best consistency compared with the previous traditional stovetop version. With eyes open, the pudding had sheen.
But the second secret is more challenging. It’s exacting sugar work that brings sugar and water to about 230 F – still clear but beginning to caramelize.
Sugar work
 “This is the fun part,” Chef Jackie says. “We just wait. You just basically want to bring your sugar to a stage of caramelization before it hits any brown color.”
With sizzling fanfare, cream hits the bubbling sugar, along with salt, vanilla and the Scotch. She adds the chips to the pot last, so they lay on the surface instead of sinking to the bottom, where they could possibly scorch. She whisks without end to prevent hot spots and keep it all smooth.
“You know it’s ready when everything is melted,” she says, “and you lift the whisk to make sure there’s no sugar, no butterscotch chips stuck to the whisk.”
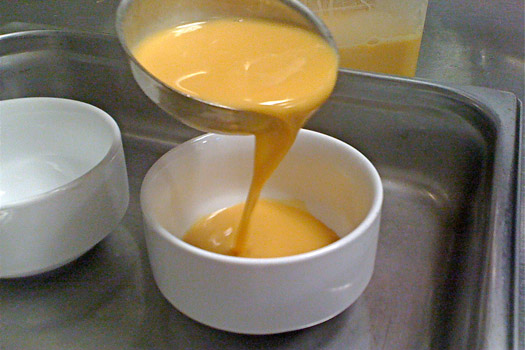
Finally, the yolks are tempered into the base. A small amount of the hot butterscotch base is whisked into all the yolks, then the now-lukewarm yolk mixture is added back to the hot base and whisked with determination.
It’s important to strain the base. Sure enough, a strainer caught some cooked whites and unsmoothed yolk.
To bake, Chef Jackie fills 30 ramekins per daily batch. For a gentler ride through the heat, they bake in a pan with water added, called a water bath. She covers the pan with foil, making sure to crimp it well around the sides. She pokes a few steam vents into the foil. The pudding, essentially, bakes and steams.
The presentation
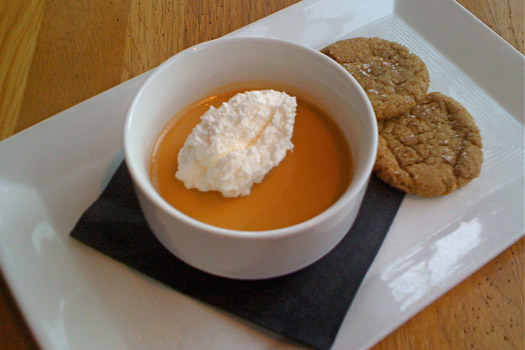
When they’re done and cooled, Chef Jackie heads upstairs to the dining room. Here, she presents each serving with a dollop of crème fraîche.
I got to sample the result with the pastry chef, and I thought I’d never tasted butterscotch so sublime. Chef Jackie could barely contain her own swoon.
“Mmmm,” the pastry chef said, feigning weakness. “Give me a minute! It’s a really rich dessert I would only eat once and I’d probably just fall over!”
Is it pudding?
Some might quibble this is not pudding. But it’s not quite pot de crème or crème caramel, either. Chef Jackie defends her glossy, spoon-soft result.
“It’s not a stovetop pudding,” says Chef Jackie. “It’s a pudding baked in a water bath. It’s pudding, but it’s a fancy pudding.”
With its smoky hint of Scotch, sometimes it pays to think outside the pudding box.
Grange Butterscotch Pudding
Serves 6
Equipment
Ingredients
Directions
- Set six sturdy 4-ounce ramekins in a baking pan, such as a metal 9-by-13-inch rectangular cake pan. Preheat the oven to 300 F. Set a medium-sized double-mesh strainer over a medium bowl and have it ready on your countertop.
- Separate the egg yolks. Reserve them in a bowl. Measure the butterscotch chips and have them ready in a bowl.
- In a large measuring cup or pitcher, stir together cream, salt, vanilla and Scotch. Have it convenient to the stove.
- Combine water and sugar in a medium pot. Heat over medium-high heat until the sugar dissolves and boils gently, about 8 to 10 minutes (up to 220 F to 230 F on a candy thermometer), making sure the sugar does not darken.
- With a whisk at the ready, pour the cream mixture into the hot sugar. (It will sizzle.) Whisk well to combine, going around the sides and across the bottom of the pot. Add the chips, continuing to whisk to prevent the chips from scorching. Turn off the heat. Continue whisking until no sugar or chips cling to the whisk and the mixture is smooth.
- Whisk some of the hot butterscotch mixture into the egg yolks, whisking gently but thoroughly. Then pour the tempered yolks back into the main mixture in the pot, whisking well.
- Strain the butterscotch through a double-mesh strainer into a bowl.
- Ladle butterscotch evenly into the arranged ramekins.
- Fill the baking pan with hot water so it comes halfway up the sides of the ramekins. Cover the pan well with foil and crimp it to seal well around the pan’s rim. Poke several holes in the foil to act as steam vents.
- Set in the oven and bake 45 to 50 minutes or until just set in the center.
Zester Daily contributor Elaine Corn is a James Beard Award-winning cookbook author and food editor. A former editor at the Louisville Courier-Journal and the Sacramento Bee, Corn has written six cookbooks and contributed food stories to National Public Radio.
Photos, from top:
The butterscotch pudding from Grange restaurant in Sacramento, Calif.
After it is prepared, the butterscotch pudding is poured into ramekins and cooked in a water bath.
Credits: Elaine Corn
Instead of buying candy to serve at home or give as gifts, flex your culinary muscles and make your own. It’s easier than you think.
For years, a close friend has always given gifts she makes herself. She believes strongly that a homemade gift expresses the character of the giver so much more than a store-bought gift.
Making chocolates requires a few specialized tools, some of which may already be in your kitchen. A double boiler or two saucepans that can fit together is essential. A Silpat or nonstick sheet is also very important. A silicone spatula is better than a rubber one.
Making individual chocolates is infinitely easier and more elegant if you invest in hard plastic or silicone molds.
If you want to make chocolates, be prepared to do a lot of tasting in your search for good quality, bulk chocolate. Before you buy, read the label. Look for natural ingredients. Avoid chocolate with artificial flavorings and additives.
Good chocolate is going to be more expensive than lesser quality chocolate, but it is worth the price. This is an instance when it’s worthwhile to splurge.
You might have to sample a few types to find a chocolate that suits you. You want a chocolate with clean flavors and a good mouth feel. If the chocolate tastes gummy or has an aftertaste, then try another.
I found two chocolates I thought were good. To make my candy, I discovered that instead of one chocolate, I liked using both. Equal amounts of milk (33 percent cocoa solids) and semi-sweet dark (72 percent cocoa solids) chocolate worked well because they complemented each other. The milk chocolate was sweet and creamy. The dark chocolate had more bite and was less sweet.
Then I experimented using different nuts and flavors. Hazelnuts, peanuts, almonds and walnuts worked well, as did vanilla, espresso syrup, crystallized ginger and candied orange peel.
I quickly learned a few lessons.
Less is more is certainly true with chocolates. Almond slivers were better than a whole almond in the small chocolate bars I was making. Barely a quarter-teaspoon of finely chopped crystallized ginger was more than enough to flavor a mini chocolate bar.
If you have parchment paper or a Silpat sheet, you can make a beautiful chocolate sheet, studded with bits and pieces of dry roasted nuts or flavorings like crystallized ginger.
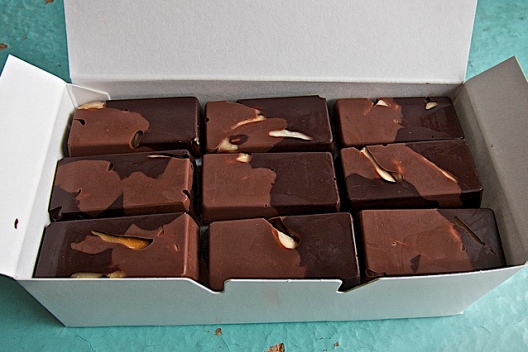
If you want to make individual chocolates, you will need hard plastic or silicone molds, which come in dozens of fun shapes: stars, hearts, rounds, squares, unicorns, horses, leaves, flowers, jewels and — my personal favorite — mini-candy bars.
Once you have made your chocolates, store them in an air-tight container in the refrigerator, using waxed bakery tissue between layers to prevent sticking.
If you want to give your chocolates as a gift, many kitchen and professional restaurant supply stores and Websites, sell candy boxes that are perfect to box up your treats.
Homemade Chocolates
Serves 6-8
Ingredients
¼ pound good quality milk chocolate
¼ pound good quality dark chocolate
¼ cup raw, slivered almonds
1 teaspoon sugar
Directions
- Use two double boilers or 4 saucepans to separately melt the two chocolates. Fill the bottom part of the double boiler or one saucepan with water, being careful that the bottom of the top or second saucepan doesn’t not touch the water.
- Break up the chocolate and place the milk chocolate into one saucepan and the dark chocolate into the other. Stir occasionally as the chocolate melts.
- Lower the temperature for 5 minutes, stir and then raise the flame again so the water simmers as it did before. This will temper the chocolate so it achieves a good finish. Be careful not to over heat the chocolate. That will granulate the chocolate and make it bitter. Keep the water in the bottom pan gently boiling so the chocolate stays in a liquid state. Add water as needed.
- While the chocolate is melting, place the almonds in a frying pan on medium heat. Toss and sprinkle with sugar. Keep the pan moving as the sugar liquefies. Coat the almond slivers, remove with a silicone spatula and let cool on a Silpat sheet or parchment paper.
- To make one, large chocolate sheet, pour dark chocolate onto the nonstick or parchment sheet placed on a cookie sheet. Press a flat knife against the sides of the chocolate to create a rectangular shape. Sprinkle the almonds on the top. Pour the milk chocolate over the almonds. Use a clean, flat knife to keep both chocolates in the rectangular shape. Let the bottom layer be larger than the top so there is a colorful contrast between the two chocolates.
- Place in the freezer uncovered for 10 minutes. Remove and refrigerate until ready to serve. If any chocolate in the saucepan is unused, use a silicone spatula to remove the chocolate from the sauce pan, place in an airtight container and refrigerate to use at a later date.
- To store the chocolate sheet, peel off the nonstick sheet and place into an airtight container. To serve, place the chocolate sheet on a platter and accompany with ice cream or whipped cream.
- To make individual chocolates, use a silicone baking or candy-making mold. Pour a small amount of one chocolate into each mold section, drop in 2-3 almond slivers and layer in the second chocolate. Place the mold on a cookie sheet, put in the freezer 10 minutes until the chocolate sets. For storage, remove the individual chocolates from the mold, place in an airtight container with waxed bakery tissue between the layers to prevent sticking and store in the refrigerator.
- The chocolates can be served either cold, straight from the refrigerator so they are crisp, or allowed to come to room temperature so they are soft. Serve on a decorative plate or platter.
Variations
- Instead of almonds, use chopped dry roasted peanuts, pecans or hazelnuts.
- Instead of nuts, use finely chopped crystallized ginger.
- Instead of nuts, use finely chopped candied orange peel.
Zester Daily contributor David Latt is a television writer/producer with a passion for food. His new book, “10 Delicious Holiday Recipes” is available on Kindle. In addition to writing about food for his own site, Men Who Like to Cook, he has contributed to Mark Bittman‘s New York Times food blog, Bitten, One for the Table and Traveling Mom. He continues to develop for television but recently has taken his passion for food on the road and is now a contributor to Peter Greenberg‘s travel site and the New York Daily News online.
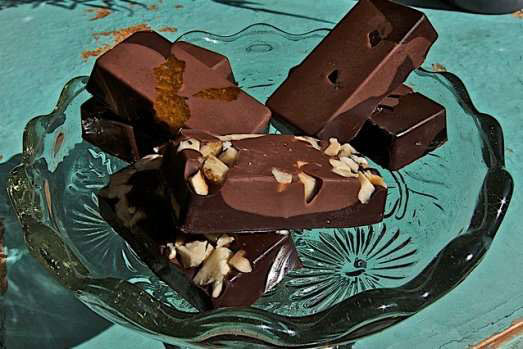
Photo: Chocolate mini-candy bars with caramelized almond slivers in a candy box. Credit: David Latt
It stands to reason that Greece should have an endearing, if waning, tradition of highly symbolic, decorative holiday breads. In agrarian communities, long before the advent of pre-fab loaves and high-tech ovens, bread was two things to almost all people: the daily sustenance and the tableau upon which the milestones, trials, tribulations, hopes and fears of life were carved. Decorative breads were part of life in Greece long before Christianity took root. In fact, many of today’s religious bread customs were co-opted from ancient pagan ritual.
The importance of bread has to do with the importance of wheat, the staff of life, in the Mediterranean. Its growing cycle is rife with symbolism, from the myth of Persephone, Demetra and Hades to the Christian imagery of bread as the symbol of God and of Christ — who is often referred to as the Bread of Life. Special breads are baked to celebrate marriage and birth and to commemorate death. At Christmas, they are made to symbolize hope for the crops and the fortunes of the family in the coming year.
Symbols include sheep, flowers and farm tools
Despite a wealth of regional variations, the figures, sculpted in dough on top of these loaves, are often similar. Yokes, threshing tools and wheat staffs are common, as are sheep and shepherds. In parts of Macedonia, oxen are almost always one of the sculpted decorations. Some are related to crops or farming traditions of a specific area. In Kastoria, which is in Macedonia, farm families make sweet biscuits in honor of their animals. In Thrace, where both farming and husbandry have been traditional professions, sheep, cows, oxen and sickles are part of the bread decorations.
Among the itinerant shepherd communities of northern Greece, especially among the Sarakatsanoi, Christmas bread garnishes include all the tools of their lifestyle: sheep, ewes, the hut and its fence, the shepherd with his long woolen cape and staff, and buckets for milk; even sheepdogs are sometimes depicted. Grapes, grapevines and daisies (the number of petals are representative of the number of family members) are often sculpted, as are some symbols we usually interpret as representative of evil, such as the snake. These, explains the author Nikos Psilakis in his excellent book [in Greek], “The Bread and Sweets Traditions of the Greeks,” explains a way of neutralizing these forces. “In villages, people thought it good luck to find a snake inside the house and that killing it would bring misfortune.”
The cross is most popular
But most common of all the Christmas bread symbols in Greece is the cross motif or the Greek letter X, the start of the word “Christ.”
Overall, these ornately sculpted figures, often created by teams of women, fellow villagers or family members represent good wishes for a prosperous harvest, as well as a kind of magic. It’s as though placing the figures on the bread protects the crops, animals and family.
All the foods of fertility and prosperity as interpreted by agrarian societies, enrich these loaves: dried fruits, nuts, sesame seeds, spices and honey or sugar foremost among them. Their typically solid round shape, sometimes with a dough cross studded with nuts baked into the top (see recipe below), is symbolic of the cycles of nature and life, of eternity.
Bread symbols as offerings
The bread has to be broken, or sacrificed, but not necessarily consumed, and tradition has it that, year in and out, it must be broken by the same member of the family, usually the male head of the household who will first make a sign of the cross over the loaf. In some parts of Greece, a piece of the Christmas bread takes its place near the family icons, which many families still keep in a corner of the house. Elsewhere, it is brought to church as an offering or set among burning incense.
There are endless traditions surrounding Greek symbolic holiday breads. The Christmas and New Year’s breads are baked with that which springs eternal: Hope. This year, more than any other perhaps, every Greek household should dig out their old recipe books to find the Christmas bread that will spread some cheer during what promises to be a tough year.
Christopsomo
Greek Christmas Bread
Makes two 12-inch round loaves
Begin one to two days ahead to make the starter:
Ingredients
For the starter:
For the bread dough:
Directions
For the starter:
- In a large bowl, dissolve 1 teaspoon active dry yeast into ½ cup warm water and mix to combine. Let stand 10 minutes until creamy.
- Add a half cup more of warm water and stir in 3 cups unbleached all-purpose flour. Mix until a dough mass forms, adding a little more flour if necessary.
- Cover with plastic wrap and let stand for one to two days; it will rise then fall back on itself.
For the bread dough:
- Combine the flour, sugar and salt in a large bowl. Add the olive oil and work the mixture with your fingertips until it is mealy and moist. Make a well in the center and pour in warm water, ouzo, nuts and raisins. Break the starter up into small pieces, adding them to the well. Mix to combine with a wooden spoon, then knead well on a lightly floured surface until the dough is smooth and soft. Cover with a towel and let rise in a warm draft-free area until doubled in bulk, about 2½ hours.
- Punch the dough back down. Remove a fist-size piece and set aside. Shape the dough into two equal balls, flatten each a little with your hands and place in two oiled, 12-inch round pans. Place five walnuts, forming a cross, in each of the loaves. Take the fistful of dough you’ve set aside and roll it into thin round strips. Cut and wrap around each of the walnuts to secure. Let the dough rise again, which will take about one hour.
- Preheat the oven to 400 F. When the dough is swollen and almost doubled, place in oven and bake for about 45 minutes, or until golden. Remove, cool on a rack, and serve.
Zester Daily contributor Diane Kochilas, the food columnist and restaurant critic for Greece’s largest newspaper, Ta Nea, is also a culinary teacher, restaurant consultant and award-winning cookbook author.
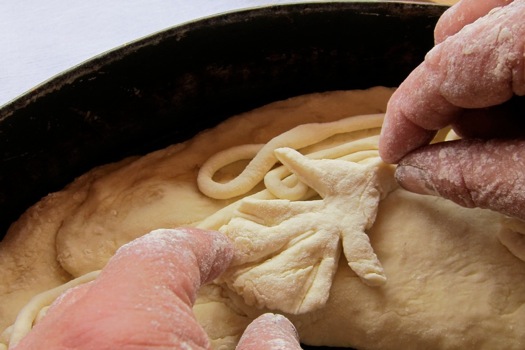
Photo: A baker sculpts an angel from bread dough. Credit: Diane Kochilas
The holidays just aren’t the same without pie, right? Apple pie, pecan pie, Grandma’s chiffon pie all sing special songs of the season. Unless you are gluten-sensitive, in which case, the holidays are a minefield of tempting, but often inedible treats. Perhaps even more so for the bewildered families and friends who have to host gluten-sensitive guests during holiday parties.
I’m all too familiar with this tricky territory, because I have celiac disease. My friends tease me, they are also quite caring and sensitive about my condition. They keep rice crackers on hand, serve polenta instead of bread and even convert favorite recipes when I join them for dinner. Some have even gone so far as to construct completely gluten-free meals, just so that my sensitivity can be accommodated, and I can enjoy a normal meal with everyone else.
I am a forager by trade and hobby. Most of my meals are built around wild vegetables, fruits and game meats. This means that on a day-to-day basis, being gluten-sensitive isn’t a problem. In fact, it’s something I rarely think about.
Doing without, and packing nuts
This hasn’t always been the case. When I was first diagnosed, I went through a mourning period. I missed my black pepper asiago sourdough loaf. I yearned for normal things like dinner rolls and breakfast cereal. I sulked when my friends visited an Asian buffet and I couldn’t come along (soy sauce contains gluten-containing wheat). I learned to travel with a bag of nuts in my purse to keep from going hungry at meal times.
There were several occasions when I had to reach for that bag of nuts. I attended more than one dinner where a dry salad mix was the only thing safe to eat. One time, a family member ended up in the hospital for an emergency and I was stuck there with nothing at the hospital safe for me to eat. I cried that night when my aunt ate doughnuts in front of me.
As the years went on, I missed these foods less. I learned to happily take my meals with a side of potatoes or other starchy vegetables. I know that every celiac is different, but I came to a point of peace. And when I reached that point, I decided that gluten-free replacement foods, such as gluten-free breads, pastas and cakes, were no longer important to me. In my mind, I had tasted breads and pastries at their finest, and those memories held a special place in my heart. Also, gluten-free replacement foods either didn’t measure up, or were too much trouble to make, often requiring blends of four or more unusual flours, and other strange ingredients.
Holidays are different
For the most part, I can do without breads and muffins and desserts entirely. But the holidays are different. Eating at the holidays is about so much more than just nutrition. During the holiday season, meals and feasts center on family and communion and nostalgia. I want to share in the tastes that have made each reunion special throughout the years.
I know others feel the same, both those with celiac disease and the people who cook for them. But gluten-free recipes and their complicated lists of ingredients can be daunting and may prevent people from diving in and creating treats every guest can enjoy.
I tried very hard to develop a recipe that used only ingredients that could be found in a major grocery store. Unfortunately, I failed. In fact, those attempts nearly had me in tears, and I’m usually a fairly calm and confident cook.
Instead, I’ve come up with this recipe, which contains only two specialty gluten-free ingredients: millet flour and xanthan gum. Millet flour is ground from millet seed and adds a delicate texture, flavor and color to the crust. If you can’t find millet flour, rice flour can be substituted. Xanthan gum is used to replace the elastic quality of gluten in regular wheat flour. If you are new to gluten-free baking, try to find the millet flour and xanthan gum in a health food store or co-op. The prices in those types of shops tend to be good, and you may even be able to purchase the items in bulk.
Because gluten-sensitive families are now so common, another good idea would be to find a friend or family member who already have millet flour and xanthan gum and purchase the necessary amounts from them.
One last important tip is to make certain the cornstarch and baking powder you use for the recipe are marked gluten-free on their label. Several major labels carried in grocery stores fit the bill.
This gluten-free pie crust comes out perfectly, time and again. I’ve used it as a crust for sweet pies, as tart shells, for turnovers, and for pot pie (omitting the sugar). It is my attempt to simplify gluten-free holiday baking for everyone. This recipe makes enough dough for either an 8- or 9-inch single crust pie.
Gluten-free pie crust
Ingredients
Directions
- Stir together dry ingredients.
- Using a pastry cutter or fork, cut in the cold butter. Stop short of creating a uniform sandy texture. Instead, aim to have some butter pieces the size of small peas, because these are what create a flaky crust.
- In a cup, whisk together the egg, vinegar, and water. Add these wet ingredients to the flour and butter mixture, and gently stir to combine. If the mixture appears to be too dry, keep adding cold water by the teaspoonful until the mixture starts to come together and form a ball of dough.
- Place the ball of dough in plastic wrap, and flatten it into a circle approximately 1-inch thick. Refrigerate for 15 minutes.
- Dust your counter and the pie dough with millet flour. Roll the dough to ⅛-inch thick, which is an approximately 12-inch circle.
- Transfer to pie plate, crimp edges, and prick the bottom with a fork. Bake in a 425 F oven for 10-12 minutes, or until the crust is slightly puffed and very slightly golden along the edges.
Zester Daily contributor Wendy Petty lives in the Rocky Mountains, where she is a forager, photographer and wild foods consultant. She writes about her adventures with mountain food on her blog, Hunger and Thirst.
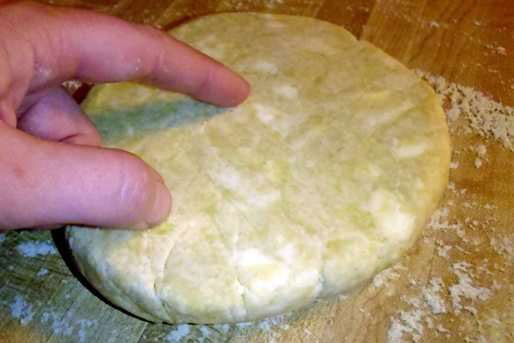
Photo: Gluten-free pie crust treat for the holidays. Photo and slideshow credit: Wendy Petty
Everybody loves apple pie, and everybody at the very least has warm feelings about pumpkin pie, which is practically a symbol of the holidays.
Apple and pumpkin, two seasonal ingredients. Hmm. Apple and pumpkin, apple and pumpkin.
Hey, why not combine them in one super-seasonal pie?
This edgy, avant-garde idea was already thought of 350 years ago. The leading English chef of the Restoration period, Robert May, gives a recipe for Pumpion Pie in his magnum opus “The Accomplisht Cook, or the Art & Mystery of Cookery.” It’s a wonderful pie, the apples giving perfume and juiciness to the pumpkin, and May’s pumpkin filling is nicely plush.
And it’s also exotic. It contains the usual pumpkin pie spices cinnamon, nutmeg and clove (plus pepper, which has a sweet aroma atop the pepperiness), but it’s also flavored with herbs: thyme, marjoram and rosemary. The herb flavoring works surprisingly well with pumpkin.
Or perhaps this is not so surprising. After all, winter squashes such as pumpkin are usually treated as vegetables, and herbs go well with them in a savory context, so why not in pie? I personally think rosemary is excellent in pumpkin pie, and if you ever have it at my house, there’s probably going to be some rosemary in it from now own.
But I’m also the kind of guy who likes to pump up the clove flavor by grinding cloves fresh. I recognize that a lot of people are reluctant to mess with the basic pumpkin pie recipe, which is practically set in stone because of its association with Thanksgiving.
Master the caudle
And the traditional Thanksgiving pumpkin pie tends to be very simple and straightforward because Thanksgiving spread around the country as a symbol of national unity after the Civil War. Pumpkin pie seemed a natural element in the great American feast because it seemed homespun and unpretentious, a symbol of sturdy Yankee self-reliance with no foreign frippery about it.
May’s recipe does admit the foreign frippery of currants, and it includes a typical 17th-century addition to pie, the caudle. This was a mixture of eggs and wine or other ingredients which was usually added to pie after it was baked, often through a hole poked in the crust. For this pie, you’re supposed to remove the whole top crust before pouring in the caudle.
I’m of two minds about this caudle business. It adds a pleasant bit of richness and a glamorous golden surface. On the other hand, it calls for six egg yolks, and this pie already contains 10 whole eggs. I’m thinking it may belong in the foreign frippery category.
An interesting thing about the filling is that May says to cook it before filling the pie. In fact, he calls on bakers to fry it “like a froise,” which was a sort of thick, eggy pancake, often containing bacon. This particular froise is so thick that it’s never going to turn into anything like a pancake because the bottom will burn before the top is ever done. You have to stir it like scrambled eggs (in effect it’s pumpkin scrambled eggs), which seems to give a pleasant crumbliness to the filling’s texture.
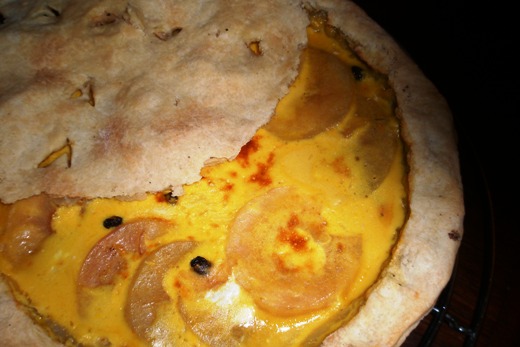
Robert May’s ‘Pumpion’ Pie
Serves 8
Ingredients
Directions
- Heat the oven to 350 degrees F. Line the pie pan with the bottom crust.
- Put the pumpkin in a food processor. Add the thyme, rosemary, marjoram, cinnamon, nutmeg, pepper, cloves, eggs and sugar, and process to a smooth soupy consistency. Transfer this to a buttered medium frying pan and cook over medium heat, stirring often, until thickened.
- Pour the filling into the bottom crust in a pie bpan. Sprinkle the currants over the pie filling. Peel and core the apples, cut in thin slices and arrange on top. Spoon the melted butter over the apples, affix the top crust and bake the pie until the crust is turning tan and you can hear bubbling, 35 or 40 minutes.
- At this point you can let the pie cool for a couple of hours in the usual way, or you can apply the “caudle.” To do so, slice around the top of the pie and lift off the crust. Pour the egg yolks and wine over the apple slices and return the pie to the oven until the caudle sets, about 7 minutes. Return the crust and let cool.
Zester Daily contributor Charles Perry is a former rock ‘n’ roll journalist turned food historian who worked for the Los Angeles Times’ award-winning Food section, where he twice was a finalist for the James Beard award.
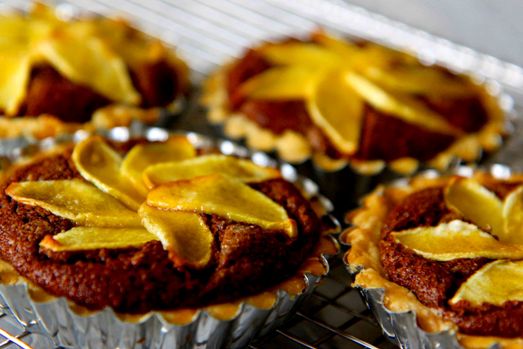
Photo: Apple pumpkin pie. Credit: Charles Perry
In early October I wrote a light-hearted story about the supposed pumpkin shortage on Long Island. It was hard to believe national news reports that a fungal blight was destroying local crops. At the time, I could drive down Route 27 in the Hamptons and see pumpkins for miles. Now it’s no joke. Late blight has taken its toll, resulting in a small harvest of pumpkins that often began to go bad within days of picking. Although our farm stands are flush with Brussels sprouts and cauliflower this November, pumpkins are scarce. Since I didn’t stock up before Halloween when they were plentiful, I’m out of luck now.
Good thing that fresh pumpkins are best enjoyed as holiday décor. I agree with experts like Dorie Greenspan and Nick Malgieri, who say that canned pumpkin (100 percent pure pumpkin, not “pumpkin pie filling,” which contains sugar and spices) is just as tasty and easier to use than fresh for use in seasonal baked goods. A bonus: According to doctors at the University of California at Berkeley, canned pumpkin is actually more nutritious than fresh, with more carotenoids and nutrients, ounce for ounce, than fresh because it is more concentrated (processing eliminates a lot of the water).
To me, opening a can of pumpkin feels like taking a step back in time. When my mother was growing up in the 1940s, canned vegetables were a convenient and economical kitchen mainstay. According to Mom, their altered texture and flavor were part of their appeal. I never tire of hearing how she and my aunt used to argue over whose turn it was to drink the “juice” from a freshly opened can of sauerkraut! I wonder if part of pumpkin pie’s retro allure is the fact that it all starts with a can.
One thing is certain: Strict Long Island locavores won’t be satisfied with the pumpkin purée on the shelves at the Bridgehampton King Kullen supermarket. Although it seemed in October that every field on the East End of Long Island was covered with the orange orbs, our local crop makes up a minuscule slice of the national pumpkin pie. According to the University of Illinois, 90 percent of the pumpkins grown in the U.S. are raised within a 90-mile radius of Peoria. Nearby Morton, the “Pumpkin Capital of the World,” is home to a Libby’s processing plant that produces 85 percent of the country’s canned pumpkin.
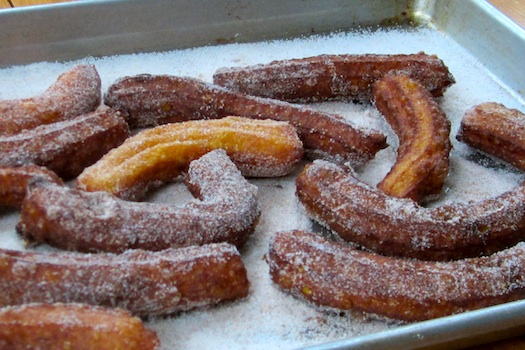
So I don’t put pumpkin recipes to the 100 mile test. I just enjoy them. Pumpkin’s moisture, along with its great color and sweet vegetal flavor, make it a valuable addition to baked goods beyond pie. Pumpkin quick breads, muffins and waffles are welcome at breakfast, brunch and tea time during the holiday season. After baking all of these, I thought I’d try something new last weekend: Churros made with canned pumpkin instead of water. The pumpkin added some nutritional value to this fried dough recipe, although I’d still place it firmly in the category of “treat,” especially when served with a cup of thick Mexican hot chocolate.
Pumpkin Churros
Makes about 20 (4-inch) churros.
Although I’d love to own a home churro maker someday, for now I squeeze my dough through a pastry bag fitted with my largest star tip (an Ateco 827) to get a similar result. Or if I’m being lazy, I’ll simply spoon the dough into the hot oil, to make pumpkin beignets.
Ingredients
Directions
- Combine the granulated sugar and cinnamon in a bowl. Spread on a rimmed baking sheet. Line another rimmed baking sheet with paper towels.
- Combine the pumpkin purée, butter, brown sugar, and salt in a medium saucepan over medium-high heat and bring to a boil. Add the flour all at once and cook, stirring constantly with a wooden spoon, until the mixture forms a ball, no more than 30 seconds. Transfer to a bowl and let cool for 5 minutes. Beat in the eggs, one at a time, with an electric mixer, until smooth.
- Heat 2 inches of oil in a large Dutch oven. Scrape the dough into a pastry bag fitted with a large star tip.
- When the oil is hot (between 350 and 375 F — a small piece of dough placed in the pot will cause the oil to bubble up), pipe 4-inch strips of dough into the pot. Use a scissors to cut the strips as they are extruded from the bag. Take care not to overcrowd the churros (you should be able to fry 4 or 5 at a time). Fry until golden brown, turning once, about 3 minutes total. Remove to the paper towel-lined baking sheet to drain briefly and repeat with remaining dough.
- Roll hot churros in cinnamon sugar and serve warm.
Zester Daily contributor Lauren Chattman is a cookbook author, freelance writer and former professional pastry chef. Her recipes have appeared in Food & Wine, Bon Appetit, Cook’s Illustrated and The New York Times. She is the author of 14 books, most recently “Cake Keeper Cakes” (Taunton, 2009) and “Cookie Swap!” (Workman, 2010).
Photo: Pumpkin churros. Credit: Lauren Chattman
Discover why the time for wine is now. Enter here to win one of 10 copies!
Upcoming Events
-
see all of our
Upcoming Events
-
Summer Fancy Food Show June 30th-July 2ndTook place on June 30, 2013Summer Fancy Food Show Presented by Specialty Food North America’s Largest Specialty Food & Beverage Event will be in New York City from June 30…
-
Nathan’s Famous International Hot Dog-Eating Contest July 4Takes place on July 4, 2013Nathan’s Famous International Hot Dog-Eating Contest The men and women will compete separately for the title of Men’s Hot Dog Eating World Champion and Women’s…
-
The Park City Food & Wine Classic July 10-14Takes place on July 10, 2013The Park City Food & Wine Classic THE PARK CITY FOOD & WINE CLASSIC is a premier destination event where master winemakers, culinary greats, and…
SmartBrief